
Andy weaves a lengthy tale of two recent Dark Ages games involving himself, Jeremey and Stephen. Clearly there are axes to grind here…
At a recent meeting Jeremey and I took on Stephen in a couple of games of Dux Bellorum.
Before we get to the day’s games, we need to set the scene. Last year Stephen ran a SAGA: Age of the Wolf campaign, in which we all participated. Jeremey and I both chose Anglo Danish factions, so naturally we were quite often allied. On one campaign turn we decided to focus our efforts on Stephen and his Welsh army, and both of us attacked him that turn. Sad to say Stephen beat both of us, and he was not reticent about broadcasting that fact to the world. He also built a little diorama to celebrate the victory, a large banner placed over the bodies of two white wolves. You can read Stephen’s diatribe, and see the banner, here.
Truly the man can prattle on.
So, back to the Dux Bellorum game. We had agreed 50 points a side, with Jeremey and I sharing command of one side. I chose a Late Saxon army, comprising
- 1 Shieldwall Companions
- 1 Noble Shieldwall (Veteran)
- 2 Noble Shieldwall
- 6 Ordinary Shieldwall
- 2 Foot Skirmishers (Javelin)
I also gave all the Shieldwall units Hurled Weapons, giving them an advantage in combat if they were charged from the front, and I bought an extra leadership point to complete the 50 point spend. In Dux Bellorum leadership points can be used to modify Bravery rolls (to move units), increase the number of dice rolled in melee, interrupt the opponent’s movement or to cancel hits suffered.
Stephen chose a late Welsh force, comprising
- 1 Warrior Companions
- 2 Noble Warriors
- 6 Ordinary Warrior
- 3 Ordinary Riders
- 1 Monks
The Monks gave Stephen two additional leadership points, and he also chose to give all his units javelins, giving them a short-range missile option. One characteristic of Warriors is that if they get within 3 base widths and line of sight of the enemy, they have to test for an uncontrolled advance; if they fail, they don’t move at all.

We rolled the dice to determine the Aggressor and Repeller, the Saxons had a slight advantage in Aggressor rating, and won the die roll.
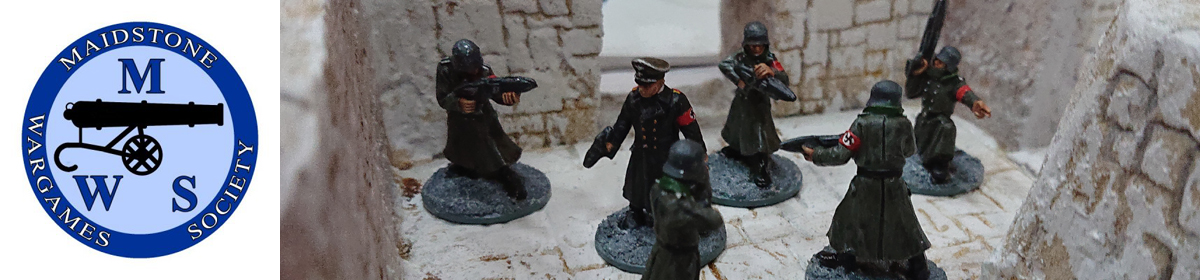
As Repeller Stephen chose the terrain, all placed near the centreline of the field of battle, a wood and hill close together to our left, and a marsh to our right. And on the top of the hill he placed the banner trophy from the SAGA campaign!
Jeremey and I split the Saxons into two roughly equal commands, I had the Companions and Jeremey had the Veteran Shieldwall. Jeremey took the left, behind the woods and the hill, and I took the right facing the marsh.
Stephen deployed his Riders, Companions and Noble Warriors facing me, and his Ordinary Warriors, supported by the Monks, facing Jeremey, separated by the woods and the hill.

Stephen’s Riders advanced, I sent my Skirmishers forward, which was a classic mistake as they were soon ridden down and routed from the table; one leadership point lost, but they don’t count towards the army morale tests, well, they aren’t trained warriors now are they?
Stephen continued to harass my Shieldwall with volleys of javelins from his riders, as his companions and noble warriors expressed a distinct lack of enthusiasm and declined to advance. For several turns.
Eventually some of Stephen’s noble foot got their act together and advanced on my line, when they eventually got close enough Stephen let their uncontrolled advance rule take over and sent them in.

Stephen got tired of lobbing javelins, and sent his Riders in against my Shieldwall.

After a couple of rounds of combat, I beat them off.

On the other flank, Stephen’s ordinary warriors advanced towards the woods and hills, and Jeremey’s forces waiting beyond. For some reason the Monks didn’t seem that keen to approach the Saxons, and stayed where they deployed. As the leadership points they bestowed could only be given to units within 5 base widths (about 24”), the number of potential recipients gradually reduced.

The warriors on this flank now suffered the problem of the uncontrolled advance; the units on the ends of his line could see Jeremey’s units, while those in the middle could not. As a result, the end units charged in on their own while the central units plodded through the woods. And the units that did charge in, lost.

Stephen did achieve one unlikely event; during one attack, he rolled six dice for an attack on Jeremey’s untested Veteran Shieldwall unit, and all six came up sixes. That’s a 1 in 46,656 chance! Six hits inflicted wiped the Veterans from the face of the earth. I hope he bought a lottery ticket.

Stephen seemed to have the overall advantage, having lost fewer units, but whereas our losses had been concentrated on a few units, destroying them, Stephen’s were spread out across his units. Eventually the losses caught up and Stephen lost several units in the same turn, in fact both sides reached their 50% loss point in the same turn. So, both sides had to take morale tests on all remaining units; the steadfast Saxons stood firm, while the weaselly Welsh failed their tests. With these units routing Stephen’s army reached the 75% of units lost point, ending the first game in a Saxon Victory.

As we had plenty of time left, we decided on a second game. Both sides decided to tweak their army lists. Stephen was less than impressed with his Monks, so sent them packing back to the monastery. He was a bit cagey on what he would add to his army with the 3 points the monks had cost.
I decided that the 3 points used to upgrade one of the units to Veteran might be better spent on another unit of Ordinary Shieldwall. So we had the Companions, three Noble Shieldwall and seven Ordinary Shieldwall. That meant we would need to lose 6 units before we had to take a morale test, and 9 units before losing the battle (excluding skirmishers of course). Jeremey and I split the forces pretty much as we had before, but I got the additional Ordinary Shieldwall unit.
We rolled the dice and this time the Welsh won and became the aggressors. We deployed the terrain, only 2 pieces for us; we went for a wood on the left and a marsh on the right.
Stephen split his Riders between the two wings, two facing Jeremey and one facing me. He deployed his Companions and Noble warriors on his left, opposite me, and the ordinary warriors opposite Jeremey.

Once both sides had deployed Stephen then revealed what he had spent his 3 points on, a Champion’s Challenge! Each side sent forth a champion to fight; the loser’s side would forfeit a leadership point. Had we refused the challenge we would have lost the leadership point through shame. Unfortunately for Stephen he lost the Champion’s Challenge (simple die roll), and so he started the game with 5 leadership points available, the Saxons had 7.
Stephen sent his lone left flank unit of Riders forward, hoping to ride down my Skirmishers, but this time I pulled them back behind my Shieldwall. The riders stood off for a while, but as the Welsh Companions and Noble Warriors were more motivated in this second game, and were quick to advance, Stephen sent them all in against my Shieldwall.
On the opposite flank Jeremey nailed his units to the floor and refused to be goaded into attacking. As with the first game this forced the Welsh to move through the woods in a haphazard manner. After a closer than expected fight between Jeremey’s units and the Welsh riders he was able to concentrate on the emerging Welsh warriors from the wood and deal a decisive blow.

This time the battle was not so close, Stephen’s Welsh reached their 50% morale test point which several units failed, ending the game in a Saxon victory; leaving the Wolf tail banner safely in Saxon hands.
You must be logged in to post a comment.