Some time ago I bought a bag of 2 dozen trees from a model railway shop, they were of various heights from about 2.5” (65mm) to 4.5” (115mm) the largest with a diameter of 2” (50mm).
I originally based these on either 1p, 2p coins or some 25mm diameter mdf bases, depending on the height of the tree.
The trees on their original bases
Unfortunately, these bases were generally too small, the slightest knock on the top of the tree and over it went. They needed bigger bases.
A few weeks ago, while browsing in The Works, I saw a pack of various sized wooden discs, of 20mm, 30mm and 40mm diameter, each 2mm thick. The pack cost £2.00 and had just under 40 of each size, so about 2p each.
Examples of the bases from The Works
My original plan was to make some explosion markers similar to those Jeremey made, using the discs for the bases and some foam sheets for the explosions.
But then a thought stuck me, I could use the 40mm diameter discs to rebase the trees!
I decided not to remove the original bases, I just used Bostick general purpose glue to stick the original base to the 40mm diameter disc.
Trees rebased.
Once the glue had dried I used Polyfilla to build up the exposed outer ring of the new base, and then applied a layer of green basetex to finish off the base.
Three of the finished trees
Overall this project took me a couple of hours (excluding drying time) and I now have a much more stable wood!
Just a few offerings for this week. I’m blaming the heat. It certainly saps creativity and painting.
Above we have some space fighters from Stephen (really need to find out who makes these). And below Stephen has been creating more Loot tokens for Stargrave.
Physical and Data Loot ready to be salvaged
I’ve also been creating Loot tokens for Stargrave only I went with some blank indented dice and some free sci-fi textures to turn them into Loots tokens.
The dice were undercoated first before the textures added, then some dry brushing to get them blended in.
After about 10 years of sitting in a box I also managed to stick some previously purchased plastic aquarium plants into the start of a jungle.
Multiple plastic plants stuck together with the hot glue gun
And finally this week Andy has made a bit more progress on his medieval Sergeants.
The heat is definitely slowing down painting
See you next week for the next glimpse of our club activity.
Andy describes how he goes about painting his irregular figures.
I don’t claim to be a great painter, I’m certainly unlikely to win any painting competitions, my aim is to get figures to a reasonable standard for the table top in a reasonable time.
When painting irregular, or at least non-uniformed, troops I still try to have a systematic method of painting, so I thought I’d share how I go about it.
I start off by washing the figures in warm soapy water, to remove any mould release agent, then rinse and dry them.
For 28mm infantry I standardise on 2p coins for the bases. I can then use them individually for games like SAGA or Lion Rampant, or on sabot trays for games like Dux Bellorum.
So once cut from the sprues and any mould lined removed with a scalpel and file the figures were stuck to their bases using a general-purpose adhesive, like Bostick.
Cleaned up and based.
Some of the figures have their left arms as part of the torso, others have them as separate pieces. I then assembled the figures using liquid polystyrene cement, except for the shields. I leave the shields off to make it easier to paint the left arm and chest. I do keep a shield handy to check the position of the left arm against the position of the right arm and spear during assembly.
I didn’t have quite enough heads with helmets for the 16 (I had previously used some on some unarmoured bodies) so a couple of the figures had bare heads from the Dark Ages Warriors box. The bases were then built up with Polyfilla.
Assembled, bases built up with polyfila.
I then undercoated the figures with grey car primer spray.
Most of the paints I use are Vallejo Model Colour, exceptions are mainly Army Painter (AP) washes and inks.
First off, I painted any areas of mail matt black, followed by dry-brushed Gunmetal Grey. Spear tips and helmets were painted the same colour. Next the faces, necks and hands were base coated Brown Sand.
Skin basecoat, mail and helmets painted.
Skin was the painted Medium Flesh Tone.
Now to start with the systematic randomisation of colours for the clothing. I arranged the figures into as near a rectangular formation as possible, in this case the 16 figures simply went into four ranks of four files.
I then painted the figure’s trousers by file:
Light Brown (A, E, I, M)
Chocolate Brown (B, F, J, N)
AP Dark Stone (C, G, K, O)
Basalt Grey (D, H, L, P)
Skin and Trousers done.
Then the tunics by rank:
Grey Blue (A, B, C, D)
Deep Green (E, F, G, H)
Red (I, J, K, L)
Mahogany Brown (M, N, O, P)
If I had been painting lower status troops, I would have used the same colours overall for tunic and trousers, but added an additional colour to the tunic mix to avoid having the tunic and trousers the same colour on any individual figure.
Tunics done.
Next were the leggings, in diagonal lines top left to bottom right
Buff (A, F, K, P)
Pale Sand (B, G, L, M)
Beige (C, H, I, N)
Deck Tan (D, E, J, O)
Leggings done.
Next is the leatherwork. Belts, pouches and scabbard in diagonal lines from top right to bottom left, I used the same colours for the figure’s boots in a semi random order.
Red Leather. Belts etc: (C, F, I, P) Boots: (B, G, L, M)
Saddle Brown. Belts etc: (B, E, L, O) Boots: (C, E, J, P)
German Cam Black Brown. Belts etc: (A, H, K, N) Boots: (D, F, I, O)
Sword and knife hilts were painted in the same colours, plus black, at random.
Next was the hair, again four colours were used, with a semi-random selection of figures, making sure I didn’t use the same colour twice in any row or column of the 16 figures.
Black: C, E, L, N
Tan Yellow: A, G, J, P
Flat Brown: B, H, K, M
Brown Sand: D, F, I O
Belts and scabbards done.
Belt buckles and scabbard metalwork were painted either Gunmetal Grey or Bronze.
The spear shafts and wooden crosses were painted Beige Brown and the cords of the crosses painted AP Hemp Rope.
Swords, spear shafts and crosses done.
As always when I paint, I have to do some corrections, reworking any colours that had accidentally been painted over.
After corrections.
Once all the main colours had been finished, I proceeded to the washes.
All skin was given a wash with AP Flesh wash.
The tunics were washed as follows:
Blue Wash (A, B, C, D)
Green Wash (E, F, G, H)
Red Wash (I, J, K, L)
Soft tone Wash (M, N, O, P)
Soft Tone was also used for all spears and figures with Red Leather or Saddle Brown Belts, Scabbards and Boots.
Red Leather. Belts etc: (C, F, I, P) Boots: (B, G, L, M)
Saddle Brown Belts etc: (B, E, L, O) Boots: (C, E, J, P)
Dark tone was used for figures with Chocolate Brown or German Cam Black Brown Belts, Scabbards and Boots:
German Cam Black Brown. Belts etc: (A, H, K, N) Boots: (D, F, I, O)
All leggings and figures with Tan Yellow or Brown Sand hair was washed with AP Light Tone wash.
The bases were then finished with green basetex.
Washes added and bases finished.
Having finished the figures, I moved on to the shields.
These were cleaned up in the same way as the figures, then undercoated black on the backs and white on the front. I use white on the fronts as I was going to use shield transfers rather than painting the designs.
I then drybrushed the back of the shields with Beige Brown and painted the shield bosses Gunmetal Grey while still on the sprues.
Shields work in progress. The white needs touching up.
Little Big Men Studios decals have a hole for the shield boss already cut out, but the Battle Flag decals don’t, you have to cut those yourself.
I did have some issues with some of the LBMS decals, I couldn’t peel the plastic cover off to expose the self-adhesive surface. After ruining a few of the decals I ended up gluing them to the shield complete with the plastic layer using PVA glue. I haven’t had that problem before, so I wonder if it’s because these are fairly old, 3-4 years maybe? I didn’t have any problems with the Battle Flag decals.
Once the decals had dried, I painted the shield rims with Japanese Uniform to represent the leather edging. Once this was dry, I then cut the shields from the sprues, tidied up the edges with more Japanese Uniform.
Finished shields
The astute among you will notice there are 20 shields, but only 16 figures, the extras will be used as battlefield markers: Fatigue in SAGA, Battered in Lion Rampant, or Leadership Points in Dux Bellorum.
It’s never a good idea to glue painted articles together, paint to paint bonds aren’t strong, so I used a file to remove the paint from the contact points and then used liquid polystyrene cement to glue the shields in place.
The figures were then given a coat of spray matt varnish.
Here they are, 16 figures, making up 4 points of SAGA Hearthguard, a unit of Lion Rampant Sergeants with four figures left over or 2 units of Dux Bellorum Noble Shieldwall:
The finished figures.
The guy on the left of the front rank has a painted shield (Green and Light Blue) from my stash of spare shields rather than one of the shields I did in this session.
So, that’s my method for painting irregulars in a systematic way.
We start this week with Tony having made painting progress on Mos Arun in 6mm. Looking forward to having this in a game.
Nice little settlement, unless it’s full of vile scum!
Next up Marcus has been working on a 15mm GZG Moongrunt unit and Ral Parthia Battletech Rommel tanks. Marcus said “Nominally around 10mm I think, but perfect as heavy AFV’s in 6mm”.
15mm Moongrunt and 10mm tanks
Eric is up next with some conversion work he is doing on a potential Stargrave crew.
Conversion work in progress
Eric explains the work being done “Old 40k Space Marine scouts with some head swaps. The guy with the yellow armour also has a right and left arm from a Mantic Forefather mini and his head is an old 40k daemon head with some reshaping”.
Stephen has created another unit for his Moslem army. This time some Hashishin.
Nice looking Hashishin unit
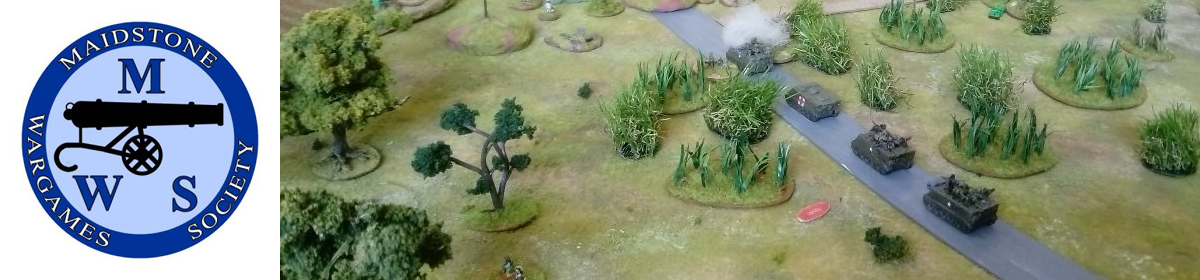
And last for this week Andy continues work for the forestry commission with some rebasing.
Rebasing the curse of wargaming, but sometimes useful
The first historical wargames army I ever bought was a Crusader army. It’s always been a period of great interest to me, especially the later crusades of the thirteenth century.
I resisted buying a crusades army in 28mm because that meant I’d also have to get some Saracens and I just didn’t want to paint all that patterned cloth.
Then a while ago I was given a box of plastic Gripping Beast Arab infantry. They sat in a cupboard for a couple of months because I still didn’t have the will to paint all that fabric. Then I saw some pictures of other’s Saracen armies and I saw how they’d done them in plain white material. ‘That’s a good idea’, I thought. So that’s what I did, and decided I’d make the Ghulams a bit more colourful – representing wealthier troops able to buy expensive fabrics.
Being motivated to get these done, I motored through them. And this weekend I decided to have a game. I was going to play Saga, but it doesn’t play solo so well. So instead I went with Lion Rampant…
Forces Deployed
The two sides lined up opposite each other. Both had 24 points a side.
The Crusaders had two units of Templar knights (LR: Mounted Men at Arms), two units of Mounted Sergeants, and one of foot Crossbows.
I gave the Saracens two units of Ghulams (LR: Foot Men at Arms), two units of Ghazis (LR: Foot Yeomen, armed with short range missiles – javelins), and two units of Ahdath (LR: Bidowers).
I did a simple meeting scenario – both sides hacking at each other until one is gone.
I rolled for leader traits and got Vulnerable for the Crusaders (leader killed on a Lucky Blow of 2 or 3) and Lionheart (ironically) for the Saracen leader (meaning his unit could re-roll 2 failed hit dice).
The Saracens went first and they were lucky enough to activate all their units – moving up to occupy favourable terrain that would hamper the mounted crusaders. The Ahdath would be well placed in these areas of bad terrain, where they could lodge themselves in and shoot at the Crusader cavalry. The only solution to this would be the Crusader crossbows, so it would be worth the Saracens taking out the Crossbows as soon as possible.
Saracens Advance
The Crusaders were equally lucky, activating all their units. The Sergeants on the right went galloping past the village, the Crossbows moved up to get into range of the Ahdath hiding in the scrub, and the Knights also moved up.
One thing became obvious – there was a natural funnel to the battlefield between two areas of rough terrain. The Ghulams had moved up to block this gap, with the Ahdath either side with their bows to shoot at anything coming between them. The only thing the Crusaders could do was to advance as quickly as possible to minimise their exposure to the enemy arrows.
Getting Ready To Shoot
The Saracen Ghazis kept moving up to the Crossbows, desperate to engage and eliminate them – if they could it would make a Crusader victory difficult. The other unit of Ghazis, over by the village, decided to hurl their javelins at the approaching Sergeants, scoring enough hits to take one of them out. When it came to the Crusader’s turn they were more than ready to return the gesture. Although the Ghazis were approaching the Crossbows, it was obvious the Crossbows had to take a shot at the Ahdath in the scrub. Spanning their bows, they took aim, and…a devastating volley! The unit of Saracen skirmishers were devastated and routed off the table! Both units of Sergeants advanced – those on the left moved into the middle of the funnel to threaten the Ghulams, whilst those on the right put in their spurs and charged the other Ghazi unit.
Sergeants Charge In
Casualties were taken on both sides and the Ghazis were bounced back. But the Sergeants were now down to half strength which meant their combat effectiveness was also halved.
It was then over to the Saracens to go on the attack. On their activation they sent the Ghazis in to charge the crossbows.
Ghazis Rush The Crossbows
Improbably, the Crossbows prevailed! They didn’t take a single casualty and pushed back the Ghazis who failed their courage roll and were now battered. The other unit of Ghazis managed to rally, ready to block the Sergeants. The remaining unit of Ahdath drew their bows, trying to decide who to shoot at – the unit of Sergeants leading the attack through the funnel, or the unit of Knights who were coming in behind to mop up any remnants the Sergeants left behind.
In Go The Cavalry
Deciding that the Ghulams should be able to resist an attack by the Sergeants, the Ahdath took aim at the Knights and let fly. No effect this time.
Now it was over to the Crusaders. The Sergeants were in charge range of the Saracen leader, so decided to go for it and see if they could get a lucky hit. And they did! OK, so the Saracen leader didn’t go down, but a couple of his Ghulam bodyguards did and had to retreat. The Crossbows, knowing how lucky they’d just been in repelling the Ghazi charge, took aim and let rip. A good shot that took out a couple of the Ghazis. However, best of all, the Ghazis then failed their courage test. It was such a bad fail that they routed off the table.
Sergeants Charge The Saracen Leader
The Saracens had to go on the counter-charge. The Saracen leader ordered his men to charge and in they went against the Sergeants. But it happened again – the Sergeants came out on top. Sort of – no casualties on either side, but since the Saracens had charged and failed they had to retreat. The Ahdath had another go at the Knights, this time scoring a kill. And the Ghazi unit by the village threw more of their javelins at the Sergeants, taking another rider out and leaving them battered.
Templars and Ghulams
Things were coming to a head. The Sergeants, not believing their luck, charged the Saracen leader again. Not such a good result this time – the Sergeants took heavy loses and were pushed back, under half strength and battered! The first unit of Crusader Knights went in and charged the Ghulams. A fairly even result, meaning the Crusaders had to retreat. Had the Saracens managed to turn things around?
Back to the Saracens, and they spent most of their turn rallying units. The Ahdath once again took a shot and once again took out one of the Knights. They were starting to become a real pain.
So on the Crusader turn the Crossbows moved up so they could get in range of the other unit of Saracen skirmishers. The Crusader leader also decided to take part (remember, his leader trait would make him more susceptible to a lucky blow, so he’d been wise to keep out of it until needed). So the Crusader leader took command of his Knights and they charged one of the Ghulam units. Casualties were taken on both sides, and a Lucky Blow roll was made against the Crusader leader: double 6 – nowhere near!
Templar Leader Takes Control
On the Saracen turn I noticed the two leaders were near each other. There was only one thing for it – Leaders Challenge! The Crusader leader accepted. Into the middle they went and rolled for it.
Challenge Accepted
No hits for the Saracen leader, but the Crusader leader scored a hit, meaning the Saracen leader had been killed in personal combat! All the Saracen units now had to make courage rolls. Only the ex-leader’s unit failed, leaving them battered, but all the others passed. There were still enough Saracens left to make it worth fighting on, so I kept the battle going – despite losing their leader, could the Saracens still manage to win?
Well, maybe. But on the Crusaders’ turn the crossbows took a shot at the remaining unit of Ahdath in the rocks. Despite the extra protection, they still lost half their unit and fled. It was now looking extremely unlikely that the Saracens could win this one. All they really had left was a single unit of Ghazis. Well, there were the Ghulams, but both of those units were down to just two models each, so they’d lost their punch.
One Last Charge
Ultimately and inevitably, it would be a Crusader victory. The Crusader leader, emboldened by his victory with the Saracen leader in single combat, led his knights in repeated charges on the final unit of Ghazis. The Ghazis were steadily whittled down until they finally failed their courage test.
A steady stream of activity from club members at the moment. I did wonder if it would slow down as people run out of projects, but no sign of that for now.
Above we have Stephen’s superb addition to a new Saga force in the shape of some Saracen cavalry.
Next up Tony has made progress on Mos Arun as it is now known.
6mm Mos Arun with the start of the paint job
Andy continues with his Medieval soldiers with the start of some mounted sergeants.
The remaining Fireforge Foot and Mounted Sergeants, this will make a Lion Rampant unit of each, a unit of bidowers and a couple of spares.
Andy has also decided to rebase some trees onto bigger bases.
MDF discs at the Works, £2 for an assortment of 20mm, 30mm and 40mm diameter discs each about 1mm thick. There were just under 40 of each size.
Not last this time I’ve been putting hair nets on balls to make some progress on my Napoleonic Balloon Project.
If you buy a pack of three onions in the supermarket, the net packaging is enough to make two balloons
And last but not least for this week, Marcus has asked if his discovery of some old Ground Zero Games 6mm tanks is worthy of a mention. it is but mainly because these are likely to end up adding to Marcus’ sci-fi version of What a Tanker!
Always good to rediscover some miniatures you thought were lost
Marcus gives us the next instalment of his Sci FI adaption of What a Tanker!
I have continued to develop my WA(G)T ideas since the first outing and this is the third time on the table. Well actually on the floor again, but I did at least get to use the table for game 2.
I have introduced some changes, and there are more ideas to come. Firstly, I went back to the original Lardy allocation for the dice orders. On reflection I didn’t feel much was gained by that change.
Secondly, this time I added in a command group each. I tried this in the first game but adjusted how they worked this time. For simplicity I gave both command groups four dice. The idea behind these is that they can (apart from making nice objectives for the enemy maybe…) use their dice to cancel enemy orders or supplement their own units die rolls. I played it that the command units needed to roll at least one 6 to use as a comms/data link. At first it was too easy to disrupt enemy shooting by allowing any dice rolled by a command unit to cancel an enemy order dice. This time I went for the following options:
Cancel one enemy move dice or substitute a friendly unit dice
Cancel or add an acquisition dice
Add/Improve aim
Add a shoot dice
Add a defensive dice
Comms/data link
I also added in missiles in both games. However, in the first game they didn’t work satisfactorily. In the second, well, you’ll see.
I added in a wider selection of cards than in the original WAT game, to add some sci-fi flavour. Some were successful, although those relating to missiles need to be revised.
Finally, influenced by PSC’s “Red Alert” which I have written about previously, the biggest change in this iteration was the number of vehicles on the table (sorry, floor!) with a shift to multiple element units. Essentially these employed the same stats as used previously with a hit just removing one vehicle.
There were a few new or adjusted vehicles. The “attack boats” were a Callisto class boat, as seen in the previous game, but with a change to a missile launcher in place of the forward twin gun. It is a modular design (the turrets on the models are magnetised). The two smaller boats notionally have vertical launch cells under the bow cover. These still acted like one unit, although in retrospect I think I should have upped the defence value and/or the hits that could be taken, especially on the larger Ganymede.
Additional units:
Core Dice
Max Attack
Defence
Movement
Attack Boats
6
Ganymede 8 missiles; Leda & Ersa 4 each
8
6
Pz 35 “Hornisse”
5
15
9
9
Command Units
4
0
8
7
The British started with 2 groups of 4 Chieftains, one of 4 Ferret’s and the naval group of Ganymede, Leda and Ersa plus the command group, see the header picture.
The NAU had 3 groups of 4 Wespe, 1 group of 4 Hornisse and the command group.
The Hornisse models are envisaged as earlier models which have not been completely replaced by a later version, but are ideal for service in a riverine/swamp environment (maybe they should be better than grav vehicles over this kind of terrain. I always envisaged grav vehicles having more “mushy” responsiveness over wide stretches of water)
Ersa and Leda are also from GZG. The Hornisse is from the Osario from the Scotia range. As an objective I thought about both making this the command groups or taking the previous route; the British was to get the Callisto off the far river edge with the NAU needing to prevent this. In the end I went for just targeting the naval group and playing out a few turns.
Activation worked as previously, but I forgot about the “exploding 6’s” for hits. It seemed likely to be a more destructive game anyway…
Here is an “drone” shot of the initial set up:
With shots from the British perspective:
And the NAU positions:
Turn 1:
The NAU took the initiative moving the green Pz 37 unit up, seen at the bottom of the drone recce photo, and the corresponding yellow unit to the top. The yellow unit benefited from a stealth card requiring an additional 2 acquisition dice. The British Ferrets activating next were unable to move, but prepped for future activation with the idea that they would designate targets for the missiles on the naval units if possible. The Ganymede group also moved up and were able to acquire and aim at the NAU yellow group having rolled three 6’s.
The cautious positioning continued since the British had no data link and the GBR yellow group were therefore unable to acquire the stealthed NAU yellows. No firing took place this turn.
Turn 2:
The NAU again gained the initiative (on exactly the same number of dice as the GBR), continuing a theme from the last game.
NAU command had rolled two 6 (one of which could be used as data link) and two “shoot” dice last turn. The dice rolled for the last turn continue to be available until a unit activates in the subsequent turn and rolls a new “hand” of dice.
The NAU orange “Hornisse” hover tanks moved forward in the centre, but were unable to find a target in line of sight. However, NAU blue had no such difficulty. Moving to acquire the naval group they launched a 15 dice attack. Despite the GBR side using a card for a D6 firer systems down, resulting in a reduction of only 1 attack dice to 14. A roll of 6655 didn’t seem too threatening, until the 8 defence dice yielded no blocks! A further desperate defensive systems card for the GBR took out one of the critical hits, but under the new rules either critical (6) or a double hit (55) would destroy a target. While the card saved the Ganymede the Ersa and Leda were destroyed.
In response the GBR yellow Chieftain unit moved out of cover and launch a retaliatory attack on the more exposed NAU yellow unit. With 13 attack dice -1 for range attenuation, the Brits roll 666655. Despite playing an “All power to shields” card, the NAU rolls only a 65 against the incoming fire, seeing three of the four vehicles in the unit destroyed. The remaining vehicle rolled a test and stayed in the fight (D6 higher than the number of vehicles destroyed)
GBR orange Ferrets attack the “Hornisse” unit, having rolled 6543 (using the wild 6 as a 2 to acquire), but hits of 665 were all blocked . The Ganymede went into stealth mode with a card.
Both command units now activated successively and maintained comms/data links.
The turn concluded with a GBR Green Cheiftain attack on the exposed NAU yellow over the river with a 6555 on 13 dice. With only a defence of 4 the unit still blocked with 65 resulting in one tank destroyed.
Turn 3:
This proved to be the final round of a vicious confrontation.
The NAU maintained the initiative and their yellow unit used an extra command unit acquisition dice to make 3 allowing them to target the Ganymede in stealth mode. 15 dice resulted in a 66666. A defensive systems card d4 roll resulted in two of these being cancelled. The Ganymede’s defence dice only took out one of the remaining hits, resulting in a mighty explosion as the last two critical hits crashed home. BOOM!
The NAU red Hornisse unit rolls 65511. However, despite being unable to acquire or aim, using a “snapshot” card, they are able to make a reduced level attack. A ten dice attack results in an unlikely 66655. The green unit with all power switched to attack is unable to stop any of these critical hits, although a damage control card cancels the non-criticals.
NAU command rolls a 5321. Without a data link it cannot use any of these dice to support its units. NAU Green rolls 633322 continuing the paralysis on the NAU left flank as without a shoot order, they cannot get into the fight.
The GBR command group still has data link and the GBR yellow unit uses a command unit 2 to acquire NAU yellow. With a 13566 and the 2, the GBR unit can make two attacks using the wild 66 as 44 shoot orders. A 66655 followed by 65555 leaves the NAU unit doomed, having only two for defence against each attack.
That effectively ended the action for the round and the game, with both sides more or less suffering equal damage and choosing to retire.
As alluded to earlier, the missile rules didn’t get tested and the cards need further development given the rule changes. Overall though, I like the changes; having the extra vehicles on the board “Red Alert” style and the command unit rules, although these could evolve further. While the game was excessively destructive I think that was a function of the lack of defensive allocation and a need to restructure the cards to reflect rule developments. The cards are a key thing to work on going forward.
However, missiles still need work. I am thinking of rolling one dice (probably a D6 but maybe others depending on missile characteristics) per missile and in the spirit of using the same dice in a different way, rolling the defence dice to block the specific number rolled (i.e. a defensive 6 would take out any attacking rolls of 6, a 2 would take out any attack rolls of 2 etc.)
I hope to develop the command group idea and use multiple groups (2/3 perhaps depending on the size of game).
I have an idea that I might do an Antarctic game going forward. I have a suitable shower curtain that I used as a mat for a club show game. However, I have no suitable vehicles or other terrain. In the interim I may break out my island terrain (a couple of pictures of which can be seen here) for the next game and hopefully some future blogs might cover painting vehicles (probably striping and re-painting old vehicles) in snow camo and creating some terrain.
Marcus starts us off this week with progress on some 15mm Sci-fi miniatures. Above we have some alien critters (definitely look the part) from Bombshell minis .
And finally some robots, robo scouts from Critical Mass (now Ral Partha) and Alternative Armies (monkey).
Scout and Monkey (sounds like a 1980’s band)
Tony has made more progress on his 6mm sci-fi town, now with ground texture added.
Inner city development
John has finished his new crew for Kontraband (the doggy makes an appearance).
Good Doggy
Andy has made more progress on his medieval sergeants, well he has actually finished these now as they were getting stuck in at the Medway Rapture Gaming & Creative Festival last weekend. I haven’t asked how they got on.
Sergeants and Crossbows
And finally for this week let’s end on a load of rubbish. I created a landfill rubbish tip from real rubbish around the house that I was not able to recycle.
Copped up rubbish and a hot glue gun later
So on that rubbish note, that’s another Work in Progress Wednesday in the can, we will see you next week for more tips (ok I’ll stop now).
Angry that she’d missed out on treasure from the wrecked ships, Li Chee the Pirate Queen shadowed Admiral Feng Shui from the islands to Qui Nhon in the South China Sea. Determined to exact revenge, she planned a night raid on the harbour at Qui Nhon (see picture above).
She hoped to capture one of the junks, avoiding the larger Treasure Ships and the Admiral’s Flagship. She’d also have to avoid the attentions of the fort guarding the harbour entrance.
Li Chee passes the fort guarding Qui Nhon Harbour
All Feng Shui’s ships were moored facing into the wind. Li Chee decided to go for the smallest Junk. This would make a fine pirate Junk to accompany her on further adventures and was bound to hold some treasure too.
In this scenario, Feng Shui can only activate when Li Chee performs a boarding or firing action.
The first activation. Li Chee rolls up to 3 activation dice requiring 2+ to take an action. The double 5 indicates a change in wind direction of one point clockwise.
Li Chee slowly and silently passed by the fort and after several moves is in a position upwind of the smallest Junk ready to strike in a swift and deadly boarding action.
Li Chee’s crew have ‘Derring Do’. This reduces the combat value of both vessels to zero in the first boarding action of the game. They are intimidating so get a +1 modifier. The enemy Junk has a -2 modifier from the scenario and a further -1 being a Merchantman. The Junk is tripled and takes 3 damage. Ouch!
The hapless Junk attempts to cut the grapples and head away.
Two activations are sufficient to cut the grapples but the ‘1’ requires the ship to take an all at sea roll. A ‘3’ is reduced by 1 as Li Chee is a Dread Pirate. Li Chee decides to let the Junk continue. She will move in for the kill next turn.
All this commotion has alerted Feng Shui, who turns his junk which is in irons to a firing position.
In the next round of combat, Li Chee takes her prize – now to escape!
The captured junk is now manned by a prize crew and Feng Shui opens fire on it.
Feng Shui opens fire to no effect. The reinforced Junk hull proving invaluable.
As the pirate junks begin to pull away to safety, Feng Shui makes a boarding attempt on Li Chee’s junk. Li Chee is in great peril.
Boarding! Li Chee has an intimidating crew and gets +1 but Feng Shui has a higher combat value, high castles and Drilled Soldiers. The dice roll saves Li Chee but the Feng Shui’s veteran NCO rallies the troops.
It had been a lucky escape for Li Chee and using actions to cut the grapples and break free she was able to move away from Feng Shui, who was now in a bad position and would have to sail round the island or lose time in irons. The two pirate junks would now have to run the gauntlet of the fort.
The fort opens fire first on the captured junk.
The Junk is not doubled but the ‘6’ dice roll causes a point of damage.
And then on the Pirate Queen.
The fort fires on the Pirate Queen to no effect.
As the pirate Junks head for safety, the fort manages to fire on them again a longer range but fails to score a hit.
As the sun begins to rise in the east, Li Chee and her pirate crews make good their escape.
It had been a close-run thing but now, Li Chee had a second junk which she would repair and turn into a formidable fighting ship. Feng Shui was worried as he tried to get to grips with the Chilli Crab. The treacherous Straits of Malacca would have to be negotiated with their swirling currents and risk of ambush – things did not look good.
Appendix
This game was based on the cutting out scenario from the Galleys and Galleons rule book. Vessel and fort stats below:


You must be logged in to post a comment.