John Lambert fills us in on the happenings at the first Gaslands race event
This season of televised Gaslands events started off with a bang – literally!!
All racers took part in one huge Death Race to open the season so with six teams of two cars each, CARNAGE! was assured. For this season, there were two teams sponsored by Miyazaki, two sponsored by Idris and single teams sponsored by Rutherford and Warden respectively.
With a packed grid, a good clean start was essential, two Idris sponsored cars made a good start whilst the second two were blocked in at the back of the grid it would take time for them to break free.
As cars tried to break free, multiple smashes had the crowds baying for more, TV screens are fitted with an audience votes app and the system froze out as the drivers scrambled for glory.
Amid the mayhem Ghost of the South cleared the pack and then pulled off a stunning manoeuvre at Gate 1
This lead wouldn’t last for long as one of the Warden cars caught him and He was destroyed in a hail of lead by one of the prison cars.
These Idris cars were to prove to be fast but vulnerable. Between gate 1 and 2, the action was about to get hotter as the Rocketman was hit by gunfire from one of Miyazaki cars. None of the rockets had been fired so an explosion destroyed Rocketman and a fireball engulfed an Idris car and a Miyazaki buggy. This is what the crowd had come to see.
Meanwhile three cars were battling it out for the lead. A skilfully executed powerslide allowed Black Stalin (12) to thread through the obstacles on the approach to the finishing line.
With ‘This is my moment’ blasting through the speakers, Black Stalin was cruelly shot up by Chain Reaction.
As Chain Reaction and Constance Sin traded blows, AC1 was able to take advantage and slip past them to win and take first place on the podium.
In this post – apocalyptic world, there’s no Champagne just an inland sea filled with Diet Coke.
Podium places 1st Dave, 2nd Bob, 3rd Andy.
After the success of this event Gascar19 Event 2 will feature not one but two venues!!
Tony F goes aerial with his planned Open Day game.
Operation Musketeer was the codename given to the joint British and French plan to occupy the Suez Canal zone in 1956. The conflict also involved Israel which invaded the Sinai peninsula, forming part of the second Arab-Israeli war.
MiG-17s overfly a coastal town.
My game looks at the conflict in the air. It was one of the last air wars to be fought entirely with guns, before the advent of the missile age. It also involved a wide range of aircraft, from WW2-era prop planes such as the Mustang and Mosquito used by the IAF, to the latest jet fighters. Egyptian pilots flew the MiG-15 and MiG-17, the RAF deployed Hunters, Venoms and Vampires, and even deployed the first of the nuclear capable V-Bombers,the Valiant, along with the smaller Canberra, from bases in Cyprus and Malta. Not a great deal of air-to-air combat occurred during the conflict but as wargamers we never let the truth get in the way of a good game, so rest assured there will be plenty of chances to dogfight with the enemy.
RAF Canberra Bombers
The 1/600th models are all from Tumbling Dice. Buildings and other scenery come from local manufacturer Brigade Models. The rules are a home-brew variant of Spitting Fire by US publisher Majestic 12 Games.
Israeli Mosquitoes on a recce flight
The idea will be to run a number of consecutive short scenarios over the day, allowing players to drop in and out during the day.
Israeli Mysteres over a mosque near the Suez canal.
Andy weaves a lengthy tale of two recent Dark Ages games involving himself, Jeremey and Stephen. Clearly there are axes to grind here…
At a recent meeting Jeremey and I took on Stephen in a couple of games of Dux Bellorum.
Before we get to the day’s games, we need to set the scene. Last year Stephen ran a SAGA: Age of the Wolf campaign, in which we all participated. Jeremey and I both chose Anglo Danish factions, so naturally we were quite often allied. On one campaign turn we decided to focus our efforts on Stephen and his Welsh army, and both of us attacked him that turn. Sad to say Stephen beat both of us, and he was not reticent about broadcasting that fact to the world. He also built a little diorama to celebrate the victory, a large banner placed over the bodies of two white wolves. You can read Stephen’s diatribe, and see the banner, here.
Truly the man can prattle on.
So, back to the Dux Bellorum game. We had agreed 50 points a side, with Jeremey and I sharing command of one side. I chose a Late Saxon army, comprising
1 Shieldwall Companions
1 Noble Shieldwall (Veteran)
2 Noble Shieldwall
6 Ordinary Shieldwall
2 Foot Skirmishers (Javelin)
I also gave all the Shieldwall units Hurled Weapons, giving them an advantage in combat if they were charged from the front, and I bought an extra leadership point to complete the 50 point spend. In Dux Bellorum leadership points can be used to modify Bravery rolls (to move units), increase the number of dice rolled in melee, interrupt the opponent’s movement or to cancel hits suffered.
Stephen chose a late Welsh force, comprising
1 Warrior Companions
2 Noble Warriors
6 Ordinary Warrior
3 Ordinary Riders
1 Monks
The Monks gave Stephen two additional leadership points, and he also chose to give all his units javelins, giving them a short-range missile option. One characteristic of Warriors is that if they get within 3 base widths and line of sight of the enemy, they have to test for an uncontrolled advance; if they fail, they don’t move at all.
Stephen’s Monks
We rolled the dice to determine the Aggressor and Repeller, the Saxons had a slight advantage in Aggressor rating, and won the die roll.
As Repeller Stephen chose the terrain, all placed near the centreline of the field of battle, a wood and hill close together to our left, and a marsh to our right. And on the top of the hill he placed the banner trophy from the SAGA campaign!
Jeremey and I split the Saxons into two roughly equal commands, I had the Companions and Jeremey had the Veteran Shieldwall. Jeremey took the left, behind the woods and the hill, and I took the right facing the marsh.
Stephen deployed his Riders, Companions and Noble Warriors facing me, and his Ordinary Warriors, supported by the Monks, facing Jeremey, separated by the woods and the hill.
Stephen’s Riders, Companions and Noble Warriors
Stephen’s Riders advanced, I sent my Skirmishers forward, which was a classic mistake as they were soon ridden down and routed from the table; one leadership point lost, but they don’t count towards the army morale tests, well, they aren’t trained warriors now are they?
Stephen continued to harass my Shieldwall with volleys of javelins from his riders, as his companions and noble warriors expressed a distinct lack of enthusiasm and declined to advance. For several turns.
Eventually some of Stephen’s noble foot got their act together and advanced on my line, when they eventually got close enough Stephen let their uncontrolled advance rule take over and sent them in.
The leadership contest, Stephen and Andy’s Companions. The brown disc is a leadership point.
Stephen got tired of lobbing javelins, and sent his Riders in against my Shieldwall.
Stephen’s Riders charge my Shieldwall, Nobles to the left, Ordinary to the right. The small yellow die on the Riders indicates a hit suffered.
After a couple of rounds of combat, I beat them off.
Welsh repelled!
On the other flank, Stephen’s ordinary warriors advanced towards the woods and hills, and Jeremey’s forces waiting beyond. For some reason the Monks didn’t seem that keen to approach the Saxons, and stayed where they deployed. As the leadership points they bestowed could only be given to units within 5 base widths (about 24”), the number of potential recipients gradually reduced.
Stephen’s Monks and Warriors, before the advance.
The warriors on this flank now suffered the problem of the uncontrolled advance; the units on the ends of his line could see Jeremey’s units, while those in the middle could not. As a result, the end units charged in on their own while the central units plodded through the woods. And the units that did charge in, lost.
Stephen’s disrupted line of Warriors, no Monks in sight.
Stephen did achieve one unlikely event; during one attack, he rolled six dice for an attack on Jeremey’s untested Veteran Shieldwall unit, and all six came up sixes. That’s a 1 in 46,656 chance! Six hits inflicted wiped the Veterans from the face of the earth. I hope he bought a lottery ticket.
The 1 in 46,656 chance!
Stephen seemed to have the overall advantage, having lost fewer units, but whereas our losses had been concentrated on a few units, destroying them, Stephen’s were spread out across his units. Eventually the losses caught up and Stephen lost several units in the same turn, in fact both sides reached their 50% loss point in the same turn. So, both sides had to take morale tests on all remaining units; the steadfast Saxons stood firm, while the weaselly Welsh failed their tests. With these units routing Stephen’s army reached the 75% of units lost point, ending the first game in a Saxon Victory.
The Saxon Companions and their spoils of victory after the first game.
As we had plenty of time left, we decided on a second game. Both sides decided to tweak their army lists. Stephen was less than impressed with his Monks, so sent them packing back to the monastery. He was a bit cagey on what he would add to his army with the 3 points the monks had cost.
I decided that the 3 points used to upgrade one of the units to Veteran might be better spent on another unit of Ordinary Shieldwall. So we had the Companions, three Noble Shieldwall and seven Ordinary Shieldwall. That meant we would need to lose 6 units before we had to take a morale test, and 9 units before losing the battle (excluding skirmishers of course). Jeremey and I split the forces pretty much as we had before, but I got the additional Ordinary Shieldwall unit.
We rolled the dice and this time the Welsh won and became the aggressors. We deployed the terrain, only 2 pieces for us; we went for a wood on the left and a marsh on the right.
Stephen split his Riders between the two wings, two facing Jeremey and one facing me. He deployed his Companions and Noble warriors on his left, opposite me, and the ordinary warriors opposite Jeremey.
Saxon Companions and Noble Shieldwall await the Welsh onslaught.
Once both sides had deployed Stephen then revealed what he had spent his 3 points on, a Champion’s Challenge! Each side sent forth a champion to fight; the loser’s side would forfeit a leadership point. Had we refused the challenge we would have lost the leadership point through shame. Unfortunately for Stephen he lost the Champion’s Challenge (simple die roll), and so he started the game with 5 leadership points available, the Saxons had 7.
Stephen sent his lone left flank unit of Riders forward, hoping to ride down my Skirmishers, but this time I pulled them back behind my Shieldwall. The riders stood off for a while, but as the Welsh Companions and Noble Warriors were more motivated in this second game, and were quick to advance, Stephen sent them all in against my Shieldwall.
On the opposite flank Jeremey nailed his units to the floor and refused to be goaded into attacking. As with the first game this forced the Welsh to move through the woods in a haphazard manner. After a closer than expected fight between Jeremey’s units and the Welsh riders he was able to concentrate on the emerging Welsh warriors from the wood and deal a decisive blow.
Stephen’s leader and his Companions not setting an example.
This time the battle was not so close, Stephen’s Welsh reached their 50% morale test point which several units failed, ending the game in a Saxon victory; leaving the Wolf tail banner safely in Saxon hands.
For this year’s Open Day I will be doing a 28mm Saga game. It is based on the Norman invasion of Ireland.
I have a large collection of dark ages/early medieval stuff. However, I thought the Norse Gaels would better reflect the military style of the later Irish warriors than the actual Irish battleboard in the game. Whilst I had most of the necessary troops what I was lacking were some two-handed axe armed warriors – so that’s what I’ve painted up.
These are all Gripping Beast figures. I am pleased to say they have now blooded their axes! We recently had a game of Saga and I brought the Norse Gaels out to give them a try.
The Open Day game will centre around a Norman raid on an Irish religious community. This means I will have to build a round tower for the game as well.
If you’ve never played Saga before, or if you have but have yet to try Saga 2 (because that’s what we’ll be using) then come along and enjoy a game – whether wildly swinging axes is your style or if you prefer mounting a good cavalry charge.
Tony F shows the latest painting additions to his ever-growing collection of Middle-Earth miniatures.
I’ve once again been splashing some paint on a random selection of characters, mostly from Games Workshop’s range but with a few extras from other manufacturers to fill some gaps. One I painted just for fun is shown above – it’s a younger (Martin Freeman) version of Bilbo from The Hobbit, outside a really nice hobbit hole that I picked up on a Kickstarter. I don’t have an immediate use for him but he didn’t take too long to paint.
Phil and I have a game due soon based on a fictitious (as in not-mentioned-in-any-of-Tolkein’s-books-but-it-could-well-have happened) attack on the village of Bree. This is the village where the four hobbits were due to meet Gandalf soon after they left the Shire, but instead bumped into Aragorn and the Ringwraiths.
According to my Atlas of Middle Earth, the village is one of three that surround Bree-hill (the others being Combe and Staddle). Bree is sited on the west of the steep hill which serves to protect it from the north and east, and a large hedge and dike keeps marauders at bay from the south and west. The population is mostly Men, but a number of hobbits live in holes on the slopes of the hill.
My defenders will come from three sources – the inhabitants of the village (both men and hobbits), a small number of Grey Company rangers and Dunedain, and a few random travellers who might be staying in the Prancing Pony when the attackers arrive. There aren’t really any official GW figures that I could use to represent the villagers, so I had to look at other manufacturers and came up with this mean looking bunch from Gripping Beast. They’re arrayed before a Caliver Books butter market surrounded by plenty of Ainsty bits and pieces.
Leading the Grey Company is Halbarad, a Ranger who helps guard the borders of the Shire – he’s another minor character who has a bit part in the books (he carries Aragorn’s standard onto the Pelennor Fields where he meets his end) but is left out of the film adaptation.
Talking of the Battle of Pelennor Fields, and looking further ahead to a rather ambitious game we have planned for later in the year, I’ve also been painting Rohirrim – lots of them. For someone who has a rather irrational dislike of painting horses, an army made up entirely of cavalry seems like a bad move. I’ve made a start with the King of Rohan, Theoden, painting the superb new plastic model released late last year.
I’ve also painted the version on foot and at the same time painted Gamling, the King’s standard bearer (although he appears to have lost it in this version of the figure).
And finally, just for now, a few dwarves. This is a version of Balin from The Hobbit, along with a small retinue of dwarf rangers.
Another Open Day game preview, this time from Marcus Wheeler
It’s Wellington Stock’s toughest mission yet! What is Project Thunderhead, and why has its chief scientist Dr. “Cat” Fisher disappeared? Wellington finds himself in deep trouble in the dangerous waters off Australia’s north coast.
The game is a “playable demo” (in other words, I am still working on it!) of underwater close quarters combat, with all the staples of the genre. From a stealthy starting mission, play builds to an action packed, frenetic big battle conclusion.
Stephen updates his progress on his Yorkists (or Lancastrians, I don’t think he’s made up his mind).
Along with Jeremey I have been popping away at some 15mm Wars of the Roses for games of Sword & Spear.
I made a good start at the beginning of the year then I lost my mojo for painting these. However, I’ve got my mojo back and now they find themselves back on the painting desk.
The majority of the figures are by Essex Miniatures. The plate armoured men-at-arms are Peter Pig, as are the cavalry (not painted yet). I chose to base mine on Sword & Spear size bases (which are multiples of WRG/DBA bases) rather than small elements because I don’t enjoy playing DBA or FoG so it made sense to base them on the necessary size bases to avoid fiddling about with lots of small bases. That means they are also compatible with Armati, which is another set of ancient rules I enjoy (though not played for yonks), and also Impetus.
The flags are generic and not specific to any noble families from the period. These are just for decoration. I decided to make them generic so it didn’t tie the army down to anything specific and would give more flexibility. My intention is to give the commanders the actual flags of the nobles who fought. I haven’t yet decided whether to make a command base for each of the noblemen or whether to do like Jeremey has done with his and make them removable.
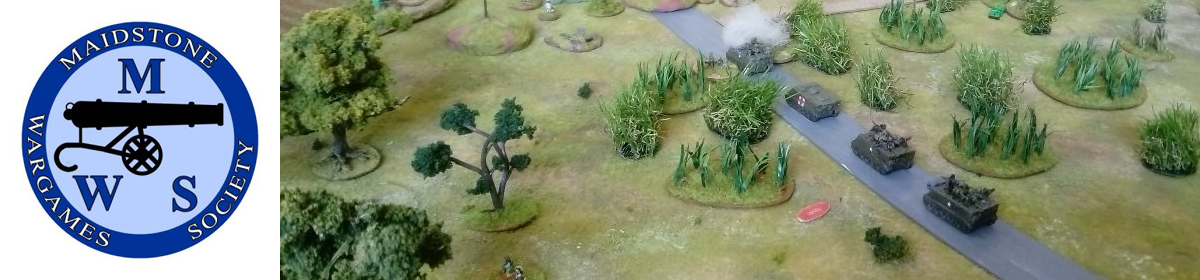
“Charlie Don’t Surf” is a card driven Company level Vietnam game played with 10mm figures and models from club member Pete Smith’s collection.
This scenario will see three Platoons of US Infantry search for VC munition and rice caches in and around a small hamlet on the main highway from Saigon to Da Nang. Local VC are known to operate in this area. Also,Company HQ has advised that a company of NVA may have deployed to this area to interrupt any US operations.
The US forces may be inserted into the area by Huey Helicopters or may decide to go in on foot.
A Cobra gunship and spotter helicopter are in support,along with a mech.platoon of M113s and maybe a Phantom F4 could be available to assist.
The US have a lot of fire power at hand, but a couple of well placed ambushes by the VC and NVA can turn things around against the US very rapidly.
We’ve played several CDS games at the club and they’ve all been fast moving and exiting.
Why not not swing by and visit the ‘Nam and maybe command a squad of US Infantry or VC/NVA for a few turns?
I can’t remember where I got these, might have been Rochester Games and Models.
Four ruined pillars in resin, very simply painted by spraying with matt grey primer (Halfords) and then a very heavy application of Army Painter dark shade and matt varnish.


You must be logged in to post a comment.