On Farthest Tides’ – Dire Straits

John’s latest report on Li Chee the Pirate Queen’s feud with Admiral Feng Shui using Ganesha Games Galleys and Galleons rules.

Months had passed since Li Chee’s raid on Qui Nhon harbour, the junk she had captured now had a new crew and was ready for action.

Meanwhile Admiral Feng Shui set sail with his treasure ships hoping to reach India safely but first he had to negotiate the Straits of Molucca. He had taken the precaution of hiring a trusty Proa to act as pilot, he would be glad of this before the day was out. It was here, close to the dreaded ‘Whirlpool of Indesit’, that Li Chee planned her ambush and with some of the treasure won at Qui Nhon she had enlisted the help of some head hunters, Sumatran cannibals of terrifying reputation.

Making good use of the wind, the Treasure fleet made stately progress through the straits, until…

The trap is sprung!

The new Pirate junk captured at Qui Nhon and refitted, moves in to attack a Treasure Ship, keen to show her mettle.

The new Pirate junk hits the Treasure Ship with a short-range broadside rake the Treasure Ship suffers 2 points of damage as it’s tripled (Treasure Ship has reinforced hull but combat factor reduced by firing full broadside and short-range rake). Junks combat factor increased by one as firing from short range. The vessel also takes a critical hit (4) – Rudder struck!

First blood to the pirates, it’s a devastating attack that the Treasure Ship will struggle to recover from. Li Chee attempts the same tactic on the small Merchant Junk with less success.

LI Chee curses her gunners as they only score one point of damage on the Merchant Junk

The badly damaged Treasure Ship attempts a risky manoeuvre to avoid the attentions of the Pirate Junks.

Things are looking bleak for the Treasure Ship but 3 successful activation rolls allow it to change course avoiding the Head hunters and the junk. Will it escape? – We shall see.

Meanwhile the smaller Merchant Junk is unable to avoid a collision with the Pirate Queen’s ship and comes off worse.

Both vessels roll for damage. The Merchant Junk has a reinforced hull so takes a second point of damage whilst Li Chee is unaffected

Things were looking bad for the Treasure Fleet, with two junks badly damaged. Where was Admiral Feng Shui? He’d decided to hang back to prevent being cut off by the wind but horrified by what he could see before him, Feng Shui swung into action, attacking the pirate junk that had devastated the Treasure Ship. A Devastating cannonade from Feng Shui’s flagship ripped through the Pirate Junk.

The Pirate Junk is doubled and the critical hit sets it aflame!

The Pirate Junk’s crew manage to extinguish the fire but are so preoccupied and cannot prevent the Junk heading directly for an island.

Here the Junk has to roll 3 successful activations to put the fire out, which it does. Had it rolled a 1 on either of the red dice, it would have to take an all at sea roll which is bad news!

The Merchant Junk which collided with the Pirate Queen veers away but strays too close to the ‘Whirlpool of Indesit’ and is sucked in, never to be seen again. To this day, on still nights it’s said you can hear the mournful cries of the crew.

For the Whirlpool I decided that any vessel within S of the edge of the whirlpool at any point of its move was sucked in.

Meanwhile Feng Shui’s Junk comes under attack from the Head Hunters. No vessel is off limits, they just want a nice collection of skulls. They have enough actions to move up to the Flagship and grapple but frustratingly not enough to board.

Here two activations are required to cut the grapples. As a flagship, Feng Shui has an extra free activation. The grapples are cut. But there are no activations leftConcentrating on cutting the grappling ropes Feng Shui’s flagship is unable to avoid a collision with a Treasure Ship.

The ships collide with a destructive crash. Both vessels are badly damaged.

The collision roll is bad. Despite the reinforced hull, both vessels take 2 points of damage. Ouch!

The Pirate Queen opens fire on the badly damaged Treasure Ship which takes more damaged and is now crippled.

Whilst upwind, the damaged Pirate Junk manages to turn away from the island and manages to avoid foundering on the shallows by the skin of its teeth.
The Junk has to pass it’s Quality roll (2), three times as it’s travelling at L

Feng Shui’s nightmare day goes from bad to worse as the Flagship cannot avoid a second collision with the Treasure Ship. A gaping hole develops in the bows and despite the reinforced hull, the pumps can’t prevent the Flagship sinking. Feng Shui escapes, clinging to driftwood.

The Treasure Ship fails all its activations. This is a turnover; all un- activated vessels must move in a straight line and both vessels collide again.

With Admiral Feng Shui clinging to floating wreckage, Li Chee seizes her chance to board the damaged Treasure Ship.

The Treasure Ship is on a – 2 modifier (-1 Merchantman, -1 crippled), but with the Pirate Queen has ‘Derring do’ which reduces combat factors to 0 and Intimidating which gives +1

The damaged Pirate Junk which had escaped grounding also managed to avoid the ‘Whirlpool of Indesit’ so now Li Chee had a huge prize and both pirate junks survived the encounter. Time to pay off the Head hunters cheaply, repair and refit the junks and spend days counting treasure. As Feng Shui drowned with his ship she looked forward to further profitable ventures, but first she needed a patron to establish bases for repair and re- victualling.

Feng Shui was grateful to be picked up by the Proa, though whilst he clung onto the outrigger, he pondered his next move. Returning to China was out of the question, an excruciating death at the hands of Emperor Ming the Merciless lay in wait. Yet if he tried to make a new life here, the long hands of Ming’s empire would grab him by the throat. What he needed was a Pirate Hunter and fast.

Appendix Vessel stats for the Engagement

Work in Progress Wednesday

Just a few offerings from the club this week. It’s been nice to be getting more games in, but this always has a knock on effect to the lead pile.

Above Andy has made some progress on his Medieval miniatures.

Next up Mark has taken a break from his 6mm Hundred Years War army to paint another Judge Dredd miniature.

Where as Stephen has managed to throw some bits together to create some effective Drones.

And finally for this week I’ve made a start on my Concremental miniature, a modern take on the fantasy Earth Elemental. Shamelessly blowing my own trumpet here as it is a miniature I made for Fenris Games. I’ll do a full blog post showing how I decide to paint it at a later date. First thing will be to assemble it.

See you all next week.

SED NOMINI TUO DA GLORIAM

Stephen reports on a game of SAGA: Age of Crusades fought at a recent meeting, with occasional comments from his opponent, Andy, the editor. For those whose schoolboy Latin is a little rusty, the title translates as “But give glory to your name”…

Sir Fulkes LaMont was awakened early by the wailing of the muzzerain. He calmly threw aside the tent flap, the sun still low and it’s warm glow lighting up the sky like molten metal. There was no breeze. Nothing. Just the call to prayers carried across the still air. Sir Fulkes looked out to the silhouette of the distant city walls, the tall towers of the mosques rising above all, and the cries of the muzzerain carrying far…

It’s been the best part of 18 months since I have had a game of Saga. During The Great Plague I  painted a Saracen army and since we agreed we’d have a game of Saga at the club, it was time for them to whet their blades.

Saracen Ghazis Draw Bows

Andy took the Saracens and I had the Templars (Milites Christi in Saga: Age of Crusades terms). We went with 5 points each. The Saracen force was entirely mounted and had a warlord, three points of Ghulams (hearthguard) and two points of Ghazis with composite bows (warriors). The Templars had a mounted warlord with three points of mounted knights (hearthguard), one point of crossbows (warriors) and one point of foot sergeants (warriors).

The table was set up and then, using the Book of Battles, we made a roll for deployment (Confusion), Duration (Cautious), Special Rules (A Dash of Nostalgia), and Victory Conditions (Overrun).

Spear of Distance vs Axe of Measurement

So, Andy took first move. And forward the Saracens went. He took quite a wild move on my right flank, obviously trying to outflank the crossbows, and maybe come around the back. (Andy: I was trying to draw one or two of Stephen’s units off to counter the Ghazis leaving him weaker in the centre). On my turn I put the crossbows on top of the hill where they could have a good field of fire. The knights went forward, and I repositioned the warlord behind some rocks – a defensive position until I could see what Andy intended on doing (Andy: Leading from the back eh?).

Saracens Advance

What I noticed was that Andy had shifted his warlord forward, just ahead of the rest of his army. I’m sure Andy will claim that’s because he was bold and daring, but I reckon it was because he wasn’t concentrating. (Andy: I’d like to claim that too, but Stephen was right). This was too good a target to ignore, so Sir Fulkes ordered his knights to charge and in they went!

Fortunately for the Saracen emir he had a unit of Ghulams nearby, which is just as well because otherwise he would have ended up dead! Instead, those bold warriors laid down their lives for their leader. Badly shaken, badly beaten, and badly fatigued, the Saracen warlord boldly fled to the rear of the table, as far away as he could get from the knights.

Saracen Ghulams and Warlord

Now, one should keep in mind that we’d never played Age of Crusades before and not only that, but we seldom, if ever, use mounted troops in previous games of Saga. That, added to the fact that it had been a long time since playing, meant there was some learning to do. Andy’s Ghazis also had composite bows, which activate differently to regular bows. (Andy: These units have free Shooting activations, but cannot do two such actions consecutively). So there were some inevitable teething problems. From my perspective I felt that Andy, initially anyway, was using his Ghazis like regular fighting troops. Although as the game progressed he seemed to get the hang of using them to skirmish – dashing in, loosing their arrows, then off again. (Andy: I was trying to combine Shooting and Movement, took me a few turns to get it right).

Skirmishing Saracen Cavalry

The Ghazis on my right moved within crossbow range and took a salvo for their troubles. Not too damaging, but enough to make him start to think about the Saracen battleboard properly. Meanwhile, on my left where the other unit of Ghazis were, they started harrying my spearmen. Still can’t think what made me take dismounted warriors when I had the option to have them mounted. Oh well. They were always going to be out of their depth and prone to attacks from all the fast moving cavalry around them.

Crusader Spearmen

Realising the game was going to be won or lost in the centre, I pushed my two units of knights forward. This would mean I might get outflanked on both sides – my hope was the crossbows would tie Andy down on the right and the spearmen would hold him off on the left. I was partly right.

Templars Charge Forth

We had an almighty clash in the centre. My knights had gone forward. I’d combined my three points of hearthguard into two units of six, whilst Andy had kept his three points in three units of four. One of those had been decimated whilst saving the skin of the Saracen warlord. But now the other two units took it in turns to charge my knights. Andy came out slightly on top of that one (he lost four models, I lost five). And then I sent my spearmen in, trying to take the heat off the knights. But that didn’t go too well for them (Andy: I managed to follow up a Shooting attack by the Ghazis with a subsequent charge from the Ghulams).

Surrounded and Doomed

So we had a five turn game limit. Along came turn five and, to be honest, it was looking fairly even to me. You normally expect your opponent to throw everything at you on the last turn but Andy was surprisingly restrained. (Andy: I’ll blame my SAGA dice).

‘I’ll show him,’ I thought. I loaded up my battleboard so my few remaining knights could charge in to his unit of Ghazis. It went alright – the Orison ability of the Templars saved their skins, and sent some of the Saracens packing.

And that was it. Game over. We totted up points and the final result was…5 points to the Saracens, and 11 points to the Templars.

Work in Progress Wednesday

It’s another Wednesday and we have some more offerings from the club.

Above we have some 15mm Rebel Troopers painted by Tony. He’s making good progress on his Star Wars project.

Next up Mark has continued the good work with his 6mm Hundred Years War in the shape of the Black Prince and his commanders.
Mark has also painted up a 15mm musician for his Spartan army.
Now we have some Sci-Fi troopers painted by one of Marcus’ children. It’s always good to know the hobby is being passed down.
And last but by no means least Stephen has put the final touches to his hover camper van.
That’s it for this week, see you next time.

Club meeting 23rd October

A quick round up of the games at the recent club meeting, four scales, four periods.

First up, a 15mm War of the Roses game between Stephen & Tony (Lancastran) and Jeremey and Andy (Yorkist) using Sword and Spear second edition rules.

Jeremey added some flavour with some random event cards, one to be drawn by each player. The four used in this game were:

Jeremey’s random event cards

Jeremey will write up the game, so I won’t go into detail on how the cards were used here.

Andy’s Yorkist Archers and Crossbows occupy hill as the Lancastrians approach
Andy’s command.
Tony’s Border Horse take on Jeremey’s Men at Arms (with the banner)
The Yorkist line seen from the Lancastrian’s perspective

Next up Mark, David and Alan fought a battle in the War of the Spanish Succession using Mark’s 6mm collection and his own rules.

The battle lines are drawn
The Grand Alliance Lines
Alliance infantry and train.

Cavalry advance
Local firefight

Moving on several centuries, we come to 2004, Fallujah, using Force on Force rules. This 20mm collection was put together during the lockdown by Peter, this is its first outing at the club. Peter was joined by John, Brett, Colin and the other Mark.

Marines on the roof
Marines take casualties while advancing
Pilot’s eye view
Insurgents
The Ruins of Fallujah
Insurgents around a skip
Insurgents in the open

And finally we move into the near future, with an excursion into Zona Alfa. John (another one) took Eric through the rules with a series of short scenarios using his 28mm collection.

Stalkers encounter some mutant dogs
Hostiles approach
Zombies in the smoke
Close encounter of the gruesome mutant kind
Where did everybody go?
Start of the next mission, all seems quiet… too quiet!
Creeping through the undergrowth
Objective taken, but man down.
Anomalies abound

Falluja, Iraq, 2004

Peter reports on his major lockdown project, making its debut at the club today.

This is my lock down project that’s taken the best part of two years to complete. 

It is a modern warfare game using 20mm scale figures and the Force-on-Force rules from Ambush Alley Games. 

We’ve played the rules a few times during past meetings with Mike, who left the club a couple of years ago. They were memorable games and great fun. That’s why I decided to start assembling figures and models to put on a game based on the battle of Falluja, Iraq, 2004.

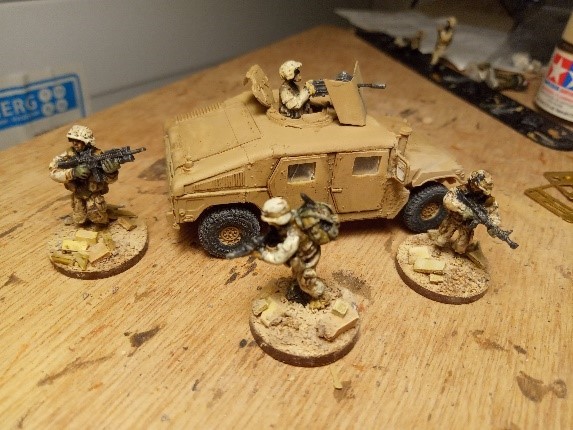
Here are the first figures ready for action – US Marines and a Humvee with Grenade launcher. 

After assembling and painting more US Marines and a couple more Humvees, I started on the Iraqi insurgents and foreign fighters.

And a couple of Technicals with machine guns. 

Next the terrain.  

The game board is about 4’x4’ and depicts a section of a modern middle eastern city with damaged buildings, debris strewn streets and abandoned vehicles all over the place. 

I chose 4mm foam board for the construction of the buildings as it’s readily available at shops like Hobby Craft and the Range. It’s also easy to cut and it’s light to transport around. The rest of the terrain and building details were sourced from places like S&S models and model railway shops.

Here are some completed buildings.

 Rubble mounds were made of scrunched up newspaper and coarse basing material from various wargames and modelling websites and all stuck down with good old PVA glue. 

I got hold of a plastic model Abrams M1A2 MBT and enhanced it with some baggage and lose rubble. 

More rubble and damaged buildings were made next …

The roads are black 3mm thick soft foam sprayed with grey paint and debris sand and rubble stuck down. The road markings were done with masking tape and paint – gently rubbed down with glass paper when dry. 

A couple of Helo’s adds to the US Marines arsenal… 

A couple of shots from a practice game, Delta team on building clearance mission.


Work in Progress Wednesday

Here we are back with another selection from the club members on what they have been up to.

First we have Stephen’s impressive Hover Camper Van (above). Stephen went with a suitably retro colour scheme and has added some luggage items to the roof. Still a few stages to go – cargo and top, and weathering.

Matching up colours

Stephen has also decided to do some extra harbour/quayside sections, he just needs to remember what colours he used on the original.

Next up John has added a few more Bolivian infantry units to his Pacific war project.

John describes these as poorly equipped ‘ragged foot’.

Next up Mark has finished his hundred years war longbows.

Some men at arms that need basing.

And a camp to rest up after a long days march.

I cannot wait to see the whole of Mark’s army on the battlefield.

And last but not least this week, I managed to paint up my long lost Viking first purchased in 1985 and then lost for 36 years!

See you next Wednesday for more miniature goodness from the club.

Harwich Submarines in the Great War

Our treasurer recently had a book published by Helion & Company. Royalties will be supporting the work of the Royal Navy Submarine Museum.

We had a book signing at our last meeting and here are the happy purchasers!

Signing of Harwich Submarines in the Great War at MWS 9 October 2021

You can find out about the background to the book in his post on the Helion & Company blog here:

The first campaign of the Royal Navy Submarine Service in the First World War


Scratch Building on a Budget

Jeremey takes us through building terrain from things just laying around.

For a while now I’ve been determined to build up (no pun intended) my collection of terrain features and some table top dressing. But I wasn’t able to just throw lots of money at all those nice resin or plastic terrain sets, and so I looked at the materials I had around me.

The Swamp
First up was a swamp, I’ve never actually owned a piece of swamp terrain but often see other gamers with a single round piece of cloth or card to act as a swamp.

I wanted to do something a little different to just one large swamp and so built a selection of smaller pieces that could be pushed together to form a large swamp or break up providing paths through the swamp.

The swamp pieces were made from a piece of backing board from an old flat pack chest of draws. It’s like a thinner version of hardboard and easy to cut. I painted the pieces in a swampy green colour and stuck bits of real wood branches to it. A bit of flock was added and then to get that wet looked I used clear PVA glue. it took a couple of layers but ended up looking the part.

Total cost for the swamp was the price of a bit of flock, bit of glue and bit of paint. In other words pretty cheap.

Stone Walls
Battlefields have to have walls, if for no other reason than to justify the half dozen pages in most wargame rules dedicated to how to move your troops over them.

For these again I used the backing board and stuck to it some polystyrene pieces. However it wasn’t your standard white polystyrene this was a special grey insulating styrene that was a bit stronger and had a larger better formed structure that looked like a pile of stones. I didn’t know such existed until my neighbour had some building work done and let me have some of the off cuts. They were very easy to paint and fitting for this project, free.

Signs of Past Battles
As well as actual terrain pieces I also wanted to create some scenery to break up the blank spaces you often get on the battlefield but do not affect the game.

I found in the bits box a few old sprues of Games Workshop plastic skeletons and thought having some remnants of a past battle.

I cut some small pieces from the backing board and simply stuck various body parts down. In quite a few cases I cut the underside so that it would lay flat to the base and in some cases used the part of the model I’d sliced off back on the base. A bit of flock and the odd grass tuff and I had a half dozen pieces to add a bit of character to the battlefield.

Forest Hall
On a wander through some local woods I came across an unusual piece of bark that had fallen off a tree (quite a long time ago given the state of it), and I immediately thought it would make a good roof for some primitive dwelling.

I brought it home and using some other sticks I’d collected I built a forest hall by sticking the bark and sticks together with the hot glue gun. A little bit of flock and the hall was complete. I might return to this and add some furs or other decoration to the entrance.

Trees
Lastly I just used some of the collected bits of old wood from the forest floor to make additional dressing pieces to the battlefield.

I made two tree stump pieces and two large ancient trees that would work as objective markers or some other scenario goal in games. You can also see the size of the forest hall in the above picture.

Building all of this terrain was exceptionally easy and as pointed out cost next to nothing to get on the battlefield.

Work in Progress Wednesday

Welcome to another Work in Progress Wednesday, as a complete contrast I’ll start this week with what I’ve been up to. Above you can see I finished my long dead warriors scatter terrain pieces, and below I have a re-discovered a Citadel Miniatures Viking from 1985 that I’ll be adding to my Viking Saga warband.

36 years old and still looking the part

Next up Mark has yet more 6mm units. Fist are some Roman infantry units.

Medium infantry ready to join the Roman army

Then we have some Hundred Years War Men at Arms and Longbowmen.

Hundred Years War English Men at Arms and Longbows

Finally from Mark a camp for his Greek 15mm army. This is a nice twist on the normal two tents and a wagon style camps we often see.

Camping at a ruined temple after a hard day on the battlefield

Next up Stephen has added to his Sci-Fi collection with a group of generic crew members.

More conversions for Stargrave

Marcus has been improving this years club game (technically last years game!) With more snowy terrain that will hopefully be ready to play at Broadside.

More Snowy Ground for Biggles!

And last but not least this week, Tony has continued painting his Lord of the Rings dwarf Grim Hammers.

Grim Hammers led by Bombur, who’s obviously spotted something to eat ahead of him

See you next Wednesday for another catch up with the club.