
Stephen gives us his views on the Osprey rulebook and follows up with a battle report.
I am a big fan of the Osprey ‘blue book’ rules. They’re the right physical size and just the right price that they’re worth taking a punt on. I bought Outremer: Faith And Blood when it came out but it just sat on the bookshelf for ages. This weekend I finally managed to have a game of it. What follows are my thoughts and a battle report.
Like all the blue books the rules can be a bit patchy in places. That’s no bad thing, but it is something to be aware of and you have to realise that player input may be needed. Some are patchier than others, and I’m pleased to say that Outremer was less patchy than some. Though some bits were unclear and did need a bit of improvisation (mainly terrain – but I’ll come to that below).
The game is designed so that each player controls about 6-12 figures. Activation is done by drawing cards. Since each figure is likely to have slightly different stats and a few extra traits I decided to cobble up some character cards. I made them business card size so they could be put in a plastic wallet. The rules suggest using a pack of regular playing cards and you assign a card to each figure. What I did was knock up a bespoke card with the character name and picture for this.

I did a simple game – seven a side with the French versus the English. It’s worth saying here that though Outremer is set during the crusades it is really just a generic set of medieval skirmish rules. So that’s how I’ve used them.

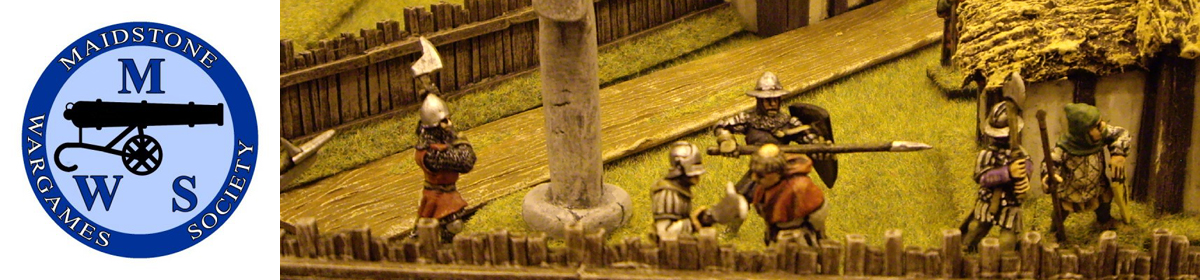
It seems to me the key to these mini-games (‘mini’ because they don’t have many figures) is to ensure there’s LOT’S of terrain. So I had a large ruin in the middle, all of which counted as rough terrain and hard cover, and some wood – which also counted as rough terrain and soft cover. This is where I had to do some improvisation. The rules say nothing about shooting into and out of terrain. So I adopted a Saga approach – you can fire into and out of terrain but you cannot shoot through terrain. Since there were a lot of ruins I had to think about how that would affect the game. The rules don’t really help. The choice is either count the terrain as a piece of rough terrain and is symbolic only (so if there are high walls then you can still move through that, etc) OR figures can only move around the ruins through gaps or climb over walls and high walls block line of sight. I can see pros and cons with either approach. In the end I adopted the former.
The game started with both sides either side of the ruins. The French were led by Sir William le Bon with his squire Luc Brecon. The English were led by Sir Walter de Marsh and his young squire Henry Wilton. Luc took up place with the French crossbowmen in some woods overlooking the ruins whilst Sir William took charge of the spearmen and moved up to the ruins.
The English longbowmen advanced to the ruins, with Walter Fletcher taking a particularly advantageous position behind a wall.
With all that rough terrain movement was slowed down. When a model’s card is drawn it can make two actions. Most actions cost 1 point but some cost 2 points. A model completes all actions before the next card is drawn.

The French crossbows let fly nice and early as the English tried to cross the ruins. But the combination of long range and hard cover meant the English took no casualties. Models have a series of stats and, depending on how good they are, the better the die type they roll. I like that game mechanic. It’s nice and simple and does the job well. Thierry, a French crossbowman, had the ‘corrective shooting’ trait, which meant once per game he could re-roll a failed shoot roll. He took a pot shot at Sir Walter, missed, and decided to re-roll. Fortunately he missed again.

Sir William and one of his spearmen, Louis, moved into the ruined chancel. By now Henry Wilton and Adam (an English spearman) had also made their way into the ruins. The two sides faced off against each other. However, an English longbowman, Peter Ashdown, had also moved in to the ruins and decided to see if he could bring it all to a quick end by taking out Sir William. He missed.

Realising they couldn’t afford to wait, both Sir William and Louis advanced against their adversaries as soon as they could. In the game it’s not just a matter of moving models in to combat. They have to make a Faith Test to summon the courage to go in. The charger rolls his die and he has to beat his opponent’s Presence score. If he fails then he stays where he is. If he passes then in he goes!

Walter Fletcher’s sniping position was paying off. The French crossbowmen had to advance to shorten the range so they could get a good shot in and as they did so Walter started picking them off. Squire Luc could see the only way out of this was to cut Walter down – he had no choice but to charge the Englishman. Not this time though. He dithered and before he could summon the courage he was taken down by Walter’s bow skills.

In the chancel the fight was coming to a conclusion – Sir William and Louis had defeated both Henry and Adam. Sir Walter had now advanced through the ruins toward the chancel. There was only one way to sort the matter out – the two knights would have to square off.

It wasn’t to be though. Walter Fletcher drew his bow, took aim, and…there went Sir William.

Game over.
I enjoyed that game. I wasn’t sure what it would be like with such a limited number of models on the table. I think it works best with a bit of role-playing and players investing a bit of character into the models.
There’s also a campaign system in the game whereby after each encounter the models gain experience and can improve. Oh, it’s also worth saying that models that are ‘killed’ in the game aren’t necessarily dead. Being ‘taken down’ merely means they are out of the game. At game end you make a roll and see what’s happened – they could be dead, could be a slight scar, or something more inhibiting.
You must be logged in to post a comment.