
Stephen reports on a series of Barons War games played at a recent meeting.
We had a Barons’ War session recently.
We kept it small, with 500 point retinues, which meant we got three games in.
What’s nice about Barons’ War is the scenario content – there’s 15 different scenarios with 12 different deployment options. Which makes 180 different combinations. That’s not bad, eh?

We chose scenarios and deployments randomly.
Game 1
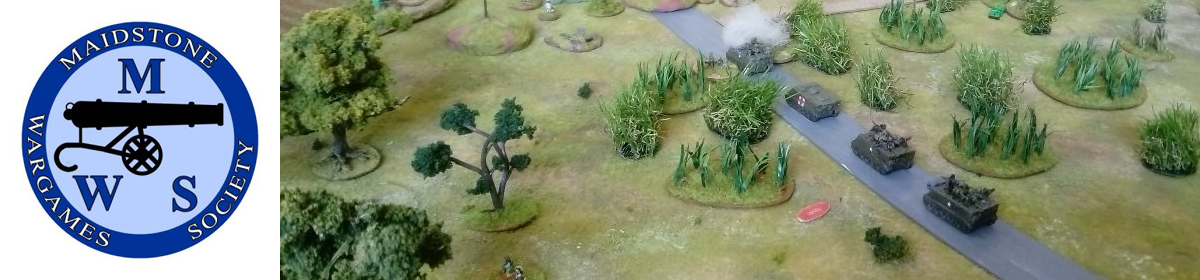
First up was #10 ‘Hidden Treasures’ with Deployment Map 3 (both opposite each other in the traditional way).

In this scenario each player places 3 objectives. When a player controls an objective you roll a D6 and on a 6 you’ve found the treasure (all other objectives are then removed) and the winner is the one who has possession at the end of Turn 5.
Tony was using a mixed force of knights, sergeants, spearmen, and crossbowmen. He won initiative and, since he started in control of one of the objectives, rolled a dice and…nope, no treasure. This was the first time Tony had played Barons’ War, and it had been a while since I played, so it was very much a ‘get to know the rules’ game. He advanced his sergeants and his spearmen (being led by a sergeant commander).

My retinue was made up predominantly of outlaws. My archers also started in control of one of the objectives (in a cabbage patch) so I rolled a D6 and…I got a 6! The treasure was mine, now all I had to do was hold on to it for the rest of the game.
Both my archers and Tony’s crossbows were behind fences and hedges, and at long range to each other, so we stayed put and exchanged a bit of missile fire – the odd casualty but essentially harassment fire. I also engaged Tony’s knights with my archers as he moved into the centre. The rest of our units got stuck in with the melees and by the end of turn 5 the treasure was still in the hands of my outlaws, so game 1 went to me.

Game 2
Second game was #6 ‘Tear It Down’ with Deployment Map 11 (in a kind of wedge shape).

In this scenario the two players again placed 3 objectives each but the idea was that you had to burn your opponent’s objective by being in control of them. The first player to burn all their opponent’s objectives is the winner.
I was unlucky enough to get the red deployment zone, Tony got the blue zone.
This one went a bit catastrophic for me. In fact, the game lasted no more than 30 minutes (and could have been over sooner than that if I’d conceded sooner!).

Again, Tony won initiative and his opening action was to shoot with his crossbowmen at a unit of my outlaws. It was long range and they caused a couple of casualties, meaning I had to make a Morale roll. Which I seriously fluffed and the outlaws went Broken and had to make a move away. Problem was, I’d deployed them quite close to the table edge, and so they routed off table having done exactly chuff all! Realising that my whole right flank, and probably centre, was now compromised (and I had two of my objectives there) I had to hurriedly plug the gap. So I moved my knights around to delay Tony. He then charged my knights with his sergeants, which is fair enough (if he hadn’t charged me I was going to charge him). However, in Barons’ War if you roll a 10 it’s counted as a critical hit which can only be defended with a 10. My four knights got hit by four 10s! And I didn’t roll a single 10 for defence, which meant…off go the knights!
Truth is, that was pretty much the end of the game (my outlaw commander took control, so I could technically fight on but knew it was no hope). However, I just couldn’t let him win 3-0, so we played another turn and the other unit of outlaws then set fire to one of his objectives. At that point I conceded – at least I got one of his!

Game 3
The third, and final deciding, game was #1 ‘Behind Enemy Lines’ with Deployment Map 4 (lined up opposite each other on short edges).

In this scenario players place 1 objective each and the winner is the one who controls both objectives.
We both began by moving units up by Running, to make up the ground. Things slowed down once we got near each other as we tried to out manoeuvre each other. Both Tony’s crossbows and my archers were on the same flank. I decided to move my archers into the yard of an inn so they could use the fences for cover. These archers were led by an outlaw commander (a veteran, dispossessed, young nobleman – you know what I was thinking!) who used his multiple actions to order the archers to keep firing. They peppered Tony’s crossbowmen who promptly routed off the field. Good – I needed to get rid of them. This opened up the way to Tony’s objective and if I could get my archers there I would win.

Meanwhile, in the middle, Tony’s sergeant, led by his sergeant commander, engaged more of my outlaws and Broke them. And on the other flank I left my knights in control of my objective, with some spearmen hiding in the woods. Similarly, Tony was advancing on them with his knights and spearmen.
Next turn my archers double-timed to get to Tony’s objective. Realising how exposed the objective was he’d moved some sergeants up to take control of the objective, meaning I would have to fight for it after all. Well, I say ‘fight’ but what I intended to do was shoot more arrows at him.

‘Intended’ is the important word there, because Tony won initiative next turn and, quite rightly, charged my archers with his sergeants. Fair enough, I expected that. But it went bad. A couple of casualties and, like the knights in the previous game, I rolled really badly for their morale, meaning they had to fall back. But, again, like the outlaws in the previous game, they were too close to the table edge and the flee move had them off the field!

The game was decided in the fight for my objective. My knights were finally surrounded by Tony’s knights and spearmen. I counter-charged his knights and killed two of them! That took the smile off his face. But I was surrounded and every time I had to fall back I had nowhere to go, which meant I took an extra casualty. That quickly mounted up.
Result? Tony won the last game. But only just!

You must be logged in to post a comment.