A quick round up of the games at the recent club meeting, four scales, four periods.
First up, a 15mm War of the Roses game between Stephen & Tony (Lancastran) and Jeremey and Andy (Yorkist) using Sword and Spear second edition rules.
Jeremey added some flavour with some random event cards, one to be drawn by each player. The four used in this game were:
Jeremey’s random event cards
Jeremey will write up the game, so I won’t go into detail on how the cards were used here.
Andy’s Yorkist Archers and Crossbows occupy hill as the Lancastrians approachAndy’s command.Tony’s Border Horse take on Jeremey’s Men at Arms (with the banner)The Yorkist line seen from the Lancastrian’s perspective
Next up Mark, David and Alan fought a battle in the War of the Spanish Succession using Mark’s 6mm collection and his own rules.
The battle lines are drawnThe Grand Alliance LinesAlliance infantry and train.
Cavalry advanceLocal firefight
Moving on several centuries, we come to 2004, Fallujah, using Force on Force rules. This 20mm collection was put together during the lockdown by Peter, this is its first outing at the club. Peter was joined by John, Brett, Colin and the other Mark.
Marines on the roofMarines take casualties while advancingPilot’s eye viewInsurgentsThe Ruins of FallujahInsurgents around a skipInsurgents in the open
And finally we move into the near future, with an excursion into Zona Alfa. John (another one) took Eric through the rules with a series of short scenarios using his 28mm collection.
Stalkers encounter some mutant dogsHostiles approachZombies in the smokeClose encounter of the gruesome mutant kindWhere did everybody go?Start of the next mission, all seems quiet… too quiet!Creeping through the undergrowthObjective taken, but man down.Anomalies abound
Peter reports on his major lockdown project, making its debut at the club today.
This is my lock down project that’s taken the best part of two years to complete.
It is a modern warfare game using 20mm scale figures and the Force-on-Force rules from Ambush Alley Games.
We’ve played the rules a few times during past meetings with Mike, who left the club a couple of years ago. They were memorable games and great fun. That’s why I decided to start assembling figures and models to put on a game based on the battle of Falluja, Iraq, 2004.
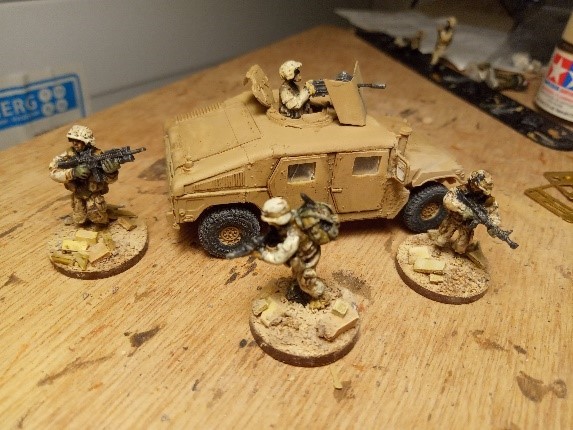
Here are the first figures ready for action – US Marines and a Humvee with Grenade launcher.
After assembling and painting more US Marines and a couple more Humvees, I started on the Iraqi insurgents and foreign fighters.
And a couple of Technicals with machine guns.
Next the terrain.
The game board is about 4’x4’ and depicts a section of a modern middle eastern city with damaged buildings, debris strewn streets and abandoned vehicles all over the place.
I chose 4mm foam board for the construction of the buildings as it’s readily available at shops like Hobby Craft and the Range. It’s also easy to cut and it’s light to transport around. The rest of the terrain and building details were sourced from places like S&S models and model railway shops.
Here are some completed buildings.
Rubble mounds were made of scrunched up newspaper and coarse basing material from various wargames and modelling websites and all stuck down with good old PVA glue.
I got hold of a plastic model Abrams M1A2 MBT and enhanced it with some baggage and lose rubble.
More rubble and damaged buildings were made next …
The roads are black 3mm thick soft foam sprayed with grey paint and debris sand and rubble stuck down. The road markings were done with masking tape and paint – gently rubbed down with glass paper when dry.
A couple of Helo’s adds to the US Marines arsenal…
A couple of shots from a practice game, Delta team on building clearance mission.
A short pictorial round up of the games at the latest meeting.
First up a couple of FOG Ancients games.
6mm FOG Roman Civil War6mm FOG Ancient British Chariots6mm FOG Ancient British Warband
Next, on a planet far, far away, Alan ran a couple of games using Fistful of Lead Galactic Heroes rules.
Star Wars ImperialsStar Wars BattlefieldStar Wars Imperial All Terrain Scout TransportStar Wars Rebels annoy the native fauna
Lastly Several SAGA Games. Stephen and Andy in the Age of Crusades, Templars vs Saracens.
SAGA Age of Crusades deploymentSAGA Age of Crusades. Salim al-Katid’s Warband on parade
There will be a full write up of this game in a couple of week’s time.
Jeremey and Tony were playing SAGA Age of Vikings, Norse-Gaels vs Anglo Saxons.
SAGA Age of Vikings, Jeremey’s Anglo Saxon WarbandSAGA Age of Vikings, Tony’s Norse-GaelsSAGA Age of Vikings Warbands Clash
Later in the afternoon Tony (Norse-Gaels) and Jeremey and Andy (both Vikings) had a couple of three handed games fighting to control a Bard, after all, he who controls the bard writes the saga.
SAGA Age of Vikings, Three way fight for the Bard. Tony’s Norse Gaels top left, Jeremey’s Vikings top right and Andy’s Vikings at the bottomSAGA Age of Vikings, second battle for the Bard. Andy’s warband eliminated, the Bard in Jeremey’s protective custody while Tony’s Norse-Gaels look on.
Andy tells the story of the Fenris mission from a different perspective.
Following the limited success of the first mission to Denides, Captain Ash de Vere set about recruiting replacements for the losses incurred, Eric Olsen, the First Mate and Sam Fleet, a pathfinder had both died during the mission.
The first order of business was to recruit a new First Mate, by a stroke of fate the best candidate Ash could find was also called Eric, Eric Bamburgh. After some reflection Ash decided the crew really ought to have the services of a medic, and fortunately the new first mate knew of a good man called Dan McIntyre who was looking for a new berth.
As the two new crewmen were settling in Patina dZuk, one of the Runners Ash had engaged for the last mission, popped in and asked Ash if he could stump up 20 credits to get her the kit needed to become a Chisler. As there was just enough credit remaining after hiring Dan, Ash agreed.
So, with the crew back up to full strength Ash set about looking for a new mission to bolster the funds. An information broker Ash knew, Germy, had heard some rumours that Fenris, site of one of the major battles in the Robot Wars, was awash with loot and knew of potential buyers for any physical loot that Ash could find. What Germy didn’t say was how many robots remained active on the surface of Fenris…
Ash and Eric tried to lay some groundwork for the mission, Ash tried his usual sources for some high impact ammunition, but none was to be found. Eric tried greasing some palms to get possible rival crews to look the other way at an opportune moment, but there were no takers.
As Ash set the shuttle down on Fenris he briefed his crew. He would lead one team with Charlie, Jen and Patina. Eric would lead a second team with Skel, Honu and Offler. Bren, who hadn’t fully recovered from the injuries sustained on Denides, and the new medic Dan would be the reserve.
As the teams approached the ruins of a town movement could be seen, several of the Fenris incident robots were moving around the town.
Robots patrolling
In addition, more than one other crew were in the town, no doubt searching for the same loot Ash was after.
Tony’s crew
Ash led his team towards Tony’s crew, an ex-military group judging by their uniforms, activating his Energy Shield as he moved through the ruins.
Ash’s team took up positions behind some rocks while Patina got out her lock picks and set to opening a promising looking crate. Success, unlocked!
As Patina checked the contents of the crate she came under fire from Tony’s crew, presumably trying to take her out so they could steal the loot.
Ash and the rest of the team returned fire at Tony’s crew, giving the wounded Patina the chance to fall back with the loot behind some rocks to take her out of the line of fire. Ash told Patina to get back to the Troubadour with the loot as fast as she could; he and the rest of the team would cover her retreat.
A wounded Patina and her loot.
In the ensuing firefight Jen was knocked down, and as Ash and Charlie were both hit before they pulled back. As did Tony’s crew, perhaps they realised they weren’t going to be able to catch Patina.
Meanwhile, Eric’s team had moved into a different part of the ruins searching for more loot.
Eric’s team
As they advanced a clanking sound was heard behind them, one of the Fenris Robots had appeared from the ruins and opened fire, wounding Skel.
Bren and Dan came to Skel’s aid, Bren taking out the robot, and Dan treating Skel’s injuries.
Dan treats Skel with Bren on guard
Honu took up a position to guard the right flank, hunkering down amid the ruins. Good job too as another Robot moved up, firing on and wounding Honu. In returning fire Honu managed to put the Robot down.
Honu takes cover
While Honu dealt with the robot, Eric and Offler advanced through the ruins, finding another crate.
Offler and Eric find some loot
As they examined the crate they came under fire from Stephen’s crew, who seemed to be concentrating their fire on Offler. She was knocked down, and after returning fire Eric pulled back to some cover, with Bren coming up to support.
For some unknown reason the crew that had shot Offler then fell back, giving Eric the chance to go back and unlock the loot.
With Bren and Honu covering, Eric grabbed the loot and headed back toward the ship, only for yet another robot to appear! Luckily for the crew the combined fire of Bren, Honu and Eric managed to take down the robot, although Bren’s carbine jammed part way through the firefight.
With the robot down Eric’s team made good their escape, with Eric wondering why they had been robot magnets.
Eric’s team fall back with the loot (White skull denotes Bren’s jammed Carbine)
Once the Troubadour had left orbit, Dan took Jen and Offler into the sick bay to treat their wounds. Jen was remarkably uninjured after all, it must have been just a glancing blow, but Offler was in worse condition. Dan managed to patch her up, but she would not be back to full strength for a while.
Back at the Grand Market, Ash decided not to fence the loot through Germy, he hadn’t forgiven Germy for the bad intel on the robots. After some haggling, he found buyers for the Trade Goods and Alien Artefact they had recovered, netting 250 and 400 credits respectively. Ash would have to think on how to spend the hard-earned credits.
The crew gained 135 experience from the mission, enabling Eric to advance a level.
15mm War of Spanish Succession: France vs Allies. Field of Battle, 3rd Edition (Piquet)
Alliance infantry advance
6mm Peninsular War Napoleonic Peninsular, French vs Spanish & British/Portuguese
John La – Gaslands
Start Line for the Death RaceAndy’s first dice roll, not a good start!John rams Chris’s TaxiFirst two through gate 2, weapons hot!Eric shows Andy how the dice should be rolledAndy still hasn’t learned how to roll.Chris’s Mini gets revenge on John (7 hits!)Second Game (Arena of Death). Chris’ Land Rover demonstrates its superior off road performance.
28mm Dragon Rampant: Dwarves vs The Undead
Dwarf Crossbows, and baggage.Dwarf AxesDwarf Main forceThe Dwarves’ Bear allies are pushed back by the undead (where’s Goldilocks when you need her?)Dwarves test the waters at the ford as the Ghouls approachThe remainder of the Skeletons take on some Dwarf Crossbows
And sometimes we don’t play games
Having lost his Dragon Rampant game, Tony paints some Dwarf reinforcements.
Stephen gives us step by step guide to painting a Sci Fi villain.
For an upcoming game of Stargrave I wanted a baddie. The Big Boss. I looked at the models I had and none of them were really suitable.
So I decided I would buy something. I knew how I wanted the model to be armed, and knew my chances of finding something exactly like that was virtually zero, so it had to be something that could be modified.
Since I intended to order some bits from Ral Partha I thought I’d have a look there.
And lo and behold, I found just the thing – a Neo Soviet Handler from their Vor range (specifically, code 40-412):
The original figure
I trimmed off the knuckle-duster thing in his left hand and in its place went a blaster pistol from the spares bag. His main armament was going to be a void blade. And when I saw this model, and what he had in his right hand, I couldn’t believe my luck. This would make the perfect handle for a lightsaber (sorry, void blade). I trimmed it down a bit, but I liked the flared ending so kept that. A hole was drilled and a piece of 1.5mm styrene rod was glued in. The model was then stuck to a 25mm plastic base and the base built up with filler. And then it was given a brown undercoat:
Modified and undercoated figure
Now, in this write-up I am just going to give generic colours rather than specific names and codes for a brand. I use from more than one range of paints and I am sure everyone else does as well.
I decided his robes, gloves, and gimp mask were going to be black. So I slapped it on, letting it get into any awkward gaps in case I couldn’t get a brush in there later so it would act as a deep shade.
Basic black basecoat
Right, this is just my own personal philosophy on black. But I never highlight black with just grey. No. Black is seldom that helpful. Look at any black clothes you may have. I bet they’re all slightly different shades – it depends on age, what the material is, what dye was used. Lots of variables. So try to keep that in mind when highlighting your blacks. The black for the robes had a bit of blue added, then white added to that for successive highlights. The gloves and mask had a blob of red added, then white added to that for successive highlights. You can see the slight difference in ‘black’ here:
Shades of black highlights
Next up, I decided to do the bits that would get a dark brown (OK, OK, GW’s Agrax Earthshade) wash – the boots, pouches, bracers, and metallic bits. These received the same base brown colour. The metals had a steel base colour. Once dried, on goes the wash.
Brown and steel parts base coated and washed.
And when that’s dried the pieces are painted up. Like black (and most colours, to be honest) it helps if you vary what you use to highlight your base colours. It’s tempting to add white to lighten it. But maybe yellow might give a different shade to the base colour, or a pale grey. This is a good thing to keep in mind, especially if you have two uses of the same colour next to each other. That said, I did use white to highlight the brown. The metal bits were touched up with the base steel colour, and then highlighted with silver. I ummed and ahhed about what colour to do the lenses on the eyepieces. Blue or green were the first choices that came to mind. But then I thought, orange. So orange it was, highlighted with a dot of yellow.
More highlights and those glowing orange lenses
Next up I decided to do his weapons. There’s a good reason for this – I just couldn’t make up my mind what colour to do his armour. Normally I would have left the weapons to last because they stick out and there’s every chance they could get knocked or rubbed as I did other bits. But I just couldn’t make up my mind. I had thought about green, but I had also decided that his blade was going to be green, and if there was too much green then I may have to re-paint the armour. With that, I decided to do the weapons first, and once that was done maybe the armour colour would be obvious. The handgun had a base colour that was a mix of steel and black to make a gun metal colour, then highlighted with the steel. A red laser sight was also dotted in. I knew from the outset I was going to do a green blade. I have a nice rich green colour, so I went with that. It’s hard to paint a 3D object like it is lit from inside, so I chose to just highlight the base and tip of the blade. I used white to highlight this time.
Pistol and lightsabre, sorry void blade, painted and highlighted
I looked at it. You know what, I thought, I reckon green would look OK. So I went with green for the armour, but a different shade of green. I gave all the armour panels a thin coating (not really a wash, but not really thick paint either) of the base green mixed with a blob of dark brown (again, you don’t have to darken colours with just black). Once dry I then painted in the panels with the base colour, which was highlighted by adding yellow to the green to create a more vibrant green, but also so it didn’t have the same tonal value as the green on the blade. The edges of the armour were based in dark yellow, and then picked out with a flat yellow.
Armour panels painted green and yellow.
And that’s the end of the painting for Doctor Moreau. Once finished, I thought the 25mm base looked a little small on what was a chunky model. So I pried the model off the base (and, inevitably, had to touch up a few knocks and chips) and glued him to a 30mm wooden base. Flocking was my standard recipe – a mix of railway ballasts first, and then some spots of static grass:
The rebased and finished figure
And that’s Doctor Moreau done, ready to be pestered and set upon by a group of ne’er do wells and freeloaders.
A brief picture album of the third meeting back, still operating under members only rules.
Four games in play today, in chronological order:
First up a FOG Ancients game by Colin & Paul, we only have one picture of this unfortunately.
FOG Ancients game in progress
Moving on to the 17th Century we had a FOG Renaissance game with Brett, Pete, John and Mark, the Scots involvement in the English Civil War.
FOG Renaissance Scottish (mostly) await the attack.FOG Renaissance Cavalry on the moveFOG Renaissance ECW Scottish in action
Moving on a couple of Centuries we move to Mexico in the 1860’s, with the French Intervention played by Alan and Mike using Zouave II rules.
Republican Mexican defencesFrench and Imperial Mexicans advance
Finally we have a couple of games of Stargrave.
The first game was run by Stephen, with Eric, Marcus, Jeremey and Andy sending their crews to investigate Dr Moreau’s House of Pain.
First Stargrave game, run by StephenDr Moreau’s bunker from Andy’s point of viewAndy’s crew fight off Audrey IIMarcus’ alien crewEric’s and Marcus’ crews approach each otherMarcus’ and Eric’s crews engageDr Moreau’s creatures take the high ground as Jeremey’s crew approach the compoundAndy’s crew try hacking the force field
We had to cut the first game short as Stephen had to leave, so we then played a second game which Jeremey had devised. As Andy’s crew had to disband after his Captain was killed in the first game he ran the second game enabling Jeremey to play.
A ship had crashed, leaving a trail of cargo and potential loot in its wake. Jeremey, Eric and Marcus’s crews came looking for loot, with indigenous interference run by Andy.
Eric’s crew, lead by Captain GreyfaxThe crashed freighter, with cargo strewn in its trail. Jeremey’s crew approaching from the top of the picture, Eric’s from the bottom.Eric’s crew approach the wreckEric and Jeremey’s crews fight over the loot (the corrugated fence representing a Holographic Wall)The indigenes
A tad late today, apologies all. This week the vast majority of work was done by Eric, with one small addition from Tony. Where’s everyone else gone?
Eric says his painting mojo has really sunk it’s teeth into him at the moment, and he’s been prolific in his output. First up is Inquisitor Greyfax from Warhammer 40k, Eric says she’s a work in progress, and will make a great “psyker” captain for Stargrave in addition to appearing in his 40K army.
Inquisitor Greyfax
Next, an old piece of scenery he finally got round to paying attention to.
Ruined Cathedral?
Some random robot that was found in the desert just before the locals decided to handball him on to their transport. Will likely serve as a data loot cache marker for Stargrave.
Stargrave R2D2 data marker
And for a complete change of direction, some Roman Legionaries.
Early Imperial Romans
Back to the Sci Fi theme, a small Adeptus Astartes Reiver squad for either 40k or Kill Team (maybe Stargrave, who knows?)
Adeptus Astartes Reiver squad
And 3 x runners/recruits for Stargrave and a robot. The runners were kitbashed from 40k spares, the robot is based on Claptrap from Borderlands. Model by Crooked Dice Games.
Stargrave Runners and Robot
And, finally from Eric, some Stargrave Loot markers.
Stargrave Loot markers
It’s not quite an Eric monopoly this week, Tony has finished a few figures. He’s decided to start on Thorin’s Company, so here are Thorin, James Nesbitt Bofur and Gandalf.
Thorin, Bofur and Gandalf.
That’s it for this week, hopefully we’ll be back on schedule next Wednesday.
Last Saturday was the second meeting post lockdown. We are still operating with members only. Fewer games and members this time, perhaps because of the Bank Holiday weekend?
First up, a couple of games of Fields of Glory, Dominate Roman vs Selucid, report from Chairman John.
Mark’s Romans took to the battlefield against a very mixed force of Paul’s Seleucids. The Romans deployed their many legions in the centre to face off the Seleucid cataphracts, pikes and elephants.
With the full deployment revealed the Romans moved aggressively to take advantage with their skirmishes on the left flank. This resulted in successfully routing the enemy light foot off the table and capturing the enemy camp. However the Seleucids fought back attacking the rear of the Roman horse who were still sacking the camp. In the meantime on the other flank the Seleucid light foot seemed to be in excellent shooting form scoring hits in multiple rounds and routing the Hun cavalry.
The deciding battle should have been in the middle with the Seleucid caraphracts taking on the legions, but despite vicious fighting no overall victor emerged. At this point the Seleucids were declared the marginal victors due to their success on the flanks.
The second game was a repeat meeting, this time the Romans sat back and let the Seleucids come to them intending to not be aggressive on the flanks and risk losing their again. However the Hun cavalry again proved to be very vulnerable to shooting, with the cavalry and light horse on the other flank also suffering at the hands of some good dice rolling by the Seleucids. In the centre the cataphracts managed to manoeuvre to hit the Romans at their weakest point, eventually routing several battle groups, the Roman army withdraw just before it would break, a successful day of battle for the Seleucids.
The next table saw some Border Reiver action. Report by a different John.
I brought along Osprey’s En Garde! Ruleset, my collection of Outpost Reivers I’d purchased and painted many years ago and scratchbuilt terrain for Eric and Tony to try out the rules. We played on a 3 foot square mat. Whilst rule memory was hazy at times, we did manage to play two scenarios.
Scenario 1 – During a previous raid some of the stolen booty had to be hidden in a derelict Shepherd’s hut in Bewcastle Waste. Both gangs were desperate to recover the heavy chest containing cutlery and a wooden dinner service (yes, they would have been that desperate). We used the capture scenario from the En Garde! Rulebook. It was dark and raining, typical Reiver weather.
Both forces approached the hut with some figures dismounting so that they could enter the hut and grab the chest. Eric’s gang managed to score some hits using a Latch – a short range rapid fire crossbow as the skirmish developed around the hut.
The skirmish around the hut.
With men down, Tony attempted a ride by lance charge on Eric’s Headman but unluckily failed and with that, Tony’s chances in the game faded.
Scenario 2 – Eric’s gang have kidnapped the lady love of Tony’s Headman’s son and locked her up in their fortified farmhouse. The scratchbuilt Bastle House is an accurate model of Gatehouse (North) Bastle in Tynedale. We used the Defence Scenario from the En Garde! Rulebook.
Bastle House modelled on Gatehouse (North) Bastle in Tynedale
For this scenario, Tony had got some hired help as He would have to break into the Bastle. He decided to use the time honoured tactic of ‘Scumfishing’ applying fire to the door in order to smoke out the occupants.
Trying to fire the door to the Bastel House
Meanwhile if Eric’s Headman’s son could rush out and light the straw pile, this would alert the Land Sergeant and the Militia who would be duty bound to come to their aid (unless handsomely paid off by Tony). The son was ruthlessly put to the sword by one of Tony’s henchmen. Tony was unable to start a fire at the door and with time running out, brute force was brought into play. A fierce melee took place in the basement with Tony’s men just avoiding a bucket of night soil thrown down the chute above the door. The Headman’s son was able to rescue his sweetheart (the only girl in the village with her own teeth) in the nick of time or by the skin of his teeth.
So honours were even over the day. We had a couple of queries on the rules and will probably bring in house rules next time where our protagonists will encounter ‘Mad Meg’s Bairns’ a merciless band of cutthroat mercenaries and I’ll start looking at the possibility of a campaign.
Last, but by no means least, Tony and Andy tried out Dragon Rampant. Report by Andy
Tony wanted to try out Dragon Rampant using his Lord of the Rings Rohirrim troops, so we agreed on a 24 point game.
For our first Game Tony’s army was made up of :
1 x Elite Riders (Theoden and guard)
1 x Elite Foot (Royal Guard)
1 x Light Riders (Eomer and escorts)
1 x Light Foot with Mixed Weapons
1 x Light Foot.
I fielded a Goblin force with the following:
1 x Offensive Light Foot (Durburz and guards)
1 x Light Foot Wizardling (Shamen and Drummers)
2 x Light Foot with Mixed Weapons
2 x Scouts
Armies deployed for the first game (one unit of Goblin Scouts out of picture on the left flank)
Tony threw forward his cavalry, with the foot catching up as best they could.
Theoden leads his guard forward.
Having the leader as a unit of Elite Riders had the drawback of the unit having the wild charge rule, so once within move distance of my forces he had to test to charge.
Goblin Light Foot prepare to receive a chargeRohan infantry enter the village
After a game of attrition, with both sides losing their leaders, the last unit of Rohan foot await the end.
The last unit of Rohan foot await the end.
For the second game we both expanded our armies, Tony added a unit of Bellicose Foot, using his Army of the Dead models, and another unit of Light Riders, lead by Eowyn. I added a couple of units of Light Riders (Orcs on Wargs). This took both armies to 32 points.
In this game my Wargs were often successful in evading Tony’s Light Rider charges, until they ran out of space.
Another game of attrition, at the end all that was left of Tony’s Rohirrim was Gamling, leader of the Royal Guard
Gamling’s last stand
For our third game we expanded the armies yet again. I added a unit of Venomous Giant Spiders (Lesser Warbeasts) at 7 points. Tony gave his Elite Riders the Level Headed upgrade, which removed the wild charge and made it easier to move. He also converted his Light Riders to Heavy Riders and added a third unit. For the last point he added a War Banner to the Elite Riders.
The expanded armies deployedTheoden charging the Warg riders
Theoden still getting ahead of the rest of the units.
Eowyn leads the charge
Eowyn lead her unit to charge the Goblin Shamen, who surprisingly held them off.
Clash of leaders
Theoden about to fall to the Goblin King.
In all we easily got three games in at the meeting, and plan to try doing the Battle of the Pelennor Fields at a future meeting. Tony now has to work out how to portray the Mûmakil in Dragon Rampant.
While Jeremey is away he handed the reins over to Andy for this week’s post.
Only four items to show this week, not sure if that is the effect of the weather, or that we have now resumed meetings.
First up, Tony continues his 15mm Sci Fi Des Res, made from an electrical pattress box, accessories from the Brigade range, and spares from the bits box. He has added a few more greeblies including a radar dish, then started painting – undercoat, dark wash then some drybrushing. Front view above, rear aspect below.
Tony’s Des Res (Rear Aspect)
John has added a fourth base to his Chilean battalions for the War of the Pacific.
John’s Chilean Reinforcements (Pendraken 10mm)
Meanwhile Mark has done some more work on his Judge Dread figures and his 6mm Pontic army.
Mark’s Judges and 6mm Pontics
And his son, Felix, has been trying out GW Contrast Paints on his Mega City Block Gang.
Felix’s Block Gang
(Ed: In an earlier edition of this post I credited the Judge Dredd and Pontic work to Eric and his son in error. It should have been credited to Mark and his son. Apologies to all concerned.)
Finally, not so much WIP as just finished. The last of my Dark Ages foot, ready for a game last night at Milton Hundred.
Andy’s Gripping Beast Plastics Warriors
Well, that’s it for this week. Back into Jeremey’s safe hands next week.


You must be logged in to post a comment.