Jeremey is on holiday this week, so he’s left Tony the keys to the WIP Wednesday post…
We’ll start off with Chairman Mark’s fine collection of 28mm Shermans that he’s been working on for a while, building up towards a big Nijmegen game later this year. There’s been a bit of rivalry at the club over who has the biggest Sherman collection – we suspect Phil is still ahead, with Dave also a strong contender, but Mark’s catching up…
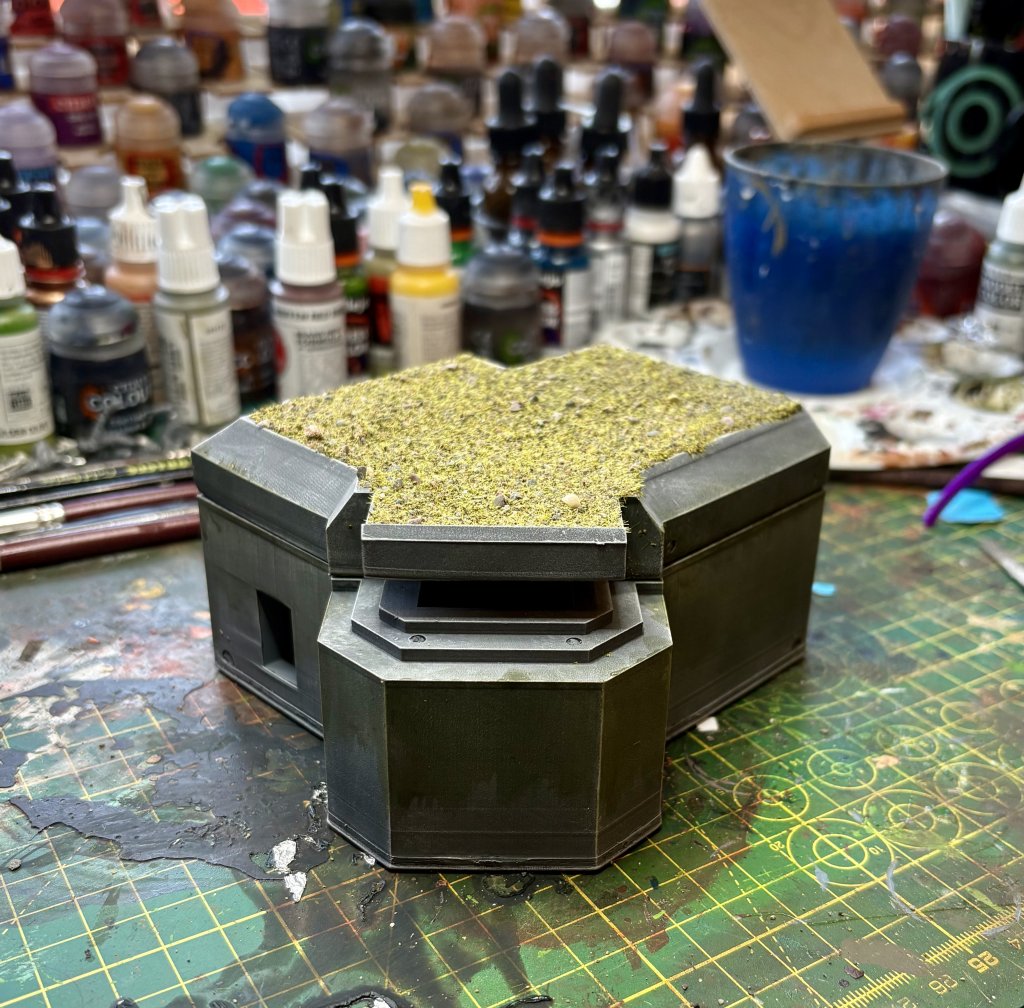
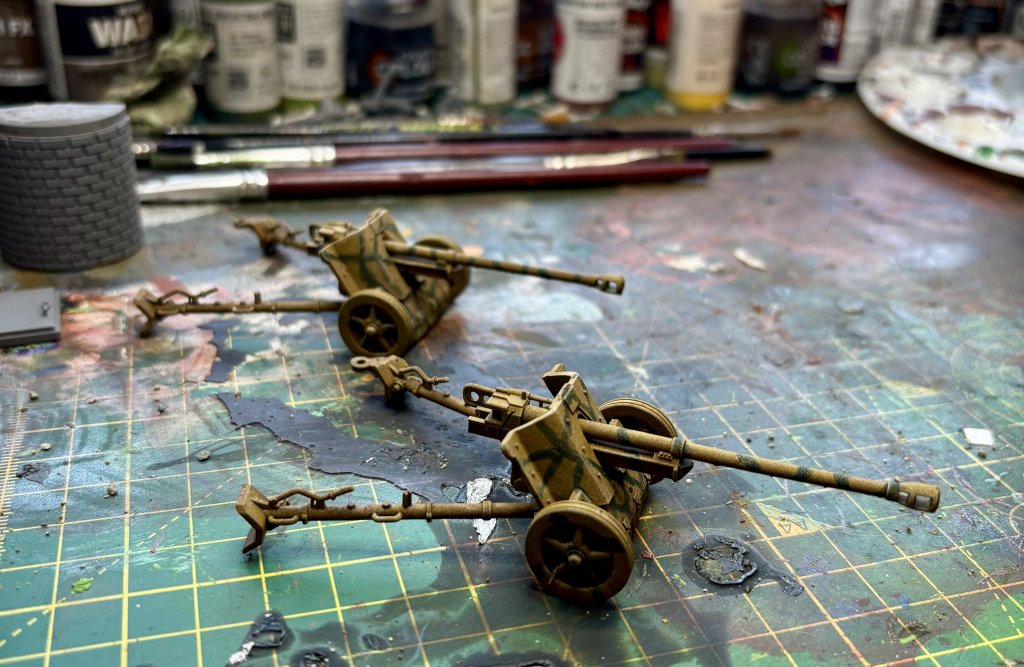
He’s also added a British half-track (likely an M5) and Daimler armoured car, a German bunker and some anti-tank guns (type unspecified, but some internet research points at them being 50mm Pak 38s).
Eric has been turning yet more Matchbox cars into wasteland warriors for a Gaslands game with all manner of add-ons and accessories. The one on the right with exposed wheels looks especially cool.
Stephen has made some 15mm objective markers for Vietnam games, which should also serve for WW2. I suspect a few of us will be hunting for those in an upcoming game of Charlie Don’t Surf.
And finally, I quickly turned out some individually based figures to act as Big Men (NCOs and officers) for a game of TFL’s Quadrant 13. They’re only 6mm, so really they should be Little Men. Or Little Big Men ?
Jeremey will be back next week, you’ll doubtless be pleased to hear !
Our 2024 Open Day is just over a month away and there has been lots of progress on this years games. The Open Day is on the 22th June this year. We’re open to the public from 11am – 4pm on the day.
This is a great day to come and see the society in action and maybe throw some dice at one of the various games we will have on the day.
This year we have a good selection of games, which might just be the incentive you need to either get back into the hobby or to find a new home for your own armies and games.
We will have a game of Barons War complete with scratchbuilt castle.
There will be a game of Project Z for some post-apocalypse fun!
The Elephants will be on the rampage in a battle between Romans and Carthaginians
The Soviet/Afghan war will also be covered this year
Along with a big World War 2 battle somewhere in Europe
And last but not least the magical treefolk will be fighting their ancient enemy the rock warriors in an entirely scratchbuilt fantasy game.
Details of where the club meets and location of the Open Day can be found on our About the Society page.
On Saturday the 13th May meeting Mark H, Tim, Eric and I played Warlord Games Judge Dredd skirmish, we used 28mm figures and terrain depicting Mega City 1, including the famous Rowdy Yates block.
The infamous Rowdy Yates Block
The aim of the game was to take Rowdy Yates, there were four teams:
Justice, including Dredd (no creep messes with my home!)
Muties
City Def
Block Gang ‘Reasonable Approach’ (Albert Einstein Block)
City Def are located at Rowdy Yates, they are well armed with a sniper and rocket launcher, ready to take out anyone trying to take their block. The muties move in first dashing for one of the ground floor doors, there are fresh norms in there ripe and juicy for a cursed earth BBQ!
The Reasonable Approach Block Gang move in from the east, using the terrain as cover hoping to get in close with their sawn-off stump guns, they wave their reasonable banners as they move in shouting ‘we support the law’, ‘be reasonable’ and of course ‘e = mc2’!
The Reasonable Approach Block Gang
Justice next, coming in from the south; no one is fooling veteran street judge Milo who promptly shoots down one of Reasonable Approach, the gang immediately change their banners to ‘we hate the law!’. Meanwhile City Def start to pick off the muties on the ground floor, ‘supported’ by cadet judge Bow, city def attempt to fry some muties with a grenade but take out the young judge, game over for baby justice!
Rowdy Yates Tower , ground floor.
No way these muties are going down easy and street judge Bell takes a serious a hit after messing with a mutie packing a heavy spit gun. City Def buggs out to the second floor setting up an ambush for the muties, who are still pilling into Rowdy yates ground floor and heading for the lift and some tasty norms!
Dredd arrives on his Law Master ‘I am the Law!’, he’s not too happy that is old home is being attacked and he promptly jumps of his bike and heads for the front door his Lawgiver MkII at the ready. Reasonable approach keeps pushing from the east, taking out a mutie but taking some hits too. Dredd’s bike heads around Rowdy Yates and promptly dispatches justice taking out a mutie and a passing citizen! The not too happy muties head towards the lift at Rowdy Yates hoping to take out some norms.
City def unleash a rocket on Reasonable Approaching taking out one of the gang and exploding some fuel laden barrels. Seeing this, veteran Judge Milo moves to support Dredd and promptly runs into Judge Death who’s been lurking next to an add pod; a heart squeezing moment for Milo! Death also takes out rookie judge Reed and moves towards Rowdy Yates and Dredd ‘the ssentenccce isss death’.
The fight is getting hot in Rowdy Yates, city def wait on the second floor around the lift hoping to take out some muties. The muties oblige by coming up to the second floor, city def fire as the muties arrive but to no effect. One of city def is carrying a can of Boing and sprays the first mutie encasing him in an impenetrable plastic sphere! The second mutie roles out his buddy and heads back to the first floor. While all of this is going on, Reasonable Approach take out Dredd’s Lawmaster by exploding some chem waste. Dredd’s not happy and bursts into the ground floor of his old pad taking out two muties, he takes three hits but shrugs them off.
Death heads towards Dredd, seeing him from the corner of his eye Dredd spins around and fires a hotshot round at Death, nothing doing! Dredd rushes out of the building and attacks Death with his day stick and a culinary laser he happened to have tucked in his boot!
Judge Dredd and Judge Death
A mutie heads back up the lift, licking his lips in anticipation of some fresh norm meat. As he arrives on the second-floor, city def throw in a hi ex grenade, BOOM! The mutie manages to throw himself to the floor and the explosion comes right back at city def frying three of them but they remain standing and take out the mutie.
Dredd and Death proceed to knock lumps off each other but no-one’s winning the fight, Reasonable Approach move in close to Rowdy Yates and city Def seeing this, move back to the ground floor; singed but still in the fight. Seeing Dredd and Death fighting it out, the city def Boing guy moves in to help Dredd and manages to encase Death in Boing!
The games ends there, Dredd’s still standing but the rest of justice are dead, the muties are in bad shape but have caused a heap of chaos, Reasonable Approach are a few down but in the building. City def are a little charred but hold their block! A great game with many laughs and sticky moments, just as it should be in the Big Meg.
We’ve been remiss and not posted a photo round up of several of our meetings held over the last three months. Here’s the first of these covering the first two of the missing meetings.
August 27th
Three games ran at the meeting, first up a 6mm Ancients game using Field of Glory rules.
Alan ran an Eastern Front WWI game in 15mm using “Battles with Brusilov” rules.
And finally for this meeting, Stephen ran a very wet Stargrave game, Waterworld. We should have a more detailed write up of this game soon, but you can find an article about the boat building endeavours of our members here.
Andy’s crew approach a tower blockTony’s crew encounter a KrakenThe view from orbit
September 10th
We had another three games at this meeting, firstly a 2mm Strength & Honour game.
Stephen and Jeremey ran another game in their refight of the War of the Roses, using Sword & Spear rules. There’s a full account of this battle (written by the victor, of course) here.
Lancastrian defensive positionYorkist right flankYorkists advance
And finally, Eric ran a series of Gaslands races.
We’ll round off the other two missing meetings, September 24th & October 8th in the not-too-distant future.
Stephen organised a SAGA Age of Vikings Battle day, several games through the day across a couple of tables. In Stephen’s words:
Hail! Hail! Bleddyn ap Owain, Lord of Bangor, rides victorious! Hail! Hail! Lord Bleddyn has met the Normans and Scots in battle and comes home victor. Glory to his name! Honour to his household! From this day forth let him be known as Bleddyn The Dragon! Hail! Hail!
The header photo shows Bleddyn and his warriors off raiding. Here are a few more from the various SAGA battles.
Norman cavalry about to have a bad dayWelsh mounted
Scots advanceMore ScotsAnglo-DanesNorman Archers
Marcus ran another rules development game for his Spy Fi underwater combat rules, based on Galactic Heroes. Bond and friends vs Largo. It didn’t end well for either of them!
Layout for game 1, blue markers are points of interest, die rolls would determine what is found.Largo’s henchmen gang up on Felix LeiterLargo’s shark drone attacks a Royal Navy diver.Largo’s henchmen advance
Dave ran a Gaslands race day
Gaslands race trackRear endedOil slicks make life harder
And, finally, Paul ran a 3mm Ancients game using his own rules.
Shortly before Christmas Stephen issued a challenge, throughout the rest of December post pictures on our members groups.io page of famous scenes from military history, or myth, or fiction. Fantasy or sci fi, film or whatever, but using models from our collections.
Moving from myth to history, Andy contributed Gaius Julius Caesar leading Legio XIII Gemina across the river Rubicon in January 49BC precipitating (another) Roman Civil War.
Alea iacta est
And going back to fiction, Andy staged the battle between Gandalf and the Balrog in the Mines of Moria:
Gandalf and the Balrog at the Bridge of Khazad-dûm.
“Your dead sleep quietly, at least, Captain, out of reach of sharks” “Yes, sir, of sharks and men.” ― Jules Verne, Twenty Thousand Leagues Under the Sea
Stephen had a play with his camera to create a sepia print of Pickett’s Charge.
Picket’s Charge
Mark delved into comic-lore to give us a scene from the comic 2000AD, Judge Death vs Judge Dredd.
Judge Death Lives! 2000ad progs 224-228, “you cannot kill what doesss not live”.
Marcus offers a scene from an Iron Hand mission in Vietnam.
Two MiG 21 Én Bạcs pursue a pair of F105 Thunderchiefs on an Iron Hand mission. A SAM-6 site is the F105’s target.
A quick round up of the games at the recent club meeting, four scales, four periods.
First up, a 15mm War of the Roses game between Stephen & Tony (Lancastran) and Jeremey and Andy (Yorkist) using Sword and Spear second edition rules.
Jeremey added some flavour with some random event cards, one to be drawn by each player. The four used in this game were:
Jeremey’s random event cards
Jeremey will write up the game, so I won’t go into detail on how the cards were used here.
Andy’s Yorkist Archers and Crossbows occupy hill as the Lancastrians approachAndy’s command.Tony’s Border Horse take on Jeremey’s Men at Arms (with the banner)The Yorkist line seen from the Lancastrian’s perspective
Next up Mark, David and Alan fought a battle in the War of the Spanish Succession using Mark’s 6mm collection and his own rules.
The battle lines are drawnThe Grand Alliance LinesAlliance infantry and train.
Cavalry advanceLocal firefight
Moving on several centuries, we come to 2004, Fallujah, using Force on Force rules. This 20mm collection was put together during the lockdown by Peter, this is its first outing at the club. Peter was joined by John, Brett, Colin and the other Mark.
Marines on the roofMarines take casualties while advancingPilot’s eye viewInsurgentsThe Ruins of FallujahInsurgents around a skipInsurgents in the open
And finally we move into the near future, with an excursion into Zona Alfa. John (another one) took Eric through the rules with a series of short scenarios using his 28mm collection.
Stalkers encounter some mutant dogsHostiles approachZombies in the smokeClose encounter of the gruesome mutant kindWhere did everybody go?Start of the next mission, all seems quiet… too quiet!Creeping through the undergrowthObjective taken, but man down.Anomalies abound
15mm War of Spanish Succession: France vs Allies. Field of Battle, 3rd Edition (Piquet)
Alliance infantry advance
6mm Peninsular War Napoleonic Peninsular, French vs Spanish & British/Portuguese
John La – Gaslands
Start Line for the Death RaceAndy’s first dice roll, not a good start!John rams Chris’s TaxiFirst two through gate 2, weapons hot!Eric shows Andy how the dice should be rolledAndy still hasn’t learned how to roll.Chris’s Mini gets revenge on John (7 hits!)Second Game (Arena of Death). Chris’ Land Rover demonstrates its superior off road performance.
28mm Dragon Rampant: Dwarves vs The Undead
Dwarf Crossbows, and baggage.Dwarf AxesDwarf Main forceThe Dwarves’ Bear allies are pushed back by the undead (where’s Goldilocks when you need her?)Dwarves test the waters at the ford as the Ghouls approachThe remainder of the Skeletons take on some Dwarf Crossbows
And sometimes we don’t play games
Having lost his Dragon Rampant game, Tony paints some Dwarf reinforcements.
After a gap of exactly 17 months the Society resumed meetings last weekend. For the time being meetings will be members-only, no visitors or prospective new members are allowed. That is being kept under review.
For the first meeting we had five games in progress; Ancients (6mm, Fields of Glory), Dark Ages (28mm, SAGA), WW2 (3mm, Rommel), Modern / Post Apocalypse (28mm, Zona Alfa) and Fantasy (28mm, Lord of the Rings).
Fields of Glory, by Mark.
This was the first outing for the Pontic army, who took on a late Republican Roman army, basically pike and cavalry vs well trained legionaries.
Game 1. Republican Roman vs Pontics
The first battle was a close run thing, the Pontic cavalry chased the Roman cavalry around the left flank before taking out two units, alas this was too little too late as the Romans swept around the right flank destroying all in their path, a close battle but the Romans won the day.
The second battle saw the Pontic forces consolidate their pike into one large block (24 bases) with two generals attached and rear support in the shape of offensive spearman. The intent was to take out two elite legions, however the Romans had other ideas and deftly avoided a full on battle taking out the supporting spearmen and eventually surrounding the pike block which spelt the end of things for the Pontic army.
Game 2. The end of the massive Pontic pike block?
A heavy defeat for the Pontics this time as the Romans showed that well drilled troops and some great tactics can win the day. Great to be back at the club, as for the Pontic army, there’s always next time!
SAGA, by Andy & Jeremey
We staged two games, both with 6 point armies. In the first game Jeremey had a Viking warband, comprising his Warlord, two units of six Hearthguard (3 pts) and three units of 8 Warriors (3pts). Against that Andy fielded an Anglo-Danish warband, comprising his Warlord, two units of six Hearthguard (3 pts), two units of 8 Warriors (2pts) and a unit of bow armed levy (1 pt).
Both sides deployed across a diagonal centreline, with each sides right flank extending past the opponents left flank.
As the warbands advanced Andy brought the units of Warriors and Hearthguard on his right flank round to try and out flank Jeremey’s left, and also pushed his levy forward taking a second activation (and a fatigue marker) in order to loose arrows at some Viking Warriors, to little effect. Jeremey responded by using the Viking Battle board ability Odin to exhaust the Levy, and promptly charged the Warriors in decimating the Archers.
Jeremey’s warriors crash into Andy’s exhausted Levy archers. Spare shields used as Fatigue markers.
That set the tone for the first game, with Andy dishing out Fatigue when he could, and Jeremey removing it and several of Andy’s warband in response. The battle culminated in Andy’s Warlord with a couple of Hearthguard taking a stand against the last of Jeremey’s Hearthguard, only to fall in ignominy.
Andy’s Warlord surveys the remnants of his Warband and braces himself for the onslaught.
In the second game both players changed their warbands.
Jeremey changed his army completely, going for a Anglo Saxon warband with three units of 16 Warriors* (2 pts each) in addition to his Warlord.
* (Ed: We got that wrong, maximum unit size is 12 figures, so it should have been 4 units of 12 Warriors).
The Anglo-Saxon battle board is markedly different from most to others, with abilities dependent more on the number of figures in a unit rather than their quality.
Jeremey’s Anglo Saxons (and his Spear of Destiny measuring stick).
Andy retired his Levy archers and took an additional point of Warriors, splitting them between the two units to make 2 units of 12.
The Anglo Saxons (far side) and Anglo Danes (near side) in their starting positions
The armies advanced, clashing in a range of hills. Jeremey made good use of the abilities that reduce the number of attack dice available to their opponents. (Ed: Which would have been less effective with units of 12 rather than 16).
The battle lines draw near. Jeremey’s Left flank unit has been slowed down through the use of fatigue.
The battle raged back and forth with the Saxons keeping the upper hand while their unit sizes remained large. But similar to the first game the battle was hard fought, coming down to a fight with the Warlord. Although in the second battle Andy sent his Warlord to his doom against the last of Jeremey’s Saxon Fyrd, cutting down several before being overcome.
Andy’s Warlord bites the dust as Jeremey’s victorious warriors march past.
Rommel
Counterattack at Deir el Tarfa, by Alan
The battlefield. Each square of the grid is 1 km
In the summer of 1942, following its victory at Gazala, Panzerarmee Afrika pursued the British 8th army into Egypt. Rommel’s first attempt to break 8th Army’s lines failed in July, but by the end of August he was prepared to mount one last major offensive. German and Italian armor turned the Allied left flank almost 90 degrees and drove deep into Allied positions. On the evening of 31 August the 15th Panzer division began an assault on Alam-el-Halfa Ridge while the 21st Panzer division protected its exposed left flank.
Italian and German forces
The latter, however, suddenly found itself under counterattack by the British 22nd and 23rd armoured brigades. Eighth Army’s new commander, Bernard Montgomery, had held these units in reserve for precisely this contingency.
Elements of the 22nd Armoured Brigade
Our game focussed on the fight between the two British armoured brigades and 21st Panzer which was supported by elements of the Italian Littorio Division.
An initial advance by the British held most of 21st Panzer between the Deir el Tarfa and Deir el Agram ridges and an intense tank battle ensued. But the Italians swept around the British right flank and managed to seize one of the objectives. With the tank battle see-sawing between the British and German forces the Italian held objective became the key to the engagement. Despite several British counterattacks on the position the Italians held on.
Clash of Armour
The last British infantry assault almost succeeded but couldn’t quite take the position. So as night fell the engagement went to the Axis but with supplies running low they were forced to pull out overnight.
The game was played using the Rommel rule set by Sam Mustafa and using 3mm models from Oddzial Osmy.
PzIIIs of the 21 Panzer Division
Zona Alfa, by John and Tony
I decided to run a 4 mission mini campaign to introduce a new player (Tony) to the rules. Tony would have to recover salvage to generate funds to enable retirement from the zone whilst achieving the objectives from the mission. This is done by searching Hotspots of which there are five and the objective. A triggered Hotspot is guarded by Zone Hostiles, these can be of 6 types, the type and distance from the Hotspot being determine by Dice. Those Zone Hostiles with Melee capability head for the nearest member of the crew, those with ranged combat capability will head for cover then shoot at the nearest member of the crew. The missions were linked so that achieving an objective allows the player to proceed with the following mission.
Tony’s first job was to pick a 4 person Veteran crew from my collection and kit them out ready for action.
Mission 1. Disaster at Kovgorod.
The village of Kovgorod
A patrol has been lost in the Exclusion Zone. The last signal has been tracked from their APC to Kovgorod so that’s where the crew are headed. As they approach the village, they spot the disabled APC but a pack of Zombies has beaten them to it attracted by the smell of Blood.
Tony did well in this game and was well on his way to the retirement fund target after just one game. What could possibly go wrong?
Mission 2. The Prisoner at Bunker C13
Leader and scrounger gang up to take out a mutant
After completing the mission, the crew recover a map with a bunker highlighted. There were four dead bodies in the APC, the map revealed the location of the fifth member of the patrol. Here Tony got into trouble with Bandits. One party of Bandits had been triggered before the start of the mission and a second entered on table as Tony triggered a hotspot. Caught in a crossfire his Leader was killed early on the mission and when deciding to head for the objective, he found that these were also guarded by Bandits. Using smoke to blindside this group of Bandits, the crew were able to move out of Line of Sight, rescue the prisoner and make it out. The objective had been achieved but at a high price.
Mission 3. Road Block at Strabants Crossing
The Prisoner from the bunker had recovered and told the crew about a Laboratory hidden deep in the forest so after reequipping that’s where they were headed until they found the track blocked with a party of bandits lying in wait. This time they were dealt with clinically, as were a swarm of zombies headed for them.
Support trooper is taken out by some zombies
A satchel charge was laid and the roadblock cleared at the second attempt. Another hotspot was triggered and a gaggle of ghouls were stopped in the nick of time. Things were heating up as another hotspot was triggered and a pack of wild mutant dogs clambered over the APC to attack one of the crew members stationed on its roof.
A pack of mad mutant dogs attack
A desperate fight saw all dogs killed and as the PC was refuelled from the diesel tank, the crew were able to make good their escape.
Mission 4. The Hidden laboratory.
With no time to replenish the supplies, Tony’s crew appeared in good shape. The retirement fund had almost been achieved and now all that was needed was a top up and recovery of the drugs caches hidden in the lab – piece of cake, except at the start of each turn a D10 was rolled. If this result added to the turn number was more than 10 a zone event would occur the following move. The crew moved quickly to the lab and whilst the first zone event, a swarm of irradiated insects was easily avoided, the second – a zone security patrol was a different proposition and two of the crew were wounded in a protracted fire fight whilst the lab was being searched. With the security patrol eliminated and the drugs collected, it was time to head back to the APC, just as a terrifying Alpha Mutant entered the arena.
Enter the Alpha Mutant – time to run
Unable to take on this monster one crew member bravely fought it as the rest of the crew fled. Finally succumbing to the vicious attacks of the Mutant, she had bought vital time for the rest of the crew as they just made it back to the APC before another Zone Patrol entered the area.
It had been a rollercoaster Zone Run with plenty of tactical decisions to make, with some jeopardy and the result hanging in the balance until the final stages of the final mission.
Lord of the Rings
Tony and Phil staged this game, they each sent reports, Tony’s first:
We played two Lord of the Rings games, both involving Mumaks. The first involved a group of Knights of Dol Amroth supported by some Gondorian archers attempting to take down a single beast. This all went horribly wrong for the good guys early on when Phil started shooting my knights from their saddles with archers from the howdah, much against the odds – he is not renowned for rolling sixes when it matters !
The knights of Dol Amroth charge one of the MumaksGondorian Archer’s view of the Mumak
Prince Imrahil did his best to tackle the beast single-handedly but in the end was only ever one failed priority roll from being trampled, as he duly was…
Close up of the Mumak at the start of the second game.
The second game didn’t show any improvement (Ed.: If you can’t kill one Mumak in the first game then of course you should have two in the second game!)- this time we played a scenario in Ithilien (similar to a scene in the films) with Faramir’s Rangers ambushing an advancing group of Haradrim.
Ithilien Rangers lay their Ambush
My plan was to wound the Mumaks, hope it panicked them (as happened on screen) and defeat them that way – trying to just pick them off with arrows was never going to work.
The ill fated Faramir points the way
I managed to inflict some wounds on Eric’s overgrown pachyderm but it simply shrugged them off, and they simply marched on by, killing Denethor’s second son on the way.
If we hide behind the rocks the Mumak might not see us!
Finally, Phil’s somewhat shorter report:
“Phil in shock double LOTR victories”
It should be noted that Phil deliberately stomped on a couple of his own spearman to get to the Dol Amroth chaps.
John gives a the low down on the Kontraband expansion for Zona Alfa, and a prize winning battle report on one of the scenarios from the book.
John tells us “There’s a competition on the F/B page for battle reports. I sent a copy of the article to the rules author and I’ve won a copy of the rule book signed by the author and illustrator.”
Zona Alfa was published by Osprey in early 2020. It’s a skirmish game set in the Chernobyl exclusion zone where teams battle for salvage and hope to survive. I’d hoped to play it at the club, then along came the pandemic. The author supports the game well via the Stalker 7 website and solo or Coop rules were soon developed, where the player games against the zone itself rather than a physical opponent. I’ve posted 3 battle reports here and you can check out Guerrilla Miniature Games U Tube channel where a full 7 game campaign is played out. These rules are highly recommended.
Kontraband is an 80 page expansion to the Zona Alfa ruleset (which you will need to play Kontraband), available through Amazon as hardcopy or Wargames Vault as a pdf. It develops the ideas above to take the game in a different direction, recommending a play area of 3’ x 3’ and a crew of 4 veterans. It is set deep in the Exclusion Zone at high threat level so it’s worth playing through a few standard Zona Alfa games before diving in. Here’s what’s in the book.
Crew Members.
Crew members can either be Stalkers – good at combat or Scientists – good at technical tasks, a further option is to include a dog companion for which there are detailed rules and additional rules for Hazmat suits. Each crew member can have different equipment or skills so it’s worth spending the time to make them complementary.
Zone Setting.
The play area is populated with a recommended nine searchable locations (points of interest). The crew have to live off the land so these need to be searched for food, drink, ammo etc. to sustain the crew for the next game. There are 20 points of interest cards from which the 9 are randomly selected, shuffled and placed as an Incident Deck, the top card being revealed when a point of interest is searched. These cards are nearly all bad news and may spawn a zone hostile within close combat distance, dangerous plants or booby traps. There is a greater emphasis on melee combat than in Zona Alfa.
The objective of the game is to search Anomalies to retrieve artifacts (the recommended goal for a campaign being 12 artifacts). It is recommended that the play area for a game has 3 Anomalies to search. The rules for anomalies are fleshed out and there are options for different area effects if the anomaly search goes wrong – four ways to die. Models can be caught in a gravity force field, electrocuted, blasted or teleported away from the anomaly.
There is no game turn limit, the risk of staying in a dangerous area is handled by zone events. Starting on the second move, and becoming more likely with each subsequent move, there is a risk of a zone event, for example: an energy wave, vermin stampede, security patrol, angry mutant or anomaly movement to ruin your day.
New Stuff
This covers a better way of dealing with wounds than the original rule book, there are new weapons and accessories with better options for melee combat. Zone hostiles can be made more dangerous and the concept of fatigue and obsessions are introduced. In Zona Alfa, progression is covered from Rookie through to Veteran. In Kontraband, crew members can add sixth sense, extra toughness, and an additional skill after a number of survived missions.
Missions and Expeditions.
There are 6 separate mission ideas for pick- up games or to link together to form an expedition and a sample expedition of 5 missions in the rulebook. So whilst waiting for some new figures, I decided to try out the reconnaissance mission.
Here is the table layout with 9 POI (blank dice) and 3 anomalies (Spheres), the crew will enter at the bottom RH corner. Their mission is to search the 4 POI at the corners as a minimum, destroying all Zone Hostiles and retrieving samples from any of the corner POI which contain a hazard. I selected a crew with 3 Stalkers and 1 Scientist.
Turn 1.
For the first turn the crew will check out the POI closest to their entry point, the abandoned farm equipment. Each crew member can have three actions per turn and it’s worth using one action “alert” to provide overwatch for the Searcher. The top card from the Incident deck is revealed.
Here the vermin swarm is spawned by using a D10. The dice roll number is the distance in inches/2 from the POI and the facing gives the direction. The Leader (Nimzo), with the steady hands skill and a red dot sight has one action before the swarm can charge into the nearest model and attack it. They are destroyed.
Had the incident card been a bandit ambush, it’s likely that one or more crew members would have been out of action on turn one, unless crew members are on alert to take pre-emptive action.
The Searcher (Ali) has the scrounger skill so can search the POI twice, He secures rations, water and ammo which the crew will need for the next mission – in the game you have to think about the future as well as the present.
Turn 2
At each turn after turn 1 a D10 is rolled. The die roll is added to the turn number and if the result is greater than 10, a zone event occurs the subsequent turn. No zone event for turn 3.
The crew head up the board and Sukova (a Scientist) is best equipped to search the anomaly, which she does.
Here, a skill roll of 8 would normally fail but Sukova is equipped with a Detector which gives her a +2 bonus and she recovers an artefact, which would count towards a campaign goal.
Turn 3
A zone event, an anomaly shift will take place at the start of turn 4. The crew move up to the top RH corner of the board to search the POI, next turn. This will not affect the crew as they will be out of range.
Turn 4
No zone event is rolled. Spassky (Bounty Hunter) checks the POI – not the best option. The card reveals a zone hazard ‘Spores and Spitters’. He survives one attack and retrieves a sample from the POI.
Turn 5
The zone event roll results in an Alpha Predator entering the board at the start of turn 6.
The crew move towards the POI at the top left hand corner of the board but reserve an alert action to use against the Predator when it enters the board. Where possible, they move into cover, this will give protection against the attacking Predator which has Ranged and Melee combat abilities
Turn 6
An area emission effect will arrive at the start of turn 7
The predator enters, this is a dangerous opponent with high armour value. Ruined buildings prevent a direct attack route and it is forced wide and after 3 movement actions it has none left to attack the crew. It’s the crew’s turn and Ali fires the grenade launcher and scores one wound. The Leader gives him an extra action to get into cover. Spassky with Steady hands and a Red Dot sight on his battle rifle fires at the predator. It takes 3 firing actions but the predator is downed. Spassky is stuck in the open.
Turn 7
The Zone event roll results in another Alpha predator arriving. Things are not good for Spassky. He takes the full force of the Zone emission, he’s pinned and wounded and it takes all his actions to recover. Nimzo gives him an action to go on alert. The rest of the team move round to deal with the Predator when it enters.
Turn 8
The zone event roll brings up another zone emission at the start of the next turn.
The Predator enters, Ali fires a grenade which causes one wound, whilst Nimzo causes another. Spassky lobs a smoke grenade at the Predator which has to take a will check. It rolls a 10. This is an automatic pin and the will failure adds another. It will take 2 actions to remove the pinned counter but the Predator will still be able to attack Spassky once when it emerges from the smoke.
It’s a straight roll off, Spassky has the knife man skill and is armed with a Trench knife. Both adversaries roll a hit. Spassky could use his roll to parry the attack from the Predator but he’s a Bounty Hunter. Both take a wound and the Predator is destroyed.
Ali makes it to the thicket which holds the POI they must search for. Sukova manages to search a second anomaly and grab an artefact before ducking into cover. Nimzo orders Spassky to seek cover under farm machinery. Nimzo joins him there to apply a med kit.
Turn 9
The zone event for the next turn is another Alfa Predator
This turn, the effect of the zone emission is negated because all crew members are in cover. Nimzo and Spassky go on alert whilst Sukova searches a POI, which reveals a mutant.
The mutant spawns 4 inches away from the POI and is downed by Spassky. Sukova retrieves some ‘hotload’ ammo for the crew.
Meanwhile Ali’s search triggers a Zone Hazard – cobwebs.
Ali avoids the effect of the Zone Hazard, collecting a sample and retrieves a Lithium battery, Med Kit and heavy weapons reload. He will need this for the grenade launcher next mission.
Nimzo gives Ali an extra action so he can go on alert and get in position to attack the Predator the next turn
Turn 10
The zone event for move 11 is another zone emission.
The Predator enters but the crew are ready. Ali fires a grenade causing one wound and Spassky finishes it off with two shoot actions, the extra damage from his AS Val battle rifle proving crucial. In their move, the crew race towards the final POI that needs to be searched to complete the mission. They duck into cover to avoid the effect of the emission. Ali moves slower as he is slowed down by the heavy weapon.
Turn 11
The zone event for move 12 is the arrival of a Spetsnaz zone patrol
The zone emission has no effect and the crew continue towards the final POI. Spassky searches the POI – Marsh gas, if he fails the will check, he will fire at the nearest crew member! He passes and collects a sample having an action to clear the board. The rest of the crew follow, Ali needs to take a swig of Electric Juice to give him the extra action before the Zone Patrol enters.
The incident packed game had taken just over 90 minutes, a bit longer to make commentary notes and photos. I really enjoyed the game which adds extra detail to the Zona Alfa ruleset. I’ve played this scenario 4 times now, each game was different and challenging. I’d recommend this game to all players- whether you are a regular player or a sceptic who felt the original game wasn’t for them.
Reflections
Zona Alfa and Kontraband are well supported by the author who has answered any queries or clarification promptly. The Facebook page is an excellent and supportive source for the game, no bitchy point scorers on this site which is refreshing compared to other wargaming Facebook pages I subscribe to.


You must be logged in to post a comment.