A quieter meeting this time, just three games in progress.
Paul and Colin staged a 2mm recreation of the Battle of Waterloo.
French advance covered by skirmishers
Mark J and Tony F were trying out ‘O’ Group with an early WW2 encounter between the French and Germans in 10mm.
German and French Infantry line the hedgesFrench InfantryFrench ArmourGerman ArmourGerman InfantryGermans push back the French right flank
And finally Stephen ran a Stargrave game, with a Valentine’s Day theme. Look out for the Captains’ unbiased reports in a blog post soon.
Some nere-do-wells in the streets of Verona on the planet RomanceThe mean streets of the west side of VeronaCarnage outside the pub.Mariah – the Angel, guarded by Captain Greyfax’s crewCaptain Reynold’s crew passing quietly down a back alley.All is quiet again in Verona
MWS meet on the 2nd and 4th Saturdays of the month (except the 4th Saturday in December) from 10:00 to 17:00 at Linton Village Hall, south of Maidstone on the A299.
Information about the Society, including directions, can be found here.
The diary of planned games can be found here, this is updated throughout the year so please have a look from time to time.
Another good turn out for the second meeting of the year, around 20 members were present with 5 games in progress.
First up we have John L running another naval game, this time in the South China Sea with Emperor Ming taking on Li Chee (the Pirate Queen) using Galleys and Galleons rules.
We then move on to David P running a small Chain of Command 2 game, in 20mm, to introduce the rules to a couple of players.
Former Chairman John ran a 6mm Ancient FOG game with multiple players
Current chairman Mark, together with Dave and Chris put on a Legions Imperialis game using masses of tanks etc.
And finally Stephen ran the third of his trilogy of 173rd Airborne in Vietnam games, Operation McLain, in 15mm. A write up of this game will be appearing soon.
MWS meet on the 2nd and 4th Saturdays of the month (except the 4th Saturday in December) from 10:00 to 17:00 at Linton Village Hall, south of Maidstone on the A299.
Information about the Society, including directions, can be found here.
The diary of planned games can be found here, this is updated throughout the year so please have a look from time to time.
Maidstone Wargames Society held their first meeting of the year on Saturday. This meeting includes our AGM so often has a good turnout.
Around 24 members were in attendance for the meeting. The AGM was, as usual, short, only around 30 minutes. Also, as usual, the existing committee was re-elected without opposition. Despite the chairman’s pleas to be released!
There was also a very good turnout of games, covering a variety of scales, periods of genres, here’s a short photo round up.
John L brought out his 1:1200 Baltic Galleys for some Naval action.
Another naval game, but a few centuries later and under the water rather than on it, Peter M staged a 1:100th Stingray game, “Anything can happen in the next half hour“.
Paul and Colin brought out some 3mm Ancients for some FoG games.
Tony G and Stephen both fielded Anglo-Saxon warbands for some 28mm SAGA games.
Some more recent conflict now, some late WW2 Chain of Command action staged by chairman Mark J with 28mm vehicles and figures.
And last, but by no means least, Tony F and Phil staged a battle from the Lord of the Rings, again in 28mm.
That’s it for the round up of the first meeting of the year.
MWS meet on the 2nd and 4th Saturdays of the month (except the 4th Saturday in December) from 10:00 to 17:00 at Linton Village Hall, south of Maidstone on the A299.
Information about the Society, including directions, can be found here.
The diary of planned games can be found here, this is updated throughout the year so please have a look from time to time.
Stout Hearts, The British and Canadians in Normandy 1944 by Ben Kite.
Review by Mark J
I have been a lover of books for as long as I can remember and very much love the fact that books really help me play better games on the tabletop. The research part of our hobby is one of my favourite parts. Learning about a battle, campaign and the men and women that fought brings the historical game narrative to the tabletop.
I’m always on the lookout for a good book that helps me create and run better games. Ben Kite’s Stout Hearts fits the bill perfectly. Easy to read, covering British and Canadian armed forces that fought to liberate France in 44. I’ve used this book to create an Op Bluecoat game at the club next year. Here’s my take on the book.
Stout Hearts is an impressive, deeply researched analysis of British and Canadian operations in Normandy, offering a refreshing counterbalance to long-standing myths about Allied performance. Ben Kite blends operational history with tactical detail, drawing heavily on primary sources to show how units fought on the ground. His writing is clear, measured, and avoids the polemics that so frustratingly often colour Normandy historiography.
Kite’s great strength is his ability to contextualise British and Canadian actions—explaining doctrine, logistics, training, and the battlefield environment—to illustrate why commanders made the choices they did. The book challenges the idea that the British and Canadians were slow or lacking aggression, showing instead a professional and adaptive army grappling with a formidable German defence and extremely difficult terrain.
While occasionally dense due to its technical depth, Stout Hearts is accessible and is packed with valuable insight for wargamers, military historians, and anyone interested in the Normandy campaign. One of the most balanced and authoritative studies of Allied performance in 1944 I’ve read in a long time.
If you want to view the book on Amazon you can find it here. The club earns a small referral if you purchase it which we put towards our website fees.
Jeremey is on holiday this week, so he’s left Tony the keys to the WIP Wednesday post…
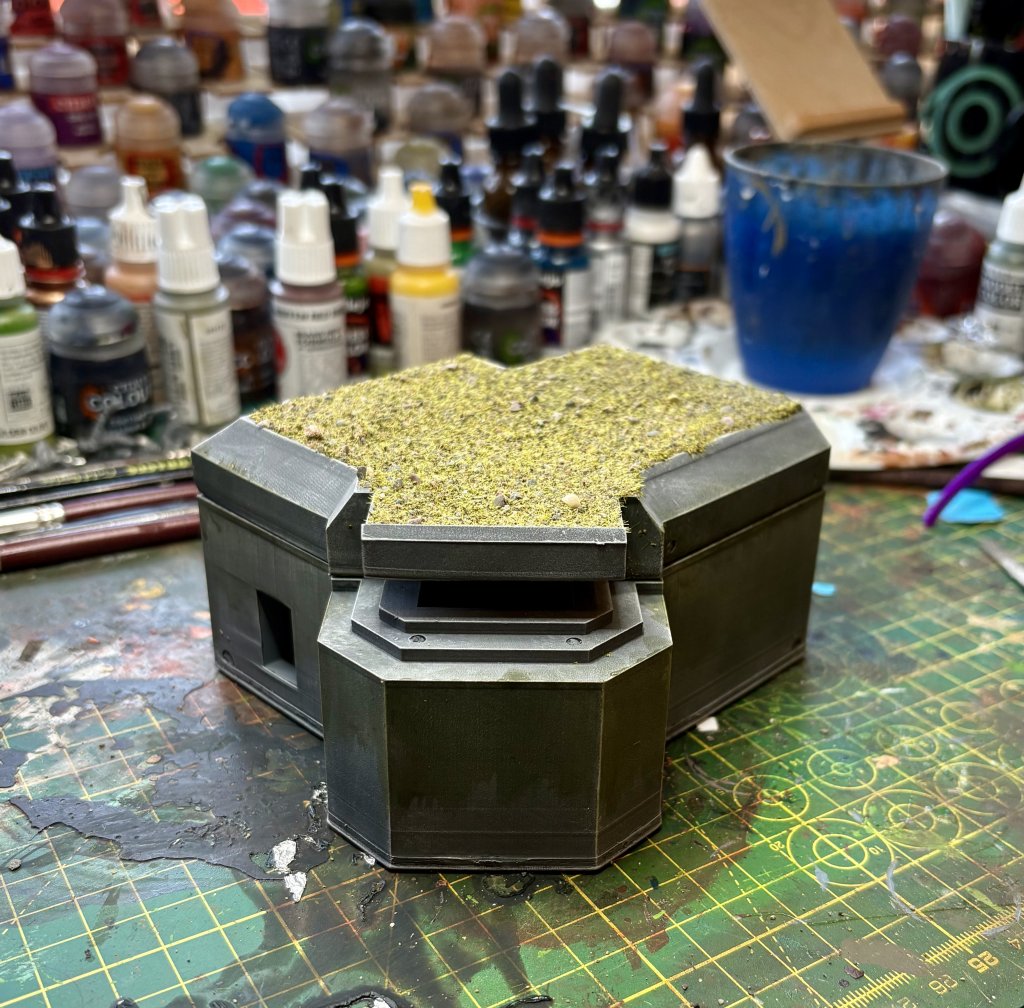
We’ll start off with Chairman Mark’s fine collection of 28mm Shermans that he’s been working on for a while, building up towards a big Nijmegen game later this year. There’s been a bit of rivalry at the club over who has the biggest Sherman collection – we suspect Phil is still ahead, with Dave also a strong contender, but Mark’s catching up…
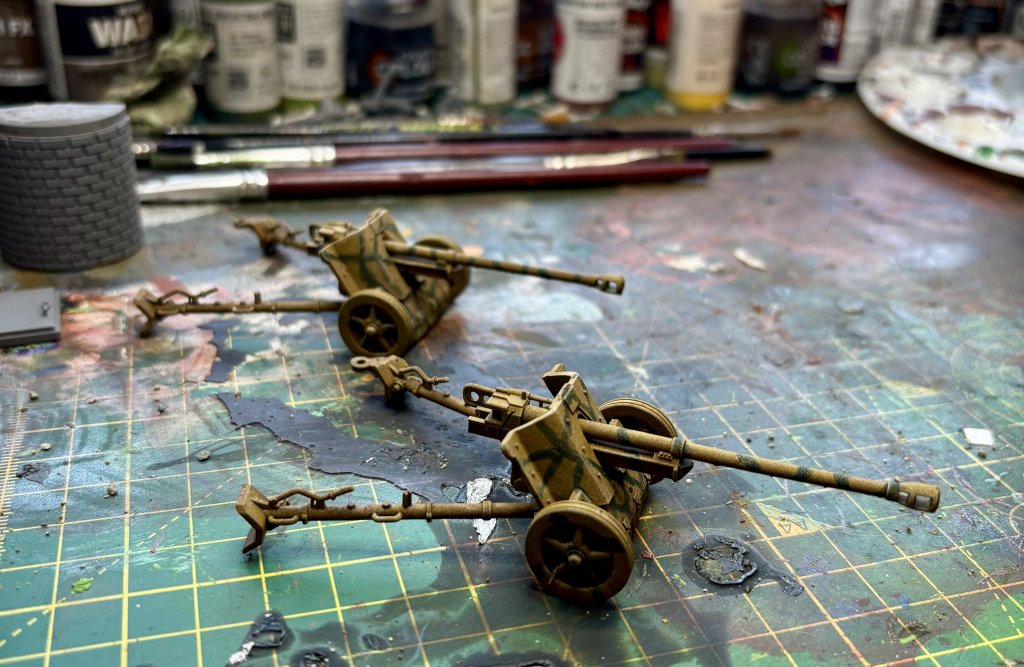
He’s also added a British half-track (likely an M5) and Daimler armoured car, a German bunker and some anti-tank guns (type unspecified, but some internet research points at them being 50mm Pak 38s).
Eric has been turning yet more Matchbox cars into wasteland warriors for a Gaslands game with all manner of add-ons and accessories. The one on the right with exposed wheels looks especially cool.
Stephen has made some 15mm objective markers for Vietnam games, which should also serve for WW2. I suspect a few of us will be hunting for those in an upcoming game of Charlie Don’t Surf.
And finally, I quickly turned out some individually based figures to act as Big Men (NCOs and officers) for a game of TFL’s Quadrant 13. They’re only 6mm, so really they should be Little Men. Or Little Big Men ?
Jeremey will be back next week, you’ll doubtless be pleased to hear !
Colin, John Le and Paul L had a try out game of the new Eisenhower rules from Sam Mustafa. The rules were released earlier this year and are ww2 strategic / operational in scope.
Players control up to 6 divisional formations across a table representing a ground scale of 24 by 16 miles.
Our game was a home brew eastern front Barbarossa type scenario pitching 2 Panzer divisions and a motorized infantry division against a Soviet defence of 2 infantry divisions with a reserve tank corps.
The armies were made up from 2mm Irregular ww2 models with bases of 4x4cm representing battalion strength units.
The table is gridded in 6×6 inch squares and this controls placement and movement of the units.
This works well for this scale of game where the players represent corps commanders. At this scale its not mm placement of units which count but key decisions such as which areas of the front are you attempting to break through in, which units are you structuring your offensive with and are your reserves in the correct position based on the timescales of the offensive.
The rules feature a number of innovative mechanisms including an objectives based victory point mechanism where the objectives move once they are secured so ensuring a dynamic game of movement for the two sides, each of which takes the role of strategic offensive or defensive.
The time period represented in the game is between 4 to 6 days with each day consisting of separate rounds which allow formations to move and combat across the table. At the end of each day is a night phase where supply is checked with potential attrition of units. Exhausted units can also be recovered to a worn status.
In our game we had the Soviets dug in with prepared positions across the table. The panzer divisions lead the attack with mixed success in achieving objectives early on and forcing a breakthrough. We ended up concluding that in our scenario the Soviet reserve tank corps was too powerful when placed on the table at the outset. A more balanced game would probably be achieved by holding it as reinforcements off table which is catered for within the rules.
Future scenarios we will explore include France 1940 and a Normandy amphibious landing.
Alan takes us through a big game of Chain of Command set in France 1940.
The purchase of a Cigar Box Battle river mat on eBay sparked thoughts about the interesting challenges of a game with one side having to make a strategic withdrawal across a river and the other trying to seize the crossings.
This led to the purchase of not just one, but two bridges from Sarissa Precision, a road and a rail bridge. The latter then led to building the track to go with it and then a station. To make the game work it needed to be big both physically (a 12 foot by 6 foot table) but also from a Chain of Command perspective; this meant at least a company a side. This was the result.
It saw a rag-tag French outfit as the defender facing a determined German company supported by a platoon of tanks. The French were made up of a platoon of Foreign Legion and a platoon of Tirailleurs Sénégalais on one side of the river, needing to withdraw across the bridges and a Motorcycle platoon holding those bridges. The French also had some support in the form of an anti-tank gun and some engineers in a truck – the latter to demolish the bridges before the Germans could capture them intact. Along with two Bouteilles Incendiaires, two roadblocks and a couple of full Chain of Command dice for the withdrawing troops, this was the defending force. The Germans, in addition to their infantry company and tank platoon, had an Adjutant, a Pioneer team in a Kubelwagen, a SdKfz 222 armoured car, an infantry gun and a truck with four rubber boats. It wouldn’t have been an early war game without a Shabby Nazi Trick – the German players selected a fifth column sniper (Jean-Claude). We played through the patrol phase which saw some interesting jockeying for positions around the buildings on the German side of the board. With jump off points then positioned we were ready for the meat of the game.
The Foreign Legion were covering the French left flank and the Tirailleurs Sénégalais on the right. The Germans began their advance with the platoon on their right flank making serious progress until they encountered the Legion. The other German platoons soon found that the Tirailleurs weren’t going to be easily dislodged and put them under heavy concentrated fire. The roadblock constrained the easiest route for their Panzers and so the main armoured advance was through the farmland to the right of the road.
Repeated exchanges of fire were telling on the French forces as they tried to hold the Germans long enough for their engineers to deploy and mine the bridges.
Eventually they began to fall back but not before taking serious casualties. Meanwhile Jean-Claude who had been placed in the church tower (it’s traditional!) was causing the French some unexpected problems.
With the French C-in-C desperate to blow the now mined bridges he ordered a full withdrawal but this was easier said than done with the Germans covering most of the routes to the bridges.
The Tirailleurs were aiming for the road bridge but when they got there the C-in-C ordered them to switch to the distant rail bridge so he could blow the former.
Meanwhile the German pioneers were making heavy weather of destroying the roadblock and the motorised elements of the German force were still held up as a result.
In the end only a single Legion section got to safety before the second bridge was blown and with neither side having been able to meet their victory conditions we declared the game a draw.
Society member Stephen kicks of our posts for 2025 with a WW2 game of Crossfire.
During the Festive period I decided to have a non-Festive WW2 game using Crossfire rules.
It was a late-war Eastern Front game with the Russians on the attack. Each side had a company which comprised three platoons with a company HQ and machine gun. In addition, since the Russians were attacking, I gave the Russians an extra SMG platoon. I made these veterans (an NKVD unit, no doubt) and decided this platoon’s command bonus would help in both close combat as well as morale (obviously led by a commissar – usually Russian commanders only assist in close combat). Since it was a late-war game, to reflect the change in training and doctrine the Russian army went through, I also decided that Russian squads could end movement out of line of sight of platoon commanders but still had to start movement within LOS as usual (normally, Russian squads have to start and end movement in LOS). This reflects the Russian adoption of the British and American structure they went through when the Russian army went on the attack.
The battlefield was set up as follows:
The Germans deployed on table with all units deployed north of the east/west road. The two large barns and the railway station were big enough to accommodate three squads. The other houses and the chapel could only accommodate two squads.
The Germans put their first platoon in the easternmost barn. In the house looking south down the road was the German company command and machine gun – this would make it very risky for any Russian squad trying to cross that road. In the big barn in the middle went the second German platoon. The final German platoon deployed with one squad in the chapel and a squad in each of the wooded areas either side.
The Russians would deploy by activating from the southern edge.
Each side would gain 1 Victory Point for each enemy squad/machine gun killed. The first to 7 VP would be declared winner.
This was obviously going to be a difficult job for the Russians. The sides were more or less equal (Russians with four platoons and the Germans with three) but the Germans had the advantage of being in defence and set up in protective cover.
Right then, on with the game.
The Russians started activation by bringing on their first platoon and occupying the sunken ground on the extreme left. Second platoon came on and took position in the adjacent woods, and the third platoon came on and took cover behind the fence that ran alongside the wheat field. The plan was for the Russians to attack on one flank where they could concentrate their firepower and force the Germans to break cover or risk being rolled up. The Russians held the NKVD sub-machine gun platoon and the company HQ with HMG back – these were due to deploy on the right.
Initiative still lay with the Russians and so the platoon in the sunken ground made a group move to advance across the rail track and into the woods in front of them. At this point the Germans opened up with Reactive Fire. Using a coordinated crossfire, the German first platoon in the woods and chapel let rip – a series of Pinned results ensued but no Suppression, so the Russians maintained initiative. The Russian platoon decided to return the favour – they Pinned the German squad in the woods on the left but also failed to cause a Suppression. This meant they lost initiative and it switched to the Germans.
With all the action taking place on the western side of the battlefield the Germans decided to advance one of their platoons: those on the right, in the other barn, crossed the road and rail track and took up position in the woods. The German first platoon chose to keep up the pressure and poured more fire on the Russians in the woods. They caused a Suppression, so carried on firing, hoping for a kill on the Russians. But they failed to cause another Suppression which meant the initiative switched to the Russians.
The Russians did two things. Firstly, they brought on the NKVD platoon, which came on at the extreme right in the sunken ground there. They also decided to advance their third platoon across the wheatfield into cover behind the fence overlooking the rail track. At this point the German second platoon, in the barn opposite, engaged them with Reactive Fire. Not only that, but the machine gun also had line of sight and fire arc to the Russians in the field. This would be a lot of Reactive Fire. The machine gun was firing independently and fortunately scored a Suppression, meaning the Germans could carry on. The Germans in the barn shot as a firegroup but only caused Pinned results and so initiative went back to the Russians. But the Russian platoon had taken a lot of fire and all squads were either Pinned or Suppressed.
Both Russian platoons that had advanced found themselves with their heads down – all Pinned and Suppressed. So the Russians needed to start putting the pressure on elsewhere. They did this by bringing on the company HQ and machine gun. These took position on the edge of the fence by the farm. The German platoon in the woods on the right had line of sight and took Reactive Fire, but failed to score even a Pinned result – squads failing to score at least a Pin are marked No Fire (NF) and are unable to conduct any more Reactive Fire during that initiative. This gave the NKVD squad a chance – since they would receive no Reactive Fire they could charge forward and try to engage the German platoon in close combat! Being SMG armed and veterans would give them a bonus. So that is what they did. And it paid off very well indeed – the NKVD over-ran and eliminated the German platoon!
The Russian Company Command and machine gun moved into the first of the farm buildings. What they needed to do next, though, was try to rally some of their squads. However, failing a rally roll also means initiative is lost. As it happened the platoon in the wheatfield managed to rally all its squads, whilst the platoon in the woods on the left managed to rally one squad but failed the others. So initiative once more went over to the Germans.
The loss of the German platoon to the SMG platoon really blunted the German options. The other two platoons had little choice but to dig in and see what they could do. As such, both platoons were organised into firegroups and crossfires to make the most of what they had. The Germans in the barn once again Suppressed the Russians in the wheat field but the platoon in the woods and chapel could only cause Pins on the Russians in the wood so they lost initiative.
The Russian second platoon which, up to now, had remained ensconced in the woods behind the railway station were given the order to move up – by bringing the whole Russian company into line it would spread the German fire. As a group they moved into the railway station and took Reactive Fire from the Germans in front of them – the Germans causing Pins on each of the Russian squads!
Now, by causing a Pin a squad may continue Reactive Fire, but should they fail to cause a Pin then they may no longer do Reactive Fire during that initiative. So the Germans could carry on with their Reactive Fire, hoping to Suppress and steal initiative. But they’d seen what could happen if they get a No Fire marker and are charged. So rather than continue Reactive Fire they chose to hold back and allow the Russians to continue with their activations and maybe another opportunity to react may present itself.
The Russian company command and machine gun chose to move up to the next farm building which brought them directly opposite the German company command and machine gun. And these decided to do Reactive Fire against the Russians – causing a Suppression and taking initiative away from the Russians! So the German machine gun kept on chattering away, this time turning to the NKVD platoon in the woods in front of them – a kill! One of the NKVD squads was off. The Germans decided to make the most of their firing so the platoon in the barn resumed fire against the Russians in the wheat field – another kill!
Things were starting to improve for the Germans.
But not for much longer – they attempted more fire against the Russians in the station but failed. Initiative went back to the Russians. There then followed an extended exchange of fire between the Russian and German machine guns – one side would fire, fail and initiative would switch, and this went on for several rounds, changing initiative after just a single activation. This ended up inconclusive. Occasionally one side or the other would be Pinned or Suppressed, but then rally this off and resume firing.
Something needed to be done.
Then during one activation the Russians Suppressed the German machine gun and decided to advance the NKVD platoon into the barn on the opposite side of the road on the right. But as they moved into the open crossing the road the German squads further down opened up with Reactive Fire. Being in the open was never going to go down well and one of the NKVD squads was killed and the other Suppressed! The Germans took initiative, rallied their machine gun, which opened fire on the Russian machine gun and…eliminated it!
Victory Points were now equal – 3 each. If the Russians were going to win they would have to think of something daring. For the time being, though, it was still with the Germans who continued with their fire against the Russians in the station, but a failure to Suppress soon meant it went back to the Russians.
Close Combat is very decisive in Crossfire – a simple win means the opposing squad/s are destroyed. So the Russians looked to bring things to close combat since they had advantage of numbers on the left. The Russian platoon in the woods on the left opened up on the solitary squad beside the chapel, causing a Suppression. With that, they decided to go for it and charged across the road with guns blazing.
As soon as they broke cover the Germans in the chapel opened up with Reactive Fire. They scored a Pin against the first squad meaning they could carry on, but failing to score any more hits meant they received a No Fire marker and the other two Russian squads charged the Germans with the inevitable result – one dead German squad. With their blood up, and a No Fire marker on the Germans in the chapel, they kept up the momentum and sought to charge the squad in the chapel. However, they could only get one squad against them (remember, the chapel has a capacity of two squads and there was already a German squad in there), which meant it was an even combat and on the dice roll. Which favoured the Russians! Another German squad gone.
The remaining German squad of this platoon, in the woods to the right of the chapel, used Reactive Fire on the Russian attackers and scored a Suppression. With initiative, what could the Germans do? Truth be told, they didn’t have many options. The machine gun opened up on the Suppressed NKVD squad and killed it. Victory Points were now 5 to the Russians and 5 to the Germans – still tight. The German machine gun then turned its attention to the Russian company command but failed to score a hit.
So what could the Russians do? They decided to see if they could Suppress the Germans in the barn. They did even better than that and killed one squad. With a platoon in the railway station and another moving up through the woods and chapel, they decided to bring things to a close. The platoon in the station opened up at the German squad in the woods and caused a Suppression – this was what they wanted and made a charge against the Germans. The platoon in the station fixed bayonets and moved out. They drew Reactive Fire from the Germans in the barn and found themselves Pinned down by the roadside! So the Russian squad in the chapel, under cover of the woods, made a final charge against the Suppressed German squad.
And that was that. The German squad was killed which meant the Russians had reached their Victory Points – 7 German squads eliminated.
It had been a very close game and a very enjoyable one, and the Russians had won.
Stephen presents a comparison of three different WW2 rules.
I’m only an occasional WW2 gamer. Probably not even that often. I often tussle with what rules to use because I’m not sure what kind of game I want. Generally, I’m more interested in the infantry experience, but WW2 is all about the tanks as well, isn’t it?
So what I’ve decided to do is have a game with the three sets of WW2 rules I have – Crossfire by Arty Conliffe, Battlegroup by Warwick Kincaid, and Fireball Forward by Mark Fastoso and Jonathan Miller. To test the games I have decided to play exactly the same scenario with the same forces to see how it goes.
Scenario
To give a true compare and contrast between the rules all games will use the same layout and the same forces (more or less), a German company with machine gun support and a Russian company with mortar support.
The games will be small ones, on a 3’x2’ board. To the south east is a farm with a road running north/south and a junction heading west. Wheat fields lie either side of the western road. To the north east and south west are areas of light woodland. In the north west there is an area of high ground.
The Battlefield
It is August 1944 somewhere in east Europe. Stalin has launched Operation Bagration. The Germans are on a strategic withdrawal in the face of a Russian advance. The German armour is making its way south, down the road, so it can turn west back to Germany. The Russians are coming from the south east. Both sides need to capture the farm and the road junction – so the Germans can get their tanks to safety, and so the Russians can stop them! A German infantry platoon has been sent to capture the objective, just as a Russian scout platoon arrives on the scene…
Game #1: Battlegroup
As written, Battlegroup uses individually based figures. But mine are based in 3s. This is easily dealt with by adding wound markers. Each player’s battlegroup is composed of ‘units’ (e.g. a squad of infantry). Each unit will add to the Battlegroup’s Battle Rating. During the game a player will have to draw a token from a bag after certain events (e.g. a unit is destroyed, or you try to unpin units, plus other events). This token could have a numerical value (from 1 to 5) or be a special event. When the numbered tokens add up to the battlegroup’s Battle Rating it is game over.
Germans take cover by a wheat field.
The Russians went first. At the start of each turn the player rolls one or more D6s (depending on the size of the game) and adds one for each officer. This total is the number of units you can activate this turn. This means you won’t always be able to activate everything every turn. I like that – it creates tension and decision making.
The Russians advanced north along the road and west behind the wheat fields. In response the Germans advanced – one squad with MG34 went into the wheat fields and the other two squads advanced toward the two areas of woodland. To activate a unit you must choose from specific orders. These include moving and firing, firing and moving, double move, double fire, plus many others (e.g. calling in mortars). One such order is to put your unit on reactive movement or reactive fire, which occurs in your opponent’s turn.
Russians advance past the farm.
The Russians moving behind the wheat field held in place and went on reactive fire (wondering what one of the German squads would do). The Russian Maxim gun attempted to open fire on the other German squad in the other piece of woodland. To open fire first you must roll to spot. This seems to be the case even if you have previously shot at a unit (the wording certainly implies this is the case), the rules highlighting how seldom opposing enemies saw each other, especially when trying to keep low and out of sight themselves. Once spotted you then total up all the figures firing – each weapon has a ROF and this is the number of dice rolled. Chance to hit is based on range and ROF. The target then makes a save roll (based on any cover). Remaining hits are then taken as casualties and a morale roll is taken which could be anything from OK, to Pinned, to Rout. Standard stuff.
The Germans were starting to encircle the Russians, holding both areas of woodland and also the wheat fields in the centre. Then, on the Russian turn, the Russian officer called in some mortars. This caused two German casualties and the Germans failed their morale and went pinned. A pinned unit can take no action at all and stays pinned until rallied. To rally a player must draw a token from the bag. For each token 1D6 pinned markers can be removed. I drew a token and pulled out a 3 – a significant number for a game as small as this. The German MG34 decided to return the favour and opened up. The Russians took casualties and also got a Pin result. But on the Russian turn I decided to leave them pinned (you don’t have to rally) for fear of drawing a bad token.
The Russians in the fenced field have taken casualties and one unit is pinned.
The Germans had taken more pinned markers, which I had to try and rally or else they’d sit there doing nothing.
Germans have taken casualties and are Pinned, but they drew a “Beyond the Call of Duty” token.
But this time I drew a special marker: Beyond the Call of Duty. Not only did the pin marker come off, but it came off without any harm to their Battle Rating. The Beyond the Call of Duty marker allowed them to make a roll to see if they could take an extra activation. They failed. But at least they were no longer pinned.
Ultimately, it would be a Russian victory. The Germans found themselves taking shelter in the woods and with Russian mortars falling they soon took enough casualties for game end.
Game #2: Crossfire
A confession: I’ve played Crossfire quite a few times. Models in Crossfire are based in multiples, with 3 on a base for a squad. It’s pitched at company level infantry actions, which is precisely what I’m interested in.
Russias occupy the farm, but some are Suppressed.
So Crossfire has some key concepts – no fixed turns (units can keep activating, multiple times), no ranges (if you can see it, you can shoot at it), no move distances (I’ll say a bit more about this). The core mechanics are very simple though – when shooting you’ll roll a few D6 and need a 5 or 6. One hit is a Pin, two hits a Suppression, 3 hits a Kill. Not rocket science.
Germans brace for the Russian advance.
The game started with the Germans on the high ground. The Russians came on by activating. You can either move them by individual squads or you can do a group move. So I brought the first Russian platoon on, behind the barn. I put the mortar observer in the barn where he’d have a good view. And so on. In Crossfire units move in straight lines. Players have to indicate to their opponent the route they are taking and if an enemy squad can draw LOS it can make a reactive fire. If the reactive fire fails to Suppress then the active player can carry on. If it does Suppress then initiative switches. Units move from terrain piece to terrain piece (or into the open). All the time they have initiative they can activate again, even with the same unit.
Russians advance screened by smoke.
The Russians moved up to the western road with two of their platoons whilst the Germans came off the hills to take cover behind the wheat fields. The Russian FO then called in smoke to obscure the Russian advance and the Russian squads moved up behind it. The Russian Maxim MG took up position in one of the farm buildings to prevent a German flank attack, it opened fire on the Germans but failed to score a hit.
Over to the Germans.
With little to stop them the Germans made their way along the top of the battlefield and into the woods, where they engaged the Russian Maxim. The MG crew attempted reactive fire but failed to score a hit which means they would be unable to do any more reactive fire until after initiative switches, so they are marked with a No Fire counter. The Germans opened up.
Russian Maxim gun team are Pinned, and may Not Fire until initiative changes hands
Things were a bit slower along the western road, with neither side daring to break cover. One of the Russian platoons dug-in and the German machine guns repositioned. Meanwhile the attack on the farm buildings was going well for the Germans – they destroyed the Russian MG and moved up to occupy the buildings. To counter this a Russian platoon moved into one of the wheat fields and a prolonged firefight broke out, but the Russians finally managed to dislodge the Germans from the farm.
The game would end as another Russian victory! This game had been a lot more dynamic and fast-paced – one of the advantages of Crossfire. It had been more tactical as well (compared to the line ‘em up, face each other, and start shooting affair of Battlegroup). This is the real advantage of Crossfire – you start to think like an infantry commander – laying down smoke for cover, trying to organise squads in to firegroups or the eponymous crossfires, when to react, when to rally…lots of decision points. That’s where the complexity lies in the game, in the tactics. Very enjoyable.
Game #3: Fireball Forward
OK, let’s deal with the elephant in the room. The dice. If you know anything about Fireball Forward it’s the whole dice thing. So here’s how it works. To shoot you will be rolling some white D6 and some red D6 (for infantry squads it’s actually one of each). And you will also be rolling a range dice (a D20 for infantry). The red dice hits on a 6. Only a 6, and it’s never modified. The white dice can be modified and will hit on either a 4, 5, or 6. Then we come to the range dice. A weapon has an effective range (e.g. 10”) PLUS what you roll on the range dice – so for infantry squads it could be up to 30” (10” plus you roll a 20 on the D20). You do not pre-measure! So after rolling, if the range is higher than the effective range plus the range dice you have missed regardless of what you roll on the white/red dice and if the target is within the effective range plus range dice then there’s the chance of a hit – check the white/red dice. If the actual range is less than the D20 roll you get a +1 on the white dice.
Russians open up, if the range to their target is <=13″ they’ll score a hit with the 5 on the white die.
That sounds more complicated than it actually is. It only gets messy when you are dealing with weapons with range dice like D20D20D8.
You are either going to get on with this or you aren’t. It’s a marmite thing. Like I just said, it’s not as bad as it sounds like it could be, so long as you restrict yourself to predominantly infantry actions with just a few different armoured vehicles.
Russians about to be outflanked.
Movement is also a bit novel. Infantry can, in theory, have an unlimited move. But what they can’t do is finish their move, nor can any part of their move, take them more than 12” from where they started. The player must trace the movement route so the opposing player can announce if and where he can make an opportunity shot.
These are the two big Fireball Forward things and I wanted to get them out in the air at the beginning.
For initiative you need a pack of playing cards. You draw a card and keep drawing until a different colour comes up – you put that card back on top of the deck. You check how many cards you have and then you mark your units with a number and activate them in that order – lowest first. So let’s say I draw 3 red cards and the fourth is black. The black card is put back. I have three red cards which means I can now activate three Allied units. Once all units, of both sides, have activated a new turn begins. What’s really good about this is that both players are involved at all times and there’s always a chance you can salvage a bad situation.
German machineguns about to fire.
I realise I’ve spent more time discussing mechanics than actual game play, but that’s OK – after all, this is about letting you know about these very different sets of rules. I bet those of you who are into rules writing and game design will enjoy reading Fireball Forward.
So let’s deal with the actual game. This one turned into a much harder fought encounter. Both sides used more or less the same tactics as previous games – the Germans moved along the northern edge into the woods and then tried to force their way south, down the road, into the farmyard. Meanwhile, the Russians advanced along the southern edge, behind the wheat fields, hoping to outflank the Germans.
This time the Germans were more successful. They eliminated the Russian platoon occupying the farm and then moved in themselves. The German machine guns halted the Russian advance down the western road and brought up a platoon through the fields to outflank the guns. Meanwhile, the Germans in the farm pressed the attack and came round behind the Russians to launch an attack against the Russian company command and Maxim gun. The Germans finally achieved a win!
Russians move past the farm.
Conclusion
I’m not going to offer scores or say which is best and that kind of thing. Instead I am going to say how they suit me and my gaming – in a club setting with multiple players on a Saturday.
Battlegroup is a very ‘traditional’ game. By that I mean it is an IGOUGO system with nothing particularly ground-breaking mechanics wise. I don’t mean that negatively. If you have several players, none of whom have played Battlegroup before (or even WW2), then they will pick it up soon enough. Which is what you need in a club. It’s also aimed at being a ‘big’ game – with combined arms. Battlegroup, as the name suggests, is about lots of infantry and armoured columns having at each other. The simplicity of the rules does mean it has less subtlety or tactical finesse and I imagine it could get a bit vanilla, but that also suits group play.
By contrast, Crossfire is a game for the gamer. It may be the oldest of the three but it’s also the most innovative. It’s really aimed at infantry-only games. Yes, there are armoured vehicle rules, but they do seem a bit tacked on and the rules writer himself admits they aren’t the best. And they aren’t. Fortunately for me, infantry actions are what I’m most interested in, so I don’t play Crossfire with vehicles. Although it’s a simple game, the novelty of some of the processes will take a bit of getting used to for a newcomer. The game mechanics are very simple, but the tactical choices and options are what make it complex – the mark of a good game! A one-on-one game with someone new would be a good way of introducing the rules and be a real pleasure. Crossfire is my go-to WW2 rules. If you are inclined to the tactics and experience of the infantry commander then you could do a lot worse.
This leaves us with Fireball Forward. Like Crossfire, it has some innovative components, particularly the dice mechanism. Like Battlegroup, it is also about combined arms and integrates vehicles into the rules in a better way than Crossfire. But I have to underline the dice mechanism. It reads worse than it plays. In practice, you roll the hit dice and range dice at the same time, and I found myself looking at the hit dice first to see if there was even a chance of hit. This made it playable and you will pick it up in just a couple of turns of combat. This is OK so long as you aren’t dealing with too many varieties of range dice. Infantry will, generally, be using a D20. Though some vehicles will use a tortured combination such as D20D20D8D8. No. Just no. As such, for my money Fireball Forward works somewhere between Battlegroup and Crossfire – mainly infantry actions with two or three vehicles in support. Which is what I’m looking for.
There’s a place for all these rules. What you go for will depend on what you are looking for. They all provide a different kind of game and they all provide a good game. You won’t go wrong with any of them, but I think I will mostly be sticking with Crossfire (with the odd game of Fireball Forward).
Oh, one last thing. Yes, I have heard of Chain of Command. Yes, it is a very good game. But I don’t own a copy.
Our 2024 Open Day is just over a month away and there has been lots of progress on this years games. The Open Day is on the 22th June this year. We’re open to the public from 11am – 4pm on the day.
This is a great day to come and see the society in action and maybe throw some dice at one of the various games we will have on the day.
This year we have a good selection of games, which might just be the incentive you need to either get back into the hobby or to find a new home for your own armies and games.
We will have a game of Barons War complete with scratchbuilt castle.
There will be a game of Project Z for some post-apocalypse fun!
The Elephants will be on the rampage in a battle between Romans and Carthaginians
The Soviet/Afghan war will also be covered this year
Along with a big World War 2 battle somewhere in Europe
And last but not least the magical treefolk will be fighting their ancient enemy the rock warriors in an entirely scratchbuilt fantasy game.
Details of where the club meets and location of the Open Day can be found on our About the Society page.


 Players control up to 6 divisional formations across a table representing a ground scale of 24 by 16 miles.
 The armies were made up from 2mm Irregular ww2 models with bases of 4x4cm representing battalion strength units.
 The rules feature a number of innovative mechanisms including an objectives based victory point mechanism where the objectives move once they are secured so ensuring a dynamic game of movement for the two sides, each of which takes the role of strategic offensive or defensive.
 In our game we had the Soviets dug in with prepared positions across the table. The panzer divisions lead the attack with mixed success in achieving objectives early on and forcing a breakthrough. We ended up concluding that in our scenario the Soviet reserve tank corps was too powerful when placed on the table at the outset. A more balanced game would probably be achieved by holding it as reinforcements off table which is catered for within the rules.
 It saw a rag-tag French outfit as the defender facing a determined German company supported by a platoon of tanks. The French were made up of a platoon of Foreign Legion and a platoon of Tirailleurs Sénégalais on one side of the river, needing to withdraw across the bridges and a Motorcycle platoon holding those bridges. The French also had some support in the form of an anti-tank gun and some engineers in a truck – the latter to demolish the bridges before the Germans could capture them intact. Along with two Bouteilles Incendiaires, two roadblocks and a couple of full Chain of Command dice for the withdrawing troops, this was the defending force. The Germans, in addition to their infantry company and tank platoon, had an Adjutant, a Pioneer team in a Kubelwagen, a SdKfz 222 armoured car, an infantry gun and a truck with four rubber boats. It wouldn’t have been an early war game without a Shabby Nazi Trick – the German players selected a fifth column sniper (Jean-Claude). We played through the patrol phase which saw some interesting jockeying for positions around the buildings on the German side of the board. With jump off points then positioned we were ready for the meat of the game.
 Repeated exchanges of fire were telling on the French forces as they tried to hold the Germans long enough for their engineers to deploy and mine the bridges.


You must be logged in to post a comment.