Battlezone! Futuristic warfare from 1980.

Coming to gaming shows throughout 2025:
Cavalier – February 23rd
Salute – April 12th
Broadside – June 14th
Pete M describes an underground encounter in Middle-Earth.
The scenario is based on the encounter at the dwarf king Balin’s tomb, where the nine members of The Fellowship are trapped while making their way through the old underground Dwarven Kingdom known as the ‘Mines of Moria’, a massive complex of caves, tunnels & chambers, hewn out of the living rock itself!!! Sorry, slipping into Pythonesque ‘Tim The Enchanter’ mode again there…. Unfortunately, soon after discovering the tomb the party is discovered by the new tenants, namely a shed load of Goblins/Orcs & orcs, assisted by the odd mountain troll and a very, very grumpy Balrog. The objective is simply to hold-off the hordes until Gandalf secures a means of escape – to the fateful Bridge at Khazad-Dum…

As with the previous outings (see credits), the home-grown system is partly based on the excellent but now sadly difficult to find Hasbro boardgame “Star Wars Epic Duels” (see links at the end). The key features of this design are that each player controls a small team, with one main character (say, Darth Vader), plus one or two little helpers (Stormtroopers in Vader’s case). Normal movement is fairly standard, although some variability is introduced by means of a die roll. However, the design really scores because teams also get a dedicated pack of cards which are used for both combat and any unique ‘special abilities’ – such an elegant, simple way to reflect widely varying attributes, and without resorting to thick books of charts and +/- tables!
The use of the dedicated card packs adds so much to the ‘period flavour’ of the game, hopefully reflecting the different combat options and other unique actions of the various Fellowship, Goblins/Orcs & the Troll. For example, the Goblins/Orcs can gain advantage by deliberately sacrificing figures in massed attacks or simply ‘shoving’ (the ‘active’ group drags one or more adjacent ones with it); whilst the Fellowship archery and spear-throwing are deadly. And whilst your immediate choice of tactics may be affected by the cards in your hand, like any ‘real’ historical combat, victory will go to the side which can maximise their peculiar advantages whilst exploiting the weaknesses of the enemy.
“Mines of Moria” was perfect for a straight adaptation of this team-based, low-figure count approach, with the four main players each handling one main character (Aragorn, Legolas, Boromir or Gimli) plus one Hobbit (Frodo, Sam, Merry or Pippin). As with previous games, having no cards at all left in your hand if confronted by a bunch of Goblins/Orcs etc could be bad news – but the Hobbits could also prove useful given their special abilities. And unlike previous games, the action this time is very claustrophobic, taking place within the confines of the tomb chamber. But this this does not mean it is any less intense, as nuanced tactical considerations of blocking, retreating, counter-attacking are just as vital as any big battle.

Each turn consists of two phases per player, movement then two actions (Fellowship can do in any order, Bad guys must move then do one action). Normal movement uses a modified die roll to generate movement points, albeit with new variations to account for the slow-moving and incredibly dim but tough Mountain Troll. However some ‘special moves’ are also possible, such as Hobbits ducking between groups etc! Play alternates in a random manner between one Fellowship then one goblin group, so it can be that not everyone is quite in the right place at the right time…
But what about Gandalf, I hear you ask? Well, the basis of the scenario is that the four main players must buy time for Big G to work his magic on the (only) exit from the tomb. By placing some of their ‘special action’ cards in the Gandalf ‘pot’, at the end of each turn these can be converted (via die-roll) to magical protection points.
The game ends when either:
Well, despite only one player ever having used the system before, we actually managed two games on the day. In the first, the group did well taking out the fearsome troll by ‘suckering’ it further into the tomb so it could be attacked from it’s vulnerable rear. The waves of Goblins/Orcs came and went, but in the end only Aragorn caused some concern, having been left somewhat behind when the bug-out started with the summons of Boromir’s ‘Horn of Gondor’ (a special move which shuffles all friends a bit closer to him)!
In the second game the group tried a new tactic with the troll, namely letting it trundle forward then knock seven bells out of Legolas, Merry and Boromir (well, anyone in range), whilst Gimli tried not to attract undue attention – at least, that’s what seemed to be the plan…… 🙂 ). It was a good idea for Gimli to dart behind, just the Troll didn’t get the memo leading to several anxious turns of Gimli ducking and weaving (and cutting chunks off said troll), before the massive brute was finally finished-off – by a ranged slingshot stone from a Hobbit!!
My tremendous thanks, as ever, to a fabulous bunch of guys at the Maidstone club.


Rules and Card Decks
As with almost all my games the rules are home-grown stuff and, as such, possible to extend or amend as you wish (the mark of a good product/system in my view). Hopefully these will appear on the blog site ‘real soon now’. If not, come along to the club and try it some time!
Original game
Details of the original HASBRO “Star Wars Epic Duels” by Craig Van Ness (with assistance from Rob Daviau) can be found here.
Figures
The basic figures all from the fabulous “Armies of Middle Earth” (AOME) range by PlayAlong Toys and ToyBiz. This vast range of 1/24th scale (3.5” or 75mm), multi-pose figures covered everything from the RingWraiths (fabulous sculpts) and Fellowship, and includes no less than three different sets of Orcs/Uruks, five different Wargs and numerous Rohirrim (foot and mounted), as well as a number of special sets (like the great Uruk-Hai siege crew – the battering ram crew were the source of the ‘pikemen’, among others) and even siege towers! As they are semi-animated, it is possible to create different poses and even mix body-parts, Timpo-style! I have to say that, at this scale, a couple of hundred Orcs or 30-ish charging Rohan cavalry are quite impressive…
Unfortunately, as with many of my games their availability seems to diminish the closer I get to putting them on show! However, if you want to risk it a quick browse on eBay still pulls up a fair number of hits, which is OK to provide all you would need for a normal skirmish. Of course, you could also use those tiny 32mm ones some people prefer… 😊
The 7” Mountain Troll was a fantasy figure from PAPO toy range, suitably based and painted by Kevin Dallimore. Actually, AOME does a troll, but it’s the up-armoured one from Return of the King which is used to push the 16”-high siege towers in ‘Pelennor Fields’…
The large ‘Bernard The Balrog’ was another cross-range recruit from the extensive ‘MacFarlane SWARM’ range of fearsome, wonderful monsters – do scan this lot if you need any 8”-10” villains.
{As an aside, the hard-plastic figures have some advantages over their metal cousins, in that it is easy to make some bits transparent – there’s a version of Frodo with ring on, plus the MacFarlane monster is drooling clear yellow bile…..}
For more pics and other rules, see here.
There is a great fan-following on the net as well (for this and the original Star Trek game), with lots of suggestions for other card deck, scenarios etc.
BTW, I am also in the process of using the wonderful character-specific card system for such diverse topics as:
Stay tuned to this blog……
Tony F reports on the club’s first encounter with an alien ruleset.
The club has played a lot of Daniel Mersey’s Rampant rules, both the original Lion and the fantasy Dragon spinoff. So there was a lot of interest when a sci-fi variant, Xenos Rampant was announced. We wanted to see how well the game engine would translate to the new setting with (presumably) more emphasis on shooting than close combat. And to be fair, not everyone thought it would work.

Recently, four of us managed to finally get ourselves organised and gave the rules a try (yes, we know that the book came out months ago – the wheels sometimes turn slowly in Maidstone). Eric and Mike had 30mm armies derived from WH40K forces, while Marcus had a 15mm force of mainly Khurasan miniatures and I cobbled together a force in the same scale from my Hammer’s Slammers armies (you can see those in the header photo).
Mike and Eric ran each other very close in their game, with just a handful of figures left on table at the end (although I’m not sure who actually won!) – sadly I didn’t get any photos. Marcus on the other hand had some dreadful luck with the dice and got a bit of a thumping.

We then switched round and I took on Mike, while Eric switched to a 15mm force of Brigade Models miniatures. Mike and I fought a very tight game, I just prevailed but with very little of my force left on the table.


Marcus’ luck improved a little but he still went down to Eric eventually.


So our conclusions? We felt the game worked well, there are plenty of options to customise units to give your army a unique feel. The familiar game mechanics helped for those who have played other games in the series.
All of our games were 24 points, and we managed two each with plenty of time to spare. Units, especially vehicles, are relatively expensive so none of our forces had more than 5-6 units, and the game ran pretty quickly. So we felt that 36 point games would be perfectly manageable. One thing we found odd was the limit of only one vehicle – none of us could see an obvious reason for this.
We’ve penciled in another session for later in the year, some sort of mini-campaign or tournament. These will be 36 point games, and we’ll ignore the one vehicle rule so expect to see a bit more heavy armour. We seem to have won over a couple of previous refuseniks to give the game a go, so look out for another report in a few months, along with plenty of work-in-progress reports as people build up their armies.
Marcus fesses up to his Stargrave woes and how he’s gone about recruiting a new crew.
I’ve had some problems playing Stargrave. It’s not the game. I am sure it isn’t perfect, but we love playing it at the club. It’s not even my club-mates, who keep shooting me. It’s my crew. Well, that’s not fair. I do like my crew. But they look quite…similar. Too similar. And it hasn’t helped that I used the original Stargrave roster from the book, downloading it from the Osprey site. In the middle of a game I would find myself shuffling and flipping over sheets trying to work out which character was being fired at, or acting, and not exactly sure which one I was looking out without checking.
The concept of that crew was something like the Bynars from Star Trek: The Next Generation (the episode 1.15 “11001001”) with an added dose of psionics. The crew comprised some small Copplestone Grey’s, the brains, and the mean looking, vat-grown “Big Greys”, which were from the now defunct Griffin Miniatures. I had never managed to get around to using these before. It took me long enough to get around to painting the mean Greys, although I really like them.

I might use them in Xenos Rampant in the future, although we have been using 15mm figures for that so far. But I digress.
In an effort to solve the problems in my personal organizational abilities I needed two things:
Firstly, a one page roster so that all that stats were right in front of me. I had tried looking at creating roster cards, but they just didn’t seem to work for me. I wanted everything, the whole crew, on one side of A4. Fortunately club members, noticing my travails, kindly offered me a selection.
(Editor’s note: If you print this roster, make sure you open the “More Settings” option in the print preview screen and have “Fit to Printable Area” selected.)
Secondly, I needed to recruit a new crew. A more individual crew of characters.
And it really isn’t that hard to stat a crew up, at least not if you can be decisive about it! In a nutshell, recruit a Captain and First Mate from the various specialities (akin to schools of magic in Frostgrave) available and spend 400 Cr. on recruiting the rest of your eight crew.
The specialities I referred to are “abilities”. The Captain chooses five, with three of four from the characters background e.g. psionics as i referred to for my first crew, or veteran. There is quite a range with new backgrounds being added in the inevitable supplements to the core rules. It makes for an interesting comparison with Five Parsecs from Home, which regular readers of the blog will know I have also been playing solo (I should really complete another episode soon!) However, in Five Parsecs the choice of crew characteristics is all based on random rolls reminiscent of the old school Traveller RPG. It’s much more about the whole crew even if the Captain is the first among equals. In Stargrave it is very much about the Captain and a little about the First Mate. In truth, everyone else is disposable to a greater or lesser extent. The First Mate chooses four abilities, with two or three from their background. Previously I chose two Psionicists, but this time I chose a Cyborg Captain and a Veteran First Mate.
Why did I make this choice? I am not entirely sure. I was looking through the core rules on character creation with the intent of choosing a new crew but the process became influenced by the models I had available or fancied using and the narrative that began to create in my head. I think that is a good thing!
I initially had the idea that I would use figures from a Kick-Starter project that I had received: Star-Schlock. This at least started out rooted in influences of the pulpy Sci-Fi TV of the 80’s. Buck Rogers in the 25th Century crossed with Star Trek and maybe a dose of Star Wars and 80’s Flash Gordon, in particular.

Some similarity occurred to me between the Star Trek: TNG era and Buck Rogers slightly more campy second season. Something akin to the rescued Borg Seven Of Nine in Star Trek Voyager. I had the idea of using some unused cyborg miniatures which I had from the old Scotia Grendel Urban War range, the VOID Syntha biomechs, making them a kind of Star Trek Borg analogue.
I had already started painting some of these after a long time in the lead pile. I was intending to put them to use in Spy-Fi games as some kind of, well, Fembot for want of a better word. Yeah Baby!
Then I hit a problem.

It was only when I compared the completed Syntha miniatures to the Star Schlock figures I noticed a considerable size discrepancy! That was pretty much the deal breaker although at this point I realized that I was in some danger of repeating the same folly using some Star Schlock rank and file figures; a lack of clear characterisation.

I was now fixed on using the Syntha as Borg analogues but the sizing discrepancy made me think about using at least some more old school miniatures. Hence a look at EM-4’s range of early Grenadier sculpts. It was a chance to pick up some older, characterful miniatures that I had regularly seen pictures of, or seen new versions of older sculpts, but had never quite managed to add to my collection. Since i was basing this crew around the escaped cyborgs I wanted a crew that at least in part were themed around interconnection, robotics and coordinated firepower. At least that was the plan.

The Black Rat
Also known as Six of Seven, Black Rat is to be my captain. She had somehow managed to escape some Authority “black-ops” experiment as government broke down. She has very little knowledge of her origins, but is on a quest to know more.

I chose to give her:
She also has a carbine (2 spaces), a pistol, light armour, a deck for hacking and a filter mask.
Harriet “Harry” Barber
I originally had a figure in a beret picked out for this role, but Harry has grown on me. I first saw the figure many years ago. It normally has a truncheon and I think is supposed to be a “space police” figure. I removed the truncheon and added a small pouch in its place. In my mind there is a similarity to Glynis Barber in the 80’s series “Dempsey and Makepeace” where her character was called Harriet Makepeace. She is some kind of ex-security figure (the kind of security that doesn’t use a truncheon or wear a uniform) who along the way helped the Black Rat escape from her captors.

Harry also has a filter mask (always handy), light armour, a carbine taking up two spaces and picks for breaking into physical objects.

Moving on to the Standard and Specialist figures, these are much easier to select as they are very much modular, “plug in” selections.
The “White Rat” (Three of Seven) – Commando

Naturally, also being a cyborg and a comrade of Six (or part of the same hive mind), the White Rat needed to pack a bit of a punch. They were specialist operatives after all.
Ratchet the Robot

Picked up from some abandoned facility and reprogrammed by Harriet, Ratchet is an armoured trooper. Thanks to Harry’s Armoury skill she can offset the upkeep cost. Originally I costed out Ratchet as a grenadier, making that rather large gun a grenade launcher of some kind. I changed to admittedly costly power armour as a result of choosing the armoury skill for the First Mate.

Troopers (3)

There have been various iterations of this crew, but they always seemed to revolve around having three troopers. These are Viridian, (with the green skin and yellow jacket), Sal Buco (long green coat and pistol) and Cy An (Blue skinned alien). At the outset they all have a carbine, heavy armour and a knife. Yes, I know Sal appears to have a pistol. Does anyone remember the pistols in the original “Man From Uncle”? Well Sal has picked up something like one of those. He can attach an extended barrel, long magazine and collapsible stock. Hey presto: a carbine. Originally Sal was going to be a simple recruit, but I had another idea…

Hacker – Zero One

A nod to my old crew. Zero One now stands out in a crowd. It is my hacker equipped with a pistol, light armour, a deck for hacking (of course) and a knife.

Recruits (2)

Finally, my two recruits. Originally I was going to fit in a guard dog, but the dog cost 10 credits and frankly can do less. I am not a min/maxer, but when you want to fit in certain options the free figures give more flexibility. And a bit of colour. These miniatures came from the Hydra “Retro Ray-Gun” range. It is a nice range although the figures tend to be a little larger overall. But these two are I think teenagers. I painted them up with no clear objective for using them. I watched Firefly again recently and it occurred to me that these two, the “Citrus Kids” could be analogues to Simon and River Tam (except he isn’t a doctor and she isn’t a psychic killing machine). That points to the one thing which might be slightly dissatisfying with the rules. As I pointed out earlier, if you aren’t a Captain or First Mate, there isn’t going to be much progression, beyond adding a better bit of kit. That said, I don’t think that is what this game is for and is why I like a bit of solo Five Parsecs.
Recruits have a pistol, light armour and a knife.

So that is the crew of the “Dirty Rat”. I’m looking forward to seeing how they do in an outing at the club mysteriously entitled “Oubliette”, very soon. I am sure there will be a report.
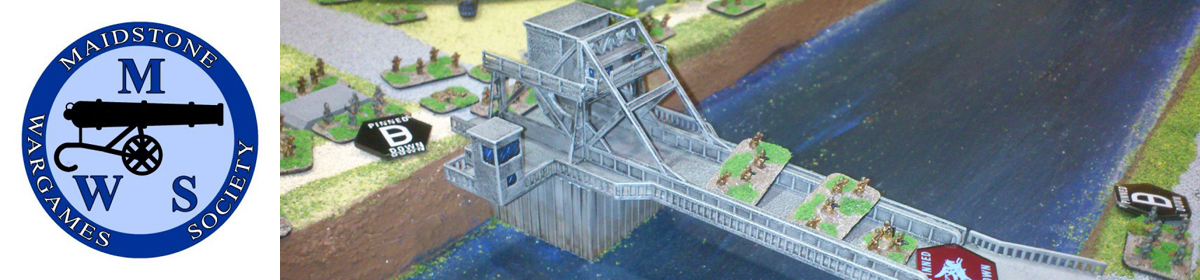
Tony F reports on the further adventures of Frodo and the rest of the Hobbits as he and Phil, along with guests Jon and Andy, play through the Quest of the Ringbearer. You can read his report of the first two scenarios here.
Scenario 3 – Buckleberry Ferry
“Two steps on the water”
Scenario three saw the Hobbits attempting to cross the Brandywine at the Buckleberry Ferry. They had to race three ringwraiths to the ferry to cross the river. The game went encouragingly well for the Good side initially, with one wraith despatched in short order (we were discovering that at this point in the Quest they were, if not feeble, then certainly not as frightening as we expected in combat, even to hobbits).
But then our game took a rather odd twist. In a move probably not foreseen by the scenario writer, Andy had one of the ringwraiths jump on the ferry before the hobbits reached it and take it to the other bank, leaving them stranded. The four hobbits managed to gang up and take down the remaining wraith on their side of the river, but we were left with a bit of a standoff. The hobbits were on the wrong side of the river, with the vital ferry on the other bank guarded by the single remaining ringwraith. Their only option would be to swim, but the swimming rules and the hobbits’ fear of water meant doing that would probably allow the wraith to pick them off one at a time as they emerged. So in the end we called it a draw, as neither side could see a way ahead.

Scenario 4 – The Old Forest
“See those trees, bend in the wind, I feel they’ve got a lot more sense than me”
The final scenario of our first session was a bit unusual, with the hobbits trying to cross the Old Forest in the face of – er – nothing. Just trees. Instead of orcs or wraiths, the trees of the Old Forest came alive and tried to hem them in and trap them – the trees couldn’t kill the hobbits, merely capture them.
Our game ended quite quickly, with all four hobbits rapidly overwhelmed, and hoping desperately for rescue. In hindsight, the scenario setup wasn’t particularly specific about how many trees should be placed on table, and we we may have overdone it, leaving the hobbits little chance of getting to safety – Jon and I barely made it halfway across the table.


So this one went evil’s way, leaving the score at
The Quest will resume at the club’s Christmas meeting, where we hope to get through another 3-4 scenarios.
Tony F reports on the beginnings of an epic journey.
About four years ago, Games Workshop released The Quest of the Ringbearer, the latest source book in their Middle Earth Strategy Battle series. This is centred around a series of 28 scenarios which, if played in succession, tell the story of Frodo’s journey across Middle Earth to destroy the One Ring. It’s a bit of a mash-up between the story as told in the book, and the slightly different version in Peter Jackson’s films.
Phil and I have finally managed to get ourselves into gear and started on our Quest at the first meeting of the year. The initial scenarios are quite short, so we managed to race through the first four, even with the club AGM being held during the meeting ! Aiding us were Andy, who joined Phil on the Evil side, while Jon R played with me on the side of all that is Good. This report will cover the first two scenarios, with the next two in a separate post.
Scenario 1 – Farmer Maggot’s Crop
“The hounds of love are hunting”

This was a simple starter scenario, with the four hobbits (Frodo, Sam, Merry and Pippin) being on the evil side for once, trying to steal cabbages from Farmer Maggot’s field. Defending the brassicas were Maggot along with his three dogs, Grip, Wolf and Fang. The hobbits had to steal five cabbages from the field and get it back to their stash, while the dogs had to inflict sufficient bites on the backsides of the thieving hobbits to drive them away. Because this was nothing more than a scrumping mission, no-one could ‘die’ – when the dogs took a wound they ran back to their kennel until the Farmer sent them back again, while a hobbit that lost all of their wounds would run away and abandon the expedition.

In our playthrough, the hobbits got off to a good start, stealing their first cabbage and sending two of the dogs back to the kennel almost immediately. However, Wolf showed early form by biting Sam – in fact Wolf would be responsible for most of the wounds we inflicted. As soon as one of the dogs took a wound it woke Farmer Maggot, and as the mechanics of the scenario meant that the Farmer had to be touching the kennel in order to release any hound that had slunk back to it, Jon and I decided that our best course of action was simply to leave him there so that the dogs would be immediately be back into the fray.

With two of the dogs temporarily out of action, the hobbits managed to grab a further three cabbages before they returned. When a hobbit was charged it had to drop its plunder, so not all of the cabbages made it back to the stash point when the dogs returned. As all three dogs got into action we started whittling the hobbits’ numbers down, with Wolf playing a starring role, until there was only one left facing all three dogs, with two plunder tokens still needed – a couple of good bites and it was all over.
The scenario was pretty well balanced, we felt – the hobbits managed to make it off with three of the required five cabbages, and could easily have made it further had Jon not rolled something like four successive sixes towards the end of the game.
Scenario 2 – Short Cuts Make Long Delays
“It’s in the trees – it’s coming !”
This scenario saw three of the four hobbits lost in the forest on the way to Crickhollow (Merry has already gone ahead). Three Ringwraiths are closing in on them, and only the intervention of Gildor Inglorion can save them. The hobbits started in the lee of a large hedge which runs through the forest; the Ringwraiths started in the centre of three of the board edges, while Gildor was on the fourth, Eastern edge (he got to start 3″ in because the Good side won the previous scenario). The objective was to get Frodo off the Eastern side of the table.
The Ringwraiths are in ‘Sentry’ mode – each turn they must roll a dice and depending on the result they could either move normally, at half speed, stay still or even in some cases be moved by the Good side. Conversely, the hobbits are all petrified of what could be in the woods so they each had to make a Courage test every turn – pass and they could move normally, fail and the Evil side got to move them. Once a Ringwraith spotted a hobbit (which was only at 3″ range in the woods) the alarm was raised and everyone could move normally. So these rolls would be crucial to the outcome – if the hobbits could evade detection for long enough then Frodo could escape.

The Ringwraiths pottered around pretty randomly – the one on the Southern edge came up with several 1s on his movement rolls, allowing the Good side to move him away, and he gained the nickname ‘Sh*t Ringwraith’ from has master which stuck for the rest of the day. The Western ‘wraith quickly moved up to the hedge with a decent couple of rolls. Pippin then failed a courage test and the Evil side moved him back towards the hedge and things looked dicey – one more dodgy roll and the alarm would be raised, which would allow the Ringwraiths to quickly close in with their superior speed. But the Western ‘wraith twice failed his rolls to cross the hedge, and spent two turns untangling his cloak from the branches, allowing Pippin to get away. Pippin did fail at least one more courage test but the Good side, being somewhat more decorous, decided not to christen him the ‘Sh*t Hobbit’.


This left just the Northern Ringwraith as a threat – but by this time Gildor had moved up to meet the hobbits and was shielding Frodo. Since the scenario only required Frodo to escape, we decided we’d sacrifice the other two if necessary to get him away. So Sam and Pippin moved into blocking positions and Gildor hurried the Ringbearer off the table. Pippin was struck down in the last turn, but it was nevertheless a victory for the Good side again (rolling after the game, Pippin was determined to not be entirely dead, so his sacrifice was worth it).
The scenario was tricky for the Evil side, but depending on the random movement rolls for the Ringwraiths it could have gone entirely differently – and getting stuck on the hedge for two turns (only a 1-in-6 chance) effectively took one of them out of the game. What was key for the Good side was that Frodo, with his higher courage value, didn’t fail a single test and so could move towards the edge of the table at full speed every turn, making it in the minimum possible time.

So – after two scenarios, it’s
Tony F recounts a tale of woe but also tells us of new beginnings…
Kal Gaden’s week had been… interesting. Ten days ago he was near rock bottom, down to his last credit and had sunk so low that he was even contemplating the unthinkable – selling his armour for food. Then a chance encounter with Jenin Hosvarn, captain of the freebooter vessel the Empyrean Drifter, threw him a lifeline. He signed up on the spot as a general service deckhand/dogsbody for what could only be described as a ‘variable’ salary – but at least he was going to be fed.
Four days later the ship left port for his first assignment, on a distant moon many parsecs into the next sector of space, with everyone in good spirits. The regular crew consisted of the captain, his reptilian first mate Budfodo and the other two deckhands, Whibirt and Scogill. The former was also the ship’s medic, and his colleague was supposedly tech-savvy, a bit of a hacker. Kal assumed that he spent most of his time keeping B6C5, the ship’s ancient robo-pilot, and the captain’s aging cyber-dog Lucifer in working order. They also had a five-man guard detachment onboard from the local security agency – big burly goons clad in bright orange plasteel armour and toting carbines. Allegedly Budfodo was a bit of a dab-hand with his huge repeating plasma cannon (in a quiet moment, Whibirt told him that the giant alien had shot nine men on their last mission), while Pervol, the taciturn minigun-wielding guard, had single-handedly taken down a tentacled sea beast on a waterworld six months back. So no-one was worried about their safety.
And then they landed – and Kal had never seen such a fiasco. They disembarked into a dense jungle, where you could barely see the guy five paces in front of you. All around he could hear the cries and screeches of the local fauna, along with the heavy footsteps of something that was obviously really BIG. Then they suddenly came across the Big Thing – a genetically engineered monstrosity bred from the DNA of a long extinct giant reptile. No one seemed to know how to deal with it, so instead everyone just froze. After what seemed an eternity they skirted round it, and it wandered off back into the dense undergrowth in search of something a bit more lively.
Then they stumbled upon an old bunker covered in vines and creepers, decrepit but still sealed. Step forward Scogill, the tech “expert”, who made such a bantha’s ear of cracking the lock that in the end Kal just did it for him! Without a word of thanks (probably too embarrassed), Scogill stepped past him and straightaway tripped some ancient motion detector, setting off a self-destruct alarm. Fortunately the detonator circuits had long since expired and this one turned out to be a dud, but not before everyone had bolted in a rather unedifying spectacle.
Then came the one thing they did get right. Captain Hosvarn had struck a deal with the elders of a local village to get rid of a tentacled beast that had made its home in their water supply. The security detail this time managed to do their thing and get a grenade into the well. And as a bonus, at the same time they upset several other crews who’d been squabbling over the loot around the area (Hosvarn’s crew should have been there too, but they’d spent their time running from giant herbivores and antiquated alarm systems and missed out on any bounty).
So job done, after a fashion – time to return to the Drifter. Except that on the way back they stumbled upon a trio of vicious saurian critters, no bigger than dogs, but with very sharp teeth. The security detail utterly failed to do what they were hired for, the Captain tried to fend them off with an alien plasma pistol he’d found – but that misfired, and in the end it was Kal’s pistols and Budfodo’s cannon that did for the creatures. But Hosvarn had been badly hurt, and expired on the return flight despite the ministrations of the medic.
Thus ended Kal Gaden’s brief tenure aboard the Empyrian Drifter – with Captain Hosvarn gone, the crew dispersed to the four corners of the galaxy and he was once again out on his ear…
So that was the tale of woe for my Stargrave crew’s final mission. It really was the first mission for my new crew member Kal Gaden, and he really was witness to an utter disaster. Although I learnt some valuable lessons (don’t put your captain at the front, even if he does have a fancy plasma pistol) it was not my finest hour, and I’ve had to start again with a new crew since my first mate hadn’t reached a high enough level to take over. I decided to start from scratch with new figures since just recycling and renaming the old ones didn’t feel enough of a fresh start. Kal is a Diehard Miniatures figure who bears a passing resemblance to characters from a certain sci-fi franchise – and I decided to build the team around him. I took the plunge and bought Diehard’s two Elite Bounty Hunter packs, which are very good deals compared to buying the figures individually, plus “Nub Nub, Dark Apprentice“, also definitely not derived from the same franchise. This gave me enough for a 10-figure crew plus a couple of spares.

Let’s not beat around the bush – they’re Mandalorians in everything but name. In the series they come in all sorts of colours, so I had fun painting them in a variety of schemes. I found a Mandalorian name generator online which was very helpful in giving them all unique monikers and the crew began to come together.


In Stargrave terms, my captain (Garo Braven) is a Veteran – it seemed the closest fit. I made Nub-Nub (tentatively named Gebro) my first mate and a Mystic, complete with suitable powers to try and reproduce his fledgling Force abilities (including Void Blade for his lightsabre).
The make-up of the rest of the crew was dictated by how many credits you get to create a new outfit – not enough to set all of them up as I would really like, so some will have to be upgraded as and when I can earn some cash! I tried to at least pick soldier types that had the correct weapons, so apart from three specialists (a Gunfighter, Gunner and Sniper) the others are either Troopers if they have a rifle, or Runners or Recruits if it’s a pistol.
Following the release of the latest supplement, Bold Endeavour, which brought each crew’s ship more into the game, they also need a ride. Obviously this had to be some version of the Razorcrest, and after some searching I came up with two options – the Star Wars Micro Galaxy one, a smaller, fairly detailed and pretty accurate model, or the Hasbro Mission Fleet version, a more toy-like option that wasn’t so exact but was just about the right size for 32mm figures given the Razorcrest’s stated length of 80′. In the end I went for the former, as the more in-scale toy version was possibly a bit too big for the average gaming table at ~18″ long. The smaller model looks better and is still big enough to be a slightly cramped 10-person shuttle craft.


So that’s the new crew of the newly-named Cepheid Variable – their first mission will commence just after this post is published, so wish them luck!
The DBA Tournament returned for the first time since 2019, with a new champion – the two headed hydra of new members Mark N and Bob, both new to the club and the rules, who teamed up together because Bob had to go early and they thought it would be a good idea to team up to learn the ropes. Tournament organiser Dave S loaned them his Anglo-Norman army and after a shaky first round, they soon built up a head of steam.
Three Knight and Heavy Chariot armies dominated the scoring leaving the other four trailing. Mike and Mark/Bob both finished with 22 points each, however the Mark/Bob pairing was declared the tournament winner. This was because there was an uneven number of entries and a “bye” result had to be awarded to those who had not participated in a given round. Before the start of the tournament, Dave made a ruling that in the event of tie for first place, that the non bye player would be awarded the trophy. As Mark/Bob had not taken a bye, they were deemed to be the winning contestant(s).
If there is one lesson Dave took away from the day, it is not to loan your Anglo-Norman Army to the newcomers !


Marcus turns assassin as he tried to eliminate a Japanese Admiral.
I needed to dig out a space mat in connection with another project this week and as a result just fancied a game of Full Thrust. I’d sketched out some ship diagrams previously and done a couple of other designs. The scenario I threw together was loosely inspired by Operation Vengeance, the plan to kill Admiral Yamamoto which took place on April 18, 1943, during the Solomon Islands campaign in the Pacific. Yamamoto, the commander of the IJN Combined Fleet was deliberately targeted by USAF aircraft following US Navy codebreakers identifying his flight-plan in the area of Bougainville Island.
In this scenario, Admiral Maya of the IJN is present aboard the Heavy Cruiser Chokai escorted by the Light Cruiser Mogami and a frigate, the Fubuki, having visited an installation in the Bougainville asteroid belt. Royal Navy forces, having been made aware of his presence in the area have penetrated deep into IJN space using light forces with the intent of springing an ambush using the belt as cover. The Chokai needed to exit the far end of the table for a win.
The British forces are composed of the (very) light carrier Pandai (with just one fighter group), two destroyers, the Triton and Ganymede, and four pulse torpedo armed corvettes: Leda, Ersa, Elara and Dia. I set up the game initially and played a couple of turns but then match abandoned for dinner! More of that anon (the abandoned game, not dinner!) I set up again the next day for take two.
Turn 1
The IJN ships entered from the short navigating carefully at speed 3 but accelerate to 4 on detecting trouble. Both the Mogami and Fubuki detect the Leda and gain a hit each on the approaching corvette. The Callisto responds from beyond Leda to gain a hit on the Mogami.
Turn 2

The IJN fleet accelerate to 6 with Fubuki forced to make a slight turn to port to avoid an asteroid. The Ganymede to the port of the IJN fleet became exposed from behind an asteroid and suffered combined fire from the Japanese. Chokai put four hits on the Ganymede to her port from the A and 3 B turrets. Mogami gets an unlikely three hits from her 3 B’s to turn Ganymede into a flaming wreck. However, before she succumbs Ganymede fires on Chokai, but the one shot on target is deflected by Chokai’s shield. To starboard the Fubuki opens up on the leading RN corvette, the Leda, again achieving two hits. However, both Leda and Ersa reply. Leda gets just one hit with her pulse torpedo, but this produces a damage roll of 5. Boom! Both sides have lost one ship
Turn 3

Accelerating now to a velocity of eight, the remaining Japanese ships also make a one point turn to Starboard to manoeuvre through the asteroid field and escape. Chokai open s up with her A battery at close range on the Dia but all 3 dice miss! By contrast the 2 B turrets fired at Ersa produce 6645! 4 hits from four dice! Ersa nevertheless manages to put a pulse torpedo into Mogami at close range on a 4 and rolls 4 damage before succumbing to the fatal damage from Chokai. Leda does exactly the same; a roll of 4 and a damage roll of 4 also against the Chokai. Dia misses her shot while finally Elara rolls a 5 for a hit. Elara rolls a damage of 6! The heavy cruiser now only has two damage boxes left, but the critical damage “threshold” checks result in the A turret being placed out of action. Most unfortunately though the FTL drive has been put out of action. Callisto tries to finish off Chokai at close range but her 2 B’s and a C turret get two hits of 4, but are blocked by the Chokai’s shields.
The RN Pandia, which has been lurking out of sight behind an asteroid launches her fighter group.
Turn 4

Despite the heavy damage taken by Chokai, her systems are largely intact. However she needs to get the FTL up and running if she is to escape. The damage control party attempt this but needing a 6, only roll a 5. She nevertheless pours on further acceleration in a bid to escape the onslaught, moving to velocity 10. Mogami has to slow slightly (-1 velocity to 7) to manoeuvre.
While Pandia’s fighter close in on a Chokia which is now opening up the range from Callisto, Chokia brings Pandia under fire with her 3 remaining B turrets at short range. An unlikely 66555 results in 7 hits! With just two damage boxes remaining Pandia also loses a point defence system. Mogami finished her off with a 6 and 4 from her 3 B’s resulting in 3 damage. However, while the fighters closed in on Chokai, Callisto again fired with her 2 B’s and C (5 dice) to get to 6’s and 4 damage. Chokai is eviscerated and the Admiral lost.

Despite the conclusion of the scenario objective, I played on the next couple of turns to see if the Mogami could at least make an improbable escape.
Turn 5

The Mogami runs, accelerating by +3 to a velocity of 10, chased by Pandia’s orphaned fighters. Mogami uses her area anti fighter weapon to shoot at the fighters and bring two down on a 6, but not before they launch their weapons; 125566 results in 6 hits including a point defence system and a firecon. In Mogami’s rear arc, Callisto continues to blast away with 5 dice and does a further two damage.
Turn 6
So close to the edge of the asteroid field now, Mogami accelerates to 13. Although the fighters trail they are still in range. However, although the range has opened to the extent that it reduces Callisto’s firepower to just 2 dice, a roll of 5 and 6 did three damage, finishing off the gallant Mogami. In fact although the pictures show that Mogami was pursued by the fighters I subsequently realised that they are armed with single shot weapons. But for quite a lucky roll from the Callisto, Mogami might have escaped to at least advise the IJN High Command of the disaster.

That was not the least of my mistakes! Evaluating the game I noticed something about the corvettes and crunched the numbers on the design again. I don’t think I had ever finished the calculations on this whenever I had first made them, because I had them costed out at 42 points. I now made them 76! This meant that the RN which I had earlier calculated as being down c. 30 points was actually up around 100! I also noticed page 31 of the FT rules (ship design) which noted that fighter groups should only be carried by carriers and dreadnoughts. I hadn’t really considered what this meant before, but I wondered subsequently if that outlawed “jeep” carriers like the Pandia. I am not convinced though. Even if that was the intention, such small carriers existed in World War Two and continued with carriers such as the Invincible class in the RN and a number of others armed with V/STOLs. Balancing a scenario on points is not critical, especially in such a solo, narrative game. I tried to play a “fair” game, but it is clear in retrospect that the asteroid field gave a substantial advantage to the RN flotilla.
I mentioned the earlier, abandoned game. I only played at most three turns and perhaps the third wasn’t completed either, I can’t quite recall. What was interesting is that the corvettes acquitted themselves terribly in that game, while the fighters made very early work of the Chokai. I think that this points out the power of fighters in this scenario where there was no fighter cover for the IJN. That could be balanced out in the scenario by an escort squadron from Bougainville. In any event, I would like to give the scenario another try with a better balance just out of interest.
In discussion afterwards with members of the club, they asked how I ran the ”opposition”. As I described above I played it as a more narrative game, but this did make me think about describing a couple of options for manoeuvres (almost “matrix game” like) to myself and then rolling to select which applied. The firing/target selection is less of an issue I think.
Marcus begins his solo adventures across the Five Parsecs from Home universe…
Having rolled up a world, Palacco, which wasn’t entirely conducive to operations, there wasn’t much I could do in the campaign turn or ”world” phase. Palacco is tightly restricted, which means only one crew member can explore each turn. I may have misunderstood this as I thought this term limited other options too, but perhaps I was wrong. And in the end, I didn’t bother, which was probably an error as I might have gained something out of this phase. In addition, crew subsistence costs are doubled due to the high cost of living. The crew also had to pay four credits (Cr) for an operating licence.
Wellington had initially rolled up a corporate contact although the danger pay amounted to only an additional credit. It was also urgent; must be completed this turn or lost. I rolled up a sweep mission; move across and exit the table (right to left in the photos). The corporation want to clear out some rival group from the area. Maybe there has been a mineral find in the area. Who cares? A jobs a job. I rolled up a randomized layout having set out a table for this myself. Possibly there wasn’t enough cover…

The opposition looked quite tough but limited: Three “unknown mercs” whose characteristics made them faster, tougher and better in combat (+1) than any of the crew of the Pi. However, being mercs, they were more likely to bug out in good order if things got tough. One was a mysterious hooded specialist armed with a sniper rifle. The two grunts, the rotund (or perhaps muscled) Dinohed and Redd, who looked to have a more military bearing, were armed with colony rifles. These are simple, robust weapons favoured on the frontier.

The deployment conditions specified that it would be a surprise encounter in which the enemy could not move in the first round. In addition, there was a “peculiar item” located on the table which would give 2 XP if collected.
Turn 1:
During turn one the crew moved in from the right edge but observed no targets. Kel took up an initial sniping position in cover. Their opponents, caught by surprise, didn’t move.
Turn 2:
A terrible roll meant that only one of the crew would get to act before their opponents. I say terrible; in Five Parsecs, I roll a D6 for each character in the crew at the start of each turn. For each character, if I can allocate them a dice equal to or under their reaction stat., they act in the “quick action” phase. Or they can defer. Their opponents act after this in the “enemy action” phase. Finally, any character that did not act earlier may act in the “slow action” phase. Given their reaction stats are even split between 1 and 2, few if any were ever going to move in the quick action phase. In fact only Kel did, and got in a shot at long range and hit. However, this caused no damage only a stun which pushed back Dinohed 1”. After the mercs moved up to the cover of the ruin, Veyon got a shot off and hit. Rolling a 6 on damage she immediately killed Redd outright! Wellington moved in cover on the nearside/bottom of the board in an attempt to make an outflanking movement.

At the end of turn 2 the rules provide for a random battle event. My experience previously has been that these could be quite nasty for all. Let’s just say I have seen some nasty indigenous wildlife…However, what I got this time was “A desperate plan”. One random figure doesn’t move but one other character of the players choice gets two actions; one in quick time and one in slow. In the event, Pascal and Veyon both moved in the quick round. Pascal advanced and got in close for a quick shot at the already stunned Dinohed.

Hit and a damage roll of 6! Another quick kill. At this point the leader would probably have tried to withdraw and fight another day, but this might have prejudiced the crew’s post battle circumstances. Veyon immediately went for a shot at the leader. Hit with one shot from her Blast-rifle. And a damage roll of…another 6!

Given that I have previously alluded to my earlier crew’s travails, the result of this mission was a surprise. I’ve got into all sorts of scrapes and suffered various wounds previously resulting in turns spent in med bay and out of action. Treatment has also caused me to literally bleed credits. So, this very short game was unexpectedly smooth. Subsequent conversations have suggested to me that you should expect the occasional “easier” experience. To take a phrase completely out of context; “It’s life Jim, but not as we know it.” You can have hard days (which I most certainly had) but some days are just easier. However, it also turned out to lack in fringe benefits. While Pascal picked up the item of interest for 2 XP, we got no battlefield finds. Very disappointing. Post-game we did pick up some loot, a “shock attachment” which imparts the “impact” trait to a firearm. Everyone picked up XP, especially Pascal (7 – including one in the after the battle phase because the local food was so good!) and Veyon as a result of her two kills. We also picked up a new patron.
But otherwise, I really think it is time to get off this unpromising rock. The crew took a gamble, paid 5 Cr for fuel and the Pi blasted out of Palacco spaceport looking for opportunities elsewhere…


You must be logged in to post a comment.