Wars of the Roses: Battle of Blore Heath

Stephen continues his refight of the Wars of the Roses…

This is the second battle as part of my plan to re-fight all the major battles between York and Lancaster.

On to Blore Heath we go! Like before, this will be done using Basic Impetus. It’s worth saying a bit more about these games. The idea is they can be played by anyone at home who has limited space – table size for all these battles is just 3’ x 2’.

For anyone interested in having a go themselves then here’s the order of battle I put together for the game.

Order of Battle

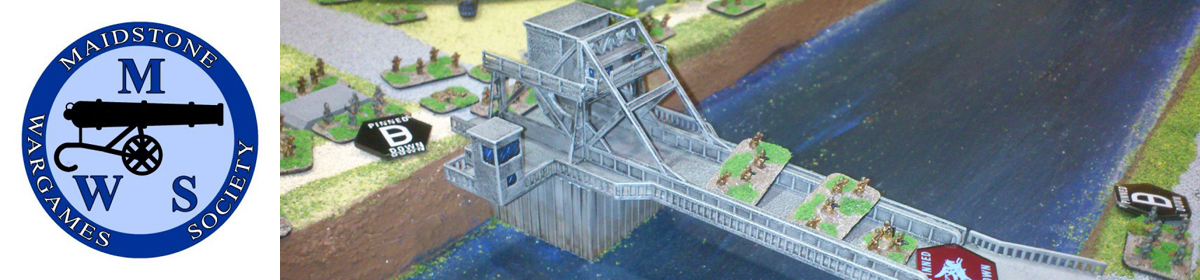
This one was always going to be difficult for the attacker. To reflect the difficulties faced by Lord Audley’s troops I classified the stream as Difficult Going. In addition, the archer’s stakes cancel out the attacker’s Impetus bonus, and the Yorkist’s will also get a bonus for defending the hill. It’s not going to be easy for the Lancastrians.

Deployed battle lines

I decided not to waste time rolling for initiative for the first couple of turns, not until just before the two sides got into bow range. At which point initiative was rolled for because then it would be important.

Audley moved his forces forward. The infantry all moved in good order, keeping their line intact. This meant they had a few turns coming under telling bow fire.

Lancastrian advance

The cavalry initially held back, unsure where they would be needed. In the end, the currours started wheeling and moving to the Lancastrian left, where they could support the infantry attack on that flank. I nearly turned the mounted knights that way as well, to load that flank for a hefty punch. But I could see it would cause a traffic jam, so I hung them back and decided to keep them in the middle where they could support the infantry there. That would prove to be a lucky decision.

Currours start to outflank

It wasn’t looking good for the Lancastrians. Moving in slowly, against the Yorkist archers, had the inevitable effect. I wondered how long it would take and if the two sides would even come into melee. On Audley’s extreme right flank the levy spearmen had slogged forward against the archers on the hill, taking damage as they went forward. By the time they had splashed through the stream, hiked up the hill, and finally got into battle, they were all but spent. The archers dropped their bows and pulled out swords and mallets and finished off the spearmen.

First contact – it won’t go well

The Yorkist archers were proving very effective. Not only had the levies been shot away, so had the Lancastrian centre – the billmen took a heck of a pounding as they progressed. Fortunately, Audley had held back his knights in the centre, and as the bills were dispersed, he drew his knights into order and got them ready to charge.

Audley prepares his knight

It had been a reversal of fortunes on the left. Here the Lancastrian archers had engaged Salisbury’s dismounted knights on the hill. It was obvious they couldn’t stay there, with arrows falling on them. Although their armour protected them from the worst, it was still a steady drip of casualties. There was only one thing for it – Salisbury himself took control and ordered his knights to charge down the hill in a counter-attack.

Salisbury orders a counter charge

This wasn’t the only charge being made by knights. With his knights now all lined up, Audley gave mis men the order to charge through the stream and up hill against the Yorkist archers.

The classic encounter – knights charge archers

The wise money would have bet against them prevailing – through the difficult stream, up the hill, and then fighting across stakes. Historically, this is what did for Audley and how he lost the battle. But what can you do? Such a valuable asset to the army can not be left behind – at some point they have to go in, and it’s never going to be good for them under these conditions. However, the God of Battle (the dice) can be fickle. And fickle they were. Although the knights lost a lot of dice with all those obstacles in their way, they still made a good roll (4 of 6 dice rolled 6s) whilst the archers couldn’t hit a barn door (not a single hit!).

The charge proves successful

This would prove to be the decisive action of the battle – the Yorkist knights charging the Lancastrian billmen, and the Lancastrian knights charging the Yorkist archers. Whichever was successful first would win the battle.

That honour would go to the Lancastrians.

The Yorkists held the right flank…

Salisbury holds the right

…but the Lancastrians held the centre and left flank.

But Audley has a firmer grip on the left

In the end Audley won the battle by the narrowest of narrow margins – there was just one point in it!

As Pyrrhus once observed, ‘Another victory like that and we are done for.’

On to Northampton next…

Zona Alfa Office

Club member John L takes us through the complete build of his recent office block.

This post is in response from a fellow club member regarding the buildings I’ve made for Zona Alfa, a sort of ‘How to’ guide. I wouldn’t profess to be a good terrain builder, but this method worked for me.

Planning
First check out photos on the internet for the type of building you want to use then draw the plan on A4. If you are going to use a storage box, check the plan against this allowing sufficient spacing around the building to get it out of the box. Simple enough but if you add on a detail later, it can prove frustrating! Plan how many floors you are going to have and if you want to be able to take it apart later (I did as I wanted the space inside the building shell to add another building).
In 28mm I work on 5mm to a foot scale and allow 35 – 40mm for door heights, depending on type of building. Door widths 15 – 20mm. Windows are 15 – 20mm from ground level, adjust until it looks right.

Materials
5mm Foam board – Hobbycraft
Mounting Board – Hobbycraft
Lolly sticks – Hobbycraft
Clear plastic (optional for windows, I used food packaging material)
Cereal box cardboard
White card A4 pack from ASDA
Fine sand
Builders sand
Tools
Snap off large and small knives – B&Q
Resin W PVA glue
Bulk PVA Glue – B&Q
Set square
Steel ruler
Pin

Step 1
Cut out the base from mounting board. This needs to fit on the box if using and should include a 5mm border around the building. It’s probably better to radius the corners of the base to prevent a ‘dog eared’ look.

Step 2
Draw out the walls onto foamboard, taking into account the joins at the corners. I used simple lap joints so the long walls were 10mm shorter than the plan, use a set square to make sure all is square. Mark the sections you want to cut out so that you don’t remove the wrong bit!. I then take a pin and push through to the reverse side of the foam board.

Step 3
When cutting foam board I use the large snap off knife and steel rule, making a shallow cut. If you try a deep cut, the foam will tear. It’s a material that will blunt your knife blade quickly so snap off blades are ideal. I use the smaller knife to cut out the window openings. To get a clean finish, flip over the foam board and check the backing of the foam board is cut through, you can use the pin holes as a guide. By keeping the blade vertical against the rule, you should get a clean finish.

Step 4
Once the wall panels are cut out, I added detailing from strips of mounting board to the front faces. On the interior faces, I added strips of foam board which would be supports for the roof and first floors. I then created slots for the cross walls.

Step 5
To assemble the building, I used Resin W PVA. This is quick drying which helps prevent the whole building collapsing as it’s drying. Use the set square to check all is square.

Step 6
At this point, I decided to add a staircase (should have been in the original plan!). I used 1cm x 2cm pieces of foam board to build the spine and then 1 cm strips to build the supports. Then used lolly sticks to add the treads.

Step 7
I decided to add broken windows to the building. To do this I added 3mm strips of cereal pack card as the outside frame for each window. This was the most time consuming bit but now the basic building was done.

Step 8
To achieve the concrete look, I painted the exterior with a thin layer of PVA and then sprinkled fine sand over this. If a bit is missed, it’s better to let the whole thing dry before touching up. It’s important to have the cross walls in place for this stage as the PVA will cause the foam board to bow in at the centre. For the base, I used Builders sand which is courser. When the whole thing is dry, I painted the base using acrylics – dark brown/black followed by a light dry brush. For the walls I started with a base coat of Wilko Mineral Stone, then mixed this with Wilko Biscuit Crunch to paint over everything except the recesses. I’d picked this up from Terrain Tutor. From the same channel, I’d seen tips on applying washes to buildings, by prewetting the surface first so I added a dark wash to the recesses and a Sage Green wash to the lower panels to the ground for Algae. I then added brown stain on some sections and I think this worked well. I then painted the interior using acrylics.

Step 9
I cut the windows from plastic by cellotaping the plastic to my cutting board, then cutting out strips which I gave a jagged edge. These were secured by 2mm strips of cereal card on the inside of the windows. Another long job, when finished. I used a dab of superglue in the corners to secure the panes in place.

Step 10
To finish, I made the door adding part of a cable tie for the lock. I added graffiti and then made up some signs to hang over the doorway. These can be changed as required.

Work in Progress Wednesday

This week has seen a marked slow down in progress reported from the club, typical given this week I’ve actually done something.

Therefore first up I’ve been using some old branches from the garden to make a petrified forest. I’m going for a selection of tree stumps to represent either the remnants of a dead forest or one after shelling or some form of barrage. I’ve got 19 trees and a few fallen logs.

The start of the petrified forest
Next up we have an impressive construction from John L as he continues to build up his battlefield for Zona Alpha. He’ll have a whole city by the time lockdown ends!
Office block in progress

And finally Andy continues to make further progress on his dark ages figures. Once he’s done I might well show each of these stages together from start to finish.

More progress on the Dark Ages

Let’s see if next week shows an increase in productivity, if nothing else I should have finished my forest.

Miniature Gardening

Gardening and Miniature Wargaming are not normally two hobbies that have a clear connection, but on a recent autumnal day club member Jeremey managed to turn green fingers into um… terrain building fingers.

It was time to tidy up the garden and get it ready for the coming winter months. I had recently cut down a shrub that had seen it’s last summer and needed to chop it up for the compost heap. Whilst doing so I got to the main trunk of the shrub and thought (as comes naturally) that maybe it would work as a piece of scenery.

The base of the shrub looking suspiciously like an ancient tree

I’d always wanted an old gnarly tree as a feature piece in a game, especially to act as some ancient druidic meeting place in fantasy games. The shrub had already dried out and so I snapped of some of the branches I didn’t want and then cleaned the stump in the sink with an old toothbrush to get the dirt off. I then put in on the radiator for a while so that the heat would dry it out completely.

Using a bit of foam for the base and some washers to add weight.

I turned to my old favourite EVA foam for the base. I didn’t have a large piece of MDF or something similar for the base. But then I also did not want this on a huge base, just one big enough to support the tree. By using foam I was also able to cut holes in it to sink the tree and branches into it. The tree was quite tall so so I added a bit of weight with some washers to stop it being easy to knock over. The trusty glue gun was used to stick all of this down.

Bathroom sealant and cheap paints.

For basing I went for a material that I have found to be a very cheap and effective way for covering large areas. Bathroom sealant, that is basically any sealant that is used for waterproofing round sinks, baths, showers. For use in terrain building I buy the cheapest version from somewhere like Poundland. I’d never use this cheap stuff for actually sealing anything, likewise I wouldn’t use the expensive stuff from the DIY store to make scenery with. I put an amount in a container and then add cheap acrylic paint depending on the colour required. In this case I added black and brown. Once mixed together I spread it into place with a small stick and then use an old paintbrush to move it around and provide texture. Adding paint can increase the drying time of the sealant but depending on the thickness it should dry in a couple of hours.

Adding a bit of colour and vegetation.

One the sealant was dry I did a bit of dry brushing of the dirt base to give a nice contrast. At this point I did also paint bits of the actual tree with watered down brown ink, this was mainly to ‘dirty’ up the recently snapped off bits so they didn’t look like new breaks and had weathered like the rest of the tree. Finally I added a bit of flock and some tufts. Not too many as I didn’t want the dead tree surrounded by lush vegetation.

The final tree being used as a rallying point for some Norsemen

And there we have it. I think the base of the old shrub works perfectly as an ancient old tree and you’d be hard pressed to find a commercial piece of terrain to match it. I also didn’t have to paint the tree making this one of those projects you can do in a day.


Off the North Cape

Marcus takes us through the set up, models and rules for a clash in the air 1977 style.

I rolled out my sea mat again to do duty as the waters off the North Cape. While it may not have the typical dark grey of northern waters, I am going for a game in the continuous day of mid- summer, at least that is my excuse for using the same sea mat (it is the only one I have, and I like it)
I went for a foundation of the Wings at War rules, with some tweaks of my own.
Aircraft for the game, the TU 128’s and Tu 95 were from Shapeways. The former needed a bit of work with an emery board to smooth off the wings, although one was worse than the other, which only needed a light application. I don’t think the Tu95 required any such treatment. Both aircraft are much lighter than a metal equivalent would be. I have some doubt whether a metal version would work with my ring magnet and ball bearing mounting system. I really wanted to get the Tu128. I love the brutal size and power of it, based as it was on the unsuccessful Tu98 bomber in order to provide the range to defend the vulnerable north of the Soviet Union from bomber incursions. The Saab AJ37 is from Oddzial Osmy, which are available from Magister Militum in the UK.

I understand their models are slightly smaller scaled than those from Tumbling Dice but it isn’t immediately obvious, although I would be cautious about mixing the same type of aircraft from the two manufacturers. The Viggen is an absolute favourite of mine, with the double delta wings and the splinter camo pattern characteristic of the AJ (optimized for attack) version. The later JA (Interceptor) often sported a grey colour scheme which lacks the distinctive character of the earlier scheme. The Yak 28 was sculpted and cast by my friend Stu (he has been waiting too long to see this write up, but more of that later) who has created some lovely models at this size, in particular my “Stingray” collection and some lovely Arado E555 Luft ’46 aircraft! I painted it as a Firebar interceptor. Subsequently I used it as a Brewer E ECM aircraft, and I may just repaint it with the glazed nose from this version. All the other aircraft were from Tumbling Dice.

*Surface search only. ** 2 each of IR and radar homing
I added some adaptations cribbed from the “Phantoms” system, which is based on the Avalon Hill game “Mustangs” but I also owe a debt to Avalon Hill’s “Flight Leader”, notably around the missile and gunfire templates. I also added a radar and countermeasures (C/M) column.

The North Cape 1977:
The object of the game for the FAA was get the Buccaneers off the table and inflict damage on the Soviets. The Soviets needed to stop the Buccaneers and do some damage if possible. I set up the game with the Yak-28 on the northern table edge, and rolled an ace pilot! Two F4K’s came in from the west, with another ace and an experienced pilot. Things began to fall apart for the Soviets as while their ace detected the Phantoms, he was immediately blown up by a Sparrow from the Royal Navy ace. Unfortunately that was Stu’s beautiful model out of the game already! I rolled for reinforcements and the TU 128’s appeared, one green and one experienced.
Along with the Tu128’s, who were unable to spot anything, the Buccaneers also entered on turn 2; spotting their adversaries they dive one level to get into the ground clutter. The F4’s spot the Tupolev’s, but both fail their Sparrow launch roll.
On turn 3 a pair of MiG-25’s now appear for the Soviets and this time the pair are an ace and an experienced pilot.
The green Tupolev pilot detects the F4’s but one AA5 fails to launch and the other misses. I discovered a reference that Soviet doctrine often saw missiles launched in pairs one IR and one radar homing, to increase the chances of a kill. I forgot however, that I wouldn’t be able to use the IR missiles except at very specific angles and treated them all as radar guided. Meanwhile the Tupolev lead also fires a pair and gets one hit on the FAA ace. This is unfortunate for the Soviets as the AA5 is a big missile and more likely to get a kill from a hit. Meanwhile, the ace Foxbat pilot fails to detect anything, but his wingman spots the Phantoms. Unfortunately, the AA6’s fail to launch. The experienced F4 pilot gets off a sparrow shot at the Tupolev, but it misses.
The MiG leader detects the Buccaneers powering across the table at low level but can’t get a lock. They are too low and the angle is too difficult.
The lead Tupolev finally gets a lock on an F4 and launches getting a hit and destroying the F4 wingman. The ace returns fire but misses.
Now another pair of F4’s join the fray, one ace and one green.
At the end of turn 5 the Soviets have scored two Phantoms and the FAA have destroyed a MiG 25 and a Yak 28, but the Buccaneers got off the table too.
Turn 6 and the lead Tupolev has no missiles left and dives, but his wingman detects the remaining ace from the original flight of F4’s and hits with two AA5’s, destroying the Phantom. The newly arrived Phantoms pick up the MiG-25’s; the ace fails with one launch but the second is successful and destroys the MiG. His wingman sees two sparrows miss.
On turn six the remaining MiG can’t make a detection, and the F4 ace tries to get around onto his tail, but unsuccessfully. His wingman turns south. Both Tupolev’s try to evade with the lead turning east on full power at level two.
Turn seven and the ace F4 goes for a sidewinder shot on the second Tupolev but misses, while the other F4 goes after the lead Tupolev. And in turn eight gets a hit, but this only damages the big aircraft, which flies off to the east. His wingman however gets on the tail of the trailing Tu128 and on turn nine manoeuvres with a barrel roll and a sideslip to launch a sidewinder, destroying it. Not bad for a rookie!
Finally in turn ten, the remaining MiG, the last soviet fighter on the table, launches against the F4, which has turned north-east after destroying the Tupolev, but its two AA6 miss.
The Soviets destroyed two F4’s while the FAA scored a MiG, Yak 28, and a Tu 128 with another damaged. The Buccaneers escaped to make a strike on the Northern Fleet. Now you are wondering what happened to the Saab and Tu 142? Initially some things about this game made me think that I wouldn’t write it up and I set up a second game which included these aircraft, and the Yak 28 as the ECM Brewer E.

I subsequently set up another game with a Kashin Mod. FFG covering an amphibious group in the Skagerrak area, allowing intervention by the Swedes. It became apparent to me, certainly as the latter game unfolded, was the lack of Soviet short-range missiles on these aircraft (although subsequently MiG 25PD’s were fitted with AA-8, introduced around 1979). In these games they were all fitted out as interceptors and didn’t have any. In addition, I had given the MiG a wider turning circle. The radar rules seemed a bit restrictive too, and in fact the next game saw six turns of action with only one sidewinder shot, which missed. The Buccaneers failed to get a missile lock on the Kashin Mod. FFG (which also failed to lock on them) and then…I was told it was time for dinner and I had to pack up an unsatisfying game at an unsatisfactory point, especially since this time I had taken the trouble to label each stand with pilot quality markers. I had even named each pilot ready for the report!
More thought about the system will be required before I venture out to the North Cape again. And in the meantime I need to paint some Tu22M’s, get some decals for the flight deck of the Moskva and base both it and the Kashin. But I did nevertheless get some nice pictures of the second game.
On the horizon for my next game is to try WW2 Check Your Six, but I also have some ships to paint for Guadalcanal, so alternatively you might see those appear here next.

Work in Progress Wednesday

This Wednesday’s work in progress sees another week packed with miniatures.

This week Tony F opens with a Rohirrim standard bearer, to keep his hopes of a LOTR figure a week going.

Lord of the Rings Standard Bearer

Next up Andy has continued making progress on his various Dark Age figures.

The multitude of Dark Age miniatures

Eric has managed to finish his crew for Zona Alfa and they are looking pretty good.

The whole crew – “Mad” Gregor, Dimitri, “Big” Mik, Vasily The Kid, Arkady (the leader).

Eric has also managed to put together some critters in the form of Zombies.

The zombies, George and Mildred

And last but not least John L has given us a sneak peak of some newly based Chilean Infantry, just waiting for a bit of vegetation.

Chilean infantry

John mention the following “A new rule book for the Pacific War 1879 – 1885 is out so I might give this a look.” So here’s hoping John gives us some more pictures of this projects.

Painting 6mm Armour using Contrast Paints

The latest innovation in hobby paints has been Citadel’s new Contrast Paints. These are fairly dilute acrylic paints, like a thick wash in consistency but with more pigment than a wash. The idea is to speed up the painting of armies by getting your shading and highlighting in one coat. Having tried them out I’ve been impressed so far, although they do need to be used on areas of heavy detail – they don’t really work on large flat areas when they can result in a very patchy finish.

I thought I’d give them a try on some 6mm AFVs to see how they worked and if they did speed things up. I’m using some Brigade Models 6mm Hammer’s Slammers vehicles to try them out on – nine Prosperity National Army tanks and APCs. These have plenty of surface detail so should be ideal.

All of the models were cleaned up, assembled and then given a good solid base coat of Halfords white car primer.

Stage 1 – Base Colour

The first colour I used was an overall coat of Agaros Dunes (desert sand, essentially). With the Contrast paints you need to take care that the paint goes into all of the nooks, crannies and panel lines – if not, when it dries you can be left with unsightly white spots. So make sure you brush along the direction of the panel lines, not across them. Try not to let the paint pool too much in one place either.

Stage 2 – Camouflage Coat

When dry, I followed this up with a camouflage coat of Militarum Green in irregular stripes across the hull, 3-4 stripes per vehicle. This needs to be reasonably thick, too thin and the colour doesn’t stand out enough.

Stage 3 – Tracks

I then used Gore-Grunta Fur (an orangey-brown) on the tracks – I painted one track on each vehicle, then went back and did the second track – it just gives the first one a chance to dry a bit and reduces the chance of finger smudges.

Stage 4 – Weapons

The only other painting on these models was to pick out some of the guns in silver, followed by a Nuln Oil (black) wash.

And that’s it – battle ready 6mm vehicles using just five paints (plus primer and varnish). I did consider giving them an overall drybrush of a pale stone colour (Citadel Terminatus Stone would be ideal) but they really are fine as they are. Excluding drying time, these took less than an hour so it’s a great way to paint large forces quickly.

Encounter at Cwm Gwyn

Stephen reports on a battle twixt Good and Evil in the Welsh Valleys…

On the border of Shropshire and Denbigh there is a lonely valley that is known locally as ‘Cwm Gwyn’ (White Valley). It has long been said that it is a haunted place. At the head of the valley there is a single stone tower – the White Tower.

For services overseas, fighting against the French, King Richard II gave the land to Sir Ursus ‘The Bear’ FitzArkus. All that was left was for this worthy knight to explore his new holdings and find out exactly what lay at the heart of the mystery of Cwm Gwyn.

This was a game of Dragon Rampant. Each side had 24 points.

Sir Ursus had with him two contingents of billmen, a contingent of crossbowmen, and his household knights.

Slowly they made their way down the wooded valley. It was only when they came to a mountain stream, the Afon Ddu, they heard the sound of a warhorn.

It would seem that rumours of a haunting would be more accurate than anyone dared imagine…

Knights advance down the stream
Crossbowmen take aim from the hill
Zombie horde
Zombies and crossbows clash
Billmen check the zombie advance
Skeletons advance
Lord Ursus descends upon the skeletons
Charge!
Things are starting to look dicey
Kluruch holds the field

Work in Progress Wednesday

It’s another Wednesday and the club seem to be as productive as ever.

First up we have Mark J taking a quick break from his WW2 Germans with this 6mm Slammers Zaporowskiey tank from Brigade Models. Mark says he’s been experimenting with a paint scheme based on the cold war British Berlin Brigade.

6mm Slammers Zaporowskiey tank

Next up Tony F has managed to get some paint on the mountain of Lord of the Rings Figures he has accumulated. In his own words “I failed my one-a-week Lord of the Rings target last week, but made up for it with two this week. On the left we have Rumil, an Elf from Lorien, brother of Haldir – he gets a brief mention in The Fellowship.”

On the right is Harry Goatleaf, gatekeeper of Bree. In the books he was in league with Bill Ferny and joined the ruffians in the Scouring of the Shire, while in the films he was ridden down and killed by Ringwraiths early on, figure is from eBob.

Andy has lined up a selection of dark age figures, undercoated them and started with the skin basecoat.

The start of another batch of Dark Age figures

Eric continues to assemble his Zona Alfa miniatures with another member of the crew.

Another figure to add to the Zona Alfa crew

And last but not least Steve has gone back to building scenery, or in this case a nice set of ruins.

Simple but effective ruins

Let’s hope the club members can keep up this level of painting and modelling. If you would like more information about the projects you see just let us know and we will quiz them on your behalf.

First Shots Fired in the Battle of Shiloh

Club member Sean gets a few turns in fighting the exciting, close run Battle of Shiloh (April 6,7 1862) at home.

In a dawn surprise attack the Confederates threatened to inflict a pyjama-clad rout on the Federals asleep in their tents. We’re playing with modified Fire and Fury rules in 6mm and will have, when the Union soldier finally wake up and get out of their tents, about 4,500 figures on the table. There was a naval element in the battle (the Lexington and the Tyler ironclads, not the casement Carondelet and monitor Pasaic gunboats shown) and the Great Western Battles F&F scenario book allows them the strength of half a battery and an indirect fire range of 16″. Any Rebs silly enough to go within 2″ get canister. But the airforce, in the shape of the balloon, was not present, so is only for decoration.
Two Union, gunboats await the Rebs on the Tennessee River at Pittsburgh Landing
Two miles to the SW three Confederate corps face only two Union divisions roused tousled & disordered
Sherman’s division holds them up but takes losses
The Confederate columns push rapidly towards Shiloh Church, more shed than church
Meanwhile 3Corps, on the right, makes a fast march north to outflank the whole Union position

Hopefully Sean will be able to get back to this game soon with an update on the action.