
**This post has been updated as the steel paper originally recommended for basing is no longer available**
We have a 6mm Napoleonic game at the club tomorrow and Mark has added a Brigade to his French Army for the occasion.
6mm figures are ideal for large battles, but many people think they must be difficult to paint – like anything it is easy if you follow some simple rules and don’t make the mistake of trying to paint them like larger figures. Here is a quick guide on how.
The figures are 1/300 scale Heroics and Ros and the units are the 4th and 46th Line Regiments comprising GB Dalesme’s Brigade, belonging to GD Carra St. Cyr’s Division of the French 4th Army Corps in May 1809 as well as the General’s of GD St.Hilaire’s Division.
Here are the 2 packs of French Fusiliers (FN26), half a pack of French Voltigeurs (FN4), half a pack of French Grenadiers (FN27) and some assorted generals (from FN 17 and AN8) that need to be painted, straight out of the packs.
 It always pays to rinse the figures in warm soapy water before starting to get rid of any mould grease, then work round the edges of the figures with a sharp hobby knife to get rid of flash and any casting mismatches. There is some surgery on the general staff figures to removed unwanted plumes, marshal’s batons, etc, as they were all to be used as French generals. The figures date back to when most people painted their flags and the old style metal flags need removing – good flags really do make or break 6mm figures, so this is worth your time – don’t skimp and put paper flags round the metal – the results don’t look good. Small nail clippers are a good tool to nibble the flag off the flagpole. Try to avoid the eagles, but you can always glue them back on with superglue if they break off!
FIRST TIP – Now base the figures, as they are easier to paint this way. The figure in this post used mounting card with steel paper underneath, but steel paper is no longer available. Instead I now use 40thou plastic card with self-adhesive non-magnetic ferrous sheet on the bottom – this needs to be the thick variety as sold by First4Magnets product code FFU620(SA)-1M. The infantry are on a 1″x.5″ base for our house rules, four bases to a battalion. One battalion is on an open order base (combined Voltigeurs of the Brigade) and this uses a 1.5″ base. There is one combined battalion of Grenadiers and four Battalions of Fusiliers.

SECOND TIP – Now undercoat all over with a black undercoat, making sure that every cranny is filled. You can use spray, but for this size an old brush can be quicker and less messy. DON’T USE WHITE FOR UNDERCOAT – if you do you give yourself a massive painting headache trying to cover the undercoat and then shade the figure to avoid it looking like a paint blob – this a technique for bigger figures! Your black undercoat on 6mm means you have already painted anything black on the figure and you have already shaded it – don’t worry that all you have at this stage is a load of black blobs:

THIRD TIP – It is essential on 6mm to use lighter shades than the colours you are depicting. This is partly to offset the black undercoat and partly to ensure the colour looks right at a distance. Your eye perceives small objects as darker than they really are. If you use dark ‘correct’ shades, all of the figures will simply look like near black blobs when you have finished.
There are three key colours we now need to add. First Dark Blue for the coats and some of the horse furniture. Citadel Ultramarines Blue was used, which is a middish blue pigment. When you paint the coat use a fairly small brush (for these a 101 was used). Work down the line painting the same feature on each base. From the front do a stroke down the left arms of all figures, then the same for the right arm, shoulder to hand (don’t worry about paint getting on the hands). Do another stroke to join these up under the chin, then fill in the lower chest, leaving the black undercoat showing in the crevices between the chest and arms. Repeat round the back. The horse furniture was also painted now (light crimson for the French generals, Vallejo Carmine was used) again don’t paint right up to the next colour – leave black showing around the furniture:


Second main colour is white (and white is – well white, Humbrol white here), for the trousers or breeches (both were used, so for a bit of variety I have done one regiment in each here), as well as coat lapels, which are a prominent feature on French line infantry. Paint up the leg from above the footwear (all left legs from the front, all right legs, then reverse and do the back – a final tidy up to join the legs at the front. Breeches are best done with a horizontal stroke around the leg as far down as the knee. Leave some black showing between legwear and coat. A simple stroke down the middle of the chest for the lapels. Also touch in the drumskin on drummers. To make the command figures stand out a bit better white scabbard and drum supports have been added, but you can omit this! Regimental plumes and pompoms were also done at this point (a simple dob on the pompom):


Now for the last main colour; red/scarlet. Before doing this the Voltigeurs plumes and epaulettes were painted (both regiments used green plumes with red tips and green epaulettes for their voltigeurs at this time) in Citadel Goblin Green – another strong middle shade. Humbrol scarlet is used for the red here, which is a nice bright shade. Paint a red line above each hand for the cuffs (again don’t worry if the paint slops onto the hand). Then paint the grenadiers plumes and a dob on each shoulder for the prominent epaulettes. A dob of red added to finish the Voltigeur plumes and the fusilier plumes are also quickly dabbed in (one base each of dark green, sky blue, light orange and violet for each battalion):


You are nearly there now! Paint the back of the rawhide knapsack with leather – leave the sides black (this is Humbrol Leather) then a stroke horizontally along the back and a touch in from the front on each end of any grey you have to hand for the rolled greatcoat on top of it (shades varied enormously for this item) Brass for the drum body and Voltigeur horns. Masses of gold lace to finish the generals (worth taking some time over these as they are few in number) and the eagle on the flagpoles. Optional extras are a small dob of brass for the helmet plate at the front and the visible sword hilts on the voltigeurs, command figures and grenadiers. Senior generals horses are painted white with a black bridle. The colour makes them easy to pick out. Regimental command horses are painted leather and brigadier’s horses left black. You can leave the underside of the horse as well as the mane and tail black for contrast, a few white flashes on the noses of some of the horses also make a lot of difference.
Lastly a stroke of silver along the top of each musket and any bayonet and drawn swords all over. Leave the rest of the musket black (it really is not worth using brown for the woodwork – the black keeps it looking thin in scale and most musket wood was in any case quite dark, but you can paint the body brown first if you really want to).
Finally add a dob of flesh on each hand and a stroke of flesh across the face to finish the figure. Don’t overdo the face and leave black around it.
Finally finish with an overall coat of matt varnish to protect the figures from handling (I use Vallejo which sets with a good clear finish):


FOURTH TIP – Don’t skimp on basing, as bad basing really ruins any figures and especially 6mm – you would be better off cutting corners on the figure painting. Flock also is not good with 6mm – it tends to make it look like the figures are moving through a patch of dense scrub! These figures are finished with Basetex. DON’T USE TOO DARK A GREEN. If you do it will kill the figure painting. Use a light spring green for both the basing and the terrain. Basetex green is way too dark for 6mm, so a mix of about half and half green and sand is used here, stored in a sealable sandwich box.
First work the green around the base of each figure with a small old brush:

Now use sand to cover the bases (and the sides). A cocktail stick works well to pick up and poke the Basetex into place. Make sure you ‘bury’ the sides of each figure base. Some printed labels are added at this stage for the generals:

Once dry use a really old big brush with a few bristle left to work over the top of the sand with your light green mix – working quickly using a mixtures of dabs and strokes and leaving the sand showing through the green:

That just leaves the flags, which really finish off each unit. The ones used here are adapted from those available free online from Warflag, reduced to around 20% size. Print these on a printer using pigment (not inkjet ink which will run if it gets damp). These were printed on an Epson printer as all Epson printers use pigment based cartridges. Use thin 80g/m paper. The flags are glued with simple PVA, which lets you work with the flag to line up the sides before it sets, then given a ‘crinkle’ to give the flag some life before the glue sets (easier with thin paper). A pair of tweezers is useful to ‘pinch’ the flag around the pole. Once dry it is well worth running round the edges of the flag with a matching colour to get rid of the ‘white edge’ effect – use a little thinned paint for this. Finally flag poles are finished in a dark blue, covering up any glue stains.
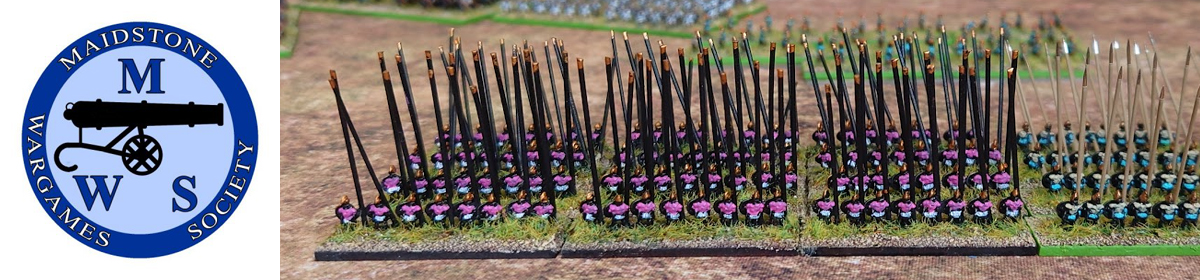
Here is the end result:


Each close order battalion sits on a 2 inch by 1 inch piece of magnetic ferrous sheet (which is why the bases have steel paper/ferrous sheet on their bottom – allowing them to grip the magnetic sheet). As the magnetic sheet looses its magnetism over the years, it is easily replaced. This is why you should not use the magnetic sheet on the figure base – not so easy to replace! The four bases on each sheet can be re-arranged for the required formation (those above are in column). Finally the whole lot sit on a brigade manoeuvre base (8″x3″), which is simply a sheet of steel paper with some Woodland Scenics Spring Green mat stuck on top. This allows the brigade to be quickly moved until it gets into contact.


You must be logged in to post a comment.