It’s Wednesday and another offering of what members are working on.
I’ll start with me for a change, above I’ve almost finished my Vikings. These are the quickest I’ve painted a group of miniatures for many a year. I need these for a game of Saga and so have put in the time to get them done.
Next up Mark has been painting an assortment of miniatures. The first being a bunch of mutants for judge Dredd.
Next we have an Elf Mage complete with fire spell effect. Apparently the spell effect comes as transparent plastic which Mark has painted with a suitable ink wash to look like fire.
Felix has also been doing a bit of painting with a Halfling Thief.
And lastly for this week Stephen has started a dungeon project. Stephen hasn’t decided what to do with the dungeon but promises there is more of this to come.
That’s it for this Wednesday, see you all next week.
It’s the first Work in Progress Wednesday of 2022 and we start the year with a bumper crop.
Eric has found his painting mojo again, above we have some Games Workshop Chaos Cultists.
Next up from Eric we have a rather snazzy looking dino warrior (apparently a Blacktooth Suppressor from Reaper Miniatures) and Theddra Skullscryer from Games Workshop.
Followed by some Games Workshop Chaos Marauders.
And lastly from Eric another Games Workshop miniature Custodian Guard Shield Captain. Never dared paint a miniature gold myself so kudos to Eric for this one.
Next up are a whole bunch of Vikings from me. These are 16 Viking archers and 16 Bondi warriors from Crusader Miniatures. I’m painting these up for SAGA.
Now we move on to Andy who has made progress on his Poles, in his own words “A little more work on the Poles, muskets, packs and greatcoats and fusilier company pom-poms done”.
Tony managed a last ditch effort to reach his target of 50 Lord of the Rings miniatures painted in a year. Here we have three more dwarves from The Hobbit (Dwalin, Dori and Gloin).
Then 3 orc berserkers, clearly in the middle of a workout down the gym.
And lastly from Tony a great looking Arathorn and a dwarf king.
Last but by no means least for this week, Stephen has added to his Sci-Fi collection with a couple of droids, another space dinosaur (must be all the rage) and a converted dog miniature as a sabre toothed pug.
Master builder Stephen takes us through the construction of his latest masterpiece.
I recently ordered a few bits from Scotia Grendel and one of the things I ordered was some standing stones.
It was a nice quick delivery.
I have a soft spot for these old resin scenics – reminds me of back in the early 90s when I started getting into gaming and our local shop stocked them.
Anyway.
What I liked about these pieces were the Saxon style carvings. You see, I like my fantasy couched a bit in history. Problem was that the Saxon carvings only appeared on one side of the top pieces. On the other side was a more literal, typical fantasy, depiction of a dragon.
The dragon designs
And on one side of each of the uprights was an equally typical fantasy style arrow thingy.
The uprights
I didn’t like that.
So what I decided to do was make a mould of the Saxon style dragon, cast it, and use it to replace the dragon I didn’t like.
I used some Oyumaru modelling compound (Ed: other suppliers are available) to make a mould of the Saxon dragon. I then used some of Wilko’s own-brand epoxy resin with a tiny blob of brown paint to cast it.
Casting the new panels
Once this had set I sanded the reverse side down and also sanded down the fantasy dragon on the actual resin piece. I then glued it in place and used some Miliput to blend it in.
With the arrows on the uprights I simply sanded them down and then skinned the surface with Miliput and stippled it to look like the stone effect.
The updated stones
I then turned my head to the base. I wanted it mounted on a rocky outcrop to make it look more dramatic. To keep it light I was going to use expanded polystyrene. However, that’s not the strongest material. So I made a sandwich of it, with a wooden base and a wooden top to which I could glue the resin so it would be more firmly attached to the wood rather than expanded polystyrene.
I used PVA glue to fix it all together and then put a couple of heavy books on it to keep it flat whilst the glue set. I left it a good 24 hours, because the glue takes longer to set on polystyrene.
The polystyrene sandwich
When that had set it was time to glue the standing stones to it. A good dollop of superglue and the basic model was done. I then broke away the surplus expanded polystyrene in the shape of how I wanted the outcrop.
All the bits glued into place
To make the model stronger and more resilient to knocks I decided I would skin the model in Miliput. I used the Standard grade, because that’s what I had to hand.
To create a stone-effect I used…a stone! Yup, went out into the garden, found a small stone with a suitable texture and after the Miliput had been smeared all over I pressed and smudged the stone into the putty.
Layer of Miliput added
The altar stone with sacrificial goat was a piece from…well, I honestly can’t remember. It’s been sitting in the bits bag for a long time waiting for a use. And now its time had come. I also thought about adding a couple of poles with skulls on them. Had a few ideas about that, but it wasn’t the time to add that just yet, so I could keep mulling on it.
Right then, the painting.
Look, stone is rarely grey. That’s not to say there’s no grey stones, but stones have a lot more to them than just grey. Stone painted grey with a black undercoat just looks too stark and is not what stone looks like. It’s as wrong as painting tree trunks brown – have a look at them, they are not the colour of chocolate!
My usual approach with painting stone is to start with a dark brown undercoat. This was no different. I used Humbrol Model Spray dark brown. There then followed a series of dry-brushings using browns and, yes, some grey as well!
Dark brown undercoat
Heavy drybrush with khakiLighter drybrush with khaki and grey mixLighter still with a bit of white added to the mixAnother light drybrush with even more white addedLast very light dry brush with an off-white
With the painting done all that was left were the final touches. I revisited my skull-on-stick idea, but I toned it down. Instead of several I decided to keep it simple with just the one – made from a cocktail stick and skull from GW’s Box Of Skulls.
Weathering and shading done, and skull added.
I used static grass in patches around the base. I kept it sparse on top of the rock because there wouldn’t be so much earth for the grass to grow in. I then added some clump foliage to represent weeds and things, paying attention to add it to nooks and crannies and also the area that may not be trodden on so much.
With that done, the Temple Of The Wilds is complete.
The final model with static grass and clump foliageThe finished article, without festive adornments.
Welcome to the last work in progress post of 2021.
We start this week with Eric’s progress on his space marines. Above we have Ahriman the Sorcerer of the Thousand Sons, Gregor Felhand of the Space Wolves, and below a whole host of Thousand Sons legionnaires.
Next up Andy has made progress on his Polish troops, the yellow is looking good.
Now we have Mark with some more Dwarves (has he got any left?).
And last but not least Phil has started making progress on a future show game for the society with some new Romans.
That’s it for 2021, we will no doubt have lots more projects for 2022, so see you then.
Welcome to another selection of what some of the society members are working on.
First up Tony has finished painting his Rebels and a few other characters. In contrast Phil has only managed the undercoat on some Storm Troopers, although you could probably argue they are nearly finished.
Next up Mark and his son have been busy once more.
We start with some more Orcs, trackers this time.
And a better picture of some hated dwarves.
There’s also been some progress from Mark on the Judge Dredd civies.
And last but not least Andy has made progress on his 10mm Polish Napoleonic. Andy is working out the best way to paint the yellow aspects of the uniform.
That’s it for this week, see you next week for the last WIP Wednesday of 2021.
Club member Jeremey takes us through building and painting his modern take on the classic earth Elemental.
While I certainly wouldn’t consider myself to be a professional sculptor, I have made a number of miniatures over the years. This miniature, the Concremental came out of an idea to create a modern version of the very familiar Earth Elemental. I was lucky enough for this miniature to be cast and so here is my attempt to paint it.
The miniature is currently being sold by Fenris Games and comes in several parts as shown. Therefore the first thing to do was to glue the parts together. The miniature is made of resin but I found superglue worked very well in sticking it together.
The miniature fit quite well on a 50mm round base and I stuck the spare bits of concrete that came with the miniature to the base.
I then added some milliput to the base to provide a texture to match the miniature.
Once the milliput was dry I sprayed the whole thing with Halfords grey primer. It was at this point that I first thought how on earth I was going to paint it. After all, concrete is grey so do I just put a black wash over the miniature and leave it at that or do something else.
I decided to try something different and painted the various concrete blocks in different shades of grey. I then dry brushed the miniature with lighter shades, before finally adding a very watered down black wash.
I then painted the traffic light pole silver and the steel reinforced bars as rusted metal. The traffic lights I did in yellow, I didn’t actually sculpt the traffic lights and they are clearly in the American style that I’ve seen in yellow.
Once all that was done I felt the miniature needed something else, so thinking the miniature would be made of modern street materials I painted road markings on the flat parts of the miniature.
The miniature started to look much better with the markings but they were too clean and bright, to remedy this I actually took a file to the whole miniature to distress the markings. This worked really well and gave the whole model a nice worn look.
Now all I need to do is find a game to put the Concremental in.
It’s Wednesday again and we have another offering from members on their current projects.
First up Tony has been putting together another unit for Hammers Slammers. These are apparently the Sincanmo, a sub-saharan Islamic inspired unit equipped with fast attack buggies, heavy armoured cars and mounted infantry on giant lizards. The miniatures and vehicles are all from Brigade Models.
Some of the vehicles still need crews to be added.The vehicles are a mix of wheeled and half tracksAnd some cool looking Lizard riders
Stephen has added yet more characters to his Sci-Fi collection and a drone.
More space bums and ne’er do wells…
And lastly this week, Mark and his son have been painting up more Lord of the Rings miniatures. First up some Mordor Orcs and a Ring Wraith.
And their hated enemy the Dwarves.
We’ll be back next Wednesday with more from the club.
This week we start with the giant Zombie Stephen was working on. He’s kindly added a Zombie from the Celtos range for size comparison.
Next up I’ve made a small amount of progress on my trees. These were bought from the shop ‘The Works’. Nice and cheap but a little threadbare compared to the ones I bought from them last year.
I’ve also managed to undercoat some 15mm Sci-Fi troopers to go with my Dropship conversion. The infantry are Brigade Models PacFed.
Now we have some more Dredd stuff from mark. This time a Judge Cadet and bike. These are from Warlord Games.
And last this week Mark’s son continues to produce some good work. This time some Uruk-Hai soldiers.
I do like those armour tones. Well that’s it for this Wednesday, see you next week!
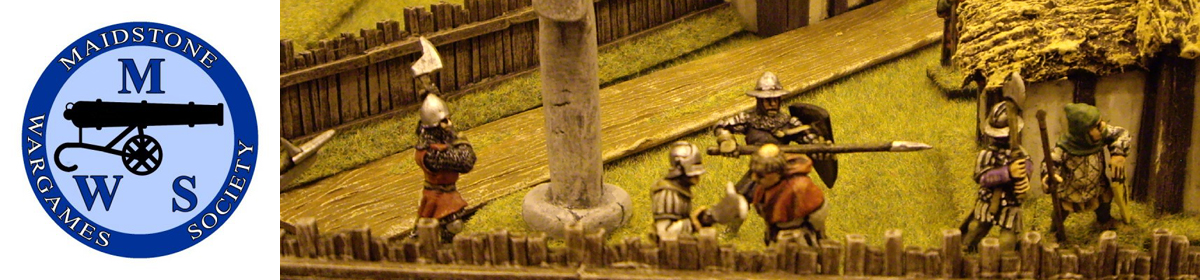
Mark J guides through his painting technique for 6mm HYW figures.
This article follows on from my first 6mm painting guide, “Painting 6mm Romans” which appeared on the Maidstone Wargames Society Blog in May 2020. So, it’s been a while since my last blog, but I’ve been busy painting more 6mm over the last 12 months or so. This article covers my English 100 Years War army. This is another FoG army, we still play 2nd edition at the club, however I have also built the army to use with MeG and you could use it with any rules system that doesn’t stipulate base sizes.
The army is loosely based on that which fought at Crécy, very loosely as I just wanted to pick a point in history to use, my army commander is painted as the Black Prince.
The figures are from Baccus, while they are listed as 6mm, they’re closer to 8mm. I really like them and there’s a wide range of periods available which continues to expand. The painting method I’m going to take you through is block painting, which begins with the application of a dark undercoat and then adding brighter colours to bring out detail, while retaining some of the dark undercoat to emphasise shadow.
Longbows
I use a black undercoat as I find it works well at this scale, however you need to be careful not to overuse the base colour otherwise your figures will look like dark blobs on the battlefield. The idea with block painting is to trick the eye; this is where the brighter colours come in, as you’ll see below, I’ve used quite vibrant colours on the longbowmen. This would look odd on a larger scale but is a must at 6mm.
So, start by washing your figures in warm soapy water and then gently dry them off with a tea towel or just leave them somewhere warm or in sunlight to dry; this will remove any casting residue which can interfere with the paint and stop an even coat forming. I then spray my figures black with an acrylic spray, I use a matt black spray from a national hardware chain, it’s cheap and works very well. Always wear a mask and ensure you’re in a ventilated room when doing this.
I’m going to start with a unit of longbowmen, there are 64 figures in each unit, I find I can paint one unit in a couple of hours, ready to base. Once the figures have dried I, begin by painting the main part of the body, in this case the tunic working with a strip of 4 figures I paint the front of the tunic remembering to leave some parts black, the belt, collar quiver, scabbard and under the arms. You don’t need to be really accurate here, paint your first strip and then look at the figures from about 3 feet away, if they look right then you have accomplished the first part of the ‘trick’.
Longbows and Command
Carry on painting each strip and then repeat the process on the other side of the tunic, you’ll notice that Baccus longbowmen are not all the same, some carry their arrows to the front others to the back, some have small shields. Just follow the principle of using the undercoat and leave these black for the moment. Remember to go bright, a general rule of thumb is to go 2-3 times brighter than you would at 28mm. You can see from the picture below how I’ve used a bright pale blue and yellow with one unit and an orange with the other. Both can be seen from the battlefield and don’t look out of place. They would look out of place at a larger scale for this period, but the rules of painting are different for 6mm, trick the eye with bright colours.
Once you’ve completed the tunic it’s now time to move onto the bow, quiver and scabbard. I use the same colour brown for these, again this would not work with a larger scale but is fine for 6mm. You can use differing colours, but they won’t really stand out and will take longer. I find a light yellowish brown works very well. Again, follow the front and then back method that I describe above, I find this gets me into a good rhythm, which gets me through a unit quickly but means I achieve the effect I’m looking for. This method also works well if you’re painting multiple units. I tend to do 3 at a time and can complete three units, fully based in around two evenings, 1 evening at a push.
Massed Longbows WIP
Once you’ve completed the bow and leatherwork it’s time to work on the metal parts, for the longbowmen this is their helms, shields if they have them and sword hilt, note that the sword hilt is optional, the figures will look fine without this. Again, apply to each strip front first and then back. With the helms it’s really important not to overdo things, too much silver and it will look like a huge silver blob, this is where your skill with a brush comes in and using the undercoat to provide shadow. I tend to use a semi dry brush when applying the silver, not as dry as I would when dry brushing, general rule of thumb is to apply enough paint to your brush to cover a couple of helms lightly.
Close up of the Longbows, showing the effect of leaving parts of the undercoat visible
It’s now time to move onto the flesh, I use a light pink flesh colour, those often used to highlight larger scale figures’ flesh. Again, front first then onto the back, you’ll see with the longbowmen that most of the work is covered from the front of the figure but it’s worth checking the back just to ensure that the flesh can be seen from all relevant angles. Paint the flesh in the same way you painted the silver, less is more. Try and keep a gap between the hands and cuffs and face and neck, this is where the dark undercoat really works well, this sounds hard, but it’s easily done with a little practice. Don’t worry if you don’t achieve this on every figure, remember you’re looking for an overall effect that will usually be viewed from the battlefield, tricking the eye with shadow and bright colours.
Once the flesh is done, then figures are complete, I usually quickly check each strip as you can miss some parts when painting large numbers of figures. Once dry, I then varnish the figures with a matt varnish. I spray my figures, if you do the same then make sure you’re not doing this in a cold room as the spray reacts to cooler temperatures and can fog, giving your figures a dusty look, which is a complete disaster at this scale as it obscures all your hard work. If this does happen, let the figures dry and then apply gloss varnish and another light coat of matt. I find a quick spray does the trick, again less is more. If it feels too cold don’t spray!
Basing next, I use a similar method to the Baccus basing, I apply a ready mixed earth texture paint first, make sure to apply up to the base not over it. Once this has been applied it is time to highlight. I use the Baccus 3 colour system, which starts with a dark beige colour moving up to an almost bone white, simply dry brush the bases. Once this is done it’s time to add some static grass, you’ll need the smaller grade, 3mm I believe. Apply some watered down PVA to the front and rear of the figures and where there are any gaps along the line. Once done sprinkle some static grass over the figure; what you’re looking for here is enough to hide any of the metal base while not covering the figure. The picture below shows how it should look.
Massed longbows, the bane of French Knights
OK so that’s how I paint 6mm longbowmen, for the men at arms use the same principles but when doing the armour ensure to use the undercoat well, leaving gaps works really well with armour. Use the same brown for any wood or leather and the same method for flesh. If you have any troops with padding, then apply this using the bright colour and shadow approach, you can see some mine below.
Billmen WIP
Finally, I painted the generals and camp using the same method, took a bit more time on some detail, but the same rules apply re tricking the eye. Up close they look a little messy, on the table they look the part.
The camp was done using a white undercoat and special contrast paints for the tents, the pigs, fires, well and baggage have a black undercoat with a block technique applied.
The Camp
The next few photos provide some completed units, in all there are 6 of longbow (8 bases each) and 6 of men at arms (4 bases each).
A selection of the retinue
Archers and their stakes
You’ll also notice some stakes placed in front of the longbowmen, these were scratch built using wire and Milliput. I cut the wire into 10mm long pieces, placed some Milliput onto a base and then added the wire to the Milliput at around a 30 to 40 degree angle. It was then a case of painting the stakes dark brown with bone white tips, and then basing using the same method described above. The stakes are bigger than they would have been relatively speaking but this is required to catch the eye and look right on the battlefield.
I hope this has been helpful, I hope to have another guide out soon covering my 6mm Spanish Napoleonic.

 Next we have an Elf Mage complete with fire spell effect. Apparently the spell effect comes as transparent plastic which Mark has painted with a suitable ink wash to look like fire.
 Felix has also been doing a bit of painting with a Halfling Thief.
 And lastly for this week Stephen has started a dungeon project. Stephen hasn’t decided what to do with the dungeon but promises there is more of this to come.
 That’s it for this Wednesday, see you all next week.


 Next up Mark and his son have been busy once more.


 I’ve also managed to undercoat some 15mm Sci-Fi troopers to go with my Dropship conversion. The infantry are


You must be logged in to post a comment.