Maidstone Wargames Society held their first meeting of the year on Saturday. This meeting includes our AGM so often has a good turnout.
Around 24 members were in attendance for the meeting. The AGM was, as usual, short, only around 30 minutes. Also, as usual, the existing committee was re-elected without opposition. Despite the chairman’s pleas to be released!
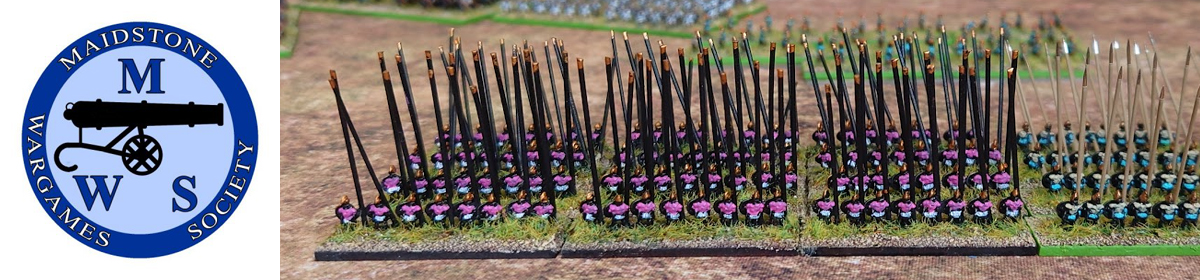
There was also a very good turnout of games, covering a variety of scales, periods of genres, here’s a short photo round up.
John L brought out his 1:1200 Baltic Galleys for some Naval action.
Another naval game, but a few centuries later and under the water rather than on it, Peter M staged a 1:100th Stingray game, “Anything can happen in the next half hour“.
Paul and Colin brought out some 3mm Ancients for some FoG games.
Tony G and Stephen both fielded Anglo-Saxon warbands for some 28mm SAGA games.
Some more recent conflict now, some late WW2 Chain of Command action staged by chairman Mark J with 28mm vehicles and figures.
And last, but by no means least, Tony F and Phil staged a battle from the Lord of the Rings, again in 28mm.
That’s it for the round up of the first meeting of the year.
MWS meet on the 2nd and 4th Saturdays of the month (except the 4th Saturday in December) from 10:00 to 17:00 at Linton Village Hall, south of Maidstone on the A299.
Information about the Society, including directions, can be found here.
The diary of planned games can be found here, this is updated throughout the year so please have a look from time to time.
Stephen umpired the game and ran the Communist forces. The US forces (A Company, 2nd Battalion, 173rd Airborne) were under the command of Captain Pete, who also ran the Weapons Platoon, with the three Rifle Platoons under the command of Lieutenants Tony F, Andy and Jeremey respectively.
We’ll start with Stephen’s summary of the game:
A Company of the 2nd Battalion, 173rd Airborne, scored an important military victory against the North Vietnamese Army today.
Led by Cpt Pete the company advanced up Hill 875, located the enemy and engaged them.
It was 3rd Platoon under the command of Lt Jeremey who first reached the top of 875. Meanwhile, a grenadier of Lt Andy 2nd Platoon earned recognition for posting a M79 round through a bunker slit. Lt Tony’ 1st Platoon got bogged down in a vicious firefight and took several MIA.
Company mortars, and a Huey gunship that shredded some NVA recoilless rifles, helped the 173rd to victory.
News on stateside TV reported the battle and civil demonstrations ensued at the loss of American life. It may have been a military victory for the US but the NVA scored a political victory.
Here follows the US Platoon commander’s accounts of the battle.
1st Platoon
First Platoon (Tony) advances early in the game.
This is as far as I got, a vicious firefight with an NVA platoon (and some less than favourable activation draws) saw me pretty much stuck in place for the rest of the game.
The NVA platoon in question, about to receive some 60mm mortar vengeance courtesy of Pete.
The 1st Platoon under fire and pinned. 1st squad suffered badly (7 KIA out of 10), although remarkably 2nd and 3rd squads emerged from the action unscathed.
2nd Platoon
2nd Platoon (Andy) A Company were deployed at the base of Hill 875 with the Weapons Platoon and Company HQ to our left, and 3rd Platoon to our right.
The platoon began its advance with 1st and 2nd squad leading, with 3rd Squad and the Platoon CO in reserve.
1st squad soon spotted insurgent troops further up the hill, the first of the Company to do so, and promptly engaged them. 2nd squad and part of 3rd squad joined in, the remainder of 3rd squad being out of line of sight of the enemy. The fire was effective, causing part of the enemy unit to suffer casualties and become pinned. 2LT Andy reported the sighting to CPT Pete, with a request for mortar support.
3rd squad deployed from reserve to the right of 2nd squad in order to bring its full firepower to bear.
The firefight with the enemy continued, with 3rd Platoon joining in, both 2nd and 3rd Platoons suffered some KIAs, but appeared to inflict more than they suffered.
Under the relentless fire of 2nd & 3rd Platoons the insurgents suffered further casualties and were seen running from their positions back over the crest of Hill 875 and presumably they continued down the reverse slope.
Slightly later a few ranging rounds began to land near 2nd Platoon’s position, expecting an NVA mortar barrage 2LT Andy ordered all squads to advance up the hill as fast as they could. 1st & 3rd squads succeeded, but 2nd squad got bogged down and didn’t move very far.
1st squad’s success in movement proved to be their undoing. They soon came under heavy automatic fire, believed to be either a DShK 1938 or KPV heavy machine gun, in a previously unseen bunker.
1st squad took a couple of casualties, but immediately hunkered down and returned fire, the squad’s M79 gunner achieving an excellent shot which put a 40mm HE round into the bunker, silencing the HMG.
2nd and 3rd squads advanced past the battered 1st squad, joining elements of 3rd Platoon in sweeping across the hill, engaging the remnants of the NVA defenders in the flank and driving them from the hill, at the cost of some more US KIA.
Eventually 2LT Andy’s prediction of a VC mortar barrage came true, but by the time it arrived on it’s original target all US forces had moved further up the hill and none were in the beaten zone.
As 1st squad looked after their dead they discovered a food and material cache buried on the hill side.
The mission proved to be something of a Pyrrhic victory for 2nd Platoon, we engaged and defeated the enemy, destroying a bunker and locating a cache, but at a cost of 5 KIA, 4 of them in 1st squad.
3rd Platoon
3rd Platoon (Jeremey) deployed on the far right of Hill 875. The mission was to assault the hill and so I decided to get moving and threw caution to the wind and advanced quickly up the hill.
Unfortunately after a few moves this left my three squads quite scattered. On top of that the first contact with the NVA turned out to be a real unit who immediately scored a casualty. My return fire was more effective and with support from Andy’s 2nd platoon the NVA were soon routed.
Despite the resistance I decided to continue my advance up the hill, I reached the top of the hill without further resistance but then the bunker was revealed along with more NVA troops. I took a few more casualties and would have taken more if not for Andy’s 2nd Platoon taking out the bunker on the first try.
Laying down some more fire on the remaining NVA, they routed and we claimed the hill.
Company Command
A company’s Forward Observer (Pete) performed well by adjusting the ranging mortar rounds and the subsequent Firing for Effect on the NVA positions on the hill which contributed to the general degrading of the enemy.
Also, significant contributions to the victory came from :-
Lt. Tony’s 1st Platoon made steady progress up the left flank but took heavy casualties due fire from a heavy weapons squad with recoilless rifles. These were suppressed by the fire of the Co HQ’s MG squad lower down the hill.
Lt. Andy’s 2nd platoon’s impressive accurate fire which neutralised the fortified position on the summit of the hill soon after the position was observed. The HMG in that bunker would have caused devastating casualties if not dealt with swiftly.
Lt. Jeremey’s 3rd platoon made a rapid advance up the slopes of our right flank, although sustaining several casualties, routed the enemy troops before them.
Although Air Support was requested, a Huey gunship arrived after a delay due to the Priority 2 rating of our Area of Operations, but completely destroyed the NVA Heavy Weapons squad enabling all platoons to advance and secure the enemy position on the summit of the hill, seizing enemy weapons and rice caches on the way.
I, Capt. Pete commanding officer of A Company,2nd Battalion,173rd Airborne, recommend citations for all the commanding officers of A Company platoons.
The view from the other side of the hill
The NVA side of things, as recounted by Stephen. Hill 875 was occupied by a reinforced NVA company – three rifle platoons with AK47s, a pair of recoilless rifle teams, plus the regimental HQ (historically, the rest of the regiment was situated in the hills adjacent and being engaged by the ARVN). Regimental HQ had a mortar spotter (the mortars were actually sited on a hill to the west), wireless team, and HMG in a bunker.
My general plan was to close with the enemy as soon as contact was made to mitigate against the inevitable artillery and airstrikes the US would call in, a tactic referred to as “belt-grabbing”.
The bunker being taken out promptly by US 2nd Platoon took the smile off my face. That HMG would have caused havoc and blunted the US advance and I was going to walk the mortars up to leave the US forces
sandwiched between the HMG and the mortars. But it never came to that.
It was a very historical outcome – the US captured the hill but suffered heavy casualties doing so, and there was considerable public outcry because of it.
And the final word also goes to Stephen:
Thanks to Andy, Tony, Pete, and Jeremey for making it an enjoyable game as I learn the rules. But a special thanks to Pete for his help and knowledge.
Just need to come up with a better name than the toe-curling ‘Big Men’ next…
Club member John reports on a game from a lesser known historical conflict.
Introduction
Our youngest daughter lives in Chile and she gave me a copy of ‘Andean Tragedy’ a history of the Pacific War 1879 – 1884. This detailed book covered the war between Chile and the allied forces of Peru and Bolivia, a war which started over mining claims in the Atacama Desert. The area was an important source of Nitrates for explosives and fertilisers and when the Bolivian government sought to tax Chilean mining companies mining on Bolivian soil, war was inevitable.
It was impractical to march a Chilean army by land through the Atacama Desert so the initial campaign was a Naval one (itself a good subject for wargaming) where Chile gained control of the sea and could then launch amphibious operations initially on the Bolivian coast and later the Peruvian coast. These were successful with Lima being captured and resulted in Bolivia being land locked (still contentious today). A later Guerrilla war took the fighting high into the Andes before Peru was finally defeated.
The Andean Tragedy, W.F. Sater University of Nebraska Press, Jan 2007
I started to paint up forces from Pendraken intending to use ‘Principles of War’ as the rule set but in 2020 a new rule set ‘It’s Getting a Bit Chile’ was launched and I decided to use this period specific set. This required more troops and a gridded cloth. The project stagnated then Stephen kindly donated me a cloth, the reverse side being ideal for a desert, it was the kick up the backside I needed and within a few weeks I was ready.
Chilean infantryBattalion Misti PeruBolivian Colorado BtnLibres del Sur BoliviaArtillery
Review of ‘It’s Getting a Bit Chile’
It’s Getting a Bit Chile, G. Evans, Wargaming for Grown Ups Publications 2020
I was attracted to this set of rules for its period specific nature which I felt was merited after reading ‘Andean Tragedy,’ I didn’t want to use any generic 19th Century rules. When I received my copy, I realised it was more than just a rule book. The book includes a history of the war, a uniform painting guide and a bibliography, it is well laid out and the rules are easy to follow with diagrams to help with explanation, there is a scenario included with the rules and a quick play sheet is included. I also discovered that the author had visited the same location in Peru which was his inspiration, the previous year to us.
The rules are army level where each army can be organised into divisions, though these are smaller than European armies. The rules are I go – you go. The lowest organisational unit is an Infantry battalion or Cavalry Regiment consisting of four bases, Artillery are a single base. Unit formation is determined by how the bases are aligned in a grid square.
Each formation has a different number of firing bases, support bases and melee bases and is a specific target type if fired at and a separate melee target type. For combat a dice is rolled for each eligible base and the sum of the dice rolls is compared on a “To hit multiple” table to determine how much damage is dished out. This avoids the 6 to hit method of casualty calculation and damage is instead noted as disorder. A fresh unit with no disorder fights using a d8 per eligible base, a unit with one disorder uses d6’s and a unit with two disorders uses d4’s. If the target formation has a support base, a disorder marker can be absorbed by the support base allowing the formation to fight unaffected if all disorder is absorbed. Changing formation can reduce the number of support bases and hence increased unabsorbed disorder, reducing fighting capability. Disorder can be rallied off by the unit itself or an adjacent Divisional or Army Commander and this is key to maintaining fighting capability.
The “to hit multiple” table and disorder mechanic are very neat and set these rules apart.
Play Test
The set up
As usually happens with a new project, there was lots of last minute stuff to do which meant I hadn’t spent much time on planning a scenario. I decided to have three objectives on table, two minor ones were to secure water supply either at a village or Nitrate mine.
Peruvians advance on the villageChileans occupy the Oficina
The main objective being capturing the hill. The Allied forces had an extra infantry battalion and an extra Cavalry unit, this last tied down some Chilean artillery as it threatened to outflank.
The Battle for the hill
In the centre, the Chilean assault on the hill ran out of steam and in true style, the Chilean Cavalry followed the routed Bolivian cavalry off table.
The Cavalry Battle
Thanks to Tony Gibbs and Jon Roche for helping. The rules played very smoothly with hardly any queries. Afterwards, I read through the rules again and posted some queries with the Author. I received an e mail back within 24 hours so excellent support.
Next Steps
I have three Peruvian battalions ready for painting and artillery limbers have arrived this week. I’m considering the small dice holders and dice to keep track of disorder. Whilst the card buildings are OK from three feet away, I’m considering making some better alternatives. Finally, I’ll need to put some time aside to consider scenarios, perhaps working those into a campaign.
Stephen reports on the beginning of a new Lion Rampant Campaign. Andy’s apologies for taking so long to get this onto the blog.
After the debacle of our Crusades campaign I demanded satisfaction from Andy and we agreed to another campaign based around the Norman Conquest.
My Normans rarely see the light of day so this was a chance for me to get them out and gain a bit of glory. Andy took the English.
In the same vein as the Crusades campaign we upped the points values a bit – two 24 point forces, two 30 point, and the final game would be a 48 point bloodbath. Each army gets an extra free point that can only be spent on Leader skills (though more points can be taken from the army total to buy more expensive Leader skills). As before, army lists have to be drawn up ahead of the campaign and assigned to each battle before they are rolled for.
So to kick off we rolled to see who would be Red (Andy) and who would be Blue (me).
And then we rolled for the first encounter of the campaign – we rolled The Village and then rolled again to see which specific scenario – The Taxman Cometh!
So it begins.
For this first game I had a 24 point, fully-mounted, force. I purchased the Strongbow Leader skill. My force consisted of 2 Elite Cavalry (the knights), 2 Heavy Cavalry, and 1 Heavy Cavalry with crossbows.
Andy’s Anglo-Danish force had 30 points, comprising 2 x Elite Foot (1 containing his leader), 2 x Heavy Infantry, 1 x Light Infantry and 3 x Skirmishers. Andy’s leader purchased the Commanding Skill.
Club member Mark placed six tax counters face down on the terrain – these all had a (hidden) value and each side would gain Glory equal to the total value of counters they could get off the table. In addition to this players gain Glory for making Boasts. My Boasts were ‘I shall strike the first blow’, ‘They shall tremble before me’, and ‘I shall burn their homes’. Andy went with ‘They shall tremble before me’ and ‘I shall destroy more than I lose’.
One of the counters had been put in a church and, since I had a mounted only force, we had to make a decision on mounted troops being able to enter a building. The rules say nothing on this. So we rolled randomly and decided that mounted troops could not enter buildings. Although this went against me it made absolute sense and was the right decision. However, this left me with a dilemma – it meant that I would be unable to secure one of the tokens. This shaped my choice of Boasts. I decided that since I would be unable to get it I would try to deny it to Andy by burning down the church! I think you’ll find that such actions are all part of the job description and duties of being a Norman tyrant. (Andy: Sacrilege!)
The first couple of turns of the game were a general advance on both sides. We both did well on Activation rolls and as I recall we both managed to activate all units for the first two turns.
Norman knights out for a ride
Andy had put his skirmishers on his flanks, where two of the tax counters were hidden in the woods, and he managed to secure both. He also made a general advance in the centre with his light infantry, heavy infantry, and dane-axe wielding elite huscarls.
Anglo Danes take the hill
I steered one of my units of heavy cavalry to the woods on my right flank to get the tax counter there, and my mounted crossbows to snatch the tax counter hidden in the woods in the centre.
Shall we shoot or shall we burn something
Those had been the easy ones. The struggle was going to be for the two central tokens – one in the church and the other in some ruins.
View from the Anglo Danish side
Surprisingly, Andy’s unit on his right took their token and fled the table (you only count tokens you get off table). I thought they might stick around for a bit longer to hold the flank. Then he advanced a unit of skirmishers into the ruins to claim a third token.
View across the battlefield
That was annoying, but I saw it coming. I knew it would be difficult to budge them – we classified the ruins as rough going with cover. This made it all the more essential that he didn’t get the token in the church. With that in mind I activated my archers to loose their bolts at the English light infantry who were approaching the church doors. I scored a couple of casualties and this forced him back. With my mind on the Boasts I’d made, I then stuck the spurs into the Leader’s unit and charged the English heavy infantry.
Norman Lord leads the charge
We caused casualties on each other but we both passed our Courage checks and bounced off each other.
On your marks, get set, go!
I then took my chance with the church. A unit of heavy cavalry had moved up and now I made a roll to see if I could burn it. With only 6 men in the unit this meant I needed a 9+. I rolled and scored…11!
Up went the church. This meant it now counted as impassable terrain making it impossible for anyone to get the last tax token. That’ll teach those English rebels, I laughed haughtily.
Normans set fire to the church
Meanwhile, out on my right flank, I could see Andy was trying to find a way of harassing me with his unit of skirmishers. Problem was that in the woods they were safe but out of range. To get in range they had to leave the woods and this would put them at risk of a cavalry charge.
Then something unexpected happened.
On Andy’s activation he charged his heavy infantry into my Leader’s unit. I rolled to counter-charge but failed!
Anglo Dane Elite Infantry charge the Norman Leader
Oh well, I thought – those knights are well armoured and might take a casualty but not the end of the world. And, yes, they did take a casualty. But I rolled a double 1 which meant it was the leader that coped it!
Down he went.
The Normans were now leaderless.
However, one thing was in my favour. The two tax counters I had were high value ones, and I’d also managed to fulfil all my Boasts. So, despite the loss of my Leader, I figured I was still in a strong position.
Problem now, though, was that my mounted crossbows, who had a token, were in a difficult position with both the English heavy infantry and elite infantry getting within charge distance. If I lost them, and their token, then the fortunes of war would be reversed, and I could see in Andy’s eyes that he knew that too.
So the race was now on – get off the table with what I had.
Being mounted had an advantage because I was faster than him. Andy started pulling back his skirmishers with the tokens to secure them, whilst trying to put the pressure on me.
It got a bit hairy when I failed an activation roll to move the crossbows, but Andy was just out of charge range and the following turn they were off and that was the end of the game.
I had secured 5 points of tax tokens and gained another 5 Glory for my Boasts plus an extra 0.5 Glory for facing a larger enemy. This gave me 10.5 Glory.
Andy also scored 5 points of tax tokens, but failed to achieve either of his boasts, so lost a point for each, giving a total of 3 Glory
The first game went to the Normans with a convincing 10.5 to 3 win.
The winner gets to choose the next game and I chose The Road. We rolled for the specific scenario and came up with Meet The Neighbours.
In this game players start in opposite corners and gain Glory for units they get off the opposite corner (plus Boasts).
In this game I had 30 points and my (new) Leader had also taken Strongbow. My force consisted of 2 Elite cavalry, 1 Heavy cavalry, 1 Heavy infantry, 1 foot crossbows with pavises, and 2 skirmishers. My Boasts were ‘Their arrows shall be lost like tears in the rain’, and ‘I shall avenge them’ (I chose his Leader’s unit – after I had lost my Leader I couldn’t let him get away with all the goading that would be coming and had to even things up!).
Andy had a smaller force this time, only 24 points, a single unit of Elite Infantry containing the Leader, 2 units of Heavy Infantry and one of Light Infantry, the force being completed by 3 units of Skirmishers. Andy’s leader purchased the Commanding Skill again.
Boldly he chose ‘Half the Enemy shall fall to my Swords’ and ‘I shall destroy more than I lose’. At least he’d start with an extra 0.5 Glory for facing a larger enemy.
Going into the second game I was cautious. Andy is a very good player and could easily turn fortunes around. So I decided that I would avoid combat where possible (the exception being to nip off the English Leader). My plan was to advance as quickly as I could with the infantry and use the cavalry to protect flanks and threaten any English units if they tried to attack.
That was the plan.
So the game started. The problem we both had is that we couldn’t get all our units in the deployment area, meaning those units off table could only come on with a successful Move activation. Andy went first and made a general, broad, advance. He managed to activate all his units and even bring on the excess unit.
Off to war they go
Things didn’t go quite so smoothly for myself. I started with my Leader’s unit off-table. The first unit I tried to activate failed and without a Leader to prompt a second attempt that was it! The English advanced again.
Back to me. Well, a bit better – I managed to move one unit, which created a gap for me to bring on the Leader. Which I failed. He had another try. Failed again! That breakfast croissant or pain au chocolat was obviously keeping him busy.
Andy advanced again. He swung two units of skirmishers south, toward an area of woodland which meant that if I wanted to advance that way I’d have to endure some bow fire.
By this time Andy was halfway across the table. I’d moved some units but still had others in the deployment zone. It was obvious my plan of getting across the table was going to fail. Andy would be off sooner than me and would win the game with a good score. I had to change my tactics. The only way I could win is if I prevented Andy getting off the table and the only way I could do that was by eliminating his entire army! I went on the attack!
Norman firing line
It was more by luck than design. By the time our two forces came face to face I hadn’t advanced too far but the position I found myself in was an advantageous one. To one side of the road was a hill and to the other was an area of rocky ground. I decided I would put the crossbows on the hill, the skirmishers in the rocky ground, and use the heavy cavalry and spearmen to plug the gap with the knights behind to act as a mobile reserve where they could either exploit a gap in the enemy or charge to the defence if the enemy broke through. It was a strong position which I can’t take any credit for.
The key to this would prove to be the rocky ground. I think Andy recognised that and I could see him manoeuvring units that way to launch an attack. Lines were drawn. Now the battle started.
Anglo Danish thanes and huscarls make a steady advance
My skirmishers in the rocks opened fire (thanks to the Leader’s Strongbow skill) on Andy’s light infantry, causing a couple of casualties. Meanwhile he started moving the heavy infantry around the side of the rocks and his Leader’s unit came forward. The English skirmishers opened up with some desultory bowfire – thankfully the rocky ground provided good cover.
Norman archers in the stones
Seeking an opportunity I thought I’d try my luck. With his Leader within charge range of the Norman heavy cavalry, and an eye on my Boasts, I thought I’d give it a go. In went the cavalry. I caused one casualty against the English (failed the Lucky Hit to bag the Leader) but Andy had given me a fair wallop – I took three casualties. Not only were the Norman cavalry Battered but they were at half strength as well. Oh well, I thought, I’ll use them as an expendable unit and see what more damage they can do to the English Leader (a perfectly acceptable attitude for an invading Norman tyrant).
On Andy’s turn he did something that surprised me – he charged his light infantry into the rocks to take on my skirmishers! Well, I suppose I don’t blame him. If he left them there then it would cause a lot of problems. He had to do something. In response to the charge I decided to Evade. That took me out of the rocks but it caused casualties on the charging English which meant they had to retreat. Meanwhile, to the south, the English skirmishers in the woods and the Norman crossbows on the hills just stared at each other. I moved a unit of Norman knights behind the hill but in position so they could charge if the skirmishers dared come out the woods.
Norman corssbows supported by Norman knights
The fight around the rocks continued. The English heavy infantry moved forward. This could be a potential problem. I had two choices. Ideally, I wanted to shoot with both my skirmishers to loosen them up, and then charge with the Norman Leader’s knights. The skirmishers would shoot on a 7+ and the knights charge on a 5+. If I failed with either of the skirmishers then activation would switch to the English and I’d miss out, so maybe I could just charge with the knights? The Norman Leader had the Strongbow skill, but I’d used that to order the crossbows to shoot at the English Leader’s unit (another casualty on them, but still not the Leader).
Anglo Danes march pass the POND OF DEATH
I decided to put my faith in the dice. I rolled for the first skirmisher unit. Success! They fired. Then I rolled for the second unit of skirmishers. Another success! OK, so the English heavy infantry had taken a few casualties. Now was the time. In went the knights, led by the Norman Leader – let’s just hope it wouldn’t be a repeat of the previous game.
In they go
No, it wouldn’t be. The English infantry took more casualties and failed their Courage test. They fell back, Battered, and below half strength. They’d taken enough casualties that it would be hard to recover.
Feeling cock-a-hoop with my charges I sent the Norman heavy cavalry in against the English Leader again. Another casualty on the English meant they were now at half strength, but in return they eliminated the last of the heavy cavalry. I didn’t care. They’d done their job. It was now starting to look good for the Normans and I could see another victory coming.
Andy realised he had to go for it. The skirmishers to the south moved out of the woods and shot at the crossbows. They caused a single casualty but I fluffed the Courage roll and they had to retreat behind the hill. My skirmishers moved back into the rocks and continued firing at the English light infantry causing more casualties and Andy obligingly rolled a double 1 for their Courage. Off they went. It was now looking very good.
We were moving into the end game. My thoughts turned to Glory points. If I entirely eliminated the English army that would be game end but since I hadn’t got any units off I would only receive Glory for the Boasts I’d made and none for the game objective. It was going to be hard to do anything about that.
Andy points an accusing finger at the Norman spears
Andy still had a unit of heavy infantry in the centre. They lined up against the Norman heavy infantry and went in. It was pretty much a draw, with a casualty on either side. In the meantime my skirmishers kept opening fire on the English Leader, but bad dice rolls meant I just couldn’t cause any casualties. I then sent in a unit of knights against the English skirmishers and completely eliminated them. In response Andy moved the other unit back into the woods where they would be safe. The Norman heavy infantry charged the English heavy infantry and, again, a couple of casualties on either side but the Normans failed their Courage test (and would ultimately fail to rally and rout off table).
Then came the final act. The Norman Leader ordered the crossbows to open up at the English heavy infantry. At close range the bolts thudded in and off they went. The skirmishers drew their bows, took aim at the English Leader and…down he went at last! All the English had left was a unit of skirmishers hiding in the woods.
Ironically, I didn’t want to destroy them. What I wanted to do first was get some of my troops off-table. Andy knew this, so it was in his interests for the skirmishers to either be eliminated or get off themselves to bring the game to an end before I gained too many Glory points. What I also wanted to do was weaken the skirmishers to reduce their effectiveness but without actually killing them. A burst of fire from the crossbows did the trick, reducing them to half strength. Both sides made a rush for the table edge. The English, though, were closer and were soon off, bringing the game to an end. I hadn’t got any of the Normans off.
Final Glory scores were just 3 for the Normans (for successful Boasts). The English had got a half strength unit off, earning 1 Glory, and had the extra 0.5 Glory for having the smaller force. But they had failed both Boasts meaning -2 Glory giving a final total of -0.5 Glory.
A second Norman win! Glory tallies at this point are 13.5 for the Normans, and 2.5 for the English. We still have three games to go. Andy is a good and capable player, so whilst I’m happy with this lead I am not complacent.
Due to an unrelated event which will be held in Linton car park on the 22nd March the society meeting scheduled for that date will now be held the following Saturday, March 29th.
The diary for games planned for this meeting can be found on our diary page, here.
Stephen presents a comparison of three different WW2 rules.
I’m only an occasional WW2 gamer. Probably not even that often. I often tussle with what rules to use because I’m not sure what kind of game I want. Generally, I’m more interested in the infantry experience, but WW2 is all about the tanks as well, isn’t it?
So what I’ve decided to do is have a game with the three sets of WW2 rules I have – Crossfire by Arty Conliffe, Battlegroup by Warwick Kincaid, and Fireball Forward by Mark Fastoso and Jonathan Miller. To test the games I have decided to play exactly the same scenario with the same forces to see how it goes.
Scenario
To give a true compare and contrast between the rules all games will use the same layout and the same forces (more or less), a German company with machine gun support and a Russian company with mortar support.
The games will be small ones, on a 3’x2’ board. To the south east is a farm with a road running north/south and a junction heading west. Wheat fields lie either side of the western road. To the north east and south west are areas of light woodland. In the north west there is an area of high ground.
The Battlefield
It is August 1944 somewhere in east Europe. Stalin has launched Operation Bagration. The Germans are on a strategic withdrawal in the face of a Russian advance. The German armour is making its way south, down the road, so it can turn west back to Germany. The Russians are coming from the south east. Both sides need to capture the farm and the road junction – so the Germans can get their tanks to safety, and so the Russians can stop them! A German infantry platoon has been sent to capture the objective, just as a Russian scout platoon arrives on the scene…
Game #1: Battlegroup
As written, Battlegroup uses individually based figures. But mine are based in 3s. This is easily dealt with by adding wound markers. Each player’s battlegroup is composed of ‘units’ (e.g. a squad of infantry). Each unit will add to the Battlegroup’s Battle Rating. During the game a player will have to draw a token from a bag after certain events (e.g. a unit is destroyed, or you try to unpin units, plus other events). This token could have a numerical value (from 1 to 5) or be a special event. When the numbered tokens add up to the battlegroup’s Battle Rating it is game over.
Germans take cover by a wheat field.
The Russians went first. At the start of each turn the player rolls one or more D6s (depending on the size of the game) and adds one for each officer. This total is the number of units you can activate this turn. This means you won’t always be able to activate everything every turn. I like that – it creates tension and decision making.
The Russians advanced north along the road and west behind the wheat fields. In response the Germans advanced – one squad with MG34 went into the wheat fields and the other two squads advanced toward the two areas of woodland. To activate a unit you must choose from specific orders. These include moving and firing, firing and moving, double move, double fire, plus many others (e.g. calling in mortars). One such order is to put your unit on reactive movement or reactive fire, which occurs in your opponent’s turn.
Russians advance past the farm.
The Russians moving behind the wheat field held in place and went on reactive fire (wondering what one of the German squads would do). The Russian Maxim gun attempted to open fire on the other German squad in the other piece of woodland. To open fire first you must roll to spot. This seems to be the case even if you have previously shot at a unit (the wording certainly implies this is the case), the rules highlighting how seldom opposing enemies saw each other, especially when trying to keep low and out of sight themselves. Once spotted you then total up all the figures firing – each weapon has a ROF and this is the number of dice rolled. Chance to hit is based on range and ROF. The target then makes a save roll (based on any cover). Remaining hits are then taken as casualties and a morale roll is taken which could be anything from OK, to Pinned, to Rout. Standard stuff.
The Germans were starting to encircle the Russians, holding both areas of woodland and also the wheat fields in the centre. Then, on the Russian turn, the Russian officer called in some mortars. This caused two German casualties and the Germans failed their morale and went pinned. A pinned unit can take no action at all and stays pinned until rallied. To rally a player must draw a token from the bag. For each token 1D6 pinned markers can be removed. I drew a token and pulled out a 3 – a significant number for a game as small as this. The German MG34 decided to return the favour and opened up. The Russians took casualties and also got a Pin result. But on the Russian turn I decided to leave them pinned (you don’t have to rally) for fear of drawing a bad token.
The Russians in the fenced field have taken casualties and one unit is pinned.
The Germans had taken more pinned markers, which I had to try and rally or else they’d sit there doing nothing.
Germans have taken casualties and are Pinned, but they drew a “Beyond the Call of Duty” token.
But this time I drew a special marker: Beyond the Call of Duty. Not only did the pin marker come off, but it came off without any harm to their Battle Rating. The Beyond the Call of Duty marker allowed them to make a roll to see if they could take an extra activation. They failed. But at least they were no longer pinned.
Ultimately, it would be a Russian victory. The Germans found themselves taking shelter in the woods and with Russian mortars falling they soon took enough casualties for game end.
Game #2: Crossfire
A confession: I’ve played Crossfire quite a few times. Models in Crossfire are based in multiples, with 3 on a base for a squad. It’s pitched at company level infantry actions, which is precisely what I’m interested in.
Russias occupy the farm, but some are Suppressed.
So Crossfire has some key concepts – no fixed turns (units can keep activating, multiple times), no ranges (if you can see it, you can shoot at it), no move distances (I’ll say a bit more about this). The core mechanics are very simple though – when shooting you’ll roll a few D6 and need a 5 or 6. One hit is a Pin, two hits a Suppression, 3 hits a Kill. Not rocket science.
Germans brace for the Russian advance.
The game started with the Germans on the high ground. The Russians came on by activating. You can either move them by individual squads or you can do a group move. So I brought the first Russian platoon on, behind the barn. I put the mortar observer in the barn where he’d have a good view. And so on. In Crossfire units move in straight lines. Players have to indicate to their opponent the route they are taking and if an enemy squad can draw LOS it can make a reactive fire. If the reactive fire fails to Suppress then the active player can carry on. If it does Suppress then initiative switches. Units move from terrain piece to terrain piece (or into the open). All the time they have initiative they can activate again, even with the same unit.
Russians advance screened by smoke.
The Russians moved up to the western road with two of their platoons whilst the Germans came off the hills to take cover behind the wheat fields. The Russian FO then called in smoke to obscure the Russian advance and the Russian squads moved up behind it. The Russian Maxim MG took up position in one of the farm buildings to prevent a German flank attack, it opened fire on the Germans but failed to score a hit.
Over to the Germans.
With little to stop them the Germans made their way along the top of the battlefield and into the woods, where they engaged the Russian Maxim. The MG crew attempted reactive fire but failed to score a hit which means they would be unable to do any more reactive fire until after initiative switches, so they are marked with a No Fire counter. The Germans opened up.
Russian Maxim gun team are Pinned, and may Not Fire until initiative changes hands
Things were a bit slower along the western road, with neither side daring to break cover. One of the Russian platoons dug-in and the German machine guns repositioned. Meanwhile the attack on the farm buildings was going well for the Germans – they destroyed the Russian MG and moved up to occupy the buildings. To counter this a Russian platoon moved into one of the wheat fields and a prolonged firefight broke out, but the Russians finally managed to dislodge the Germans from the farm.
The game would end as another Russian victory! This game had been a lot more dynamic and fast-paced – one of the advantages of Crossfire. It had been more tactical as well (compared to the line ‘em up, face each other, and start shooting affair of Battlegroup). This is the real advantage of Crossfire – you start to think like an infantry commander – laying down smoke for cover, trying to organise squads in to firegroups or the eponymous crossfires, when to react, when to rally…lots of decision points. That’s where the complexity lies in the game, in the tactics. Very enjoyable.
Game #3: Fireball Forward
OK, let’s deal with the elephant in the room. The dice. If you know anything about Fireball Forward it’s the whole dice thing. So here’s how it works. To shoot you will be rolling some white D6 and some red D6 (for infantry squads it’s actually one of each). And you will also be rolling a range dice (a D20 for infantry). The red dice hits on a 6. Only a 6, and it’s never modified. The white dice can be modified and will hit on either a 4, 5, or 6. Then we come to the range dice. A weapon has an effective range (e.g. 10”) PLUS what you roll on the range dice – so for infantry squads it could be up to 30” (10” plus you roll a 20 on the D20). You do not pre-measure! So after rolling, if the range is higher than the effective range plus the range dice you have missed regardless of what you roll on the white/red dice and if the target is within the effective range plus range dice then there’s the chance of a hit – check the white/red dice. If the actual range is less than the D20 roll you get a +1 on the white dice.
Russians open up, if the range to their target is <=13″ they’ll score a hit with the 5 on the white die.
That sounds more complicated than it actually is. It only gets messy when you are dealing with weapons with range dice like D20D20D8.
You are either going to get on with this or you aren’t. It’s a marmite thing. Like I just said, it’s not as bad as it sounds like it could be, so long as you restrict yourself to predominantly infantry actions with just a few different armoured vehicles.
Russians about to be outflanked.
Movement is also a bit novel. Infantry can, in theory, have an unlimited move. But what they can’t do is finish their move, nor can any part of their move, take them more than 12” from where they started. The player must trace the movement route so the opposing player can announce if and where he can make an opportunity shot.
These are the two big Fireball Forward things and I wanted to get them out in the air at the beginning.
For initiative you need a pack of playing cards. You draw a card and keep drawing until a different colour comes up – you put that card back on top of the deck. You check how many cards you have and then you mark your units with a number and activate them in that order – lowest first. So let’s say I draw 3 red cards and the fourth is black. The black card is put back. I have three red cards which means I can now activate three Allied units. Once all units, of both sides, have activated a new turn begins. What’s really good about this is that both players are involved at all times and there’s always a chance you can salvage a bad situation.
German machineguns about to fire.
I realise I’ve spent more time discussing mechanics than actual game play, but that’s OK – after all, this is about letting you know about these very different sets of rules. I bet those of you who are into rules writing and game design will enjoy reading Fireball Forward.
So let’s deal with the actual game. This one turned into a much harder fought encounter. Both sides used more or less the same tactics as previous games – the Germans moved along the northern edge into the woods and then tried to force their way south, down the road, into the farmyard. Meanwhile, the Russians advanced along the southern edge, behind the wheat fields, hoping to outflank the Germans.
This time the Germans were more successful. They eliminated the Russian platoon occupying the farm and then moved in themselves. The German machine guns halted the Russian advance down the western road and brought up a platoon through the fields to outflank the guns. Meanwhile, the Germans in the farm pressed the attack and came round behind the Russians to launch an attack against the Russian company command and Maxim gun. The Germans finally achieved a win!
Russians move past the farm.
Conclusion
I’m not going to offer scores or say which is best and that kind of thing. Instead I am going to say how they suit me and my gaming – in a club setting with multiple players on a Saturday.
Battlegroup is a very ‘traditional’ game. By that I mean it is an IGOUGO system with nothing particularly ground-breaking mechanics wise. I don’t mean that negatively. If you have several players, none of whom have played Battlegroup before (or even WW2), then they will pick it up soon enough. Which is what you need in a club. It’s also aimed at being a ‘big’ game – with combined arms. Battlegroup, as the name suggests, is about lots of infantry and armoured columns having at each other. The simplicity of the rules does mean it has less subtlety or tactical finesse and I imagine it could get a bit vanilla, but that also suits group play.
By contrast, Crossfire is a game for the gamer. It may be the oldest of the three but it’s also the most innovative. It’s really aimed at infantry-only games. Yes, there are armoured vehicle rules, but they do seem a bit tacked on and the rules writer himself admits they aren’t the best. And they aren’t. Fortunately for me, infantry actions are what I’m most interested in, so I don’t play Crossfire with vehicles. Although it’s a simple game, the novelty of some of the processes will take a bit of getting used to for a newcomer. The game mechanics are very simple, but the tactical choices and options are what make it complex – the mark of a good game! A one-on-one game with someone new would be a good way of introducing the rules and be a real pleasure. Crossfire is my go-to WW2 rules. If you are inclined to the tactics and experience of the infantry commander then you could do a lot worse.
This leaves us with Fireball Forward. Like Crossfire, it has some innovative components, particularly the dice mechanism. Like Battlegroup, it is also about combined arms and integrates vehicles into the rules in a better way than Crossfire. But I have to underline the dice mechanism. It reads worse than it plays. In practice, you roll the hit dice and range dice at the same time, and I found myself looking at the hit dice first to see if there was even a chance of hit. This made it playable and you will pick it up in just a couple of turns of combat. This is OK so long as you aren’t dealing with too many varieties of range dice. Infantry will, generally, be using a D20. Though some vehicles will use a tortured combination such as D20D20D8D8. No. Just no. As such, for my money Fireball Forward works somewhere between Battlegroup and Crossfire – mainly infantry actions with two or three vehicles in support. Which is what I’m looking for.
There’s a place for all these rules. What you go for will depend on what you are looking for. They all provide a different kind of game and they all provide a good game. You won’t go wrong with any of them, but I think I will mostly be sticking with Crossfire (with the odd game of Fireball Forward).
Oh, one last thing. Yes, I have heard of Chain of Command. Yes, it is a very good game. But I don’t own a copy.
Apologies, we’re a bit late with this weeks WIP Wednesday post, we got a bit side-tracked by the bank holiday weekend.
We’ll start with the honourable chairman Mark’s efforts, a Vietnam era LVTP-5 and a M-50 Ontos (above).
Next up we have a couple of offerings from Charlotte, she’s given her Spanish church a coating of sand, painting is next.
And a couple of characters from a game she’s developing “Folked Up”, the Pirate queen of Hispania: Inés de la Espada and her pet Octavio.
Inés is a Reaper sculpt and Octavio is scratch-built from earplugs.
Stephen’s gone off his painting, but he’s still got his modelling mojo running with this construction, called ‘Stairway To Heaven’. We’ll be seeing that in a Stargrave game at some point.
Regular editor Jeremey has been working on some cavalry, King Richard and his retinue, for the upcoming finale of the War of the Roses campaign, the battle of Bosworth (that’s him on the far right, with the gold armour, leading the charge from the rear).
Meanwhile Tony has take a break from his WW2 Belgian project to work on some terrain for a planned Lord of the Rings game, the Gates of Bree and the surrounding hedge
And, as something completely different, some 15mm Yenpalo Sci Fi vehicles and crew.
Going up a scale, Andy has been working on some Japanese Corporate Mercenaries, these are 25mm GZG figures that have been in Andy’s pile of shame for over a decade!.
And in case they need a bit of support, he’s also working on a War Bot from Alternative Armies, which would work in 6mm, 15mm or 25/28mm scales.
That’s all for this week, hopefully we’ll be back on time next week.
Andy is back with a round up of the Society’s members painting efforts.
We start with some Norman mounted crossbows from Stephen (above). He’s planning to field these against me in a Norman Conquest mini campaign later in the year.
Eric has been working on another car for Gaslands. Is that The Stig driving, or one of his cousins?
Felix has started work on some BAOR figures.
And Chairman Mark has finished his Vietnam USMC Recon team.
One we missed from last week, Marcus has been working on some Stargrave scenery.
Also on the scenery front, I have been working on a random selection of Lord of the Rings items.
And I’ve finished a couple of 3D prints from Brigade Models, a Ford Model T Armoured Car and a British 13pdr gun. The Ford is available from their website, but the 13pdr is a pre-production model so hasn’t quite made the website yet.
Tony has been making progress on his WW2 Belgians, first up, a Daimler Armoured Car. This is an IBG kit (the only plastic 1/72nd Daimler he could find) and it’s definitely not a quick build wargames model – it’s more like a miniature Tamiya kit with loads of tiny details. It has a fully detailed interior, although some of the parts once fitted would be impossible to see from any angle even with the hatches open, so all of that got left off.
And he’s also working on the 25pdr guns and tractors. And all the wheels!
Finally Peter M has been working on some 28mm Sci FI AFVs for the Hammer’s Slammers universe.
Another week and another roundup of MWS member’s efforts on the modelling and painting front.
First off we’ll take a look at a couple of offerings from Tony. Above we have a 6mm Hammer’s Slammers detachment – the Heliodorus Regiment who carry flamethrowers (not that they can be seen in this image) and ride around in big wheeled vehicles, with a few more bases of 6mm desert scenery. These are Brigade Models products, no surprise there!
Also from Tony we have progress on his late WW2 Belgians, a couple of 25 pdr guns, limbers and tractors, some 15cwt trucks for the motor rifle platoon, and a couple of scout cars. Tony says the green base coat looks nowhere near so pale in real life.
Next up some of Chairman Mark’s work, a Vietnam era USMC Recon Team.
Our main theme for this week is some Stargrave (other SF rules are available) markers, mostly for the Side Hustle option.
Marcus has built a Pylon from odds and ends.
A damaged robot/drone mainly for underwater games:
And finally from Marcus some Coral style scenery pieces.
Eric has built a pit marker, scratch built apart from the doors which are old 40k Rhino top hatches.
And some loot markers:
And I’ve also been working on some Side Hustle markers, although mine are commercial models rather than being scratch built. The Pylon and Pit are from Blotz, and the Robot from Alternative Armies.
I’ve also finished off a repair bot (Crooked Dice) and some sand worm type beasts, not sure where I got those.
Hopefully Jeremey will be back in charge next week.


You must be logged in to post a comment.