Club member Jeremey takes us through building and painting his modern take on the classic earth Elemental.
While I certainly wouldn’t consider myself to be a professional sculptor, I have made a number of miniatures over the years. This miniature, the Concremental came out of an idea to create a modern version of the very familiar Earth Elemental. I was lucky enough for this miniature to be cast and so here is my attempt to paint it.
The miniature is currently being sold by Fenris Games and comes in several parts as shown. Therefore the first thing to do was to glue the parts together. The miniature is made of resin but I found superglue worked very well in sticking it together.
The miniature fit quite well on a 50mm round base and I stuck the spare bits of concrete that came with the miniature to the base.
I then added some milliput to the base to provide a texture to match the miniature.
Once the milliput was dry I sprayed the whole thing with Halfords grey primer. It was at this point that I first thought how on earth I was going to paint it. After all, concrete is grey so do I just put a black wash over the miniature and leave it at that or do something else.
I decided to try something different and painted the various concrete blocks in different shades of grey. I then dry brushed the miniature with lighter shades, before finally adding a very watered down black wash.
I then painted the traffic light pole silver and the steel reinforced bars as rusted metal. The traffic lights I did in yellow, I didn’t actually sculpt the traffic lights and they are clearly in the American style that I’ve seen in yellow.
Once all that was done I felt the miniature needed something else, so thinking the miniature would be made of modern street materials I painted road markings on the flat parts of the miniature.
The miniature started to look much better with the markings but they were too clean and bright, to remedy this I actually took a file to the whole miniature to distress the markings. This worked really well and gave the whole model a nice worn look.
Now all I need to do is find a game to put the Concremental in.
It’s Wednesday again and we have another offering from members on their current projects.
First up Tony has been putting together another unit for Hammers Slammers. These are apparently the Sincanmo, a sub-saharan Islamic inspired unit equipped with fast attack buggies, heavy armoured cars and mounted infantry on giant lizards. The miniatures and vehicles are all from Brigade Models.
Some of the vehicles still need crews to be added.The vehicles are a mix of wheeled and half tracksAnd some cool looking Lizard riders
Stephen has added yet more characters to his Sci-Fi collection and a drone.
More space bums and ne’er do wells…
And lastly this week, Mark and his son have been painting up more Lord of the Rings miniatures. First up some Mordor Orcs and a Ring Wraith.
And their hated enemy the Dwarves.
We’ll be back next Wednesday with more from the club.
This week we start with the giant Zombie Stephen was working on. He’s kindly added a Zombie from the Celtos range for size comparison.
Next up I’ve made a small amount of progress on my trees. These were bought from the shop ‘The Works’. Nice and cheap but a little threadbare compared to the ones I bought from them last year.
I’ve also managed to undercoat some 15mm Sci-Fi troopers to go with my Dropship conversion. The infantry are Brigade Models PacFed.
Now we have some more Dredd stuff from mark. This time a Judge Cadet and bike. These are from Warlord Games.
And last this week Mark’s son continues to produce some good work. This time some Uruk-Hai soldiers.
I do like those armour tones. Well that’s it for this Wednesday, see you next week!
Mark J guides through his painting technique for 6mm HYW figures.
This article follows on from my first 6mm painting guide, “Painting 6mm Romans” which appeared on the Maidstone Wargames Society Blog in May 2020. So, it’s been a while since my last blog, but I’ve been busy painting more 6mm over the last 12 months or so. This article covers my English 100 Years War army. This is another FoG army, we still play 2nd edition at the club, however I have also built the army to use with MeG and you could use it with any rules system that doesn’t stipulate base sizes.
The army is loosely based on that which fought at Crécy, very loosely as I just wanted to pick a point in history to use, my army commander is painted as the Black Prince.
The figures are from Baccus, while they are listed as 6mm, they’re closer to 8mm. I really like them and there’s a wide range of periods available which continues to expand. The painting method I’m going to take you through is block painting, which begins with the application of a dark undercoat and then adding brighter colours to bring out detail, while retaining some of the dark undercoat to emphasise shadow.
Longbows
I use a black undercoat as I find it works well at this scale, however you need to be careful not to overuse the base colour otherwise your figures will look like dark blobs on the battlefield. The idea with block painting is to trick the eye; this is where the brighter colours come in, as you’ll see below, I’ve used quite vibrant colours on the longbowmen. This would look odd on a larger scale but is a must at 6mm.
So, start by washing your figures in warm soapy water and then gently dry them off with a tea towel or just leave them somewhere warm or in sunlight to dry; this will remove any casting residue which can interfere with the paint and stop an even coat forming. I then spray my figures black with an acrylic spray, I use a matt black spray from a national hardware chain, it’s cheap and works very well. Always wear a mask and ensure you’re in a ventilated room when doing this.
I’m going to start with a unit of longbowmen, there are 64 figures in each unit, I find I can paint one unit in a couple of hours, ready to base. Once the figures have dried I, begin by painting the main part of the body, in this case the tunic working with a strip of 4 figures I paint the front of the tunic remembering to leave some parts black, the belt, collar quiver, scabbard and under the arms. You don’t need to be really accurate here, paint your first strip and then look at the figures from about 3 feet away, if they look right then you have accomplished the first part of the ‘trick’.
Longbows and Command
Carry on painting each strip and then repeat the process on the other side of the tunic, you’ll notice that Baccus longbowmen are not all the same, some carry their arrows to the front others to the back, some have small shields. Just follow the principle of using the undercoat and leave these black for the moment. Remember to go bright, a general rule of thumb is to go 2-3 times brighter than you would at 28mm. You can see from the picture below how I’ve used a bright pale blue and yellow with one unit and an orange with the other. Both can be seen from the battlefield and don’t look out of place. They would look out of place at a larger scale for this period, but the rules of painting are different for 6mm, trick the eye with bright colours.
Once you’ve completed the tunic it’s now time to move onto the bow, quiver and scabbard. I use the same colour brown for these, again this would not work with a larger scale but is fine for 6mm. You can use differing colours, but they won’t really stand out and will take longer. I find a light yellowish brown works very well. Again, follow the front and then back method that I describe above, I find this gets me into a good rhythm, which gets me through a unit quickly but means I achieve the effect I’m looking for. This method also works well if you’re painting multiple units. I tend to do 3 at a time and can complete three units, fully based in around two evenings, 1 evening at a push.
Massed Longbows WIP
Once you’ve completed the bow and leatherwork it’s time to work on the metal parts, for the longbowmen this is their helms, shields if they have them and sword hilt, note that the sword hilt is optional, the figures will look fine without this. Again, apply to each strip front first and then back. With the helms it’s really important not to overdo things, too much silver and it will look like a huge silver blob, this is where your skill with a brush comes in and using the undercoat to provide shadow. I tend to use a semi dry brush when applying the silver, not as dry as I would when dry brushing, general rule of thumb is to apply enough paint to your brush to cover a couple of helms lightly.
Close up of the Longbows, showing the effect of leaving parts of the undercoat visible
It’s now time to move onto the flesh, I use a light pink flesh colour, those often used to highlight larger scale figures’ flesh. Again, front first then onto the back, you’ll see with the longbowmen that most of the work is covered from the front of the figure but it’s worth checking the back just to ensure that the flesh can be seen from all relevant angles. Paint the flesh in the same way you painted the silver, less is more. Try and keep a gap between the hands and cuffs and face and neck, this is where the dark undercoat really works well, this sounds hard, but it’s easily done with a little practice. Don’t worry if you don’t achieve this on every figure, remember you’re looking for an overall effect that will usually be viewed from the battlefield, tricking the eye with shadow and bright colours.
Once the flesh is done, then figures are complete, I usually quickly check each strip as you can miss some parts when painting large numbers of figures. Once dry, I then varnish the figures with a matt varnish. I spray my figures, if you do the same then make sure you’re not doing this in a cold room as the spray reacts to cooler temperatures and can fog, giving your figures a dusty look, which is a complete disaster at this scale as it obscures all your hard work. If this does happen, let the figures dry and then apply gloss varnish and another light coat of matt. I find a quick spray does the trick, again less is more. If it feels too cold don’t spray!
Basing next, I use a similar method to the Baccus basing, I apply a ready mixed earth texture paint first, make sure to apply up to the base not over it. Once this has been applied it is time to highlight. I use the Baccus 3 colour system, which starts with a dark beige colour moving up to an almost bone white, simply dry brush the bases. Once this is done it’s time to add some static grass, you’ll need the smaller grade, 3mm I believe. Apply some watered down PVA to the front and rear of the figures and where there are any gaps along the line. Once done sprinkle some static grass over the figure; what you’re looking for here is enough to hide any of the metal base while not covering the figure. The picture below shows how it should look.
Massed longbows, the bane of French Knights
OK so that’s how I paint 6mm longbowmen, for the men at arms use the same principles but when doing the armour ensure to use the undercoat well, leaving gaps works really well with armour. Use the same brown for any wood or leather and the same method for flesh. If you have any troops with padding, then apply this using the bright colour and shadow approach, you can see some mine below.
Billmen WIP
Finally, I painted the generals and camp using the same method, took a bit more time on some detail, but the same rules apply re tricking the eye. Up close they look a little messy, on the table they look the part.
The camp was done using a white undercoat and special contrast paints for the tents, the pigs, fires, well and baggage have a black undercoat with a block technique applied.
The Camp
The next few photos provide some completed units, in all there are 6 of longbow (8 bases each) and 6 of men at arms (4 bases each).
A selection of the retinue
Archers and their stakes
You’ll also notice some stakes placed in front of the longbowmen, these were scratch built using wire and Milliput. I cut the wire into 10mm long pieces, placed some Milliput onto a base and then added the wire to the Milliput at around a 30 to 40 degree angle. It was then a case of painting the stakes dark brown with bone white tips, and then basing using the same method described above. The stakes are bigger than they would have been relatively speaking but this is required to catch the eye and look right on the battlefield.
I hope this has been helpful, I hope to have another guide out soon covering my 6mm Spanish Napoleonic.
Welcome to another Work in Progress Wednesday, above we have club member Marks’ son working on a building for Judge Dredd, currently displayed with the City Defence miniatures.
Below is another Judge Dredd building Mark is working on himself.
Next up Stephen has decided his undead army needs something big. This time he has gone for a Giant Zombie. Will be interesting to see how this turns out.
And last up this week Marcus has put some last minute touches to his Biggles show game. First up some yeti monsters.
Another Wednesday and another selection of club members hobby efforts.
First up Tony has been adding to his 15mm Star Wars collection. Above is a Action Fleet toys Imperial Shuttle, and below we have a Ronto, a native Tatooine beast. Tony has added a black wash and a few other painted parts to the models.
Next up Mark has moved on from his hundred years war army and painted up yet more Judge Dredd miniatures. A lawmaster and some city defence forces.
Stephen has painted up some more star fighters, I’ve lost track of how many he has painted now.
And last but not least this week John has made more progress on his Pacific war project. This time some Regular Bolivian Infantry and Bolivian Cavalry Husares Del Sur.
Just a few offerings from the club this week. It’s been nice to be getting more games in, but this always has a knock on effect to the lead pile.
Above Andy has made some progress on his Medieval miniatures.
Next up Mark has taken a break from his 6mm Hundred Years War army to paint another Judge Dredd miniature.
Where as Stephen has managed to throw some bits together to create some effective Drones.
And finally for this week I’ve made a start on my Concremental miniature, a modern take on the fantasy Earth Elemental. Shamelessly blowing my own trumpet here as it is a miniature I made for Fenris Games. I’ll do a full blog post showing how I decide to paint it at a later date. First thing will be to assemble it.
Peter reports on his major lockdown project, making its debut at the club today.
This is my lock down project that’s taken the best part of two years to complete.
It is a modern warfare game using 20mm scale figures and the Force-on-Force rules from Ambush Alley Games.
We’ve played the rules a few times during past meetings with Mike, who left the club a couple of years ago. They were memorable games and great fun. That’s why I decided to start assembling figures and models to put on a game based on the battle of Falluja, Iraq, 2004.
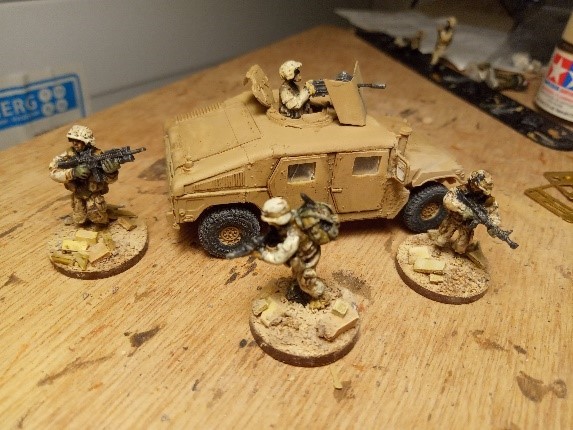
Here are the first figures ready for action – US Marines and a Humvee with Grenade launcher.
After assembling and painting more US Marines and a couple more Humvees, I started on the Iraqi insurgents and foreign fighters.
And a couple of Technicals with machine guns.
Next the terrain.
The game board is about 4’x4’ and depicts a section of a modern middle eastern city with damaged buildings, debris strewn streets and abandoned vehicles all over the place.
I chose 4mm foam board for the construction of the buildings as it’s readily available at shops like Hobby Craft and the Range. It’s also easy to cut and it’s light to transport around. The rest of the terrain and building details were sourced from places like S&S models and model railway shops.
Here are some completed buildings.
Rubble mounds were made of scrunched up newspaper and coarse basing material from various wargames and modelling websites and all stuck down with good old PVA glue.
I got hold of a plastic model Abrams M1A2 MBT and enhanced it with some baggage and lose rubble.
More rubble and damaged buildings were made next …
The roads are black 3mm thick soft foam sprayed with grey paint and debris sand and rubble stuck down. The road markings were done with masking tape and paint – gently rubbed down with glass paper when dry.
A couple of Helo’s adds to the US Marines arsenal…
A couple of shots from a practice game, Delta team on building clearance mission.
Jeremey takes us through building terrain from things just laying around.
For a while now I’ve been determined to build up (no pun intended) my collection of terrain features and some table top dressing. But I wasn’t able to just throw lots of money at all those nice resin or plastic terrain sets, and so I looked at the materials I had around me.
The Swamp
First up was a swamp, I’ve never actually owned a piece of swamp terrain but often see other gamers with a single round piece of cloth or card to act as a swamp.
I wanted to do something a little different to just one large swamp and so built a selection of smaller pieces that could be pushed together to form a large swamp or break up providing paths through the swamp.
The swamp pieces were made from a piece of backing board from an old flat pack chest of draws. It’s like a thinner version of hardboard and easy to cut. I painted the pieces in a swampy green colour and stuck bits of real wood branches to it. A bit of flock was added and then to get that wet looked I used clear PVA glue. it took a couple of layers but ended up looking the part.
Total cost for the swamp was the price of a bit of flock, bit of glue and bit of paint. In other words pretty cheap.
Stone Walls Battlefields have to have walls, if for no other reason than to justify the half dozen pages in most wargame rules dedicated to how to move your troops over them.
For these again I used the backing board and stuck to it some polystyrene pieces. However it wasn’t your standard white polystyrene this was a special grey insulating styrene that was a bit stronger and had a larger better formed structure that looked like a pile of stones. I didn’t know such existed until my neighbour had some building work done and let me have some of the off cuts. They were very easy to paint and fitting for this project, free.
Signs of Past Battles As well as actual terrain pieces I also wanted to create some scenery to break up the blank spaces you often get on the battlefield but do not affect the game.
I found in the bits box a few old sprues of Games Workshop plastic skeletons and thought having some remnants of a past battle.
I cut some small pieces from the backing board and simply stuck various body parts down. In quite a few cases I cut the underside so that it would lay flat to the base and in some cases used the part of the model I’d sliced off back on the base. A bit of flock and the odd grass tuff and I had a half dozen pieces to add a bit of character to the battlefield.
Forest Hall
On a wander through some local woods I came across an unusual piece of bark that had fallen off a tree (quite a long time ago given the state of it), and I immediately thought it would make a good roof for some primitive dwelling.
I brought it home and using some other sticks I’d collected I built a forest hall by sticking the bark and sticks together with the hot glue gun. A little bit of flock and the hall was complete. I might return to this and add some furs or other decoration to the entrance.
Trees Lastly I just used some of the collected bits of old wood from the forest floor to make additional dressing pieces to the battlefield.
I made two tree stump pieces and two large ancient trees that would work as objective markers or some other scenario goal in games. You can also see the size of the forest hall in the above picture.
Building all of this terrain was exceptionally easy and as pointed out cost next to nothing to get on the battlefield.
Welcome to another Work in Progress Wednesday, as a complete contrast I’ll start this week with what I’ve been up to. Above you can see I finished my long dead warriors scatter terrain pieces, and below I have a re-discovered a Citadel Miniatures Viking from 1985 that I’ll be adding to my Viking Saga warband.
36 years old and still looking the part
Next up Mark has yet more 6mm units. Fist are some Roman infantry units.
Medium infantry ready to join the Roman army
Then we have some Hundred Years War Men at Arms and Longbowmen.
Hundred Years War English Men at Arms and Longbows
Finally from Mark a camp for his Greek 15mm army. This is a nice twist on the normal two tents and a wagon style camps we often see.
Camping at a ruined temple after a hard day on the battlefield
Next up Stephen has added to his Sci-Fi collection with a group of generic crew members.
More conversions for Stargrave
Marcus has been improving this years club game (technically last years game!) With more snowy terrain that will hopefully be ready to play at Broadside.
More Snowy Ground for Biggles!
And last but not least this week, Tony has continued painting his Lord of the Rings dwarf Grim Hammers.
Grim Hammers led by Bombur, who’s obviously spotted something to eat ahead of him
See you next Wednesday for another catch up with the club.


 I’ve also managed to undercoat some 15mm Sci-Fi troopers to go with my Dropship conversion. The infantry are


 Next up Mark has moved on from his hundred years war army and painted up yet more Judge Dredd miniatures. A lawmaster and some city defence forces.


 And finally for this week I’ve made a start on my Concremental miniature, a modern take on the fantasy Earth Elemental. Shamelessly blowing my own trumpet here as it is a miniature I made for


You must be logged in to post a comment.