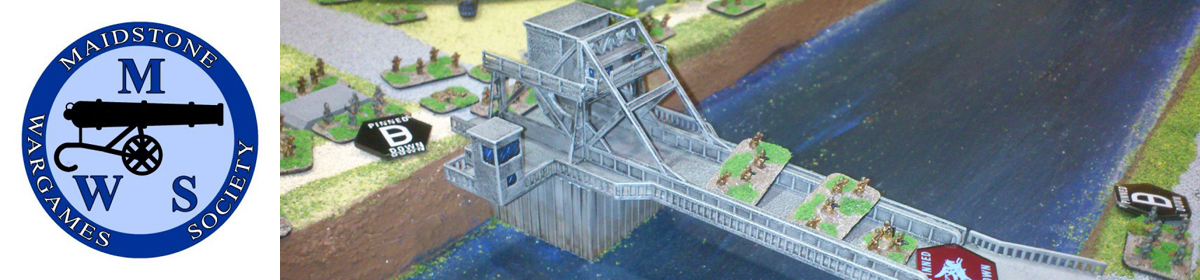
Stephen reports on a recent Sci Fi solo game using Black Ops
Since it was a wet weekend I thought I just fancied a game of something. Since I hadn’t played Black Ops for a while I thought that’s what I’d do.
I went with a simple meeting engagement. Each side had 100 points each. The human squad had two fireteams of five men – in the first was the leader, heavy weapons support, a technical expert, and two troopers. In the second was another heavy weapons support, a sniper, and three troopers. The droids had three fireteams of five, each consisting of a heavy weapon support and four troopers.
Droids occupy the relay station
The idea behind the scenario is that the droid army has captured a human communications station and the human squad has to go in, recapture it, and get it online. They have seven turns to do that and get to safety.
Moving through the cargo crates
Turn One
Black Ops is a card activation system. Each troop type has two cards in the deck and when they are drawn a model can take one action (e.g. the human Specialist card is drawn – the technical expert and sniper can each take an action). In addition, the leader gets a bonus third card which can be used to activate a third time or he can order a model within 6” to take a third action. Simple enough.
Get some! Get some!
On the first turn it seemed like there were only droid cards in the deck, all the droids had taken one action, and the droid troopers had taken their second, before one of the human cards came up. This allowed the droids to make a quick advance and move up to halfway across the board (I was using my smaller 2’x3’ board). This put the humans on a back foot, particularly the sniper (private Urek Ricci) who I had wanted to move up to an advantageous position but this was now denied because the droids, ZX81 and CPC464, had moved so far forward.
Sniper Ricci takes aim
Turn Two
The human leader, Sergeant Waylan Gomez, led his team up through some cargo containers. Urek Ricci advanced on another position and took a quick snapshot with his rifle at ZX81 – he missed. I’d made the terrain nice and close, to eliminate too many long-range avenues of fire that could dominate, so models had to move carefully to ensure they couldn’t be seen. The droids well and truly moved into the comms relay station area and crossed it safely to cover the approach of the humans.
Droids advance in strength
Turn Three
The humans had to get a move on. Private Yan Obrand, with his M77 plasma gun, saw the droids Dragon 32 and HP85 moving around the back of the comms relay. He let rip, but missed. He then took a second burst and this time both droids went down! First kill to the humans. Urek also had a go with his sniper rifle at the droids in the station compound, this time with a steady hand and good rest for his weapon. But he missed again! Close to Urek was private Cove Longstern and he moved up to put some suppressive fire down. The droids responded by moving an entire squad against Ricci and Longstern. They opened up but failed to hit anything. Sergeant Gomez with specialist Sorel Marsden and private Dorian Zenward continued to sidle through the containers trying to find a way to the relay station.
Yan Obrand lays down covering fire
Turn Four
Again, Urek Ricci took a shot and again he missed! Some sniper he was turning out to be. That would be his last shot though, because ZX81 returned fire and he went down. Two of the droids moved up to occupy his position where they would be able to make a flanking attack on the rest of the human squad. Private Longstern gave fire and a droid went down. But then C64 took a shot and it was bad news for Cove Longstern – it was the end of his game.
The firefight hots up
Turn Five
The droids sought to consolidate their position and see if they could exploit the flank they’d opened up. More droids moved up. Another pair of droids, one armed with a heavy kinetic lance, tried to counter the advance of Yan, Sorel Marsden, and Dorian Zenward. These three had advanced to the side of the comms station, but were waiting for the right moment to break cover and make a dash for the doors. Sergeant Gomez took private Uriah West to shore up the weakened flank left vulnerable after Ricci and Longstern had been taken down.
You go that way and we’ll give you cover
Turn Six
With not much time left it was obvious the humans had to get a move on. It was already looking extremely unlikely they would have time to re-enable the relay station and get off board so if they were to they would have to get moving. With that in mind, Yan, Sorel, and Dorian moved up to the station. Immediately the droids opened up and took Dorian Zenward out. But on their second activation Yan put down some suppressive fire and Marsden managed to unlock the station and get it back online. First part of the mission complete!
Behind the back of the bike sheds
Turn Seven
Last turn syndrome – go for it! So the station was working but could they get away? It pretty much happened how you think it would – the humans made a dash for the table edge and the droids opened up where they could.
In the end none of the humans escaped. The station had been reactivated but they hadn’t quite got away. Human loses were four models, and droid loses were six – so a pretty even ratio. The humans could claim a partial success.
Stephen reports on a game of SAGA: Age of Crusades fought at a recent meeting, with occasional comments from his opponent, Andy, the editor. For those whose schoolboy Latin is a little rusty, the title translates as “But give glory to your name”…
Sir Fulkes LaMont was awakened early by the wailing of the muzzerain. He calmly threw aside the tent flap, the sun still low and it’s warm glow lighting up the sky like molten metal. There was no breeze. Nothing. Just the call to prayers carried across the still air. Sir Fulkes looked out to the silhouette of the distant city walls, the tall towers of the mosques rising above all, and the cries of the muzzerain carrying far…
It’s been the best part of 18 months since I have had a game of Saga. During The Great Plague I painted a Saracen army and since we agreed we’d have a game of Saga at the club, it was time for them to whet their blades.
Saracen Ghazis Draw Bows
Andy took the Saracens and I had the Templars (Milites Christi in Saga: Age of Crusades terms). We went with 5 points each. The Saracen force was entirely mounted and had a warlord, three points of Ghulams (hearthguard) and two points of Ghazis with composite bows (warriors). The Templars had a mounted warlord with three points of mounted knights (hearthguard), one point of crossbows (warriors) and one point of foot sergeants (warriors).
The table was set up and then, using the Book of Battles, we made a roll for deployment (Confusion), Duration (Cautious), Special Rules (A Dash of Nostalgia), and Victory Conditions (Overrun).
Spear of Distance vs Axe of Measurement
So, Andy took first move. And forward the Saracens went. He took quite a wild move on my right flank, obviously trying to outflank the crossbows, and maybe come around the back. (Andy: I was trying to draw one or two of Stephen’s units off to counter the Ghazis leaving him weaker in the centre). On my turn I put the crossbows on top of the hill where they could have a good field of fire. The knights went forward, and I repositioned the warlord behind some rocks – a defensive position until I could see what Andy intended on doing (Andy: Leading from the back eh?).
Saracens Advance
What I noticed was that Andy had shifted his warlord forward, just ahead of the rest of his army. I’m sure Andy will claim that’s because he was bold and daring, but I reckon it was because he wasn’t concentrating. (Andy: I’d like to claim that too, but Stephen was right). This was too good a target to ignore, so Sir Fulkes ordered his knights to charge and in they went!
Fortunately for the Saracen emir he had a unit of Ghulams nearby, which is just as well because otherwise he would have ended up dead! Instead, those bold warriors laid down their lives for their leader. Badly shaken, badly beaten, and badly fatigued, the Saracen warlord boldly fled to the rear of the table, as far away as he could get from the knights.
Saracen Ghulams and Warlord
Now, one should keep in mind that we’d never played Age of Crusades before and not only that, but we seldom, if ever, use mounted troops in previous games of Saga. That, added to the fact that it had been a long time since playing, meant there was some learning to do. Andy’s Ghazis also had composite bows, which activate differently to regular bows. (Andy: These units have free Shooting activations, but cannot do two such actions consecutively). So there were some inevitable teething problems. From my perspective I felt that Andy, initially anyway, was using his Ghazis like regular fighting troops. Although as the game progressed he seemed to get the hang of using them to skirmish – dashing in, loosing their arrows, then off again. (Andy: I was trying to combine Shooting and Movement, took me a few turns to get it right).
Skirmishing Saracen Cavalry
The Ghazis on my right moved within crossbow range and took a salvo for their troubles. Not too damaging, but enough to make him start to think about the Saracen battleboard properly. Meanwhile, on my left where the other unit of Ghazis were, they started harrying my spearmen. Still can’t think what made me take dismounted warriors when I had the option to have them mounted. Oh well. They were always going to be out of their depth and prone to attacks from all the fast moving cavalry around them.
Crusader Spearmen
Realising the game was going to be won or lost in the centre, I pushed my two units of knights forward. This would mean I might get outflanked on both sides – my hope was the crossbows would tie Andy down on the right and the spearmen would hold him off on the left. I was partly right.
Templars Charge Forth
We had an almighty clash in the centre. My knights had gone forward. I’d combined my three points of hearthguard into two units of six, whilst Andy had kept his three points in three units of four. One of those had been decimated whilst saving the skin of the Saracen warlord. But now the other two units took it in turns to charge my knights. Andy came out slightly on top of that one (he lost four models, I lost five). And then I sent my spearmen in, trying to take the heat off the knights. But that didn’t go too well for them (Andy: I managed to follow up a Shooting attack by the Ghazis with a subsequent charge from the Ghulams).
Surrounded and Doomed
So we had a five turn game limit. Along came turn five and, to be honest, it was looking fairly even to me. You normally expect your opponent to throw everything at you on the last turn but Andy was surprisingly restrained. (Andy: I’ll blame my SAGA dice).
‘I’ll show him,’ I thought. I loaded up my battleboard so my few remaining knights could charge in to his unit of Ghazis. It went alright – the Orison ability of the Templars saved their skins, and sent some of the Saracens packing.
And that was it. Game over. We totted up points and the final result was…5 points to the Saracens, and 11 points to the Templars.
A quick round up of the games at the recent club meeting, four scales, four periods.
First up, a 15mm War of the Roses game between Stephen & Tony (Lancastran) and Jeremey and Andy (Yorkist) using Sword and Spear second edition rules.
Jeremey added some flavour with some random event cards, one to be drawn by each player. The four used in this game were:
Jeremey’s random event cards
Jeremey will write up the game, so I won’t go into detail on how the cards were used here.
Andy’s Yorkist Archers and Crossbows occupy hill as the Lancastrians approachAndy’s command.Tony’s Border Horse take on Jeremey’s Men at Arms (with the banner)The Yorkist line seen from the Lancastrian’s perspective
Next up Mark, David and Alan fought a battle in the War of the Spanish Succession using Mark’s 6mm collection and his own rules.
The battle lines are drawnThe Grand Alliance LinesAlliance infantry and train.
Cavalry advanceLocal firefight
Moving on several centuries, we come to 2004, Fallujah, using Force on Force rules. This 20mm collection was put together during the lockdown by Peter, this is its first outing at the club. Peter was joined by John, Brett, Colin and the other Mark.
Marines on the roofMarines take casualties while advancingPilot’s eye viewInsurgentsThe Ruins of FallujahInsurgents around a skipInsurgents in the open
And finally we move into the near future, with an excursion into Zona Alfa. John (another one) took Eric through the rules with a series of short scenarios using his 28mm collection.
Stalkers encounter some mutant dogsHostiles approachZombies in the smokeClose encounter of the gruesome mutant kindWhere did everybody go?Start of the next mission, all seems quiet… too quiet!Creeping through the undergrowthObjective taken, but man down.Anomalies abound
Andy tells the story of the Fenris mission from a different perspective.
Following the limited success of the first mission to Denides, Captain Ash de Vere set about recruiting replacements for the losses incurred, Eric Olsen, the First Mate and Sam Fleet, a pathfinder had both died during the mission.
The first order of business was to recruit a new First Mate, by a stroke of fate the best candidate Ash could find was also called Eric, Eric Bamburgh. After some reflection Ash decided the crew really ought to have the services of a medic, and fortunately the new first mate knew of a good man called Dan McIntyre who was looking for a new berth.
As the two new crewmen were settling in Patina dZuk, one of the Runners Ash had engaged for the last mission, popped in and asked Ash if he could stump up 20 credits to get her the kit needed to become a Chisler. As there was just enough credit remaining after hiring Dan, Ash agreed.
So, with the crew back up to full strength Ash set about looking for a new mission to bolster the funds. An information broker Ash knew, Germy, had heard some rumours that Fenris, site of one of the major battles in the Robot Wars, was awash with loot and knew of potential buyers for any physical loot that Ash could find. What Germy didn’t say was how many robots remained active on the surface of Fenris…
Ash and Eric tried to lay some groundwork for the mission, Ash tried his usual sources for some high impact ammunition, but none was to be found. Eric tried greasing some palms to get possible rival crews to look the other way at an opportune moment, but there were no takers.
As Ash set the shuttle down on Fenris he briefed his crew. He would lead one team with Charlie, Jen and Patina. Eric would lead a second team with Skel, Honu and Offler. Bren, who hadn’t fully recovered from the injuries sustained on Denides, and the new medic Dan would be the reserve.
As the teams approached the ruins of a town movement could be seen, several of the Fenris incident robots were moving around the town.
Robots patrolling
In addition, more than one other crew were in the town, no doubt searching for the same loot Ash was after.
Tony’s crew
Ash led his team towards Tony’s crew, an ex-military group judging by their uniforms, activating his Energy Shield as he moved through the ruins.
Ash’s team took up positions behind some rocks while Patina got out her lock picks and set to opening a promising looking crate. Success, unlocked!
As Patina checked the contents of the crate she came under fire from Tony’s crew, presumably trying to take her out so they could steal the loot.
Ash and the rest of the team returned fire at Tony’s crew, giving the wounded Patina the chance to fall back with the loot behind some rocks to take her out of the line of fire. Ash told Patina to get back to the Troubadour with the loot as fast as she could; he and the rest of the team would cover her retreat.
A wounded Patina and her loot.
In the ensuing firefight Jen was knocked down, and as Ash and Charlie were both hit before they pulled back. As did Tony’s crew, perhaps they realised they weren’t going to be able to catch Patina.
Meanwhile, Eric’s team had moved into a different part of the ruins searching for more loot.
Eric’s team
As they advanced a clanking sound was heard behind them, one of the Fenris Robots had appeared from the ruins and opened fire, wounding Skel.
Bren and Dan came to Skel’s aid, Bren taking out the robot, and Dan treating Skel’s injuries.
Dan treats Skel with Bren on guard
Honu took up a position to guard the right flank, hunkering down amid the ruins. Good job too as another Robot moved up, firing on and wounding Honu. In returning fire Honu managed to put the Robot down.
Honu takes cover
While Honu dealt with the robot, Eric and Offler advanced through the ruins, finding another crate.
Offler and Eric find some loot
As they examined the crate they came under fire from Stephen’s crew, who seemed to be concentrating their fire on Offler. She was knocked down, and after returning fire Eric pulled back to some cover, with Bren coming up to support.
For some unknown reason the crew that had shot Offler then fell back, giving Eric the chance to go back and unlock the loot.
With Bren and Honu covering, Eric grabbed the loot and headed back toward the ship, only for yet another robot to appear! Luckily for the crew the combined fire of Bren, Honu and Eric managed to take down the robot, although Bren’s carbine jammed part way through the firefight.
With the robot down Eric’s team made good their escape, with Eric wondering why they had been robot magnets.
Eric’s team fall back with the loot (White skull denotes Bren’s jammed Carbine)
Once the Troubadour had left orbit, Dan took Jen and Offler into the sick bay to treat their wounds. Jen was remarkably uninjured after all, it must have been just a glancing blow, but Offler was in worse condition. Dan managed to patch her up, but she would not be back to full strength for a while.
Back at the Grand Market, Ash decided not to fence the loot through Germy, he hadn’t forgiven Germy for the bad intel on the robots. After some haggling, he found buyers for the Trade Goods and Alien Artefact they had recovered, netting 250 and 400 credits respectively. Ash would have to think on how to spend the hard-earned credits.
The crew gained 135 experience from the mission, enabling Eric to advance a level.
Stephen gives us step by step guide to painting a Sci Fi villain.
For an upcoming game of Stargrave I wanted a baddie. The Big Boss. I looked at the models I had and none of them were really suitable.
So I decided I would buy something. I knew how I wanted the model to be armed, and knew my chances of finding something exactly like that was virtually zero, so it had to be something that could be modified.
Since I intended to order some bits from Ral Partha I thought I’d have a look there.
And lo and behold, I found just the thing – a Neo Soviet Handler from their Vor range (specifically, code 40-412):
The original figure
I trimmed off the knuckle-duster thing in his left hand and in its place went a blaster pistol from the spares bag. His main armament was going to be a void blade. And when I saw this model, and what he had in his right hand, I couldn’t believe my luck. This would make the perfect handle for a lightsaber (sorry, void blade). I trimmed it down a bit, but I liked the flared ending so kept that. A hole was drilled and a piece of 1.5mm styrene rod was glued in. The model was then stuck to a 25mm plastic base and the base built up with filler. And then it was given a brown undercoat:
Modified and undercoated figure
Now, in this write-up I am just going to give generic colours rather than specific names and codes for a brand. I use from more than one range of paints and I am sure everyone else does as well.
I decided his robes, gloves, and gimp mask were going to be black. So I slapped it on, letting it get into any awkward gaps in case I couldn’t get a brush in there later so it would act as a deep shade.
Basic black basecoat
Right, this is just my own personal philosophy on black. But I never highlight black with just grey. No. Black is seldom that helpful. Look at any black clothes you may have. I bet they’re all slightly different shades – it depends on age, what the material is, what dye was used. Lots of variables. So try to keep that in mind when highlighting your blacks. The black for the robes had a bit of blue added, then white added to that for successive highlights. The gloves and mask had a blob of red added, then white added to that for successive highlights. You can see the slight difference in ‘black’ here:
Shades of black highlights
Next up, I decided to do the bits that would get a dark brown (OK, OK, GW’s Agrax Earthshade) wash – the boots, pouches, bracers, and metallic bits. These received the same base brown colour. The metals had a steel base colour. Once dried, on goes the wash.
Brown and steel parts base coated and washed.
And when that’s dried the pieces are painted up. Like black (and most colours, to be honest) it helps if you vary what you use to highlight your base colours. It’s tempting to add white to lighten it. But maybe yellow might give a different shade to the base colour, or a pale grey. This is a good thing to keep in mind, especially if you have two uses of the same colour next to each other. That said, I did use white to highlight the brown. The metal bits were touched up with the base steel colour, and then highlighted with silver. I ummed and ahhed about what colour to do the lenses on the eyepieces. Blue or green were the first choices that came to mind. But then I thought, orange. So orange it was, highlighted with a dot of yellow.
More highlights and those glowing orange lenses
Next up I decided to do his weapons. There’s a good reason for this – I just couldn’t make up my mind what colour to do his armour. Normally I would have left the weapons to last because they stick out and there’s every chance they could get knocked or rubbed as I did other bits. But I just couldn’t make up my mind. I had thought about green, but I had also decided that his blade was going to be green, and if there was too much green then I may have to re-paint the armour. With that, I decided to do the weapons first, and once that was done maybe the armour colour would be obvious. The handgun had a base colour that was a mix of steel and black to make a gun metal colour, then highlighted with the steel. A red laser sight was also dotted in. I knew from the outset I was going to do a green blade. I have a nice rich green colour, so I went with that. It’s hard to paint a 3D object like it is lit from inside, so I chose to just highlight the base and tip of the blade. I used white to highlight this time.
Pistol and lightsabre, sorry void blade, painted and highlighted
I looked at it. You know what, I thought, I reckon green would look OK. So I went with green for the armour, but a different shade of green. I gave all the armour panels a thin coating (not really a wash, but not really thick paint either) of the base green mixed with a blob of dark brown (again, you don’t have to darken colours with just black). Once dry I then painted in the panels with the base colour, which was highlighted by adding yellow to the green to create a more vibrant green, but also so it didn’t have the same tonal value as the green on the blade. The edges of the armour were based in dark yellow, and then picked out with a flat yellow.
Armour panels painted green and yellow.
And that’s the end of the painting for Doctor Moreau. Once finished, I thought the 25mm base looked a little small on what was a chunky model. So I pried the model off the base (and, inevitably, had to touch up a few knocks and chips) and glued him to a 30mm wooden base. Flocking was my standard recipe – a mix of railway ballasts first, and then some spots of static grass:
The rebased and finished figure
And that’s Doctor Moreau done, ready to be pestered and set upon by a group of ne’er do wells and freeloaders.
During a recent discussion over Stagrave and making scenery Marcus mentioned a cheap set of terrain available from Mantic Games for the game Dreadball. Further browsing of the Mantic Games site showed a box set called Dreadball Xtreme for £9.99.
Club member Jeremey took the plunge and bought a set for evaluation:
This all started when I saw the Dreadball set of Free Agents that I thought would be good for converting into a Stargrave crew. The Free Agents set was £9.99 but I discovered the Dreadball Xtreme set for £9.99 included the Free Agents set, it also contained some terrain in the form of crates, perfect terrain for any Sci-fi games; so I thought I might as well pick up a set.
I had to pay postage so the whole thing cost me £16.99, and this is what I got.
Contents of the complete set
I will say straight away this is not a review of the actual game. I had no interest in playing it. I bought the set for use in other games.
This is what you get in the set. First up were the 9 Free Agent miniatures that first led me to the set. The miniatures in the game are all hard plastic. The quality varied, some had sharp details others were very soft. Also the painted miniature pictures on the Mantic Games site gave me the impression that some of the miniatures were larger. For example the Treeman looked tall but is the same height as the other humanoid miniatures. Mould lines were quite pronounced on some of the miniatures, those needed to be cut off, filing on this type of plastic just roughs up the surface of the miniature.
The Free Agents
Next came the female team for the game. The miniatures are quite slight and of all the miniatures these were the softest and worst mould lines.
First team in the set, Female players
This was a shame because I wanted a number of female characters in my Stargrave crew. You get two copies of five different miniatures in this set, although two are wounded. But these could be good for rescue scenarios in games.
Here is a close up showing the size of the mould lines on the female miniatures.
Some figures are very slight compared to other sci-fi miniatures
The second team are convicts and these had better castings. You get more variety with this team (they are convicts apparently), they are nice post apocalyptic looking. there are three miniatures where you get two copies. One pose being wounded as with the female team. There are two other miniatures and then the larger ogre/thug miniatures that come with different arms and heads so they don’t have to look the same.
Second team from the set
The Dreadball Xtreme set comes with two figures to represent team sponsors. The suited miniature would be good as a boss to be protected or assassinated in games, with the other one potentially being a gang leader.
The team Sponsors
Now we come to the terrain which is one of the reasons I wanted to get the set. These are quite good with four power unit pieces, six square crates, four lighting units and 16 hexagonal crates. These were all nice clean castings with few mould lines.
The terrain set
I should also mention the other bits from the box that I might find a use for. The rules, counters and cards for the game don’t hold much use for me. But the game mat from the set is about 24″ x 24″ and a hefty piece of rubber (mousemat?) style fabric. You could probably use it as a door mat it feels so tough. But I’m probably going to cut it up as the design will work for landing pads, storage areas or to represent the interior of a starship. There were also 24 plastic hex bases in two colours. These could be good for various terrain projects of bases for other miniatures.
So was it all worth it? I must say I was hoping for more from this set, the casting is a bit poor on some of the miniatures and the detail very soft. I will have to see how these look once I apply the spray undercoat. That often highlights the detail a bit better. But for my £16.99 I got enough miniatures to create a fairly good crew of 8 or so miniatures, some creatures and characters for scenarios, 30 terrain objects and a mat that will make several pieces for games/terrain, all that considered it was probably worth it. But I do wonder why the Dreadball Xtreme set is £9.99 when the contents if bought separately on the Mantic Games site would be over £60 just for the miniatures. Are the individual team sets at £25 each better cast? Who knows the reason behind it. But I’m happy enough with the amount of material I got from this set.
Andy describes how he goes about painting his irregular figures.
I don’t claim to be a great painter, I’m certainly unlikely to win any painting competitions, my aim is to get figures to a reasonable standard for the table top in a reasonable time.
When painting irregular, or at least non-uniformed, troops I still try to have a systematic method of painting, so I thought I’d share how I go about it.
I start off by washing the figures in warm soapy water, to remove any mould release agent, then rinse and dry them.
For 28mm infantry I standardise on 2p coins for the bases. I can then use them individually for games like SAGA or Lion Rampant, or on sabot trays for games like Dux Bellorum.
So once cut from the sprues and any mould lined removed with a scalpel and file the figures were stuck to their bases using a general-purpose adhesive, like Bostick.
Cleaned up and based.
Some of the figures have their left arms as part of the torso, others have them as separate pieces. I then assembled the figures using liquid polystyrene cement, except for the shields. I leave the shields off to make it easier to paint the left arm and chest. I do keep a shield handy to check the position of the left arm against the position of the right arm and spear during assembly.
I didn’t have quite enough heads with helmets for the 16 (I had previously used some on some unarmoured bodies) so a couple of the figures had bare heads from the Dark Ages Warriors box. The bases were then built up with Polyfilla.
Assembled, bases built up with polyfila.
I then undercoated the figures with grey car primer spray.
Most of the paints I use are Vallejo Model Colour, exceptions are mainly Army Painter (AP) washes and inks.
First off, I painted any areas of mail matt black, followed by dry-brushed Gunmetal Grey. Spear tips and helmets were painted the same colour. Next the faces, necks and hands were base coated Brown Sand.
Skin basecoat, mail and helmets painted.
Skin was the painted Medium Flesh Tone.
Now to start with the systematic randomisation of colours for the clothing. I arranged the figures into as near a rectangular formation as possible, in this case the 16 figures simply went into four ranks of four files.
I then painted the figure’s trousers by file:
Light Brown (A, E, I, M)
Chocolate Brown (B, F, J, N)
AP Dark Stone (C, G, K, O)
Basalt Grey (D, H, L, P)
Skin and Trousers done.
Then the tunics by rank:
Grey Blue (A, B, C, D)
Deep Green (E, F, G, H)
Red (I, J, K, L)
Mahogany Brown (M, N, O, P)
If I had been painting lower status troops, I would have used the same colours overall for tunic and trousers, but added an additional colour to the tunic mix to avoid having the tunic and trousers the same colour on any individual figure.
Tunics done.
Next were the leggings, in diagonal lines top left to bottom right
Buff (A, F, K, P)
Pale Sand (B, G, L, M)
Beige (C, H, I, N)
Deck Tan (D, E, J, O)
Leggings done.
Next is the leatherwork. Belts, pouches and scabbard in diagonal lines from top right to bottom left, I used the same colours for the figure’s boots in a semi random order.
Red Leather. Belts etc: (C, F, I, P) Boots: (B, G, L, M)
Saddle Brown. Belts etc: (B, E, L, O) Boots: (C, E, J, P)
German Cam Black Brown. Belts etc: (A, H, K, N) Boots: (D, F, I, O)
Sword and knife hilts were painted in the same colours, plus black, at random.
Next was the hair, again four colours were used, with a semi-random selection of figures, making sure I didn’t use the same colour twice in any row or column of the 16 figures.
Black: C, E, L, N
Tan Yellow: A, G, J, P
Flat Brown: B, H, K, M
Brown Sand: D, F, I O
Belts and scabbards done.
Belt buckles and scabbard metalwork were painted either Gunmetal Grey or Bronze.
The spear shafts and wooden crosses were painted Beige Brown and the cords of the crosses painted AP Hemp Rope.
Swords, spear shafts and crosses done.
As always when I paint, I have to do some corrections, reworking any colours that had accidentally been painted over.
After corrections.
Once all the main colours had been finished, I proceeded to the washes.
All skin was given a wash with AP Flesh wash.
The tunics were washed as follows:
Blue Wash (A, B, C, D)
Green Wash (E, F, G, H)
Red Wash (I, J, K, L)
Soft tone Wash (M, N, O, P)
Soft Tone was also used for all spears and figures with Red Leather or Saddle Brown Belts, Scabbards and Boots.
Red Leather. Belts etc: (C, F, I, P) Boots: (B, G, L, M)
Saddle Brown Belts etc: (B, E, L, O) Boots: (C, E, J, P)
Dark tone was used for figures with Chocolate Brown or German Cam Black Brown Belts, Scabbards and Boots:
German Cam Black Brown. Belts etc: (A, H, K, N) Boots: (D, F, I, O)
All leggings and figures with Tan Yellow or Brown Sand hair was washed with AP Light Tone wash.
The bases were then finished with green basetex.
Washes added and bases finished.
Having finished the figures, I moved on to the shields.
These were cleaned up in the same way as the figures, then undercoated black on the backs and white on the front. I use white on the fronts as I was going to use shield transfers rather than painting the designs.
I then drybrushed the back of the shields with Beige Brown and painted the shield bosses Gunmetal Grey while still on the sprues.
Shields work in progress. The white needs touching up.
Little Big Men Studios decals have a hole for the shield boss already cut out, but the Battle Flag decals don’t, you have to cut those yourself.
I did have some issues with some of the LBMS decals, I couldn’t peel the plastic cover off to expose the self-adhesive surface. After ruining a few of the decals I ended up gluing them to the shield complete with the plastic layer using PVA glue. I haven’t had that problem before, so I wonder if it’s because these are fairly old, 3-4 years maybe? I didn’t have any problems with the Battle Flag decals.
Once the decals had dried, I painted the shield rims with Japanese Uniform to represent the leather edging. Once this was dry, I then cut the shields from the sprues, tidied up the edges with more Japanese Uniform.
Finished shields
The astute among you will notice there are 20 shields, but only 16 figures, the extras will be used as battlefield markers: Fatigue in SAGA, Battered in Lion Rampant, or Leadership Points in Dux Bellorum.
It’s never a good idea to glue painted articles together, paint to paint bonds aren’t strong, so I used a file to remove the paint from the contact points and then used liquid polystyrene cement to glue the shields in place.
The figures were then given a coat of spray matt varnish.
Here they are, 16 figures, making up 4 points of SAGA Hearthguard, a unit of Lion Rampant Sergeants with four figures left over or 2 units of Dux Bellorum Noble Shieldwall:
The finished figures.
The guy on the left of the front rank has a painted shield (Green and Light Blue) from my stash of spare shields rather than one of the shields I did in this session.
So, that’s my method for painting irregulars in a systematic way.
The first historical wargames army I ever bought was a Crusader army. It’s always been a period of great interest to me, especially the later crusades of the thirteenth century.
I resisted buying a crusades army in 28mm because that meant I’d also have to get some Saracens and I just didn’t want to paint all that patterned cloth.
Then a while ago I was given a box of plastic Gripping Beast Arab infantry. They sat in a cupboard for a couple of months because I still didn’t have the will to paint all that fabric. Then I saw some pictures of other’s Saracen armies and I saw how they’d done them in plain white material. ‘That’s a good idea’, I thought. So that’s what I did, and decided I’d make the Ghulams a bit more colourful – representing wealthier troops able to buy expensive fabrics.
Being motivated to get these done, I motored through them. And this weekend I decided to have a game. I was going to play Saga, but it doesn’t play solo so well. So instead I went with Lion Rampant…
Forces Deployed
The two sides lined up opposite each other. Both had 24 points a side.
The Crusaders had two units of Templar knights (LR: Mounted Men at Arms), two units of Mounted Sergeants, and one of foot Crossbows.
I gave the Saracens two units of Ghulams (LR: Foot Men at Arms), two units of Ghazis (LR: Foot Yeomen, armed with short range missiles – javelins), and two units of Ahdath (LR: Bidowers).
I did a simple meeting scenario – both sides hacking at each other until one is gone.
I rolled for leader traits and got Vulnerable for the Crusaders (leader killed on a Lucky Blow of 2 or 3) and Lionheart (ironically) for the Saracen leader (meaning his unit could re-roll 2 failed hit dice).
The Saracens went first and they were lucky enough to activate all their units – moving up to occupy favourable terrain that would hamper the mounted crusaders. The Ahdath would be well placed in these areas of bad terrain, where they could lodge themselves in and shoot at the Crusader cavalry. The only solution to this would be the Crusader crossbows, so it would be worth the Saracens taking out the Crossbows as soon as possible.
Saracens Advance
The Crusaders were equally lucky, activating all their units. The Sergeants on the right went galloping past the village, the Crossbows moved up to get into range of the Ahdath hiding in the scrub, and the Knights also moved up.
One thing became obvious – there was a natural funnel to the battlefield between two areas of rough terrain. The Ghulams had moved up to block this gap, with the Ahdath either side with their bows to shoot at anything coming between them. The only thing the Crusaders could do was to advance as quickly as possible to minimise their exposure to the enemy arrows.
Getting Ready To Shoot
The Saracen Ghazis kept moving up to the Crossbows, desperate to engage and eliminate them – if they could it would make a Crusader victory difficult. The other unit of Ghazis, over by the village, decided to hurl their javelins at the approaching Sergeants, scoring enough hits to take one of them out. When it came to the Crusader’s turn they were more than ready to return the gesture. Although the Ghazis were approaching the Crossbows, it was obvious the Crossbows had to take a shot at the Ahdath in the scrub. Spanning their bows, they took aim, and…a devastating volley! The unit of Saracen skirmishers were devastated and routed off the table! Both units of Sergeants advanced – those on the left moved into the middle of the funnel to threaten the Ghulams, whilst those on the right put in their spurs and charged the other Ghazi unit.
Sergeants Charge In
Casualties were taken on both sides and the Ghazis were bounced back. But the Sergeants were now down to half strength which meant their combat effectiveness was also halved.
It was then over to the Saracens to go on the attack. On their activation they sent the Ghazis in to charge the crossbows.
Ghazis Rush The Crossbows
Improbably, the Crossbows prevailed! They didn’t take a single casualty and pushed back the Ghazis who failed their courage roll and were now battered. The other unit of Ghazis managed to rally, ready to block the Sergeants. The remaining unit of Ahdath drew their bows, trying to decide who to shoot at – the unit of Sergeants leading the attack through the funnel, or the unit of Knights who were coming in behind to mop up any remnants the Sergeants left behind.
In Go The Cavalry
Deciding that the Ghulams should be able to resist an attack by the Sergeants, the Ahdath took aim at the Knights and let fly. No effect this time.
Now it was over to the Crusaders. The Sergeants were in charge range of the Saracen leader, so decided to go for it and see if they could get a lucky hit. And they did! OK, so the Saracen leader didn’t go down, but a couple of his Ghulam bodyguards did and had to retreat. The Crossbows, knowing how lucky they’d just been in repelling the Ghazi charge, took aim and let rip. A good shot that took out a couple of the Ghazis. However, best of all, the Ghazis then failed their courage test. It was such a bad fail that they routed off the table.
Sergeants Charge The Saracen Leader
The Saracens had to go on the counter-charge. The Saracen leader ordered his men to charge and in they went against the Sergeants. But it happened again – the Sergeants came out on top. Sort of – no casualties on either side, but since the Saracens had charged and failed they had to retreat. The Ahdath had another go at the Knights, this time scoring a kill. And the Ghazi unit by the village threw more of their javelins at the Sergeants, taking another rider out and leaving them battered.
Templars and Ghulams
Things were coming to a head. The Sergeants, not believing their luck, charged the Saracen leader again. Not such a good result this time – the Sergeants took heavy loses and were pushed back, under half strength and battered! The first unit of Crusader Knights went in and charged the Ghulams. A fairly even result, meaning the Crusaders had to retreat. Had the Saracens managed to turn things around?
Back to the Saracens, and they spent most of their turn rallying units. The Ahdath once again took a shot and once again took out one of the Knights. They were starting to become a real pain.
So on the Crusader turn the Crossbows moved up so they could get in range of the other unit of Saracen skirmishers. The Crusader leader also decided to take part (remember, his leader trait would make him more susceptible to a lucky blow, so he’d been wise to keep out of it until needed). So the Crusader leader took command of his Knights and they charged one of the Ghulam units. Casualties were taken on both sides, and a Lucky Blow roll was made against the Crusader leader: double 6 – nowhere near!
Templar Leader Takes Control
On the Saracen turn I noticed the two leaders were near each other. There was only one thing for it – Leaders Challenge! The Crusader leader accepted. Into the middle they went and rolled for it.
Challenge Accepted
No hits for the Saracen leader, but the Crusader leader scored a hit, meaning the Saracen leader had been killed in personal combat! All the Saracen units now had to make courage rolls. Only the ex-leader’s unit failed, leaving them battered, but all the others passed. There were still enough Saracens left to make it worth fighting on, so I kept the battle going – despite losing their leader, could the Saracens still manage to win?
Well, maybe. But on the Crusaders’ turn the crossbows took a shot at the remaining unit of Ahdath in the rocks. Despite the extra protection, they still lost half their unit and fled. It was now looking extremely unlikely that the Saracens could win this one. All they really had left was a single unit of Ghazis. Well, there were the Ghulams, but both of those units were down to just two models each, so they’d lost their punch.
One Last Charge
Ultimately and inevitably, it would be a Crusader victory. The Crusader leader, emboldened by his victory with the Saracen leader in single combat, led his knights in repeated charges on the final unit of Ghazis. The Ghazis were steadily whittled down until they finally failed their courage test.
John gives a the low down on the Kontraband expansion for Zona Alfa, and a prize winning battle report on one of the scenarios from the book.
John tells us “There’s a competition on the F/B page for battle reports. I sent a copy of the article to the rules author and I’ve won a copy of the rule book signed by the author and illustrator.”
Zona Alfa was published by Osprey in early 2020. It’s a skirmish game set in the Chernobyl exclusion zone where teams battle for salvage and hope to survive. I’d hoped to play it at the club, then along came the pandemic. The author supports the game well via the Stalker 7 website and solo or Coop rules were soon developed, where the player games against the zone itself rather than a physical opponent. I’ve posted 3 battle reports here and you can check out Guerrilla Miniature Games U Tube channel where a full 7 game campaign is played out. These rules are highly recommended.
Kontraband is an 80 page expansion to the Zona Alfa ruleset (which you will need to play Kontraband), available through Amazon as hardcopy or Wargames Vault as a pdf. It develops the ideas above to take the game in a different direction, recommending a play area of 3’ x 3’ and a crew of 4 veterans. It is set deep in the Exclusion Zone at high threat level so it’s worth playing through a few standard Zona Alfa games before diving in. Here’s what’s in the book.
Crew Members.
Crew members can either be Stalkers – good at combat or Scientists – good at technical tasks, a further option is to include a dog companion for which there are detailed rules and additional rules for Hazmat suits. Each crew member can have different equipment or skills so it’s worth spending the time to make them complementary.
Zone Setting.
The play area is populated with a recommended nine searchable locations (points of interest). The crew have to live off the land so these need to be searched for food, drink, ammo etc. to sustain the crew for the next game. There are 20 points of interest cards from which the 9 are randomly selected, shuffled and placed as an Incident Deck, the top card being revealed when a point of interest is searched. These cards are nearly all bad news and may spawn a zone hostile within close combat distance, dangerous plants or booby traps. There is a greater emphasis on melee combat than in Zona Alfa.
The objective of the game is to search Anomalies to retrieve artifacts (the recommended goal for a campaign being 12 artifacts). It is recommended that the play area for a game has 3 Anomalies to search. The rules for anomalies are fleshed out and there are options for different area effects if the anomaly search goes wrong – four ways to die. Models can be caught in a gravity force field, electrocuted, blasted or teleported away from the anomaly.
There is no game turn limit, the risk of staying in a dangerous area is handled by zone events. Starting on the second move, and becoming more likely with each subsequent move, there is a risk of a zone event, for example: an energy wave, vermin stampede, security patrol, angry mutant or anomaly movement to ruin your day.
New Stuff
This covers a better way of dealing with wounds than the original rule book, there are new weapons and accessories with better options for melee combat. Zone hostiles can be made more dangerous and the concept of fatigue and obsessions are introduced. In Zona Alfa, progression is covered from Rookie through to Veteran. In Kontraband, crew members can add sixth sense, extra toughness, and an additional skill after a number of survived missions.
Missions and Expeditions.
There are 6 separate mission ideas for pick- up games or to link together to form an expedition and a sample expedition of 5 missions in the rulebook. So whilst waiting for some new figures, I decided to try out the reconnaissance mission.
Here is the table layout with 9 POI (blank dice) and 3 anomalies (Spheres), the crew will enter at the bottom RH corner. Their mission is to search the 4 POI at the corners as a minimum, destroying all Zone Hostiles and retrieving samples from any of the corner POI which contain a hazard. I selected a crew with 3 Stalkers and 1 Scientist.
Turn 1.
For the first turn the crew will check out the POI closest to their entry point, the abandoned farm equipment. Each crew member can have three actions per turn and it’s worth using one action “alert” to provide overwatch for the Searcher. The top card from the Incident deck is revealed.
Here the vermin swarm is spawned by using a D10. The dice roll number is the distance in inches/2 from the POI and the facing gives the direction. The Leader (Nimzo), with the steady hands skill and a red dot sight has one action before the swarm can charge into the nearest model and attack it. They are destroyed.
Had the incident card been a bandit ambush, it’s likely that one or more crew members would have been out of action on turn one, unless crew members are on alert to take pre-emptive action.
The Searcher (Ali) has the scrounger skill so can search the POI twice, He secures rations, water and ammo which the crew will need for the next mission – in the game you have to think about the future as well as the present.
Turn 2
At each turn after turn 1 a D10 is rolled. The die roll is added to the turn number and if the result is greater than 10, a zone event occurs the subsequent turn. No zone event for turn 3.
The crew head up the board and Sukova (a Scientist) is best equipped to search the anomaly, which she does.
Here, a skill roll of 8 would normally fail but Sukova is equipped with a Detector which gives her a +2 bonus and she recovers an artefact, which would count towards a campaign goal.
Turn 3
A zone event, an anomaly shift will take place at the start of turn 4. The crew move up to the top RH corner of the board to search the POI, next turn. This will not affect the crew as they will be out of range.
Turn 4
No zone event is rolled. Spassky (Bounty Hunter) checks the POI – not the best option. The card reveals a zone hazard ‘Spores and Spitters’. He survives one attack and retrieves a sample from the POI.
Turn 5
The zone event roll results in an Alpha Predator entering the board at the start of turn 6.
The crew move towards the POI at the top left hand corner of the board but reserve an alert action to use against the Predator when it enters the board. Where possible, they move into cover, this will give protection against the attacking Predator which has Ranged and Melee combat abilities
Turn 6
An area emission effect will arrive at the start of turn 7
The predator enters, this is a dangerous opponent with high armour value. Ruined buildings prevent a direct attack route and it is forced wide and after 3 movement actions it has none left to attack the crew. It’s the crew’s turn and Ali fires the grenade launcher and scores one wound. The Leader gives him an extra action to get into cover. Spassky with Steady hands and a Red Dot sight on his battle rifle fires at the predator. It takes 3 firing actions but the predator is downed. Spassky is stuck in the open.
Turn 7
The Zone event roll results in another Alpha predator arriving. Things are not good for Spassky. He takes the full force of the Zone emission, he’s pinned and wounded and it takes all his actions to recover. Nimzo gives him an action to go on alert. The rest of the team move round to deal with the Predator when it enters.
Turn 8
The zone event roll brings up another zone emission at the start of the next turn.
The Predator enters, Ali fires a grenade which causes one wound, whilst Nimzo causes another. Spassky lobs a smoke grenade at the Predator which has to take a will check. It rolls a 10. This is an automatic pin and the will failure adds another. It will take 2 actions to remove the pinned counter but the Predator will still be able to attack Spassky once when it emerges from the smoke.
It’s a straight roll off, Spassky has the knife man skill and is armed with a Trench knife. Both adversaries roll a hit. Spassky could use his roll to parry the attack from the Predator but he’s a Bounty Hunter. Both take a wound and the Predator is destroyed.
Ali makes it to the thicket which holds the POI they must search for. Sukova manages to search a second anomaly and grab an artefact before ducking into cover. Nimzo orders Spassky to seek cover under farm machinery. Nimzo joins him there to apply a med kit.
Turn 9
The zone event for the next turn is another Alfa Predator
This turn, the effect of the zone emission is negated because all crew members are in cover. Nimzo and Spassky go on alert whilst Sukova searches a POI, which reveals a mutant.
The mutant spawns 4 inches away from the POI and is downed by Spassky. Sukova retrieves some ‘hotload’ ammo for the crew.
Meanwhile Ali’s search triggers a Zone Hazard – cobwebs.
Ali avoids the effect of the Zone Hazard, collecting a sample and retrieves a Lithium battery, Med Kit and heavy weapons reload. He will need this for the grenade launcher next mission.
Nimzo gives Ali an extra action so he can go on alert and get in position to attack the Predator the next turn
Turn 10
The zone event for move 11 is another zone emission.
The Predator enters but the crew are ready. Ali fires a grenade causing one wound and Spassky finishes it off with two shoot actions, the extra damage from his AS Val battle rifle proving crucial. In their move, the crew race towards the final POI that needs to be searched to complete the mission. They duck into cover to avoid the effect of the emission. Ali moves slower as he is slowed down by the heavy weapon.
Turn 11
The zone event for move 12 is the arrival of a Spetsnaz zone patrol
The zone emission has no effect and the crew continue towards the final POI. Spassky searches the POI – Marsh gas, if he fails the will check, he will fire at the nearest crew member! He passes and collects a sample having an action to clear the board. The rest of the crew follow, Ali needs to take a swig of Electric Juice to give him the extra action before the Zone Patrol enters.
The incident packed game had taken just over 90 minutes, a bit longer to make commentary notes and photos. I really enjoyed the game which adds extra detail to the Zona Alfa ruleset. I’ve played this scenario 4 times now, each game was different and challenging. I’d recommend this game to all players- whether you are a regular player or a sceptic who felt the original game wasn’t for them.
Reflections
Zona Alfa and Kontraband are well supported by the author who has answered any queries or clarification promptly. The Facebook page is an excellent and supportive source for the game, no bitchy point scorers on this site which is refreshing compared to other wargaming Facebook pages I subscribe to.
Stephen enthuses about Stargrave and describes a couple of crews he has put together.
Image backdrops are used under the Creative Commons Attribution-Noncommercial-Share Alike 3.0 License from Deviant Art user Moodybluehttps://www.deviantart.com/moodyblue
I’m really excited about Stargrave.
I can see myself wanting to play it loads (mind you, there’s loads of other games I want to play as well – currently undergoing bad Saga withdrawal symptoms).
Lucky for me, I have enough figures and scenery to get started with Stargrave, no need to paint before play, etc.
So what I have here is an introduction to two crews I have put together.
The first group are a party of scavengers from the Candolorian system. They are led by Elias Dante, captain of The Devastator, and a rogue who has been one side of the galaxy to the other. With Elias is Imjin Tik-tok, a Tuncoul and experienced tekker who looks after Elias’ droids.
Captain Elias and Imjin
The droids themselves are TT-1B and CLN-T 35TWD. 1B is an old sentry bot who’s had his software updated. CLN-T is of unknown origin.
TT-1B and CLN-T 35TWD
The rest of the crew are made up of Mackenzie Talian, Quill Raiker, and Murch Nagu. Mac and Quill have known each other for years and have worked on many heists and smuggling jobs. Murch is a Thecan and a heavy trooper from the wars.
Mackenzie, Quill, and Murch
Next up is Madam Sholay, a psionicist and owner of The Monsoon – a converted Hauler class light freighter. First mate on The Monsoon is a biomorph called Shoggoth, who never strays far from Sholay’s side.
Madam Sholay and Shoggoth
The crew of The Monsoon is made up of ex-military personnel. There’s Aidan Kenver and Yammet de la Cruz, a pair of advance party pathfinders.
Aidan and Yammet
And rounding off the group are Mallias Bygrove and Zanford Schneider, two snipers who have a long list of kills to their names.


You must be logged in to post a comment.