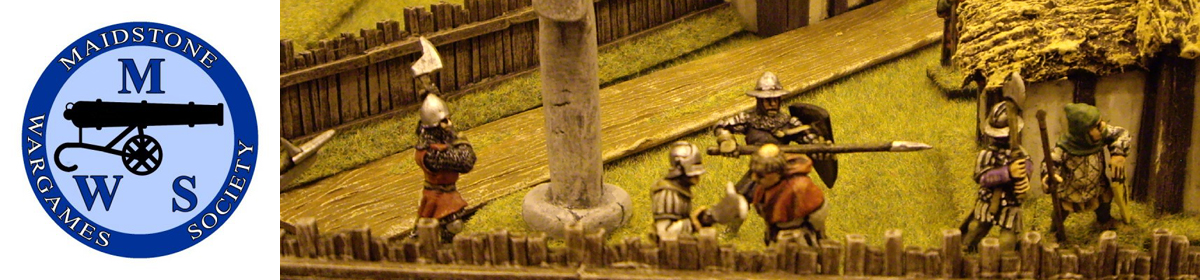
The club had another successful day at SELWG 2018, winning the Best Terrain trophy for the third year in succession. Here’s Phil looking suitably pleased with life 🙂
We’ve posted plenty of photos of the game in the past, but this is surely an excuse for a few more ! Photos by Phil and also courtesy of the official SELWG photographer.
With just one campaign season left in our Saga: Age of The Wolf campaign we are reaching the climax of the struggle for Britain in 1070AD. It’s been quite a year, with famine, recrimination, and sorrow besetting the North.
Our campaign has six players (well, seven, since one player had to pull out and a replacement took over):
Andy – Anglo Danes
Jeremey – Anglo Danes
Tony G – Normans
John R – Normans (had to pull out)
John L – Norse Gaels
Stephen – Welsh
Paul B – Vikings
It wouldn’t do to say what the rankings are at this stage (not least because I don’t know!) but I am pleased to say that, like a school sports day, everyone has had at least one win so far!
We’d also like to take this opportunity to thank our friends at Gripping Beast who have very generously provided a discount on a prize for the winner – the Saga 2 rulebook plus the Age of Vikings! Very kind and very generous. So, by the time Christmas gets here, the winner will not only have bragging rights over the others for the following year, but will also have an early Christmas pressie.
Keep an eye out for Turn 6 campaign stories and we’ll also be following up with a ‘Spoils Of War’ post, with stories about war trophies gained, blood feuds, murder, and worthy victories.
If you’ve not started your own Age Of Wolf campaign then we heartily recommend you do!
John Lambert provides some background and details on our Gaslands Christmas game, and give tips on converting Matchbox cars into post-apocalyptic racers:
As you are aware, one of our Christmas games will be Gaslands featuring a War Rig (I’m building one). For the game it is expected that participants will bring a Hot Wheels/ Matchbox “1/64 scale” vehicle to the meeting, there will be spares available though it’s much more fun and rewarding to build your own. Each vehicle build is points costed and the limit for each vehicle will be 25 cans (there’s a download file on the Yahoo group with basic vehicle costs and available upgrades). The best store to grab your vehicle is ASDA. They stock both manufacturers and are generally the cheapest.
With your prized possession safely at home, it’s time to decide what to do. Go to the Quickplay download sheet on the Yahoo group and determine the class of the vehicle you have chosen. This will give you the vehicle cost and the build slots available. There are build slot costs and cans costs for each weapon. Add it all together and get your total vehicle costs. If you have spare cans, there are perks available which can be added later.
Conversion work can be as simple or complex as you like, the key is to make it as cheap as possible so scavenge as much as possible and think about how you can use it. Do bear Health and Safety in mind though! Cable ties cut into pieces makes good side rams/armour or a minigun ammo belt. Paperclips make good gun barrels or mounts for electrical weapons. The insides of a redundant computer mouse can provide a number of suitable components. Plastic case strapping makes good chequer pattern armour plate and cocktail sticks or carpet tacks can be added as spikes, just use your imagination. There are numerous Youtube videos that do a really good job and provide lots of inspiration, J H Miniatures (James Hall) being one of the best contributors. When it’s done, superglue the wheels so it won’t slide down inclines, spray black and drybrush to bring out the details and you’re done.
If you wanted to do something more elaborate then you will need some extra bits and pieces.
Separating into components. Check the base of your car. If it’s screwed together you are in luck. If riveted you will have to drill the rivets out. Use a HSS bit as the metal is quite tough. Support the bonnet and boot from below an take it easy otherwise the bit will wander.
Stripping the paint job. Paint stripper will wreck the plastic parts. With the metal body separated you can strip off the paint to the bare metal. I used paint stripper from Homebase (TX10 for less than £4). You don’t have to remove all the paint and a good effect can be achieved by leaving part of the original paint on
Battle damage. Use a metal burr or the HSS drill bit to gouge the metal, use files to add more damage. For heavy damage I’ve used a plumbers wrench or club hammer.
Mesh Windscreens. Isopon aluminium mesh costs £2 from Halfords. Added inside or out, it hides the need for a driver.
Rust. I spray the metal body with Polyurethane gloss then apply Burnt Sienna wash to the rusted parts, then spray matt acrylic varnish from 2 feet away. This gives the rusted parts some texture which can be highlighted by drybrushing.
Weapons. If you have 1/72nd scale kits, these may supply suitable weapons. Otherwise this store has a range of weapons and bits:- http://www.sgtsmess.co.uk
Plastic Tubing and Plasticard. Evergreen supply a range of tubing and rod. Get a mixed pack, it’s all you will need and can be used to scratchbuild weapons.
Hope you find this useful, and see you at the starting grid sometime!
I had a bit of a Middle-Earth break after the efforts of the Open Day game, but I slowly eased myself back into things in September. On the shelf next to my desk is a small row of based and undercoated figures, and I find that if they stare at me long enough I end up getting having to paint them – at the front of the queue were two trios of rangers.
The first threesome are a set of Dúnedain, descendants of the men of Númenor. Known as the Rangers of the North, they patrol the borders of the Shire and keep that peaceful land (mostly) free of the perils of the rest of Middle Earth.
The other set are members of the Grey Company, a group of Dúnedain led by Halbarad who accompanied Aragorn through the Paths of the Dead and went on to capture the ships of the corsairs – their arrival at Pelargir turned the tide of the Battle of Pelennor Fields. They’re distinguished by their grey cloaks fixed by star-shaped brooches.
The official Games Workshop model of Halbarad is currently out of production, so my rangers are lacking a leader. Over the years I seem to have accumulated quite a few different Aragorn figures, so I picked a spare one of those and painted him up as his father, Arathorn (there is GW figure of Arathorn but, like Halbarad, he’s been out of production for some time and goes for silly money on eBay). The ‘conversion’ consisted of painting Aragorn’s dark locks grey, but he’ll do for me unless or until GW bring their official Arathorn figure back.
There was a man named Fritjof, son of Ake, and Eerika, daughter of Gudbrand the fearless; she was sister of Gull Half-aelf in Keflavik, and he the father of Kettle Hæing. Fritjof was a man so tall and strong that none could match him, and his bravery won him the hand of Gunborg; A volur, by the grace of Freyja. Fritjof sailed the ocean as a freebooter. On the counsel of his huswife Fritjof sailed his longships to the shores of Anglalond, seeking there wealth and renown in battle.
Fritjof and his forces fell upon the Angles and there was fought a great battle. Fritjof and the Angle lord fought manly, beard to beard, and Fritjof was sore wounded. The Angles saw victory and rushed to the fray, but the strength of Fritjofs huscarls pushed back the Angles and their lord was captured. An arrangement was made and kept, and much gold was exchanged for the return of the Angle lord who departed with little affection. Fritjof, his name feared amongst his enemies, turned north as the summer wore on, to other battles waiting for him.
Entrance of the Vikings.
Coming late to the campaign, I had a few strokes of luck. I got to roll a few times on the fate table as a way to catch up with the others in the campaign, and managed to avoid any negative results, picking up several new hearthguard recruits and nearly a full new unit of levy. I can therefore afford to be somewhat reckless with my warriors, which plays to the strengths of the viking battleboard. This, combined with the fatigue negating abilities of the faction allowed me to put in a good showing against Andy’s Anglo-Danes in my first battle, capturing and ransoming his warlord. All of this good fortune combined just about pushed my warlord over the threshold of 15 power points needed to become an aethling.
Tony F reports on one of the two mega-games that the club put on at the August bank holiday weekend meeting.
Last weekend the club ran an extended meeting – nine hours of gaming, from 10am to 7pm. To take advantage of this there were two extra large games – a Napoleonic 15mm game set in the days just before Waterloo, and a nine-player Hammer’s Slammers clash. A report on the former will be with us soon, and here’s a brief-ish rundown of events in the latter game.
This game took place on a 15 foot long table covering a border zone between the territories of the Stewarts and the Hirosekis on the planet of Kalan (mentioned briefly in the essay Backdrop to Chaos in volume one of The Complete Hammer’s Slammers). Each of the nine players commanded a combat detachment, and each side also had an air defence detachment as a shared asset.
View along the table from the Stewart end.
The Hirosekis fielded three detachments (one each of Heavy Mechanised, Planetary Warfare and Mechanised Infantry) stiffened by two Lightning Division detachments (Armoured and Infantry), with air defence provided by a Foster’s Mercenaries calliope detachment. The Stewarts’ first line of defence was provided by a detachment of Stewart Borderers – this is a unit I made up specifically for the game, comprising mostly infantry with some anti-tank guns and fixed defences. They’re very much unofficial, the detachment sheet has no points values, but feel free to use them in your own games if you wish. The defenders also had two Stewart Highland detachments and a supporting Harris Commando Armoured detachment, all in off-table barracks – these came on 1dAv turns after the first shot was fired. Air defence came from a troop of United Defence Calliopes (and boy, did they earn their fee…).
The clash would provide an interesting comparison between the Hirosekis, a Commissar force with average quality troops but commanded by officers with high leadership ratings, and the fanatic Stewart Highlanders who were rated as elite, but whose officers left much to be desired. In game terms this meant that the Hirosekis had lots of leadership points with which to order their troops around, but the troops in action couldn’t hit a barn door (from inside the barn…). On the other hand, the Stewarts were excellent quality troops but the poor leadership values of their officers meant surrendering the initiative and having very few leadership points – it took a long time to get the Highland Detachments into position once they entered the table.
Lightning Division APCs on the road
The objective was a TV transitter aerial, which the Hirosekis needed in order to broadcast propaganda to the Scots. The Stewarts had been told that they needed to hold on as long as possible so that reinforcements who were currently on the way could reach the battlefield.
The battle raged for almost seven hours – the Hirosekis opened proceedings by advancing their heavy armour down their right flank with the Lightning Division’s heavy blowers charging down the main arterial road, accompanied by mortars and MLRS. The Borderers, a territorial unit, clung on desperately as the Japanese advanced with their anti-tank guns having little impact. Their morale rose when the first of the Highland detachments came on table, as the Hirosekis finally had someone else to shoot at !
As mentioned, it took a long time for the Highlanders to get into position because of a dire shortage of leadership points. Once their tanks and anti-tank guns managed to deploy they started to chip away at the Hiroseki and Lightning Division heavies which had begun to advance at speed (the Lightning Division blowers performing a rarely-seen Thunder Run manouevre down the main road). But the Stewarts only had four tanks between them, and once they started to be knocked out they were reliant on the towed anti-tank guns, which had to be deployed in the open to counter the Soheis. The two APC mounted heavy mortars were very handy, one of them knocking out three enemy tanks on its own.
UDB Calliopes and a Stewart mortar carrier
Foster’s Mercenaries move forward
Hiroseki Sohei heavy tanks
Two Stewart towed anti-tank guns
An Apollo burns
The much-awaited reinforcements that the Scots were clinging on for finally appeared – but in the rear of the Hirosekis ! Colonel Clark, commander of Clark’s Commandos, had on his own initiative diverted his landing shuttle to an open plain behind the Hiroseki forces and sent a high-speed detachment straight into the Japanese soft underbelly. The force of light armoured cars tore into the mix of artillery, command and air defence vehicles, routing Foster’s unit almost immediately and destroying virtually all of the Hiroseki artillery. The Japanese recovered their poise quickly however, and Clark’s Commandos pretty much disappeared in hail of powerguns and lasers.
Refusing to be distracted by the clamour behind them, the remaining Hiroseki tanks made a desperate dash for the transmitter mast; one Sohei and a Shaman got there, only to be mauled by a fusilade from the remaining Stewart anti-tank guns. The Lightning Division blowers charged down the road and attempted to reach the mast that way. The leading tank was knocked out, but the following vehicle pushed it aside and the defenders had simply run out of ways to stop it.
The TV mast and the local branch of McDonalds…
Stewart Borderers in defensive positions
Stewart Apollo tanks advance behind their piper
Lightning Division Kurt blower tanks on the main road
A lone Apollo faces down the road to the border
After seven hours hard fighting, we gave the Hirosekis a minor victory for reaching the mast; more than half of their heavy tanks had gone, including that of their CO, Major Tredaiwa. The Lightning Division tanks had also taken a battering, while Foster’s Mercenaries had disappeared altogether. On the other side of the table, only one of the Stewart detachments was in any sort of shape; the other Highland detachment and the Borderers were one TU away from breaking, and the Harris Commando unit had lost most of their infantry.
We’d like to thank John Treadaway, Kevin Dallimore and Peter Merritt of the South London Warlords for coming down and helping us put the game on – John provided the Hirosekis, one of the Stewart detachments and Clark’s Commandos plus a fair chunk of the scenery. The rest of the forces and scenery were painted by me. All of the figures and vehicles are from Brigade Models apart from Clark’s Commandos, which are from Darkest Star.
Stephen reports on his latest tussle in the SAGA campaign
The English menace is never far away. The wicked attacks by Harold Godwineson are hard to forget and so, aware that Andraes Vilhelmson had summoned his troops on the borders of his lands, Owain the Wolf Tamer chose to launch a campaign against the English to once and for all silence them.
The omens were poor. Some of Owain’s men had lost their weapons and Owain, delayed by poor weather, was late to show for his own muster. This could mean only ill.
Against sage advice, and to make up for lost time, Owain decide to lead his men through Coedwig Duach, a large and forbidding forest that is a known lair of outlaws and brigands.
There were many rumblings in the Welsh forces that Owain had been foolish in this campaign, that harvest time was near and the men would be better at home bringing in their crops – it had been a difficult year and famine was known by many.
Though still they set off, and the weather was warm and pleasant and this made the march easier. Then after a few miles the dark trees of the forest could be seen and many fell back on their misgivings and made comment on the lack of preparations and set-backs they had suffered.
The Welsh warband marching to war
Owain was firm in his resolve and argued with his captains on whether to proceed or not. They had with them some pony riders from the mountains of Deheubarth and Owain ordered them into the vanguard to scout ahead.
The apprehensions had proved correct – in the midst of the deep, dark, woods, they were ambushed by Vilhelmson and his men. A brave stand-up fight was not to the English liking. No. Instead they preferred to lurk in the woods, unseen, with sharp daggers and spear points, to fight a cowardly fight!
The ambush spot
The English skulk in the woods ready to spring their ambush
The lurkers in the wood
This could have proven a terrible misfortune for Owain, but what the English cutthroats had not bargained for was the skill at arms of Owain and his men.
Vilhelmson stayed at the back, looking after himself surrounded by his bodyguard. Owain refused to move, standing firm in resolve that he would take care of his own body when that of his men were safe. The Welsh cavalry charged forward along the road so they could encircle the English and the warriors came forward to form a screen in front of their beloved Owain.
The English, under poor leadership, advanced piecemeal. In combat they soon fell under the spears and javelins of the Welsh warriors. Though the fight was a hard one, and the Welshmen, tired and fatigued by the march and battle, also started taking casualties. The riders of Deheubarth saw more English hiding in the woods and they turned around and engaged them so they could not attack Owain’s men in the flank.
Javelins are ready to fly!
And all the while Vilhelmson still hid toward the back, unseen and out of danger. Whilst Owain stood firm, not giving an inch to the English bushwhackers!
Owain’s priority had been to clear the pathway through the forest, so that his men could escape – who knew how many wicked Englishmen still lurked in the forest, and the Welshmen had not been expecting to battle in these circumstances. If the pathway ahead could be cleared then Owain knew he could lead his men to safety. So when that challenge had been completed Owain knew now was the time to lead his men out – there is no wisdom in lives being lost for the sake of it.
Once more Owain had triumphed over the English. Three times they had met in battle and three times Owain had emerged victorious. His dominion over the English malcontents was plain for all to see.
Still, Owain had been foolish in this campaign. His forces are starting to show the ravages of prolonged military activity, and the land he took off Andraes Vilhelmson barely brought in enough revenue to cover his costs of the famine that has gripped the land.
Ouch!
Owain commands his troops as the English charge forth
Owain and bodyguard in front of the Wolf Tamer
English huscarls taunted by the Wolf Tamer
Welsh warriors move forward to stop the English
Game details – We played the Forest Ambush scenario, with Andy the ambusher. The actual number of loses was pretty much even. However, the Welsh also scored points for troops they managed to get off the table, and that was the real decider. It was also the first time I’d used Welsh cavalry. I’d ummed and ahhed about it because they’re not the best troops. However for this scenario they proved the ideal choice – their speed allowed them to get away and also encircle the Anglo-Danes (English). Since Andy had no missile troops it made them even more useful (Welsh cavalry being really susceptible to missile weapons). They wouldn’t be my first choice in every game, but in this particular scenario, against this particular opponent, they were ideal.
For winning a campaign I gained a point of Land, but on the Fate table I rolled Famine which meant I also lost a point of Land – so no gain. Added to that, I lost more troops than I managed to recruit – a net loss for me, despite winning (except for the Campaign Victory Points!).
Tony F shows off some of the new models he’s putting together for next weekend’s extended meeting
If you’ve missed the previous updates, we’ve extended the hours for our August bank holiday weekend meeting, with the club open until 7pm. To take advantage of this, two members are putting on extra-large games catering for lots of players.
My offering is a 15mm science-fiction game set in the Hammer’s Slammers universe of US author David Drake. With around 10-12 players expected to take part we’ll need lots of forces to go round, so I’ve been working away on some new mercenary detachments. The first to be finished is this unit of Foster’s Mercenaries, a specialist air-defence and artillery outfit. They are equipped with huge multi-wheeled Centurion transport vehicles – some are command or transport vehicles, the others armed with howitzers or rapid-firing calliopes. The detachment also has an organic infantry element for local defence.
C800 Calliope Air-defence Vehicles
C202 Command Vehicle
C800 Artillery
C404 infantry carrier and three infantry squads
The vehicles and infantry are all from Brigade Models and you can read a bit more about them on the BM blog, including details on construction and painting. Even better, this is another task knocked off my To-do list for the year 🙂
Here’s some sci fi scatter terrain I put together for a recent game. A lot of the parts came from the bits box or shops like Poundland – so it can be very cheap to put together terrain pieces.
As we all know, extraplanetary deserts are well known for having jettisoned escape pods buried in them. And this one’s no different. The escape pod is a Revell 1/144 Apollo Command Module kit. It was mounted on an old CD and then filler was slapped on.
And if alien deserts are known for their escape pods they are just as well known for their enigmatic dinosaur skeletons.
I bought this about a year or so ago in The Works. They had several different dinosaur skeletons, in clear plastic tubes, for about £2 each. So I bought one of each, just in case. This was actually more hassle to put together than it looks like it should be. The trick is filling the rib cage. I used expanded polystyrene bits where the ribs would be (which would also keep the weight down) and then slathered it in filler before pushing the skeleton into it.
The next piece is a generic bit of industrial waste. The wheels and the cement mixer tumbler were from Poundland kids toys. The grey container thing is actually an empty stapler cartridge from an office printer/photocopier.
This bunker/shack/whatever is another bit from a Poundland toy. It’s actually the scoop from a toy tipper truck turned upside down and then bits of plasticard and other odds and ends stuck on.
The fun at Poundland doesn’t stop! I can’t take credit for this one – I stole the idea from someone else on a forum somewhere. It’s a pair of toy guns, the handles cut off and covered with plasticard. The end of the barrel is also cut off and used to make some kind of exhaust vent. Then given a slap of paint.
Yup, finally, more Poundland! A toy truck, tyres removed, and given a new paint-job and rusted up as a derelict.


You must be logged in to post a comment.