Andy’s short roundup of games at this weekend’s meeting.
First up Stephen and I tried out Barons War rules for the first time. As it was our first outing we decided to go small, and had 500 point armies. We managed two games in around 5 hours, with much referring to the rules. All in all we thought the rules worked quite well.
Andy’s green bowmen thinning out Stephen’s Welsh KnightsWelsh archers draw bows to shoot AndyEnglish knights skulking around the backSpearmen charge each otherKnights and sergeants urge the crossbows forwardStephen’s Welsh Knights run from the field.Andy’s spearmen force back Stephen’s archers
Meanwhile Jeremey and Tony were playing a War of the Roses game using Sword and Spear.
Elsewhere in the hall six of our Field of Glory players (John, Peter, Brett, Paul, Mark and Colin) fought out a tournament. Final results to be confirmed…
Yes, 6mm vs 15mm. But they all follow the same basing system.
I was digging in the garage the other day, ostensibly hunting for an old book (Kenneth Macksey’s First Clash, in case you really wanted to know). Besides dust and cobwebs, I managed to unearth a very old Burton’s plastic bag containing a treasure trove of vintage club display material (but no book – although it turned up elsewhere, you’ll be delighted to hear). These relate to some of our very first show games, dating from the second half of the eighties and early nineties.
The Vire Incident
This was a 54mm World War 2 skirmish game, featuring scratchbuilt terrain and Tamiya figures. It was a collaborative effort between half a dozen members, and saw service at four shows in 1986 and 1987. Secretary Brian arranged for a couple of display boards (painted by a bloke he met in the pub apparently !) with the club (above) and game names. You can click on all the thumbnails in this post for bigger versions.
Vire Incident display board
For its fourth outing we had an extra sign made up – unfortunately I have no memory of where this came from or who made it.
Berlin or Bust
This game was our project for 1988’s shows. Again it was set in WW2, but this time in 20mm. It was a participation game which had members of the public playing an advancing US force against the defending Germans, run by the club. The participants had 45 minutes to get from one end of the table to the other. The format was obviously successful as we revived it a few years later, with Drive to Dunkirk taking the basic scenario and applying it to the French campaign in 1940.
I’ve unearthed a copy of the handout we made for the game (a first, I don’t think we’d had handouts previously). This was carefully written out on a typewriter (no word processors in 1988 !) with wonky letraset headlines.
We had a new club logo, drawn by me (well, it has my initials at the bottom) – hand drawn with letraset type. I also found the original which has big blobs of correction fluid all round the Tiger tank, but they don’t come through on the photocopy fortunately.
The sign for the game was made from letters cut out of red card mounted on art board – this must have taken me a while to do, as I drew out letters by hand.
There was also another display board, similar to the later Vire one – so again, I don’t remember where this came from.
And finally, a sign imploring the public to join in – I think at busier shows we did have a sign-up sheet with timed slots for games.
That’s it for now – part two will cover a sci-fi game that we only ran once, but which had some fabulous display artwork.
This week we start with the giant Zombie Stephen was working on. He’s kindly added a Zombie from the Celtos range for size comparison.
Next up I’ve made a small amount of progress on my trees. These were bought from the shop ‘The Works’. Nice and cheap but a little threadbare compared to the ones I bought from them last year.
I’ve also managed to undercoat some 15mm Sci-Fi troopers to go with my Dropship conversion. The infantry are Brigade Models PacFed.
Now we have some more Dredd stuff from mark. This time a Judge Cadet and bike. These are from Warlord Games.
And last this week Mark’s son continues to produce some good work. This time some Uruk-Hai soldiers.
I do like those armour tones. Well that’s it for this Wednesday, see you next week!
Mark J guides through his painting technique for 6mm HYW figures.
This article follows on from my first 6mm painting guide, “Painting 6mm Romans” which appeared on the Maidstone Wargames Society Blog in May 2020. So, it’s been a while since my last blog, but I’ve been busy painting more 6mm over the last 12 months or so. This article covers my English 100 Years War army. This is another FoG army, we still play 2nd edition at the club, however I have also built the army to use with MeG and you could use it with any rules system that doesn’t stipulate base sizes.
The army is loosely based on that which fought at Crécy, very loosely as I just wanted to pick a point in history to use, my army commander is painted as the Black Prince.
The figures are from Baccus, while they are listed as 6mm, they’re closer to 8mm. I really like them and there’s a wide range of periods available which continues to expand. The painting method I’m going to take you through is block painting, which begins with the application of a dark undercoat and then adding brighter colours to bring out detail, while retaining some of the dark undercoat to emphasise shadow.
Longbows
I use a black undercoat as I find it works well at this scale, however you need to be careful not to overuse the base colour otherwise your figures will look like dark blobs on the battlefield. The idea with block painting is to trick the eye; this is where the brighter colours come in, as you’ll see below, I’ve used quite vibrant colours on the longbowmen. This would look odd on a larger scale but is a must at 6mm.
So, start by washing your figures in warm soapy water and then gently dry them off with a tea towel or just leave them somewhere warm or in sunlight to dry; this will remove any casting residue which can interfere with the paint and stop an even coat forming. I then spray my figures black with an acrylic spray, I use a matt black spray from a national hardware chain, it’s cheap and works very well. Always wear a mask and ensure you’re in a ventilated room when doing this.
I’m going to start with a unit of longbowmen, there are 64 figures in each unit, I find I can paint one unit in a couple of hours, ready to base. Once the figures have dried I, begin by painting the main part of the body, in this case the tunic working with a strip of 4 figures I paint the front of the tunic remembering to leave some parts black, the belt, collar quiver, scabbard and under the arms. You don’t need to be really accurate here, paint your first strip and then look at the figures from about 3 feet away, if they look right then you have accomplished the first part of the ‘trick’.
Longbows and Command
Carry on painting each strip and then repeat the process on the other side of the tunic, you’ll notice that Baccus longbowmen are not all the same, some carry their arrows to the front others to the back, some have small shields. Just follow the principle of using the undercoat and leave these black for the moment. Remember to go bright, a general rule of thumb is to go 2-3 times brighter than you would at 28mm. You can see from the picture below how I’ve used a bright pale blue and yellow with one unit and an orange with the other. Both can be seen from the battlefield and don’t look out of place. They would look out of place at a larger scale for this period, but the rules of painting are different for 6mm, trick the eye with bright colours.
Once you’ve completed the tunic it’s now time to move onto the bow, quiver and scabbard. I use the same colour brown for these, again this would not work with a larger scale but is fine for 6mm. You can use differing colours, but they won’t really stand out and will take longer. I find a light yellowish brown works very well. Again, follow the front and then back method that I describe above, I find this gets me into a good rhythm, which gets me through a unit quickly but means I achieve the effect I’m looking for. This method also works well if you’re painting multiple units. I tend to do 3 at a time and can complete three units, fully based in around two evenings, 1 evening at a push.
Massed Longbows WIP
Once you’ve completed the bow and leatherwork it’s time to work on the metal parts, for the longbowmen this is their helms, shields if they have them and sword hilt, note that the sword hilt is optional, the figures will look fine without this. Again, apply to each strip front first and then back. With the helms it’s really important not to overdo things, too much silver and it will look like a huge silver blob, this is where your skill with a brush comes in and using the undercoat to provide shadow. I tend to use a semi dry brush when applying the silver, not as dry as I would when dry brushing, general rule of thumb is to apply enough paint to your brush to cover a couple of helms lightly.
Close up of the Longbows, showing the effect of leaving parts of the undercoat visible
It’s now time to move onto the flesh, I use a light pink flesh colour, those often used to highlight larger scale figures’ flesh. Again, front first then onto the back, you’ll see with the longbowmen that most of the work is covered from the front of the figure but it’s worth checking the back just to ensure that the flesh can be seen from all relevant angles. Paint the flesh in the same way you painted the silver, less is more. Try and keep a gap between the hands and cuffs and face and neck, this is where the dark undercoat really works well, this sounds hard, but it’s easily done with a little practice. Don’t worry if you don’t achieve this on every figure, remember you’re looking for an overall effect that will usually be viewed from the battlefield, tricking the eye with shadow and bright colours.
Once the flesh is done, then figures are complete, I usually quickly check each strip as you can miss some parts when painting large numbers of figures. Once dry, I then varnish the figures with a matt varnish. I spray my figures, if you do the same then make sure you’re not doing this in a cold room as the spray reacts to cooler temperatures and can fog, giving your figures a dusty look, which is a complete disaster at this scale as it obscures all your hard work. If this does happen, let the figures dry and then apply gloss varnish and another light coat of matt. I find a quick spray does the trick, again less is more. If it feels too cold don’t spray!
Basing next, I use a similar method to the Baccus basing, I apply a ready mixed earth texture paint first, make sure to apply up to the base not over it. Once this has been applied it is time to highlight. I use the Baccus 3 colour system, which starts with a dark beige colour moving up to an almost bone white, simply dry brush the bases. Once this is done it’s time to add some static grass, you’ll need the smaller grade, 3mm I believe. Apply some watered down PVA to the front and rear of the figures and where there are any gaps along the line. Once done sprinkle some static grass over the figure; what you’re looking for here is enough to hide any of the metal base while not covering the figure. The picture below shows how it should look.
Massed longbows, the bane of French Knights
OK so that’s how I paint 6mm longbowmen, for the men at arms use the same principles but when doing the armour ensure to use the undercoat well, leaving gaps works really well with armour. Use the same brown for any wood or leather and the same method for flesh. If you have any troops with padding, then apply this using the bright colour and shadow approach, you can see some mine below.
Billmen WIP
Finally, I painted the generals and camp using the same method, took a bit more time on some detail, but the same rules apply re tricking the eye. Up close they look a little messy, on the table they look the part.
The camp was done using a white undercoat and special contrast paints for the tents, the pigs, fires, well and baggage have a black undercoat with a block technique applied.
The Camp
The next few photos provide some completed units, in all there are 6 of longbow (8 bases each) and 6 of men at arms (4 bases each).
A selection of the retinue
Archers and their stakes
You’ll also notice some stakes placed in front of the longbowmen, these were scratch built using wire and Milliput. I cut the wire into 10mm long pieces, placed some Milliput onto a base and then added the wire to the Milliput at around a 30 to 40 degree angle. It was then a case of painting the stakes dark brown with bone white tips, and then basing using the same method described above. The stakes are bigger than they would have been relatively speaking but this is required to catch the eye and look right on the battlefield.
I hope this has been helpful, I hope to have another guide out soon covering my 6mm Spanish Napoleonic.
Welcome to another Work in Progress Wednesday, above we have club member Marks’ son working on a building for Judge Dredd, currently displayed with the City Defence miniatures.
Below is another Judge Dredd building Mark is working on himself.
Next up Stephen has decided his undead army needs something big. This time he has gone for a Giant Zombie. Will be interesting to see how this turns out.
And last up this week Marcus has put some last minute touches to his Biggles show game. First up some yeti monsters.
The Society has been busy this weekend jut passed, a small contingent ventured to ExCeL for the delayed Salute 2020 (or 2021?) whilst others attended the normal society meeting. First up, Salute. Andy’s thoughts with pictures by John, Mark and Andy.
Five of the membership, John, Brian, Mark, Marcus and Andy, attended Salute putting on Marcus’ Pulp participation game “Biggles and the Island at the Top of the World“.
The theme for the show was the Battle of Britain. The 2020 show was intended to commemorate the 80th anniversary of the battle. Centrally displayed in the hall were a replica Spitfire and Hurricane, with some RAF reenactors making an appearance after the photo was taken.
They say ExCeL looks like a hanger…
I got the impression that Salute hired more of ExCeL than usual, to space us out more, although I also understand there were fewer games and traders scheduled to attend than in “normal” years; and there were a few “no shows” in both categories.
Salute General view. More spaced out than usual, and perhaps fewer attendees?
In Marcus’ game Biggles is searching a lost Artic island for a missing Professor and the strange artefacts he was studying.
Biggle’s party deplane from their Walrus
His party discover a secret labyrinth, with ever changing chambers and passages.
The labyrinth awaits the explorers
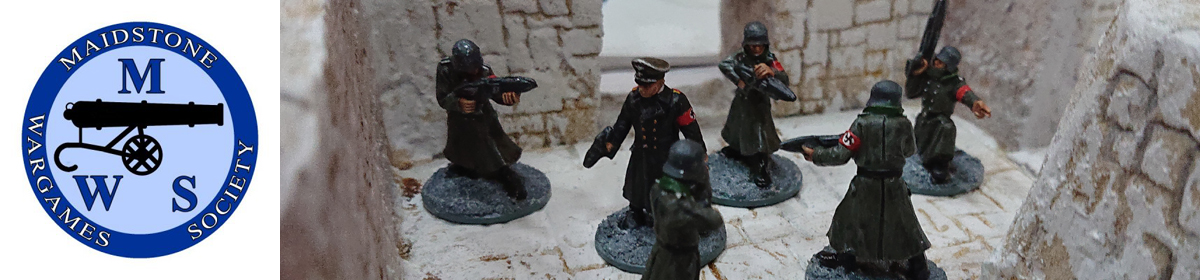
However he was not alone, a party of Nazis with unworldly weapons were also trying to recover the Professor.
The German’s advanced submarine
The Russians had also sent an NKVD team to prevent the Nazis securing their objective.
The Soviet NKVD disembark from their Aerosan
And finally, a lost tribe of Vikings were hellbent on preventing anyone from leaving the island with the Ragnarok Stones, the phenomena the Professor had been studying.
The Vikings patrol the labyrinth
We ran several games throughout the day, with up to four members of the public taking control of one of the four parties.
A selection of photos from the games:
Vikings find the secret chamberBiggles faces down the NKVDThe Germans find themselves boxed in
We are pleased to announce that the game won the Jim Clarke Memorial Award for the Best Science Fiction / Fantasy game at Salute.
The Jim Clark Memorial Award for the Best Science Fiction / Fantasy Game
Meanwhile, back at the regular Society meeting, other members were running a series of games. Photos courtesy of Mark J and Stephen.
First off Mark J and Pete ran a game of Fields of Glory, pitching Mark’s Hundred Years War English against Pete’s Hungarians.
FOG Ancients – HYW English vs HungariansFOG Ancients – HYW English vs HungariansFOG Ancients – HYW English vs HungariansFOG Ancients – HYW English vs HungariansFOG Ancients – HYW English vs HungariansFOG Ancients – HYW English vs HungariansFOG Ancients – HYW English vs Hungarians
The first battle was won by the English, the Hungarian Knights couldn’t cope with longbows and stakes. The Hungarians won the second battle by focusing on the men at arms and drawing the longbow fire away from the knights. So, honours even.
Alan ran a Star Wars X-Wing game.
Star Wars X-WingStar Wars X-WingStar Wars X-Wing
And finally Stephen ran a Stargrave game – A Hive of Scum and Villainy:
‘A Hive of Scum and Villainy’ – a Stargrave adventure‘A Hive of Scum and Villainy’ – a Stargrave adventure‘A Hive of Scum and Villainy’ – a Stargrave adventure
Stephen reports on a recent Sci Fi solo game using Black Ops
Since it was a wet weekend I thought I just fancied a game of something. Since I hadn’t played Black Ops for a while I thought that’s what I’d do.
I went with a simple meeting engagement. Each side had 100 points each. The human squad had two fireteams of five men – in the first was the leader, heavy weapons support, a technical expert, and two troopers. In the second was another heavy weapons support, a sniper, and three troopers. The droids had three fireteams of five, each consisting of a heavy weapon support and four troopers.
Droids occupy the relay station
The idea behind the scenario is that the droid army has captured a human communications station and the human squad has to go in, recapture it, and get it online. They have seven turns to do that and get to safety.
Moving through the cargo crates
Turn One
Black Ops is a card activation system. Each troop type has two cards in the deck and when they are drawn a model can take one action (e.g. the human Specialist card is drawn – the technical expert and sniper can each take an action). In addition, the leader gets a bonus third card which can be used to activate a third time or he can order a model within 6” to take a third action. Simple enough.
Get some! Get some!
On the first turn it seemed like there were only droid cards in the deck, all the droids had taken one action, and the droid troopers had taken their second, before one of the human cards came up. This allowed the droids to make a quick advance and move up to halfway across the board (I was using my smaller 2’x3’ board). This put the humans on a back foot, particularly the sniper (private Urek Ricci) who I had wanted to move up to an advantageous position but this was now denied because the droids, ZX81 and CPC464, had moved so far forward.
Sniper Ricci takes aim
Turn Two
The human leader, Sergeant Waylan Gomez, led his team up through some cargo containers. Urek Ricci advanced on another position and took a quick snapshot with his rifle at ZX81 – he missed. I’d made the terrain nice and close, to eliminate too many long-range avenues of fire that could dominate, so models had to move carefully to ensure they couldn’t be seen. The droids well and truly moved into the comms relay station area and crossed it safely to cover the approach of the humans.
Droids advance in strength
Turn Three
The humans had to get a move on. Private Yan Obrand, with his M77 plasma gun, saw the droids Dragon 32 and HP85 moving around the back of the comms relay. He let rip, but missed. He then took a second burst and this time both droids went down! First kill to the humans. Urek also had a go with his sniper rifle at the droids in the station compound, this time with a steady hand and good rest for his weapon. But he missed again! Close to Urek was private Cove Longstern and he moved up to put some suppressive fire down. The droids responded by moving an entire squad against Ricci and Longstern. They opened up but failed to hit anything. Sergeant Gomez with specialist Sorel Marsden and private Dorian Zenward continued to sidle through the containers trying to find a way to the relay station.
Yan Obrand lays down covering fire
Turn Four
Again, Urek Ricci took a shot and again he missed! Some sniper he was turning out to be. That would be his last shot though, because ZX81 returned fire and he went down. Two of the droids moved up to occupy his position where they would be able to make a flanking attack on the rest of the human squad. Private Longstern gave fire and a droid went down. But then C64 took a shot and it was bad news for Cove Longstern – it was the end of his game.
The firefight hots up
Turn Five
The droids sought to consolidate their position and see if they could exploit the flank they’d opened up. More droids moved up. Another pair of droids, one armed with a heavy kinetic lance, tried to counter the advance of Yan, Sorel Marsden, and Dorian Zenward. These three had advanced to the side of the comms station, but were waiting for the right moment to break cover and make a dash for the doors. Sergeant Gomez took private Uriah West to shore up the weakened flank left vulnerable after Ricci and Longstern had been taken down.
You go that way and we’ll give you cover
Turn Six
With not much time left it was obvious the humans had to get a move on. It was already looking extremely unlikely they would have time to re-enable the relay station and get off board so if they were to they would have to get moving. With that in mind, Yan, Sorel, and Dorian moved up to the station. Immediately the droids opened up and took Dorian Zenward out. But on their second activation Yan put down some suppressive fire and Marsden managed to unlock the station and get it back online. First part of the mission complete!
Behind the back of the bike sheds
Turn Seven
Last turn syndrome – go for it! So the station was working but could they get away? It pretty much happened how you think it would – the humans made a dash for the table edge and the droids opened up where they could.
In the end none of the humans escaped. The station had been reactivated but they hadn’t quite got away. Human loses were four models, and droid loses were six – so a pretty even ratio. The humans could claim a partial success.
Another Wednesday and another selection of club members hobby efforts.
First up Tony has been adding to his 15mm Star Wars collection. Above is a Action Fleet toys Imperial Shuttle, and below we have a Ronto, a native Tatooine beast. Tony has added a black wash and a few other painted parts to the models.
Next up Mark has moved on from his hundred years war army and painted up yet more Judge Dredd miniatures. A lawmaster and some city defence forces.
Stephen has painted up some more star fighters, I’ve lost track of how many he has painted now.
And last but not least this week John has made more progress on his Pacific war project. This time some Regular Bolivian Infantry and Bolivian Cavalry Husares Del Sur.
John’s latest report on Li Chee the Pirate Queen’s feud with Admiral Feng Shui using Ganesha Games Galleys and Galleons rules.
Months had passed since Li Chee’s raid on Qui Nhon harbour, the junk she had captured now had a new crew and was ready for action.
Meanwhile Admiral Feng Shui set sail with his treasure ships hoping to reach India safely but first he had to negotiate the Straits of Molucca. He had taken the precaution of hiring a trusty Proa to act as pilot, he would be glad of this before the day was out. It was here, close to the dreaded ‘Whirlpool of Indesit’, that Li Chee planned her ambush and with some of the treasure won at Qui Nhon she had enlisted the help of some head hunters, Sumatran cannibals of terrifying reputation.
Making good use of the wind, the Treasure fleet made stately progress through the straits, until…
The trap is sprung!
The new Pirate junk captured at Qui Nhon and refitted, moves in to attack a Treasure Ship, keen to show her mettle.
The new Pirate junk hits the Treasure Ship with a short-range broadside rake the Treasure Ship suffers 2 points of damage as it’s tripled (Treasure Ship has reinforced hull but combat factor reduced by firing full broadside and short-range rake). Junks combat factor increased by one as firing from short range. The vessel also takes a critical hit (4) – Rudder struck!
First blood to the pirates, it’s a devastating attack that the Treasure Ship will struggle to recover from. Li Chee attempts the same tactic on the small Merchant Junk with less success.
LI Chee curses her gunners as they only score one point of damage on the Merchant Junk
The badly damaged Treasure Ship attempts a risky manoeuvre to avoid the attentions of the Pirate Junks.
Things are looking bleak for the Treasure Ship but 3 successful activation rolls allow it to change course avoiding the Head hunters and the junk. Will it escape? – We shall see.
Meanwhile the smaller Merchant Junk is unable to avoid a collision with the Pirate Queen’s ship and comes off worse.
Both vessels roll for damage. The Merchant Junk has a reinforced hull so takes a second point of damage whilst Li Chee is unaffected
Things were looking bad for the Treasure Fleet, with two junks badly damaged. Where was Admiral Feng Shui? He’d decided to hang back to prevent being cut off by the wind but horrified by what he could see before him, Feng Shui swung into action, attacking the pirate junk that had devastated the Treasure Ship. A Devastating cannonade from Feng Shui’s flagship ripped through the Pirate Junk.
The Pirate Junk is doubled and the critical hit sets it aflame!
The Pirate Junk’s crew manage to extinguish the fire but are so preoccupied and cannot prevent the Junk heading directly for an island.
Here the Junk has to roll 3 successful activations to put the fire out, which it does. Had it rolled a 1 on either of the red dice, it would have to take an all at sea roll which is bad news!
The Merchant Junk which collided with the Pirate Queen veers away but strays too close to the ‘Whirlpool of Indesit’ and is sucked in, never to be seen again. To this day, on still nights it’s said you can hear the mournful cries of the crew.
For the Whirlpool I decided that any vessel within S of the edge of the whirlpool at any point of its move was sucked in.
Meanwhile Feng Shui’s Junk comes under attack from the Head Hunters. No vessel is off limits, they just want a nice collection of skulls. They have enough actions to move up to the Flagship and grapple but frustratingly not enough to board.
Here two activations are required to cut the grapples. As a flagship, Feng Shui has an extra free activation. The grapples are cut. But there are no activations leftConcentrating on cutting the grappling ropes Feng Shui’s flagship is unable to avoid a collision with a Treasure Ship.
The ships collide with a destructive crash. Both vessels are badly damaged.
The collision roll is bad. Despite the reinforced hull, both vessels take 2 points of damage. Ouch!
The Pirate Queen opens fire on the badly damaged Treasure Ship which takes more damaged and is now crippled.
Whilst upwind, the damaged Pirate Junk manages to turn away from the island and manages to avoid foundering on the shallows by the skin of its teeth.The Junk has to pass it’s Quality roll (2), three times as it’s travelling at L
Feng Shui’s nightmare day goes from bad to worse as the Flagship cannot avoid a second collision with the Treasure Ship. A gaping hole develops in the bows and despite the reinforced hull, the pumps can’t prevent the Flagship sinking. Feng Shui escapes, clinging to driftwood.
The Treasure Ship fails all its activations. This is a turnover; all un- activated vessels must move in a straight line and both vessels collide again.
With Admiral Feng Shui clinging to floating wreckage, Li Chee seizes her chance to board the damaged Treasure Ship.
The Treasure Ship is on a – 2 modifier (-1 Merchantman, -1 crippled), but with the Pirate Queen has ‘Derring do’ which reduces combat factors to 0 and Intimidating which gives +1
The damaged Pirate Junk which had escaped grounding also managed to avoid the ‘Whirlpool of Indesit’ so now Li Chee had a huge prize and both pirate junks survived the encounter. Time to pay off the Head hunters cheaply, repair and refit the junks and spend days counting treasure. As Feng Shui drowned with his ship she looked forward to further profitable ventures, but first she needed a patron to establish bases for repair and re- victualling.
Feng Shui was grateful to be picked up by the Proa, though whilst he clung onto the outrigger, he pondered his next move. Returning to China was out of the question, an excruciating death at the hands of Emperor Ming the Merciless lay in wait. Yet if he tried to make a new life here, the long hands of Ming’s empire would grab him by the throat. What he needed was a Pirate Hunter and fast.
Just a few offerings from the club this week. It’s been nice to be getting more games in, but this always has a knock on effect to the lead pile.
Above Andy has made some progress on his Medieval miniatures.
Next up Mark has taken a break from his 6mm Hundred Years War army to paint another Judge Dredd miniature.
Where as Stephen has managed to throw some bits together to create some effective Drones.
And finally for this week I’ve made a start on my Concremental miniature, a modern take on the fantasy Earth Elemental. Shamelessly blowing my own trumpet here as it is a miniature I made for Fenris Games. I’ll do a full blog post showing how I decide to paint it at a later date. First thing will be to assemble it.


 I’ve also managed to undercoat some 15mm Sci-Fi troopers to go with my Dropship conversion. The infantry are


 Next up Mark has moved on from his hundred years war army and painted up yet more Judge Dredd miniatures. A lawmaster and some city defence forces.


 And finally for this week I’ve made a start on my Concremental miniature, a modern take on the fantasy Earth Elemental. Shamelessly blowing my own trumpet here as it is a miniature I made for
You must be logged in to post a comment.