It had been a while since I’d had a game of Outremer, so I decided it was time for a quick bash.
Although the rules are set during the Crusades they also work as a generic set of medieval skirmish rules. So my games are set during the Barons’ War of the 1250s and 1260s.
I played the hostage scenario in the rules. Young master Perkin Adlington had been kidnapped by the dastardly knight, Sir Giles of Gretchley. No doubt taking advantage of the upheavel during the rebellion and hoping to make some money off the ransom.
Sir Richard Adlington, with his closest bondsmen, set off in pursuit to rescue the young lad. After two days in the saddle, following trails and clues, they finally found Sir Giles and his men. Dismounting, they made their way on foot through the woods to snatch Perkin and take him back home to safety…
The table was only a small one – 2’x3’. The two opposing sides had six men each.
With Sir Richard Adlington was his household knight, Sir Gieffroy de Metz plus Jarrard and Remon la Vielle (a pair of crossbowmen, and Will Fuller and Wilf the Strong, sergeants at arms.
With Sir Giles were Berwick, Ailwin Smith, Keaton Taylor, Pasquier l’Espee, and Burne Brewster.
The table was set up with woods and a couple of hills. On one side of the table was Sir Giles’ camp where Perkin was being held. Under the rules of the scenario, the hostage can not take an action all the time there is a guard within 4”. So Keaton Taylor was detailed with keeping an eye on Perkin. The two crossbowmen, Pasquier and Burne, took up sentry positions on the hills over-looking the approach. This left Sir Giles with Ailwin and Berwick to relax in camp.
Sir Richard led Jarrard and Will Fuller from one corner, and Sir Gieffroy led Remon and Wilf from the other – so they could make a two-pronged approach.
Battlefield and deployment
The game started. Turns take place with a pack of cards. Each character has a card in the deck, these are shuffled, and one card is drawn at a time. When a character’s card is drawn that character completes all its actions and the next card is drawn.
Sir Giles took his men through the woods, to stay in cover. And Sir Gieffroy did the same. Pasquier and Burne, armed with crossbows and away from the camp and away from the boss, sat in the bushes enjoying a bit of peace and quiet.
Burne Brewster settles down for an easy day
Jarrard skirted around the sides of the woods, hoping to sneak up on Burne He took his time, ensuring he stayed hidden for as long as possible. Then he loaded his crossbow, levelled it at his target, and let fly.
He missed.
This made Burne jump and sound the alarm. Roused, Sir Giles and Ailwin made their way over to Burne. Berwick moved toward Pasquier, in case there were others about. Perkin soon perked up as well, but Keaton kept a firm hold of his charge.
Jarrard readies his crossbow
Sir Giles and Ailwin picked up pace and made their way over to Burne as fast as they could. Burne loaded his crossbow and took aim at Jarrard, to return the favour. Except this time Burne hit, and Jarrard went down with a bolt sticking out of his chest. This meant that Sir Richard and Will would have to charge in quickly or else be subject to sniping shots from Burne’s crossbow.
The alarm is raised
Over on the other side Remon had now moved up into a good position where he could see Pasquier on top of the rise behind the bushes. He let a quick shot out that hit its target but did no damage – Pasquier’s armour saved his skin. Taking good hold of his gigantic sword, Berwick stood alongside Pasquier to see what was out there.
Sir Richard and Will strode forward to push the attack against Burne. As they approached, Burne ducked down behind the bushes trying to reload as quick as he could. But as they advanced all of a sudden Sir Giles and Ailwin Smith came out of the woods in front of them. Sir Richard smiled at his luck and both he and Will charged the two abductors!
Berwick takes down Wilf
Over on the other side Wilf decided to take matters into his own hands and charged up the slope to cut down Pasquier. But Berwick stepped forward with his two-handed sword, engaged Wilf, and with a single wild swing cut down the loyal retainer!
An epic fight began between Sir Richard and Sir Giles, and Will Fuller and Ailwin Smith. Sir Richard got in an early lucky blow against Sir Giles and wounded him badly. But Ailwin was equally lucky, and got in a deadly blow against Will. Ailwin, the coward, then came to Sir Giles’ aid and the two of them attacked Sir Richard.
Rumble in the jungle!
A similar state of affairs was taking place over on the other side. Remon began rapidly loading and shooting his crossbow at Pasquier, and Pasquier did similarly against Remon. Whilst Sir Gieffroy, an experienced knight who had seen many combats, was not so easily intimidated by Berwick mighty sword, and he advanced against Berwick meaning to kill him or chase him off!
Sir Gieffroy charges Berwick
Back with Sir Richard and things were looking dicey. With both Sir Giles and Ailwin setting about him he was taking injuries and being pushed back into the woods. Then realising that his days may soon be numbered, Sir Richard broke off and made a run for it – fleeing the field! Later, back home, he would say that he was merely making his way around to support Sir Gieffroy and Remon. We can only take this man of honour at his word.
Sir Gieffroy comes out on top
Fate was going the other way back with Sir Gieffroy. Remon’s crossbow took down Pasquier, badly wounded, but out of the fight. Sir Gieffroy took a slight wound from Berwick, but in the end this goodly knight prevailed and down went Berwick. The way now lay open into Sir Giles’ camp and the rescue of master Perkin!
Burne Brewster had pulled back into the camp whilst Sir Giles and Ailwin chased Sir Richard. Sir Gieffroy advanced as quickly as he could, trying to lure Keaton forward to Perkin could break free and make a run for it. Remon moved up behind a bush, took careful aim, and let fly at Keaton.
Remon takes aim at Keaton
A miss! But Keaton was rattled. Forward came Sir Gieffroy, and he gave Keaton the chase to yield or die. Keaton could see both Sir Giles and Ailwin making their way back, so under the eye of his lord, and hoping for some support, he gave no ground and engaged Sir Gieffroy in melee.
More fool him, because Keaton soon fell beneath the knight’s blows.
Sir Gieffroy gives Keaton a choice – yield or die
Perkin Adlington was now free and under the protection of Sir Gieffroy! All they had to do was get away. But both Sir Giles and Ailwin were not far away. They soon intercepted Sir Gieffroy and, cowardly once again, Ailwin Smith joined Sir Giles in attacking Sir Gieffroy!
Sir Giles and Ailwin assail Sir Gieffroy
For a while it looked like Sir Giles may get away with it. He was pushing the two of them back. But eventually numbers would tell. Sir Gieffroy found himself under a terrible rain of blows. It got so bad that all of a sudden…he decided to flee!
Poor master Perkin! Let’s hope the lad doesn’t grow up with abandonment syndrome.
That was the end. It had been close. They so nearly got away with Perkin. But the wicked Sir Giles and his men prevailed – Perkin Adlington would stay under his guard and doubtless Sir Richard would be expected to pay a higher ransom to make up for the losses.
The good weather appears to have slowed down member’s painting and modelling activities, so instead of a WIP Wednesday post, here’s Tony’s account of the Society’s game at Broadside.
At the recent Broadside show in Gillingham, the club resurrected an old game from many years ago – its first outing was way back in 1997. Originally named with the simple but descriptive title of ‘Tatooine Droid Hunt’, it was rebadged as ‘Utini!’ for this outing, which is a Jawa exclamation of shock or surprise.
The game centres around a Jawa sandcrawler during the opening scenes of Star Wars:A New Hope. Imperial stormtroopers are hunting for C3P0 and R2D2 amongst the droid waifs and strays which have been collected by the sandcrawler crew. Back in the day we didn’t take any photos of the game in action (it was before the days of camera phones) so this was a good chance to fill a gap in the club’s historical record.
The sandcrawler was scratchbuilt by Phil, the stormtroopers and Jawas are long-OOP figures from West End Games painted by Tony F and the droids are from the Galoob micro-machines range. Phil is going to write-up the sandcrawler build in more detail for the website, but for now here’s a gallery of photos from Broadside taken by Andy.
Jeremey has briefly been sidelined, so Tony F takes over the WIP Wednesday reins this week.
The club’s gone relatively quiet lately – obviously everyone’s efforts went into the jubilee ! However, there has still been some progress – Mark J has employed his magnifying glass for his 6mm Saxons (above), then broke out the electron microscope for some 2mm Antonine for Strength and Honour, which are based on perspex.
Warbases’ 2mm Roman Legion (Mark J)
Marcus meanwhile has been working on some 28mm Spy-fi and 15mm Sci-fi miniatures.
The initial stages of some 28mm Spy-fi from Marcus (who, like Bond, seems to have an eye for the ladies !).15mm Sci-fi from Marcus – mostly Brigade Models but with the odd interloper.
Jeremey has been converting a Copplestone figure to act as his Stargrave crew’s first mate.
Jeremey has named this image ‘Avon’ – a nod to the Blake’s 7 character perhaps ?
And finally, something from me – these were missed from the last WIP Wednesday post (about which I’m not bitter at all…) but since I’m in charge this week, I’m putting them in. First, it’s more additions to my Middle Earth armies – half-a-dozen elf spearmen to accompany the cavalry I painted a few weeks ago.
Six Rivendell elf spearmen
Next is my take on Radagast the Brown – it’s not either of the official GW figures which are rather expensive, but a Conquest Miniatures hedge witch. I added a bird from an OOP Celtos figure which is positioned as if the wizard is talking to it, painted up as a falcon.
Talking to the birds…
And to round things off, another small piece of 6mm desert terrain, an oasis made from 3mm Foamex, a sand/paint/PVA texture, cheap palm trees from eBay and clear PVA for the water.
Andy reports on a multiplayer Dragon Rampant game he ran on the April 23rd meeting, with contributions from the players.
We recently had a Society meeting on St Georges Day, there’s only one option for such an occurrence, a multiplayer Dragon Hunt game using Dragon Rampant (DR) rules.
Players were given the following briefing:
You have been drawn to this valley by tales of a Dragon terrorising the locals. Your objective is to gain fame, renown, and maybe even Sainthood, by killing the Dragon.
Then again, Dragons often have huge treasure hoards, picking up any loose gold or gems that might be lying around while you’re at it sounds like a good idea; unless you choose to be a Paladin, as Paladins are above such worldly things as wealth.
The Dragon hunters were asked to put together an 18 point warband, normal DR rules apply, with a couple of scenario specific modifications. Warbands had to contain a minimum of 3 units, and there were a couple of additional upgrades available:
Paladin, essentially the Slayer special rule with enhanced Courage, but not eligible to collect treasure.
Pack animals, which would allow a unit to carry an extra treasure token.
The Dragon itself was not limited to the 10 point unit maximum, it was a Greater Warbeast with Flame / Spore, Cunning, Fear and Flying and it had a modified failed courage test response.
Six players took part, order of play was determined by the draw of a card on each turn, one card for each of the players and a Joker for the Dragon and other fauna. The player’s army lists and game reports follow:
Swamp Army – Kim
Swamp Dragon (Elite Foot, 6 points). Leader.
Lizard Warriors (Heavy Foot, 4 points)
Small Lizards (Light Missile, 4 points)
Skeletons (Light Missile, 4 points)
First move kicked off with a random encounter consisting of a pack of wolves to the rear, lizard heavy foot turned to engage with Swamp Dragon. Casualties to both sides. Swamp Dragon engaged in subsequent turn and activated a swarm of poisonous spiders. Wolves eventually destroyed but the spiders succeeded in destroying Lizard Heavy Foot. Lizard light missiles failed to score any hits. Spiders finally destroyed by Swamp Dragon. Gained 2 treasure tokens.
Failed several activation attempts and got left behind other armies. Finally managed activation with a couple of units and headed to stream which was finally crossed just in time to see demise of the Dragon by Steve’s dwarves. Obtained a further treasure token, and as the army was isolated from any other units headed off table.
Final score 10 treasure and loss of 4 points.
Final position was more by default than any strategy due to failed activation attempts.
Thorin’s Company – Tony F
Thorin (Elite Foot, 6 points). Leader.
Dwarf unit #1 (Offensive Light Foot, 5 points)
Fili, Kili, Dwalin, Balin, Oin, Gloin
Dwarf unit #2 (Light Foot with Mixed Weapons, 5 points)
Ori, Nori, Dori, Bifur, Bombur, Bofur
Bilbo (Scout, 2 points)
“Thorin looked at the map, looked up, studied the landscape ahead and then went back to the grubby piece of parchment again. The wizard that sold it to him in the Hungry Ogre tavern – well, he said he was a wizard, he had the pointy hat and everything – had sworn that it showed him the way to Erebor and his long lost kingdom. But now they were here, something didn’t seem right. This really didn’t look as he’d expected – the city of Dale should be over there, the lake over there and as for the mountain – well, that hill over there just didn’t seem big enough.
The rest of the dwarves resumed their grumblings behind him. They were all hungry and fed up with their month-long diet of Cram, and the apparent lack of progress in their quest was beginning to test even the patience of the normally placid Balin.
So Thorin decided to lead. If in doubt, bark some orders and at least sound like you know what you’re doing. The hobbit was getting on his nerves – he’d had an ‘I told you so’ look on his smug, mousey features for the last two days – so Thorin sent him off ahead. ‘Burglar, time to earn your share. See that ruined chapel over there, on the other side of the stream? Use your skills and see if there’s anything in there we can use’. With a bit of luck he might get eaten by a giant spider – that would wipe the grin off his face…”
Tony F’s Bilbo investigates a treasure token.
I drew one of the better deployments on the table, on the far right flank. It turned out to be even better, since the hunting party to my left (Kim) kept managing to fail his activation rolls so left me alone. I sent Bilbo ahead to do his scouting job – he triggered a couple of random events which turned out to be nothing, and grabbed the first treasure token. Pushing on, he was the first unit of any party to cross the stream, but in doing so he unearthed a nest of venomous spiders in a wood. The giant arachnids charged the first group of Dwarves, threw a bunch of sixes for double hits and battered them, a state from which they never recovered. Thorin had to step in and dispatch the six legged freaks, along with a few well aimed stones from Ori’s catapult.
Bilbo kept up his covert advance, living a charmed life as he uncovered not one but two packs of wolves – the first didn’t see him and just wandered off table, the second also failed to see him and instead fell to Thorin’s rage-fuelled onslaught as the remaining dwarves followed on behind.
By this time the surprisingly wimpy dragon had fallen under the weight of Stephen’s axes, so the main prize had gone. I had three reasonable treasure tokens, so I should have cut and run at this point. Instead, like a true dwarf I got greedy and made a big mistake. Some of Jeremey’s rockmen were in the ruins sitting on a bunch of treasure tokens, so I sent Thorin in – who promptly got his backside handed to him and withdrew, bloodied and battered. The other dwarves had more success and sent the rockmen back, but the damage was done. Tony G saw a chance and send in his giant to finish off the injured dwarf. This ploy failed as the rest of the dwarves came to the rescue, but the delay, along with two successive turns of failing my first activation roll, allowed Tony’s goblin archers to move up. They finished off the second dwarf unit with a hail of black arrows, so in the end only Thorin and Bilbo made their escape.
Instead of getting off the table with three intact units each with a reasonable treasure token (and a total of +8 glory, which would have given me second place), the Dwarvish love of treasure ended up in a negative total and several dead members of the party.
And Thorin still didn’t know where Erebor was…
Wulfric the Wanderer – Eric
Wulfric and bodyguard (Bellicose Foot, 4 points). Leader.
Heavy Foot, Spellcaster, 8 points
Light Riders, 4 points
Scouts, 2 points
Wulfric’s Warband advance through a swamp, Stephen’s Axe Thanes in the background
Wulfric led his bodyguard in a wild charge sweeping Stephen’s Dwarvish scouts from the field; only for them to be routed in turn by Stephen’s Axe Thanes. The rest of Wulfric’s warband passed their courage test following his departure from the field, but soon after the scouts were annihilated by Stephen’s Axe Thanes.
Eric’s Riders searching a rocky outcrop for treasure.
Eric’s riders in search of better treasure, Tony G’s Goblins trying to keep up with them
Wulfric’s Light Riders and Heavy foot pressed forward, only for the Riders to be wiped out by Tree Giants. The only survivors were the Heavy Foot and Spell caster who escaped with 5 points of treasure.
The Goblin Horde – Tony G
Ettin (Heavy cavalry, 4 points). Leader
Fanatics (Bellicose foot with shiny armour, 6 points)
3 x Goblin bowmen (Scouts, 2 points each)
One of the Goblin Bowmen units was given a Pack Animal upgrade, in the form of a pack spider!, at 2 points)
My troops managed to deploy well, with my fanatics attacking a nearby bat unit. The following turn they then decided to attack one of Jeremys units instead which semi backfired when the bats attacked me. In the meantime, rest of the troops bogged down and couldn’t move out of the woods.
The next turn my leader charged the bats and wiped them out, and with Jeremy’s troops moving towards the stream my fanatics were luckily isolated (no wild charge!!)
Tony G’s Goblin Scouts sneak up on Eric’s Light Riders
Over the next couple of turns my dice rolling was appalling and only one scout unit managed to do anything resembling an advance.
Finally my troops did get going but again bogged down with several turns ending with an initial roll of double 1!!
Following the very quick demise of the dragon to the dwarves, the only way I was going to get anywhere was to grab as much treasure as possible and with that my fanatics attacked one of Eric’s units and whilst I wiped him out, my courage roll failed spectacularly and the fanatics fled the field.
By this time there were not many warbands left on the table so my Ettin with a unit of scouts went seeking part of Thorins company after the scouts softened them up, my Ettin charged and subsequently fled when the resulting melee was a draw (which pretty much summed up my day!!)
The Force of Nature – Jeremey
Heavy Rockmen (Heavy Foot, Spellcaster, 8 points). Leader.
Tree Giants (Heavy Foot, 4 points).
2 x Rockmen (Light Foot, 3 points each).
The forces of nature were on the march once more. I had a very simple army for this game but went for a full blow spellcaster to help cope with what this unusual game might throw up. My army came under attack from Tony G’s goblins from the start and soon saw one of my Rockmen units destroyed outright. With a crowded battlefield and coming under attack I made for the river and a chance to collect up some treasure.
Jeremey’s Force of Nature hold off a wolf pack. Tony G’s goblins hide in a wood.
Jeremey’s Treemen get their feet wetOne of Jeremey’s Treemen units, some what depleted.
Despite making some distance two constants of the game soon presented themselves. The treasure tokens each had a value with 1 being the lowest and yes you’ve guessed it the first three tokens I collected were all worth just 1 point each. The other aspect was each token collected had the potential to summon some random unit to deal with. In the end I spent more time fighting the random units than the other players.
But a quick dash to collect some more treasure after the Dragon had been killed at least provided some reward for having to fight across every inch of the field.
Kergen Sourtooth is a well known dwarven sorcerer amongst the dwarves of the Grimwold Hills. He had learnt of the location of a dragon, and dragons are known for their gold and also for the knowledge they possess. Two things that any sorcerer, and a dwarven sorcerer at that, would prize.
He had with him his two two bears – Doombear and Brawnbear. In addition he had his familiar, a colourful Jay called Orvar As well as these companions, a band of axe-thanes and scouts also signed up for this adventure. Together they would raid the dragon’s lands.
They hadn’t been the only ones with this idea. Other parties were also in the dragon’s valley, obviously after the same thing. A right motley bunch they were as well – another band of dwarves with a halfling thief, goblins, lizardmen, human barbarians, and a party of rockmen.
Kergen and his team used the cover of some woods to make their advance. But their cover was blown by a band of human berserkers. These savages charged the scouts and cut them down to a dwarf. Not content with that, they turned on Kergen, Doombear, and Brawnbear. This didn’t go quite so well for them – they’d underestimated the aged dwarven sorcerer! The human barbarians were pushed back with many casualties, but Brawnbear had fallen. Such sorrow.
Stephen’s Kergen and Doombear
But such anger as well! Kergen would have none of this and as the humans licked their wounds he summoned his powers and with the elements behind him he cast a mighty power bolt at the murderers who were all slaughtered. Let that be a lesson to them.
Kergen led the rest of his treasure-seekers along the edge of the woods, between some scrubland, and looking toward a river crossing.
Stephen’s Axe Thanes approach the river, with Kergen Sourtooth and his surviving bear bringing up the rear.
To his right he could see the lizardmen, but they seemed occupied with some menace of the valley. To his left were more of the human barbarians – he dithered here, the anger at losing Brawnbear still with him, but the humans were being waylaid by a pack of wolves and to make Brawnbear’s sacrifice mean something it would be best to achieve the aims they set out to complete.
Kergen led his troops across the ford. And there, ahead of them, they could see in the distance the dragon’s ruins and low and behold the dragon itself was abroad!
The Dragon leaves his lair (a ruined chapel). Jeremey’s Treemen have beaten back some Giant Spiders as Eric and Stephen’s warbands cross the river.
Kergen drew his axe-thanes into ranks. He turned to them and said:
“Well met, my fine fellows! Let us see off this dragon once and for all. Here is my plan – I will use my magic to hide you in a cloud of mist. The dragon will think it is aught but morning dew, and this will allow you to get close. Then, just as you reach the dragon, I will lance him with another of my power bolts, and then you can put this dragon to an end and his treasure will be ours! What say you, worthy dwarven thanes?”
“Aye”, they cried. A joyous, “AYE!”.
And that is what they did. The thanes approached under cover of the mist, then Kergen struck the dragon with a power bolt.
The Dragon faces off against Stephen’s Axe Thanes
At that, the thanes charged from out the mist with their axes ready, and they slew the dragon!
The end of the Dragon
Knowing the jealousy of those who were also seeking the dragon’s treasure, Kergen then led his dwarves, laden with dragon gold, out of the valley and back to the safety of the Grimwold Hills.
And such was the glory and renown he earned from this escapade that he was henceforth known as Kergen Dragonsbane!
Outcome
The players received, and lost, Glory points as follows:
The value of any Treasure tokens removed from the table.
Loss of glory equal to the points value of each unit wiped out or routed
In addition to the Stargrave game previously reported, there were two other games run at this meeting, both using rulesets new to the Society from from Two Fat Lardies .
First up the 6mm Ancients players tried out the Strength and Honour rules with a couple of games involving Roman and Pontic armies.
Our members collections are primarily based for Field of Glory / DBM, so for this trial game Perspex bases were used to reflect the bases sizes in Strength & Honour.
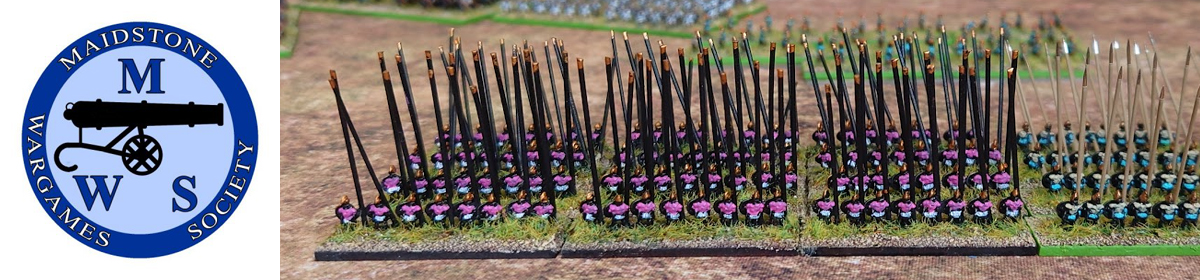
The left of the Roman Battle LinePontics on the left, Romans on the rightRoman Legions form upPontic pike phalanxesPontic scythed chariot supported by cavalry and clibanariiView from the Roman linesPontic phalanxes with skirmisher supportsClash of cavalry, Pontic Clibanarii against lighter Roman cavalryInfantry lines get into the fray
The first game was a narrow Pontic victory, the second was a Roman walkover.
Some members are also building some armies in 2mm for these rules on the regulation bases, here’s a Roman legion arrayed in the triplex acies:
Trial basing for 2mm figures.
The second game to feature a new ruleset was an early WW2 game using “O” Group rules. This featured a British advance on German positions, and ended in a German victory as the British failed to inflict enough damage on the Germans.
The battlefield in the lull before the stormGerman officer giving ordersTwo Matilda II tanks advanceGerman Pak 36German Pak 36British infantry advanceMatilda IIs with infantry supportGermans take cover behind the hedge.British infantry also take coverGerman heavy weapons, le.IG 18 75mm Infantry Support Gun in the forground. Pak 36 in the background
Finally, a few pictures from the Stargrave game that didn’t make the game report.
Tony’s crew advanceA cyber enhanced critter, the bane of Andy’s crewAndy’s sniper takes position to cover the flank
At a recent meeting Stephen ran a multiplayer Stargrave scenario:
Rather than a full blown battle report I thought I’d present the game as a photo report. Five star captains made their way to a disused research facility – Catrix Station. Each was after loot, but to keep things interesting they also had their own objectives…
Jeremey Captain Blake
Tony Captain Hosvarn
Eric Captain Kadel
Phil Captain Rita
Andy Captain Reynolds
Note some references to past TV/Film characters
Captain Blake (Jeremey) and crew disembark from The LiberatorCaptain Reynold’s (Andy) crew take up position on the outskirts of Catrix StationCaptain Kadal (Eric) and crewCaptain Rita (Phil) and First Mate Old Ned approach Catrix StationCaptain Blake’s crew advance through Catrix StationMonkey see, monkey doCaptain Kadal leads from the front into the ruins of Catrix StationCaptain Reynolds tries to organise his crewCaptain Hosvarn (Tony) is in deep tribble‘Lets make a run for it’Locked and loaded and ready to rock n rollTwo of Captain Hosvarn’s crew (on the right) cower behind cover at the approach of notorious bounty hunter Captain Kadal (Eric)Captain Blake’s crew (bottom) advance on Captain Rita’s crew (top)It took half of Captain Blake’s crew to kill a single monkeyCaptain Kadal (in the centre) goes down as her crew engages with Andy’s crewPrivate Property means nothing to these scavengersCaptains Hosvarn (bottom left) and Blakes (centre and top) crews as they surround Catrix Station
Any of the Captains that actually made it into the main Catrix Station building (see the photo of Captain Hosvarn above) landed themselves with a 150 credit bill for decontaminating their starships following a Tribble infestation.
Alan K reports on his anniversary refight of the ‘battle’ of Hokkerup, Denmark, on April 9th, 1940.
Some time in March I suddenly realised that our first club meeting would be on the 9th of April, the anniversary of the Nazi invasion of Denmark in 1940. Having “invested” in a platoon of 28mm Danes from Great Escape Games I really didn’t want to miss the opportunity and so I put on a game based around a skirmish that took place near Hokkerup on the Jutland peninsula.
The encounter we were commemorating, the ambush of a leading German reconnaissance unit, was captured in a 1946 painting by Anna Maria Mehrn which was, in part, the inspiration for choosing this particular scenario along with a scene (likely inspired by this engagement) from the Danish movie 9. april. We’re not sure about the copyright of the painting so we’re not including it, but here’s a link to it.
The Danish army went on full alert at 13:30 on the 8th of April and were held back ready to take up positions in the event of a German invasion. A thorough reconnaissance had been made regarding defensive positions but the Danish government had given strict instructions that units were not to be deployed near the border nor was digging or other fortification to be undertaken in order to avoid provoking the Germans. Despite this the Germans crossed the border at around twenty past four on the morning of the 9th.
Our intrepid 3rd bicycle platoon of the 2nd Company, 4th Cyclist Battalion supported by the autocannon and light machine gun sections of the 2nd platoon Afværgekompagniet (Anti-tank Company) , 2nd Battalion, Fodfolkspionerkommandoet set off from their barracks at just after four thirty and took up positions just after 5am. They hastily erected a roadblock before sighting the armoured cars leading the German column at half past five.
Lieutenant H.J. Højerslev had overall command with Second Lieutenant A. Olsen commanding the anti-tank sections. The team manning the 20mm auto cannon was led by F Jensen, accompanied by Gunner Nørholt and Loader Eliasen as immortalised in the painting.
The opposition is less well documented so I had them facing two SdKfz 222 armoured cars, a motorcycle section and two more sections mounted in SdKfz 251 half-tracks supported by a Panzer II.
I used the Nuts! second edition rules from Two Hour Wargames for the game.
The encounter saw the Danish auto cannon taking out both of the armoured cars and the advancing German infantry taking heavy fire. In the end the Danes were forced to withdraw but they had delayed the Germans significantly.
In the end the game lasted almost as long as the entire Danish resistance as, despite the valiant defence put up by the Danish armed forces against overwhelming odds, the Government surrendered at just after half past eight in the morning.
Over the last 12 months or so Phil and I have been assembling a variety of figures and vehicles – mostly repurposed toys – aimed at playing Star Wars games in 15mm (many of them have turned up in WIP Wednesday posts).
The Christmas meeting seemed like the ideal time to give them their debut, so I put together a simple scenario. I’d been unsure about what rules to use – I had a copy of the classic West End Games Star Wars miniatures rules as one option and another idea was to modify Games Workshop’s Middle Earth rules since they deal with heroes very effectively (using the magic rules to represent The Force). But I had an idea when I lined up some figures during painting – all of the figures were in squads of ten, which happens to be the same size as a crew in Stargrave. We’ve played a number of games since those were released, including during lockdowns when the club was unable to meet, so everyone was familiar with them which made them the ideal choice.
Figures
All of the figures in this game were from Highlander Studios in the US. For the five players we had two squads of Rebel troopers, two of Imperial stormtroopers and one of Jawas. There were also a few figures from the hero packs, including the droids and a couple of smugglers. The Jawas’ Ronto beast was a Galoob action fleet toy.
Stormtroopers
Jawas
Rebel troopers and droids
Buildings and Scenery
All of the buildings were put together by Phil from the Brigade Models 15mm Desert and Advanced Buildings ranges. The various walls and clutter around the buildings were also by Brigade. Some of the scatter terrain came from Debris of War. The desert mat came from Tiny Wargames.
Vehicles
The vehicles are sourced from a variety of toys and model kits. The Imperial stormtroopers flew in on a Galoob shuttle while the Rebels used a Revell U-Wing. The droids’ escape pod was also from Galoob, along with the skiff. The Falcon was another toy, it’s actually the wrong version (it’s from Solo and has the square radar) but I wasn’t too fussed about that, after all it looks like what it’s supposed to be, besides being much cheaper than any alternative I could find ! Luke’s landspeeder was a diecast model sourced from eBay, unfortunately I can’t remember the brand name. All of them came pre-painted, so were just given a wash of thinned black-brown acrylic mixed with Johnson’s floor polish, followed by a coat of Army Painter spray varnish – it’s amazing how this simple technique turns a toy into a scale model.
Landspeeder
Desert Skiff
U-Wing
Scenario Click for a larger version
The game is set at the start of the original Star Wars:A New Hope movie. R2-D2 and C-3PO have been ejected in an escape pod over Tatooine to keep them out of Imperial clutches, but here the story changes slightly. The Tantive IV has somehow evaded capture and has now despatched a shuttle full of Rebel troopers in a desperate bid to recover them. The Imperial Star Destroyer also spotted the pod, and sent down their own landing party to investigate. Both craft came down a short distance apart on the outskirts of Mos Eisley.
The game was intended for five players – two Rebels, two Imperials and myself playing the Jawas while also acting as a vaguely impartial umpire.
The players needed to search the buildings to find the droids – but there were other things in the buildings besides Artoo and Threepio. Each building had a random set of inhabitants, including Rebel sympathisers, Imperial loyalists and a pair of smugglers – plus the droids of course. Although I randomly rolled each time one of the buildings was searched, things were ‘fixed’ so that the droids would be in the last building to be searched.
Loitering Jawas
Stormtroopers advance past the escape pod
The hand of God (or Phil, at any rate).
The Rebels came out of the traps much more quickly than the stormtroopers – their lightly armoured figures moved slightly faster – and began searching the first buildings straightaway. They uncovered a pair of Imperial loyalists in the first building but made short work of them. However, nearby firing upset the Ronto which stampeded, and one Rebel squad ended up in a firefight with some Jawas (which inevitably ended badly for the locals).
Advancing Rebels use a landspeeder as cover
Some brave Jawas mix it with the stormtroopers
While their comrades take on the Rebels !
The Imperials slow-but-steady approach saw them unearthing some Rebel sympathisers, whose appearance was brief as they disappeared under a hail of fire. The two forces were by now engaging each other, and the slightly better armour and longer-ranged weapons of the Stormtroopers began to be significant. They unearthed a pair of Sabacc-playing smugglers – Han and Chewie made a dash for the Falcon (obviously wishing to avoid any ‘Imperial entanglements’) but Han was immediately gunned down as they tried to cross the square. Chewie’s bowcaster dealt out some measure of revenge, but eventually the Wookie went down too.
Rebel troopers form a rearguard
The droids approach the U-Wing but appear to have run out of escorts
Chewbacce goes postal on a group of stormtroopers who have just gunned down Han Solo
By now the Rebels were searching the last building, and found the two droids. All they had to do was return them to their U-Wing and get off planet. However, they had taken more losses than the Imperials in getting to this point and numbers began to tell. One by one the Rebels were picked off by the steadily advancing line of Stormtroopers, until there was one Rebel trooper left. He got the droids virtually to the U-Wing’s ramp but fell at the final hurdle, allowing the Empire to snatch victory at the last.
The Last Stand
Almost there … but this Rebel trooper was gunned down seconds after this photo was taken


You must be logged in to post a comment.