We are having a little detour this week. Member Stephen produced some blasted trees and we thought it would be a good idea to ask Stephen to show how easy it is to create such striking scenery.
Blasted Trees DIY
This building project came about because we had a game of Clash of Rhyfles in the club diary and, with the setting being a World War One analogue, I decided to create some themed terrain items.
When I think of a WW1 battlefield what comes to mind are the stark images of trees stripped bare by constant artillery barrages.
So that is what I am going to make.
I say ‘I am going to make’ but, truth is, Mother Nature did most of the work.
A walk through the woods of the North Downs soon yielded plenty of sticks. I could have carved some balsa and painted it, but why would I? I could never do as good a job as Nature has achieved. The important thing, when selecting your twigs, is to get variety in size, shape, and features (ed. and not to take them from the trees but the plentiful number on the ground).
Next was to stick the sticks to a base. I had some modeller’s light ply so I cut it up in 10cm squares. I used a hot glue gun. Quick tip – remove the bottom few millimetres of bark before gluing. With an old stick the bark peels off easily and if you leave it intact all you may end up doing is gluing the bark to the base and the twig comes free.
On to basing.
I know I said I wanted a WW1 appearance but I had to play this off against how I had based other terrain and the figures as well.
So rather than a muddy Somme-like basing I went with something half way between the two so they would fit in with other items and I could use them with other games.
I used my usual basing routine – paint the base (and glue) with a mid-brown, then cover with model railway ballast. When dry I then added patches of static grass. This was finished off with some clump foliage.
With that, it was all done and ready for the games’ table.
Our illustrious Chairman takes us through a recent game of Chain of Command.
Picture the scene, Linton Village Hall on a sunny Saturday morning, a gathering of War Gamers at one of the oldest clubs in the UK and a game of big CoC. Me, Mark J (club chairman), Alan K (long time fan of Lard), Pete S (best damn terrain builder south of Leeds), Eric G (bravest of them all) and last but never least Dave P (another keen lardman). All of us ready to do battle across an eight by five table.
I decided I had to run a game of Chain of Command at the club based around the aftermath of the encounter at Hill 226 on Sunday 30th July 1944, right at the start of operation Bluecoat in Normandy. What happened on that day was a crushing encounter for the Scots Guards, who were I believe one of the first British units to encounter the mighty Jagdpanther, three of them in fact. The encounter left 11 Churchills destroyed and sadly quite a few Scots casualties. If you go to Hill 226 now you will see a memorial to them.
The game took place Monday 31st July with a bit of a ‘what if’ twist to it. What if instead of simply zooming off after giving the Guards a very bloody nose, the Germans consolidated against the Guards right flank just beyond Hill 226 taking advantage of their tactical victory.
British forces
Two platoons of British infantry, The Argylls. Supported by a Vickers machine gun team, one 17 pound AT gun, an engineer team and a medic. Both platoons were armed with Gammon Bombs. The British also benefited from a pre battle bombardment and a company HQ and replen point.
One troop of Scotts Gaurds, 2 Churchill mk VIIs supported by 1 Churchill Crocodile from the 79th Division.
German forces
1 platoon of German infantry, 326th Division. Supported by MG42 team, 20mm flack cannon, 88mm flack gun and a Stug IIIG.
One Jagdpanther, 311 Leutnant Scheiber
The Battle
We played a broad front big CoC with two British objectives. British orders were to take both objectives (a road junction and farm just beyond Hill 226) and hold until reinforcements arrive. The British had good intel having carried out night patrols and were aware that while the Germans had pulled in some heavy fire power, they were short on manpower. Actual intel at the time stated that the 326th were depleted and in need of rest.
The Germans having hastily consolidated their position had relatively poor intel, I told the German player to expect heavy armour and a flame thrower. I took the decision to add a Crocodile as they were in the area at the time. The addition of intel worked well, with the German player selecting two mine fields and placing one across a road, the only place where the Crocodile could pass without using its flame thrower or another Churchill smashing through the bocage hedges to clear a path. I had given the Crocodile three shots with the flamethrower.
The battle started with Pete’s platoon probing the middle section of the battlefield hoping to sweep right around the woods to reach the farm. Eric to the left fank heading for the road junction, a dangerous mission given substantial open ground to cover towards the objective. Dave’s troop supported Pete’s sweep by pushing against the German’s weaker right flank (or so he thought).
Alan played things pretty cool, not deploying for the first four phases as he tried to sus out the British plan. He knew given the terrain (bocage into farmland) that the Brits would have to pepper pot with one Platoon taking the attack to him, exposing his position with the other following up and of course the heavy armour and support. Despite a lack of Germans, the British attack was quite sluggish, and they failed to deploy their platoon mortar teams. The open ground between hedges was clearly worrying them and over occupying their thoughts.
Pete was the first to take the bit between his teeth ordering Eric to push on (Pete had company HQ) he moved forward with two sections leaving one behind cover. Time for the first German ambush. As the Argyles began to cross a field toward another hedge and potential German territory, they heard the Blam! Blam! Blam! of a 20mm flack cannon. The section hit the dirt taking one causality and two shock, could have been a lot worse.
As this was taking place the Crocodile rumbled into view just to the right of Pete’s platoon, further right a Mk VII took on a bocage hedge hoping to flatten it and create another route to the Farm for the Crocodile. Unfortunately, the Mk VII didn’t make it across the hedge and was ambushed by a couple of German infantrymen with a Panzerfaust, Boom! one Churchill down. Not looking too good for the Brits. To make things worse Alan had thrown a double phase and once again blasted the poor Argylls with his 20mm, a section corporal was hit and stunned leaving the lead section stuck in the open.
Now was the time for the Crocodile to have a go, having got into range Woosh! Great streaks of flame burst out toward the 20mm flack gun destroying it and the crew plus the hedge it was using for cover. There was now a gap in front of the Argylls in open ground. What would they do next.
Alan clearly feeling it was time for some serious heavy metal deployed Jagdpanther 311 at the farm with a line of site along the road through the woods into British territory. The British responded by deploying their 17 pounder in line of sight of the Jagdpanther, a gutsy move given they would not be able to move away in time if things didn’t go well. The Germans struck ambushing the 17 pounder as it deployed and got ready to fire. An 88mm HE shell hitting the gun but doing no significant damage, unbelievable luck. The crew wasted no time firing an AT round at the beast and taking it out in one shot to a roar of cheers from the Brits. The last few minutes may have turned the battle in their favour.
On the British right flank Eric had followed orders and had pushed hard, finally deploying his platoon mortar and laying smoke he quickly moved toward the objective using sound tactics of cover and move and deploying a reconnaissance team. However just as he reached the objective, he was ambushed by a German infantry section losing two men and gaining shock. Eric continued to lay smoke well, blocking line of sight but his attack had stalled. He fought on to hold the road junction but lost a section corporal, his lead section was now severely depleted and pinned. Eric pushed on with his two remaining sections towards the German infantry section.
Pete deployed his Lieutenant and rallied the lead section; on they went with a fresh section in support towards the broken ground. No smoke was used, and his men again hit the dirt after hearing the awful BRRRRRRP! of an MG 42. The lead section had been ambushed by a tripod mounted MG42, once again luck was on their side and while this stalled their advance they took no casualties. Pete finally started to lay smoke across the German line buying his men some time to recover and move.
The Germans sensing a pivotal moment in the battle deployed another infantry section in front of Pete’s platoon. However, Eric poured fire onto their right flank forcing them back into a cornfield and in line of site of the Crocodile. Woosh! another blast of flame and Five of the section were gone, their leader remained unscathed amazingly and they fell back to some vines to the left of the Farm. The Germans now pulled back their other section giving up the road junction to consolidate their position at the farm, the Stug III was also deployed.
Once again, the Brits stalled staying behind their line of smoke and not taking the ground. The second Mk VII pushed on to right of Pete’s flank where his third section had deployed in the woods in front of the farm. The Crocodile moved across the minefield which had now been made safe by the engineer team. The British re-supplied obtaining more smoke and got ready for a final attack but time had run out.
A great game followed by a de-brief at the pub next door. What did we learn from this game. As always having fun is the main objective which we did. The Brits had opportunities to push on which would have resulted in causalities, but we all agreed would likely have won the day. Easy to say hard to do, no one wants to lose their troops.
Andy presents a taster of the games at the last meeting. Five, count them, five, games in progress!
Let’s have a look at them in historical order:
First up we have a mixed scale (6mm & 15mm) Field of Glory Game. Apologies to the players, I only took one photo of this.
Battle lines are drawn
Next up Stephen & Andy concluded their three game Barons War mini campaign. Totally unbiased reports of these games to follow.
Baron Stephen le Tookere’s troops prepare to defend the Trebuchet.Sir Andrew’s troops close in on Baron Stephen le Tookere’s Trebuchet.The Trebuchet burns! Sir Andrew’s mission accomplished.
Moving to more recent history, Chairman Mark ran a 28mm Chain of Command game, Operation Bluecoat, Normandy 1944.
The outskirts of a village in Normandy 1944.The curse of a freshly painted model making its debut, KO’ed early in the game!Churchills support the British advance
Next we had a game of AK47 Reloaded, more 15mm mayhem in 1970s San Guano. A rare outing for this ruleset at the Society.
Infantry take cover as an APC burns.Militia defend the factoryHeavy Armour (for AK47)
And last, but by no means least, Tony & Jeremey tried out Grimdark Future Mass Battle rules with their collection of 15mm armies.
Jeremey’s forces deployTony’s Jenpalo seize the junctionOne of Jeremey’s tanks is about to get a surprise!A clash in the Technoliths
That’s all for this time, next meeting is on the 9th of May, you can see Society diary here.
Stephen takes us on a starry-eyed journey to the, er, stars…
It turned out that a club meeting fell on February 14th this year. Valentine’s Day. There was only one thing for it – a suitably themed game of Stargrave.
Beneath the twin stars of Romeo and Juliet is the planet Romance. The major space port on Romance is the city of Verona. But the city is riven by two competing families: the Montagues and Capulets. One member of the Montague family, Tony, is due to marry his beloved – an Angel from the planet Seraphim, by the name of Maria. Tony believes the Capulets have kidnapped her and that she is being kept somewhere in the West Side of the city, where the Capulets are in control. He offers a substantial reward to whichever crew can return his dearest.
West Side of Verona
The table represented a section of the city. Heart-shaped chocolates were laid out on the table. These would either be clues to help them locate Maria or loot tokens (physical loot only in this game, to reflect the passion of Tony’s love). They wouldn’t know if it was a clue or loot until they reached it.
As well as the main mission of rescuing Maria, we also used the Side Hustle cards. In addition, there was a third objective – each player would gain an extra 25 experience points if they could compose a four line poem about Love. This would be doubled if the beauty and nature of the poem reduced any participant to an overflowing of emotions.
We’ll let the captains tell you how it went…
A busy town square
Captain Hertz van Rental’s Report
As Andy was off to my flank I decided to try the peaceful approach first and ignore him in order to acquire more information before entering the mayhem phase. This lasted about one turn before one of the nearest events turned into a ruddy big predator/doggie thing which proceeded to savage one of my crew; one down, several to go…
Trouble outside the cantina
We made some progress towards the rogue robot, as I had quickly decided that only mega-mayhem awaited any ‘rescue parties’, whether from locals or each other – a semi-wise decision as it turned out. As we made our way around the back alleys of the starport, we soon spied a particularly dodgy and well-armed lot approaching in the distance, led (well, egged-on from somewhat further back), by Captain Jeremy, a veteran Pirate leader whose very name brought fear to many systems (and a good laugh to many more). This group had sped-up in their approach as it turned out that their entry point was near the rogue robot, and that it – displaying excellent taste – soon decided to start shooting them!
A deadly encounter around the back of the cantina
In the meantime I had led the bulk of my (remaining) crew further on and was attempting to engage a local (unarmed) robot in conversation, with a view to any knowledge about excess Juliets in the area. I tried the robot as I thought that, unlike any locals (whose loyalties and thus veracity I could not be sure about), it might give truthful answers. Alas, it soon turned out ZX81 was not programmed for either conversation, information, confirmation or even altercation – but the latter was then supplied by ‘Jeremy’s Jumpers’ who proceeded to open fire!
I won’t dwell on the subsequent exchange – some from each crew went down (rather more than Jeremy was expecting?), but Big-J was off elsewhere, by then interviewing, and then fighting with the personnel and customers in a large local cantina…. More importantly for my lot I had made a quick mental calculation about the remaining distance to the rogue robot vs the approximate time of self-destruct before we could deactivate it. Quickly deducing that the odds were by now near-impossible, I began to remove the crew from the area with a couple of minor bonus bits we had found en-route. This decision was hastened by the sounds of major fire-fights having broken out across town where Alan and Eric had discovered the lair of the other gang and thus the location of the reluctant Juliet.
It all happens down the back alleys
Our withdrawal went without incident except for a small misunderstanding with Andy. It soon became apparent that, having found some other bonus bits early on, he had decided to leave a pile of them with only one guard while he took the bulk of his crew further into town. Now, I like to think I have drilled my disparate crew in their civil duties when visiting alien towns, and so – spotting this pile of (admittedly valuable) ‘fly-tipping’ near our exit, I offered to remove the stuff. The guard had no sense of humour, and objected most violently – if briefly… However, Alan had also left a specialist snip nearby, and so not all my crew reported back for supper that evening. And it was Spoo, as well – their favourite….
The stars for shame shall hide their light,
as my beloved ascends aright,
and all shall marvel at the sight,
of a new Angel born tonight.
-Cpt VanRental-
Tybalt Capulet and Greyfax see things differently
Captain Greyfax’s Report
The crew of the Lost Hope landed on planet Romance and began making their way across the city of Verona, looking for clues to the location of Mariah the “Angel”, the kidnapped love of Tony Montague. Having secured a side hustle card that would prove invaluable later in the game, the team split up, with the captain making for the local watering hole, whilst first mate Kadal took the of the crew with him scouring the streets for anything that might lead them to their prize.
A splitscreen van goes for a lot now
Knowing that information could be traded for coin Captain Greyfax entered the bar where she spied a likely candidate who might be willing to part with some intel. The alien monkey sex worker said it would cost a fair bit for her to tell anything that might be useful. She was looking to get off-planet. Despite having a pistol held to her head and being plied with credits the alien monkey sex worker remained resolute and refused any information. Realising that either the simian prostitute was ignorant of what Greyfax wanted to know, or was too afraid to spill the beans, and a few credits lighter, she left the bar.
Meanwhile, on the street outside, Kadal instructed the ship’s Chisler, Cl4pTrP to check out a container that seemed a prime candidate for storing loot. Cl4pTrP opened the container, and once the contents were established as being of some value, began to make his way back to the ship. As Cl4pTrP scuttled off, the ship’s hacker, Devo Ranks ambled up to a nearby communication tower and casually began side loading infiltration code from his advanced deck in order to hijack the tower and force it to yield its secrets.
Kadal and his retinue then ran afoul of what appeared to be some local yahoos. A fight erupted which escalated to gunplay. Shots were exchanged and judicious use of fragmentation grenades ensued. The team drove the ne’er do wells into a nearby warehouse where the thugs desperately attempted to make a last stand. Captain Greyfax caught up with Kadal and his men and the team took some casualties due to the liberal use of grenades and a psionic fire attack in an enclosed space.
Murch the bounty hunter finally catches up with captain Greyfax
The leader of the thugs finally went down (whether it was to a grenade, bullets, a swathe of fire or a simple punch, no one could recount for sure in the confusion, but all claimed they were responsible) and with that, resistance collapsed. Once the enemy had been “pacified”, the crew discovered Mariah the “Angel” was being held captive, right there in the warehouse. What luck!
Wasting no time, the crew limped or crawled from the warehouse, where they were greeted by Devo Ranks, the hacker. He cheerfully informed them that his successful hacking of the comms tower revealed a hidden matter transport network (the result of the previously mentioned side hustle card). Wasting no time, Greyfax instructed the crew to use the network to return to the ship. Once there, they rendezvoused with Tony Montague and reunited him with his betrothed.
Maria is rescued
Now two hundred and fifty credits richer, none of the crew suffered lasting injuries although, some may have interesting scars to talk about and know to stand well clear of crewmember Espinosa when he starts loading his grenade launcher.
Roses are red,
violets are blue.
I’m rubbish at poems,
Nice ****.
-Cpt Greyfax-
Let it be stated here that Murch the bounty hunter has put a bounty of 150 credits on Captain Greyfax’s head to whoever can take Greyfax down to 0 Health. This will be doubled to 300 credits if this results in a kill. Murch wants it known that Greyfax is a cheat and swindler who took his spaceship from him after Greyfax cheated at a game of Sabacc, and should never be trusted.
Captain Blake’s Report
This was going to be an unusual mission. I wasn’t sure if it was a rescue or a kidnap, so the crew decided on a bit of caution.
The idea being to see what loot we could salvage and if there was a chance to set Mariah free to take it. We landed in a busy urban area and it was clear there were several other crews in town, the crew split up and started to gather loot and clues to finding Mariah. Good progress was made and the other crews seemed intent on the mission.
Softly, softly catchy monkey
Things took a turn for the worse when what appeared to be a pile of junk suddenly turned into a fully armed and rather aggressive robot. Several shots saw a number of the crew taking damage. While taking cover several members of the crew found themselves in close proximity to a rival crew (Pete’s), meanwhile other members of the crew made their way to the local bar to start asking questions.
Things got a bit heated in the bar and Captain Blake was forced to adjust the behaviour of one of the locals. At the same time Pete’s crew were too close for comfort and with the junk robot still shooting at anything that moves we decided to fight our way through them and make good our escape.
With the clues in the bar leading to nothing, we stepped out into the town square right in the middle of a fire fight, Eric’s gang appeared to have taken out several gang members and a rogue bounty hunter. They were also about to storm a building, so we thought it was a good time to leave. The junk robot had finally finished shooting and so the rest of the crew could escape with their loot.
Captain Blake’s crew approach a broken robot
A good horde was collected that day and we saw on the news feeds later that Mariah had been rescued, so good all round.
My heart belongs to no other,
as I stare at you from cover.
Our future could have been bright,
But you’re currently in line of sight.
– Cpt Blake
Captain Reynolds’ Report
Mal had briefed the crew before leaving the Serenity in orbit around the planet Romance: “Badger told us that the Montagues have placed an open contract to find one of the family member’s fiancée, an Angel from Seraphim. The Montagues believe she has been kidnapped by their rivals, the Capulets. They believe the Angel is being held near the spaceport that the Capulets control in Verona. Whoever returns this Angel to the Montagues in good health will be amply rewarded.”
“There’s history between these two families,” he added, “a long and bloody history. We go looking for this Angel, but I don’t want to lose anyone to this family feud. So, we’re not going to dig too deep into the Capulet’s business. And just between ourselves, we have rumours that somewhere under Verona are the remains of an Independent planetary defence bunker. We have a lead on the way in, so we’re looking for an access panel on a Pylon that should let us gain entry to the bunker.”
There’s plenty of monkey love in the local cantina
Inara & Wash set down the shuttle on the landing pads of Verona West Side space port. Mal led his team of Wash, Kaylee and Derrial towards the town square where he believed the Pylon they needed could be found. Zoe’s team of Jayne, Inara and River took a different route, headed for a bar, thinking they may hear news of the Angel there. Tracey and Simon held back, Tracey climbing a tower to get into a position where he could support either team.
Mal and Zoe both activated their Energy Shields, which would give them a little added protection, and Zoe activated a drone and sent it scouting towards a loot marker. Mal encountered some locals on the way and discretely asked if anyone had heard anything about the Angel. Both looked nervously around, but confided that if anyone knew anything it would be Tybalt Capulet, the family’s consigliere and head of security. Not a nice man, apparently, but he could often be found at the town centre bar.
Mal passed this intel on to Zoe, then led his team to the Pylon. After a couple of attempts he was able to unlock it, giving them the access codes needed to get into the bunker. While he was doing this Wash managed to unlock a loot token. Zoe’s drone was heading for the loot token when it was blown out of the air by a member of another crew, one we had not encountered before. Jayne got into position and opened fire taking out the opposing crew member with a headshot. KayLee came across another loot token and unlocked it. In the distance the crew could hear an exchange of gun fire.
What’s this big red thing ?
Having unlocked the Pylon, and seeing Capt Greyfax’s crew gathering outside a storage bunker with what looked like a group of Capulets heading in their direction, Mal sent the recall and told the crew to withdraw to the Pit, which was the way into the bunker. Zoe’s team had entered the bar when they got the recall, on exiting she deployed another drone to give cover. As the crew gathered in an alleyway Derrial was assaulted, with no good reason, by a local thug. Fortunately, KayLee and Simon came to Derrial’s aid, with KayLee administering the coup de grace to the local ruffian. Leaving the ruffian sprawled in the dust the crew made their way to the Pit and used the access codes to get into the bunker.
Come on, lets all rough up that innocent bystander
The crew found the bunker eerie but deserted, and managed to find Trade Goods to the value of 180CR. The crew made their way through the tunnels back to the starport and lifted off in the shuttle to return to the Serenity.The other loot turned out to be another Pick Caster and a pair of Lift Gloves.
Mal commended the crew, no one was injured (apart from the loss of a Drone), and there was 540CR worth of loot added to the hold. Mal decided to sell the Trade Goods and the Pick Caster, bringing in 420CR, and hold on to the Lift Gloves for now.
Roses are red,
violets are blue.
If you need minions,
please speak to Gru.
With all of the Society’s blog editors at Salute, Stephen steps up to the plate with a short report on the games played at the Society meeting last weekend.
At the club today we had four games. Since it was also the day of Salute, club meetings tend to have fewer attending due to the fact that some members will be at Salute. (Ed: See a report on the Salute trip and the Award received here).
First up, we have a game of FoG. This is a stalwart game of the club and at most meetings there will be a game on the go. The FoGgers got in two games. In the first one it was the Romans having a bust up with the Carthaginians and in the second it was those same Romans (they’re a chippy bunch, eh?) taking a pop at some Seleucids.
The Hand Of GodFragmented. But aren’t we all?
Dave and Pete had a game of General d’Armee – a Napoleonic game. I’m sure I was told it was Prussians and Bavarians, but I might have got it wrong. Dave is a keen Napoleonicist (is that a word? It is now) and there were loads of figures on the table.
Prussians or Bavarians? (Ed: Prussians I think)Or Is Bavarians or Prussians (Ed: Bavarians this time)
Next up we have two Saga games.
John and Bob had a couple of games with Norse Gaels and Anglo-Saxons. I believe this was Bob’s first go with Saga and from what I heard he experienced the Norse Gaels’ shocking ability to dish out some damage.
Anglo Saxons Dreading The Inevitable ChargeNorse Gaels On The Razz
Tony G and myself also had a game of Saga. Having recently read a book on William II I thought the rebellion of Bishop Odo in 1088 would make a good one-day campaign. So we played three linked games. The winner of each would decide who would be attacker and defender in the next scenario. The campaign winner would be the one who scored the most total Victory Points.
(Ed: The picture at the top of the post “Burn Tonbridge, Burn” is from this series of games).
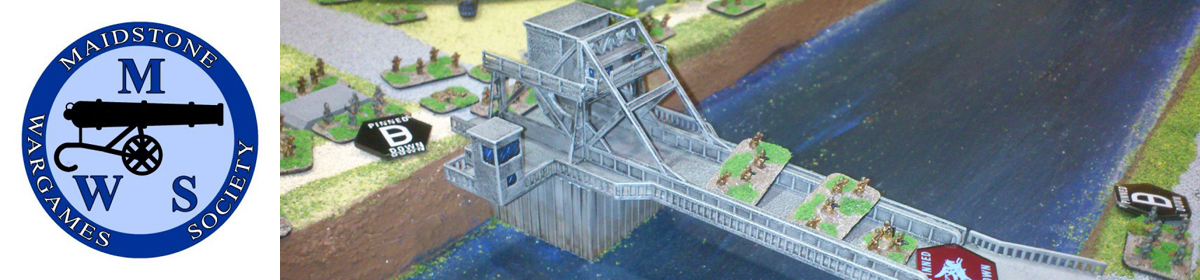
Making Way Across Aylesford BridgeBit Of A Long Distance Lob Shot
Modesty prevents me from saying who won…
(Ed: I think we can guess Stephen! We should be back to the WIP Wednesday posts from next week.)
Tony F runs us through a Stargrave scenario set on Planet Earth (before the demolition…).
At Maidstone we have a largish group of Stargrave players with games run regularly. We all keep track of the progress of our captains and crews (although there have been casualties along the way) in a series of unrelated scenarios that we take turns to organise. Almost all are run by an umpire who sits out the game and ensures that things run smoothly. I’m a massive fan of The Hitchhiker’s Guide to the Galaxy – I mean, who isn’t? – and I’ve been trying to shoehorn a Stargrave scenario into the H2G2 universe. Last autumn, I finally managed it (and it’s taken almost six months to write it all up !)…
I set things right at the start of the original book, with Arthur Dent’s house about to be demolished. I didn’t directly tell the four players that the scenario was a Hitchhiker’s one although they all twigged it from their sparse briefing notes. Two of them were tasked with ensuring that the house was efficiently pulled down, while the other two were to try and stop the destruction. But they didn’t know that there were two different sets of briefings, nor did they know that they had a potential ally, which led to some interesting results later on.
Arthur’s House, surrounded by bulldozers ready to roll.
I went rather over the top with the scenery, making Arthur’s house from a Charlie Foxtrot MDF kit and giving it a detailed garden. A borrowed Forge World fantasy inn stood in as the Red Lion pub while Sarissa Precision provided Cottington Cricket Club’s pavilion. Details such as the telephone box and bus stop were from Blotz while Debris of War were the source of bits such as the rubbish bins and bags, portaloos, traffic cones, sofa etc. I scratchbuilt details such as the hedges and fences, telegraph poles, road signs and the pond, while the post box and benches were 3D prints of models I created myself. The narrow Sussex country lanes were Early War Miniatures latex offerings. I raided my 28mm Lord of the Rings scenery for beer barrels for the pub and a high hedge round the cricket pitch, which was last seen as the defensive hedge around Bree ! I really went to town with the details (far more than was strictly necessary) but I had a lot of fun putting it all together.
Arthur’s house from the west showing the bypass roadworks.
Cottington Cricket Club pavilion
The Red Lion pub with phone box and war memorial.
The six JCBs were cheap plastic toys from eBay – I hadn’t wanted to spend a fortune on expensive die cast ones for a one-off game. I weathered them a bit, varnished them to take away the cheap plastic shine and I think they looked fine on the table. The idea was that the two demolition-tasked players could jump in them to knock the house down, but I made them difficult for the players to control on account of their weird rear wheel steering which a character used to grav sleds wouldn’t be used to.
Closup of one of the cheap plastic JCB toys, given a bit of a paint job and pressed into service.
I had fun coming up with a long list of creatures for the random encounter table. The list had 20 different possible encounters which were triggered if a player rolled four or less on their initiative roll each turn. I arranged them in increasing order of deadliness, and rolled 1d10 plus the turn number for them which meant that the players would start off with some fairly tame and easy to tackle encounters, ramping up to more difficult ones later in the game. Since Arthur lives in a fairly rural area, Warlord Games’ farmyard animals set populated the bottom half of the table, ranging from a few chickens pecking at the players’ feet up to some cows and a 3D printed bull sourced from Etsy.
The rest of the encounter table was more interesting to put together. A bunch of drunken thugs would pour forth from the Red Lion, upset at the noise and gunfire disturbing their lunchtime drinking session – these came from Killer B. Several British bobbies with truncheons from Crooked Dice would also be investigating the noise, escalating to the Sweeney (also Killer B) in a die cast police car. A simple scratchbuilt bowl of petunias (wooden bead with a flower tuft on top) and a Sperm Whale (eBay) were primed to drop out of the sky on an unlucky captain’s head. Shotgun-armed Farmer Maggert (Killer B) and his three Rottweiler dogs Grip, Wolf and Fang (Brigade Models) would get very protective over his cabbages. There were several bases of tiny red Vl’Hurg and green G’Gugvunt spaceships (Brigade again), confused about their scale but with enough firepower to give someone a nasty flesh wound. Arthur and Ford (Denizen) could well chase a Chesterfield sofa (Debris of War) across the fields, and at the top of the list was Thor, an oversized 3D print from Etsy. And I must not forget Wowbagger the Infinitely Prolonged, a Crooked Dice figure, and his 1960s toy spaceship which I picked up for a pound at a boot fair. If he managed to land a carefully crafted insult then it could cost a Captain a few Will points.
Sadly, after all that effort, the players (with the honourable exception of Captain Gloria/Charlotte) steadfastly refused to roll many low initiative scores, especially in the second half of the game, so many of my favourite characters didn’t appear. But fear not, I have ideas for more H2G2 universe scenarios, so they’ll be back.
I think the game ran pretty well, initially most of the players spent time hoovering up the loot tokens. But then Captain Gloria jumped in one of the JCBs and they all twigged what was going on. In hindsight perhaps I should have hinted a bit more about what they were supposed to do to achieve the main objective, but I think fun was had by all which after all is what we do this for. I particularly enjoyed Charlotte’s skirmishes with the local farm animals, she seemed particularly unlucky with them, not helped by a few freakishly good die rolls against her by the umpire.
Another overview, this time from the Eastern end.
My home-made order tracker made from a few clothes pegs and a length of dowel. Keeps track of the order that players move in during the turn.
Arthur and Ford exit the Red Lion (Denizen Miniatures).
Anyway, I’ll hand you over to the four Captains for their after-action reports.
Captain Gloria (The Rhythm)
The view from Captain Gloria’s end of the table, with one of Farmer Maggert’s barns in the foreground.
COMMENCE ENTRY
The Rhythm has kept a low profile since the last altercation at the Stairway to Heaven nine months ago, but funds were running low and I was longing to be back in familiar territory. When a job came through asking us to save fellow earthling Arthur Dent’s house from demolition, I practically broke the keyboard to accept it. It should have been a case of heading to Earth, getting in, having a word with the tío in charge (el señor Prosser) and getting out.
Díos mío. What should have been a straightforward job became anything but that. Upon landing, demolition seemed at its starting point, with JCBs surrounding the dwelling. We had to move fast and, as we did, it became clear that three other gangs had also received intel about the Dent house. I was not sure of their respective motivation, so I gave the order to make our way to the house, where I was sure either the inhabitant or the demolition tío would be, before the situation could escalate. This was encumbered by my smashed jaw and Estefan’s injured leg, which restricted his movement, and the native animals that kept attacking us. Before any of the crew had reached the house, Black had already been killed by a cow (milk-bearer), which was promptly executed.
More trouble with the local fauna – this time it’s the charge of the sheep brigade.
While Estefan and many of my crew were engaged with more dwellers of the farm where we had landed – several sheep, a farmer, and his dogs – I pressed on towards the house with Bluey and Red behind me. Across the road, it seemed that two gangs – Roj Blake’s men and The Dirty Rats – were muy ocupado fighting each other, so we only needed to exchange a few rounds of fire from the crew of the Monsoon and Roj Blake’s men. Once it became clear that Wilson of the Monsoon had the same goal of saving the house, we turned our attention to taking out el señor Prosser, Blake’s men and the crew of The Dirty Rat. In a moment of gross misjudgement, I started one of the JCBs, hoping to drive it past the house and into Blake or one of his cronies. Having been some time since I drove an Earthmade machine, I ran over Red and ploughed into the back of the very house we were trying to save. Miraculously, the house remained intact and lost only some plaster and a window, and Red managed to dive out of the way in time. In this time, Wilson’s men had managed to dispatch el señor Prosser and The Dirty Rat appeared to have suffered many casualties.
Damn’ sheep !
I ordered those men who were not still engaged with the farmer and his vicious menagerie to try and finish off Blake’s crew, who were by now on the retreat. We left the scene with some loot, having lost only Black and White (que descansen en paz), and having brought Bluey back to make a full recovery, and we returned to the ship with 200cr having been transferred to the ship’s account. I can only assume our client shared the same job with the Monsoon and split our pay. Qué cara tiene.
Captain Gloria leaps into one of the JCB’s and gets demolishing !
The status of Arthur Dent remains unknown to us. Communications picked up by The Rhythm suggest he may have been in the pub. I only hope he is pleased that his house remains standing and that he doesn’t send us the bill for the repairs. We press on to the nearest inhabited outpost to recruit two new crewmen; but for tonight, we’re gonna party until we see the break of day. With this in mind, Rhythm: play ‘Conga’.
Two of the Rhythm’s crew advance.
CONTACT – attacked by a cow…
Farmer Maggert and his dogs appear, dangerously near to the Rhythm’s crew
ENTRY ENDS.
Captain Kersh Wilson (The Monsoon)
‘The only thing necessary for the triumph of evil is for good men to do nothing,’ said Captain Kersh Wilson to his first mate, a giant shaggy biomorph called Shoggoth.
Shoggoth grunted in response.
‘Get the crew ready,’ instructed Kersh. ‘Far out in the uncharted backwaters of the unfashionable end of the Western Spiral Arm of the galaxy there are reports that several planets are to be destroyed to make way for an intergalactic bypass. And no one has told the inhabitants or cares about what happens to them.
We have to stop this.’
Shoggoth looked at Kersh deeply. There were many things that confused him about this human, but his kind demeanour and generosity is what had drawn him to serve this gentle and philosophical mystic.
Kersh and his crew landed on the blue and white, industrial, planet with the intent of stopping its destruction. They had discovered that it was being led by a sinister individual calling itself Planning Officer Prosser – such tyrants always give themselves grandiose titles. His elimination was essential to stopping this wanton act of violence.
Kersh and his crew approached a small house across a field of wheat. They could see large yellow machines getting ready to demolish the building. The crew’s pathfinder, Aidan Kenver, could see a large packing crate so he made a dash for it, wondering if it might have data about what was happening – the crew had secured a data loot token.
Kersh and the rest of the crew diverted around the back of the building because they’d seen more equipment stashed there and began to wonder the same as Aidan. Mallia Bygrove, an ex-army sniper, took up position at the corner of a hedge to cover Kersh and the crew in case anyone tried to come around behind (as they came into orbit they picked up the warpdrive signals of three other vessels, presumably trying to selfishly loot the planet before its destruction).
They saw movement! They recognised an individual who they knew to be a member of Captain Gloria’s crew.
‘Stay over there and come no nearer and we shall let you go in peace,’ called Kersh.
They heard no answer.
But an answer soon came because this same individual entered the wheat field and opened fire at Kersh and his men! Fire was soon returned.
Wowbagger the Infinitely Prolonged attempts to serve Captain Wilson with his pre-determined insult (they shot him – doubtless he’ll be back).
Things got busier, because Mallia saw a couple of suspicious looking types beside an older, wooden, building with a sign outside that said ‘The Red Lion’, so to keep them at bay he gave them a warning shot.
More shooting could now be heard. Not only shooting, but the lowing and mooing of large bovine creatures. A robot came into view, a droid that Kersh had seen before amongst the crew of Captain Roj. This robot raised its gun and the sensors on Kersh’s Threat Detector sensed it locking on. But the robot’s aim soon passed and found a different target elsewhere. Nonetheless, the robot’s intentions had been made all too clear and there was no knowing whether it may or may not come back and take a shot. So Kersh called out to Yammet, a rapid-fire gunner, to take his weapon and destroy captain Roj’s robot. Yammet swung around and let out a terrible burst of fire and the robot crumpled into a mess of wires and burnt steel.
‘Captain,’ said crewman Rannock Crowder, ‘aren’t we getting distracted? Aren’t we here to stop Planning Officer Prosser?’
Rannock was right, and Kersh knew it. He drew out his lightsabre void blade and made for the target of their intentions, leaving troopers Zanford Schneider and Brynan Jones to keep up the fight with Captain Gloria’s crew.
The Monsoon’s crew approach from the rear of the house.
Meanwhile, the fracas between Mallia and this other mystery crew had escalated. More deadly fire was being exchanged. Kersh’s droid, 2B-55, had joined in as well. The enemy crew were getting fewer in number, so that was a promising start. However, someone had hot-wired a pair of the large yellow machines surrounding the house, so Kersh, Shoggoth, and 2B-55 had to be careful.
There was Prosser! With his back to Kersh, the wicked Planning Officer was surveying his work, cackling cruelly at all the mayhem and destruction. Kersh was tempted to just strike him down, but his training had instilled in him an honourable code, and so he declared himself to Prosser. This code of honour was not shared by the Planning Officer who promptly swung around and struck Kersh with his briefcase before running off. Just a temporary setback as Kersh recovered and, braving the fire from the guns of the other hostile crew, Kersh pursued the Planning Officer before cornering him and striking him down with his lightsabre. Sorry, his void blade.
There was still a lot of upheaval to deal with. Kersh could see he’d been wrong about Captain Gloria and her crew who, like him, were out to protect this primitive planet. It was obvious that Captain Roj and this fourth crew he’d never encountered before had other plans. Mallia Bygrove made his way up, ducking behind some bins and boxes, before taking aim with his sniper rifle to shoot the drivers of the yellow death machines. He could see crew members of Captain Roj behind a hedge who took shots at Bygrove, but they missed their mark.
Realising they were bettered, Captain Roj and his crew soon slunk off like the dirty wamp-rats they were. Whoever this other crew had been was now irrelevant because they’d all been overcome and were nowhere to be seen.
Kersh made for 2B-55, who had received considerable damage, to make sure his droid was still fit to move. The droid was in bad shape, but still operable. Time to head back to their ship, though Kersh.
‘Back to the ship. Back to The Monsoon,’ he called and he and his crew made off, satisfied they’d stopped Planning Officer Prosser.
Captain Black Rat (The Dirty Rat)
It became apparent right from the off that it just wasn’t going to be my day. As I pulled my crew proudly from their storage foam, I soon realised one was absent. Where was Ratchet the Robot? Ratchet is bigger than the average figure. It has protection is akin to power armour. But he wasn’t there. I borrowed a robot from Tony, but then I found I had this old sculpt, at least fairly heavily armed, in the box. Then I realised I didn’t have my “powers cards” either. They are copied from the rule book and stuck to card. They are a handy aide memoire. I missed them.
The missing robot and cards. Alas, poor Marcus.
My crew deployed from behind a pub. We might as well have gone in and had a few drinks. The approach might have been better if we did. I split my team, then got confused about who needed to be with what to benefit from the synergy of my powers. Then, “Oh look, I can see a robot approaching.” One of the J10 (Jeremy’s Blake’s 7 analogues, not a stellar equivalent of J2O from the aforementioned pub.) Time to use the “Control Robot” power. This failed (naturally), drawing withering fire from Jeremy. His approach had been more direct too, so he ended up grabbing more loot on this side of the table. Sadly, it took us some time to get over this spat and realise we were on the same side (as much as anyone can be in Stargrave!).
The crew of the Dirty Rat deploy in the car park of the Red Lion.
My mission stated that I really needed to find Prosser and get the keys. As Steve and Charlotte had their own little spat over who’s side was who’s, Steve also sent some forces toward the cottage.
Prosser randomly moved towards Steve and got into trouble. “We are on your side you bureaucratic twit!”. Both groups from the Dirty Rat were taking fire and I could not roll a defence die for a Syrtis Major toffee and peanut asteroid bar. While the Orange kid did make off with some loot, Captain Black Rat went out of action, swiftly followed by Harriet Barber (who strangely enough, might have felt at home in a B7 analogue crew…) and others too numerous to mention. No-one had a great day. Did I say no-one?
My hacker 01-V2 jumped onto a digger, hacked it and started driving for the cottage. Meanwhile one of the crew managed to grab the cottage keys from the flailing Prosser’s dying fingers and made for the door. The diggers were far from easy to control, as Charlotte had found earlier. The little droid tried to drive the digger into the cottage. Surely it must go down! No. Another try? No..and he got shot. Ratchet 2 jumped onto another digger, and was similarly challenged in the driving department. Nevertheless, we got inside to discover… that despite all that effort, the keys were keys to the hotwired diggers not the cottage. That summed it up for the game really’ as Ratchet 2 also went down, like the rest of the crew under a hail of critical hits that not even someone who can calculate their defence rolls properly could have survived. Fortunately, a number of end game rolls later I could lick just one wound and everyone lived…for another day.
Fortunately these two made it off and made it to the site.
JCBs in the garden of the house – Arthur’s car has taken a bashing.
Captain Roj Blake (unnamed starship)
The power armour check was passed, everything was loaded and the crew were ready to roll. The first surprise of the mission was that we landed in a green and pleasant land. There were green fields, trees and in the
distance a not particularly nice looking house. The mission brief was to find a Mr Prosser.
But my immediate problem was there were other crews present and mine was out in the open, so orders were given to get a move on and head towards the house. Making it to the other side of a large hedge, half the crew
were presented with a strange view. Charlotte’s crew was locked in battle with various creatures. This battle was to play out for a while, involving chickens, pigs, cows and dogs. So the crew took up position resting against a fence and taking in the show.
Blake’s crew approach the high hedge.
Meanwhile, the rest of the crew continued towards the house, only to be rudely attacked by Marcus’ crew trying to take control of robot Zen. Despite this attempt at control failing, the outrage was met in a suitable way with several hot projectiles. I’m pleased to report several hit and opened the score (appropriate given the target was next to the cricket pavilion).
Some of the Captain Blake’s crew cross the road from the cricket pitch.
However it soon became clear that the positions of the other crews meant getting to Mr Prosser was going to be impossible. Stephen’s crew were already approaching Mr Prosser while also exchanging fire with Marcus’ crew. And Charlotte’s crew had decided that despite losing to the local wildlife they would also fire on my crew by the fence. Marcus had also continued to poke round the pavilion providing a steady supply of target practice.
At this point there was a sudden change in the game. One of Marcus’ crew managed to get in one of the yellow diggers surrounding the house and was trying to get it to demolish the house. Charlotte’s crew had also prevailed against the livestock and managed to wound one of my crew. So I switched track and several crew made a dash with their loot while the remaining crew made for the diggers. And boy were those diggers hard to control. I never got close to the house and in the time I spent trying both Stephen’s and Charlottes crews were advancing on the house and I was taking fire. But you cannot say my crew wasn’t adaptable. It was time to grab the loot and make a run for it. Unfortunately one of my crew Jenna Stannis was shot in the back by Charlotte as they were retreating, and that’s where we left the other crews to it. It was a good day for loot but a bad day for the crew as, despite having an advanced medical suite on the ship, Jenna didn’t make it.
On the outskirts of Cottington – they don’t look like locals.
A quieter meeting this time, just three games in progress.
Paul and Colin staged a 2mm recreation of the Battle of Waterloo.
French advance covered by skirmishers
Mark J and Tony F were trying out ‘O’ Group with an early WW2 encounter between the French and Germans in 10mm.
German and French Infantry line the hedgesFrench InfantryFrench ArmourGerman ArmourGerman InfantryGermans push back the French right flank
And finally Stephen ran a Stargrave game, with a Valentine’s Day theme. Look out for the Captains’ unbiased reports in a blog post soon.
Some nere-do-wells in the streets of Verona on the planet RomanceThe mean streets of the west side of VeronaCarnage outside the pub.Mariah – the Angel, guarded by Captain Greyfax’s crewCaptain Reynold’s crew passing quietly down a back alley.All is quiet again in Verona
MWS meet on the 2nd and 4th Saturdays of the month (except the 4th Saturday in December) from 10:00 to 17:00 at Linton Village Hall, south of Maidstone on the A299.
Information about the Society, including directions, can be found here.
The diary of planned games can be found here, this is updated throughout the year so please have a look from time to time.
This was our third, and final, game in a trilogy of scenarios based on actions conducted by the 173rd Airborne in Vietnam.
This game was based around Operation McLain, where the US and ARVN sought to regain control over rural communities they lost during the Tet Offensive. The company was supported by their mortar teams and a firebase of 105mm howitzers dedicated to their operations, plus the possibility of air support from the US Navy. The mission was to locate and engage suspected NVA and VC units in the area.
The NVA comprised a reinforced company atop Hill 435 – three rifle platoons, plus company mortars, and a command bunker with the Company HQ consisting of the CinC, a mortar spotter with radio, plus a HMG. The US forces had advanced too closely on the hill and I could tell that if they requested artillery it would be refused due to proximity of friendly troops. This would cause them a lot of problems. But Cpt Smith wisely called artillery in on the reverse slope so he could walk the artillery in to position.
The VC were in position around the northern village and were an understrength local force company of three platoons. Lt Francis had the job of sweeping through the villages, something he’d also done in the previous game.
The area was not a Free Fire Zone, so authorisation was required for any support from artillery or air. The southern village was neutral, trying to keep its head clean. Whilst the northern village was firmly in the grip of the local VC who were using it to store war materials.
Airborne assault underway
Company Commander’s report of military Operation McLain in the vicinity of Da Lat June 1968.
Our company of 173rd Airborne was ordered to conduct a recce and aggressive sweep to the north of our designated LZ , clearing the two villages in the SE and the NE, taking Hill 435 and to locate and destroy any enemy we engaged. A US press team joined our company and for security reasons I decided they should be attached to the Company HQ.
The company HQ, the weapons platoon and press team made the first Heli drop in middle of the LZ and prepared to give fire to any enemy that may attack platoons 1, 2 and 3 as they came in to land in quick succession.
All platoons came in and landed without any interruption from the enemy. Platoon 1 (Lt. Francis) to the right of Weapons platoon and HQ’s position. Platoon 2 (Lt. King) to the left and Platoon 3 (Lt. Claridge) to the left, just behind and between HQ & weapons platoon and Platoon 2. Lts King & Claridge were ordered to advance their platoons with caution – hunkering down in cover at intervals – towards Hill 435.
Lt Francis’ platoon advanced cautiously towards the village to the SE. HQ and Weapons platoon advanced also.
Weapons platoon gives supporting fire
Hill 435 was likely to be heavily defended, probably by regular NVA. Enemy positions were soon located on the Hill and consequently our weapons platoon commenced to lay down heavy fire with
M60 machine guns and 75mm recoilless rifles with devastating effect. Our company mortars were called in to fall on the north sector of the hill. This was potentially dangerously close to Pltn’s 2 & 3, but with careful direction from our Forward Observer and myself the mortar rounds landed accurately on target. Lts King & Claridge were ordered to temporally halt and hunker down whilst our mortars hit the top of Hill 435.
Meanwhile, enemy mortar rounds started to fall in the vicinity of our HQ and Pltn’s 2 & 3. This seemed to be an enemy observed bombardment as the barrage was steadily moved to the north for several minutes which put more of our platoons in danger.
It was under this bombardment that Lts Claridge and King took casualties including one fatality. Lt King himself had to be medevaced out by Heli along with three other casualties. It could have been worse, but Lts King and Claridge had kept their men hunkered down which undoubtedly protected them from further casualties.
Weapons platoon about to take mortar fire
Casualties were also taken by the weapons platoon’s machine gun squad and unfortunately one of the Press team had to be medevaced out by Heli also. Our mortar bombardment of Hill 435 caused regular NVA to move down the hill into the fire from weapons platoon which caused heavy enemy casualties. The enemy mortar bombardment stopped abruptly and we at HQ realised that the enemy mortars and FO were probably on top of Hill 435 and were destroyed by our mortar barrage. I ordered our barrage to cease to allow Pltns 2 & 3 to advance up the hill. A squad from Pltn 2 skirted around the hill to the west to discover an enemy unit of VC irregulars.
Lt Claridge discovered an enemy bunker on the upper slopes of Hill 435. After 2 light assault weapons were fired at the bunker without success it was an M79 blooper round that went straight into the bunker through the slit and despatched it with a devastating explosion.
Weapons platoon about to take mortar fire
Navy Air support was requested to engage suspected enemy positions to the north of the hill but was not available at that time.
By this time, the weapons platoon was also engaging enemy units, which looked like VC irregulars, to their front and right front, again pouring withering fire into them from the M60s and the recoilless rifles. Lt King’s platoon, under command of an NCO as Lt King was seriously wounded and evacuated, engaged irregular VC on the slopes of the hill and around the north of the hill.
Lt Francis’ platoon searched and cleared the village successfully in the SE sector and advanced through the dense jungle terrain towards the second village. Despite comms problems, they engaged and routed more irregular VC to the North of the dense terrain area and eventually entered the village. Several enemy bodies were recovered along with a concealed arms cache.
All across our company’s front, the enemy completely dispersed, abandoning several bodies and equipment. The enemy bunker turned out be the NVA’s Company HQ and also contained a heavy machine gun crew which would have been lethal for Pltns 2 & 3 had they managed to open fire before the bunker was destroyed.
The company took relatively very light casualties and all the objectives were taken. Apart from the wounded Press journalist no further civilian casualties were observed or reported.
All in all, I’d say a very successful mission. Very well done gentlemen.
173rd Airborne and the USA are very proud of you all.
AAR – 1st Platoon (Lt A Francis)
As per company orders, 1st Platoon dropped in the SE corner of the LZ behind CoHQ. 1st Squad immediately moved to search the nearby village of Bien Na while 2nd and 3rd took up position along the road, covering the nearby jungle boundary.
1st platoon enters the village of Bien Na
Following the all clear from the village, considerable mortar and small arms fire began to be heard from the western side of the LZ where CoHQ and the other two platoons were engaging the enemy on the hill. 2nd and 3rd squads crossed the road and entered the jungle to flush out any enemy towards the village situated NE of the LZ.
At this point, a communications glitch hit the platoon. Radio comms within the squad went down and we also dropped off the company net for a period. I personally was with 2nd squad and managed to establish voice contact with 3rd, but contact was lost completely with 1st who, lacking further orders, held position in the SE village. I continued to lead 2nd and 3rd squads towards the northern treeline although progress was hampered by dense undergrowth and lack of working radios (game note – the umpire accidentally dropped 1st platoon’s activation card on the floor and it was missing from the deck for several turns – hence little activity from the platoon until it was discovered !).
Eventually the radio net was restored; I ordered 1st squad to catch up with the rest of the platoon at the double (since we’d already swept the jungle ahead of them they were able to move swiftly). The jungle was less dense on its northern edge and I took 2nd and 3rd to the treeline, and we spotted a VC platoon in the paddy fields between the trees and the other village. We immediately engaged them with all available firepower, reinforced shortly after by the arrival of 1st squad. Multiple enemy casualties were observed before the survivors fell back; a subsequent follow-up sweep confirmed at least 10 enemy KIA, all VC. The platoon suffered no casualties in return, as enemy return fire was sporadic at most.
VC troops engage 1st platoon in the jungle
Following the cessation of enemy fire, all three squads advanced to the NE village. 3rd squad on our left flank briefly engaged another VC unit along with the weapons platoon who were positioned to our west as we emerged from the jungle. The enemy rapidly withdrew under heavy fire, casualties unknown.
As all enemy activity had ceased at this point, the platoon conducted a post-action sweep of the second village, uncovering a VC weapons cache.
The last few VC about to break
AAR – 2nd Platoon (submitted by Platoon Sergeant R. Turpin 2ic 2nd Platoon, vice 2LT A. King WIA)
2nd Platoon was deployed by helicopter several hundred yards to the south of Hill 435, arriving between 1st and 3rd Platoons. Sgt Turpin with 2nd and 3rd Squads were in the lead, with 1st Squad, armed with an M72 LAW in reserve with the 2LT.
Initial orders from Co HQ were to advance cautiously on hill 435 in conjunction with 3rd Platoon.
On arrival LT King noted the lack of cover in the immediate area of the LZ and ordered the platoon to move toward the cover of some elephant grass between the LZ and hill 435.
During the advance 3rd Squad spotted hostile forces on the hill, estimated at platoon strength, and I passed this intelligence back to the LT. 1st Squad acted on this information laying down fire on the enemy position while the LT contacted the company mortar platoon to request support.
NVA 1st Platoon on the hill
2nd Squad hunkered down and fired on the hill, while 3rd Squad attempted to get into the elephant grass, but were slowed down by the dense grass, making little progress, however they did manage to lay down some fire on the hill. The LT and 1st Squad closed up at the double, the LT’s request for mortar support was denied as the platoon was considered to be too close to the point of aim.
The LT was now close enough to direct 3rd Squad to open fire, while he checked paddy fields to the east of Hill 435 for possible enemy activity, finding none. At this point the LT and 1st Squad came under enemy mortar fire, with PFC Houston KIA.
Shortly afterwards LT King was grievously wounded by the sustained mortar fire and needed to be CASEVAC’d.
Lt King injured by NVA mortars
As platoon 2ic I took command, and ordered a team from 1st Squad to evacuate the LT and PFC Houston’s body to the dust-off RV point. I ordered the remainder of 1st Squad to move to the west to try to escape the mortar’s beaten zone. 2nd and 3rd Squads managed to advance into the elephant grass and take cover.
2nd and 3rd Squads both engaged the enemy on the hill with effective fire, at least two casualties were seen to fall. The team from 1st Squad saw the LT and PFC Houston loaded onto the dust-off chopper and then re-joined the rest of 1st Squad.
US forces start to take casualties
With the LT out of action 2nd Platoon would be vulnerable to accumulated shock hampering movement and reducing the effect of their weapons.
Someone in the chain of command must have persuaded the Mortar Platoon to risk danger close fire as our mortars began to fall on the rear of the hill.
Elements of 3rd platoon to our east advanced upon the hill to discover a well concealed bunker with an HMG. I ordered 1st Squad to deploy their LAW in an attempt to destroy the bunker but the shot missed. 2nd and 3rd Squads were more effective, continuing to fire at the enemy on the hill outside the bunker inflicting more casualties which caused the enemy to withdraw rapidly.
3rd Platoon tried to take out the bunker with their LAW but also failed. One of their Squads had better luck as they appeared to get a grenade into the bunker, destroying it.
With the bunker destroyed by 3rd Platoon, 2nd Platoon’s 2nd and 3rd Squads advanced to search the vacated enemy positions flanking the bunker, finding 8 NVA KIA who had been abandoned by their comrades. We left evaluation of the bunker’s ruins to 3rd Platoon.
There was then a lull in the action (2nd Platoon’s card wasn’t drawn before the end of the turn) as the VC mortar’s fell silent.
NVA 2nd platoon comes off the hill to avoid US mortars
2nd and 3rd Squads advanced to the western side and crest of hill 435, but 1st Squad’s follow up was severely hampered by the elephant grass. 2nd and 3rd Squads could see some activity in the jungle to the north of Hill 435 and attempted to identify if there were any enemy forces present, but the results were inconclusive. 1st Squad made slow progress through the elephant grass.
After another lull in the action, 3rd Squad confirmed no enemy presence immediately to the north of the hill, so 1st and 2nd Squads continued their cautious advance. 2nd and 3rd Squads continued their advance across the hill, with 1st Squad still battling their way through elephant grass.
As they advanced 2nd Squad spotted a reduced strength VC platoon in the jungle to the north east of hill 435, 3rd Squad didn’t spot them and 1st Squad FINALLY got out of the elephant grass, only to encounter the jungle on hill 435!
US troops sweep across the hill mopping up stragglers
Following another lull in the action 2nd and 3rd Squads laid down withering fire on the VC platoon they had spotted earlier, causing 4 casualties and forcing the VC to withdraw. 1st Squad cleared the jungle and advanced in the clear area to the west of hill 435.
VC take cover in the rice paddies
At this point Co HQ confirmed all enemy forces had withdrawn, leaving the Company in control of hill 435 and the surrounding villages.
Post battle analysis confirmed an overwhelming military and political victory for free world forces.
Update: 2LT King was evacuated to Tuy Hoa field hospital where he was stabilised, awarded a Purple Heart, and subsequently flown to Walter Reed Army Medical Center, Bethesda, Maryland for further treatment. The NCOs and other ranks of 2nd Platoon wish the LT a speedy recovery.
It ain’t easy being a dust off pilot – you might lose your tail rotor
AAR – 3rd Platoon (Lt J Claridge)
As part of Operation McLain the company was sent to Da Lat for a reconnaissance-in-force, once again 3rd Platoon were going to arrive last to the LZ. This time the boss said everyone was to be at the LZ before we started moving out so we could bring our full weight against the enemy, this was a welcome plan given last time we went in hot, taking fire on the way down.
Embarking on the UH-1 transports we were en route when the CO confirmed his teams were in place and the other platoons were already deployed on the ground. Then everything changed, radio chatter confirmed 1st Platoon was checking out a local village, 2nd Platoon was advancing into the elephant grass at the foot of Hill 435, while M60’s of the platoon HQ were already engaging targets on the hill. So much for the plan, then the birds took a sharp swing towards the LZ to avoid the ranging shots coming in from enemy mortars, it was going to be another hot landing.
As 3rd platoon arrived at the LZ we were still under orders to hold until the full force was gathered. But mortar shells were already falling to our rear and there was intense fire being poured onto the hill. After a few failed attempts to get clear orders from the CO we decided to head towards the hill and get as much distance from the mortars as possible.
It wasn’t enough, 2nd and 3rd squads got caught in the barrage and were lucky to avoid any casualties. 2nd Platoon was making cautious progress towards the hill while 1st platoon was nowhere to be seen. The CO was in a fierce firefight with the enemy on the hill, but it seemed like they had the upper hand. We finally got conformation to ditch the hold orders and advance on the hill.
Despite getting out of the barrage 2nd squad came under fire from the hill causing a casualty that needed immediate evac. Still trying to avoid the mortar fire and seeing 2nd platoon hunkering down again rather than make progress towards the hill we decided it was time to move. 1st squad ran through 2nd platoons’ positions in the elephant grass and advanced to the base of the hill.
3rd squad rushed past the platoon HQ to the road junction near the hill, taking a shocking amount of fire but managing to avoid any casualties. There was still no sign of 1st platoon.
At last, we saw the first enemy units retreating off the hill and so 3rd squad rushed up the hill to flush more of the enemy out only to run straight into an enemy bunker. 3rd squad quickly hunkered down and radioed in the bunker’s location. Immediately two rockets flew over but to no effect, later 1st squad reported one was theirs, I guess the other must have come from 2nd platoon. With the failure of the rockets 3rd squad engaged at point blank range and the bunker erupted in flames.
3rd platoon takes out the bunker
With the bunker out and the mortar threat neutralised by our own supporting mortar fire we advanced off the hill to support the platoon HQ. VC could be seen retreating from the jungle opposite the hill, I guess that’s where 1st platoon got to, and from the fields next to the far village. Taking up position, we continued pouring fire onto the remnants of the NVA from the hill and the VC units. 2nd squad regrouped after their casualty was evac’d and joined in to support platoon HQ. The fight had clearly been taken out of the enemy, and we were ordered to halt as they dispersed. Looking forward for some R&R and buying 3rd squad some well-earned beers.
A Corsairs eye view
Final Word
I’ve really enjoyed playing these games and learning the rules as we go. But the thanks for that must go to Pete, Andy, Jeremey, and Tony, who all entered the spirit to create a great story and narrative to the games. I think Charlie Don’t Surf (CDS) offers a splendid take on the Vietnam War – we are used to seeing those 28mm games where a platoon approaches a village and takes some fire, but games at the level of CDS give more context to those encounters and more accurately reflect the experience of the Vietnam War where it was all about company and battalion actions rather than the platoon (a certain film from the 80s left us with that impression). A great set of rules that provide a very good game.
They will always remember the day the soldiers came…


You must be logged in to post a comment.