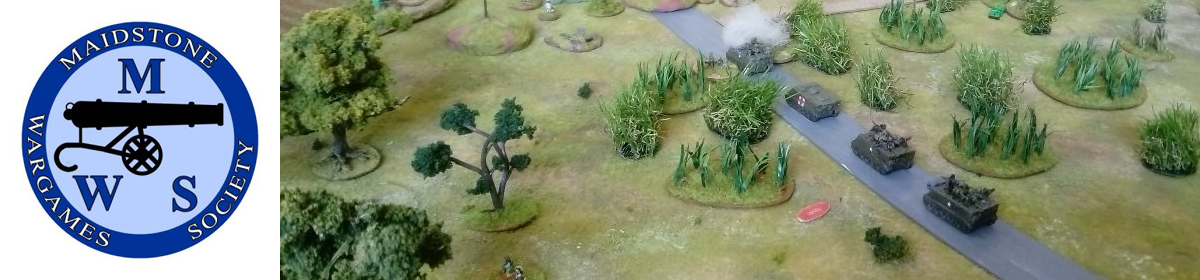
A small contingent from the society braved the roads (and rails) to Excel last weekend to stage Peter’s Fallujah 2004 game at Salute 50.
A view from one end of the Salute 50 hall to the other, MWS were at the far right end in this photo.
The premise of the game is that a USMC platoon have been tasked with clearing an area of Fallujah, sweeping through buildings to clear them of insurgents. The three participants each control one of the platoon’s squads, and depending on the draw of Fog of War cards may have additional assets to aid them in their mission, for example, helicopters, an M1 Abrams tank, a LAV-25 APC, a sniper team or a Navy Corpsman.
Games are intended to last an hour to an hour and fifteen minutes, and use a simplified version of Ambush Alley’s Force on Force rules. Figures are from Elhiem Figures Modern range, civilian vehicles from Matchbox or similar and buildings and terrain scratch-built by Society member Peter.
Peter and John explaining the finer points of the rules to the three volunteers.
Here are a few more photos of the game in action:
We were very pleased to be awarded a prize by the South London Warlords: “Best 10 – 18mm game”.
The game’s mastermind, Peter, receiving the award.
The trophy
Congratulations to Peter for creating an award winning game, and thanks to all members who have helped run the game at shows this year.
The game’s next appearance is at Broadside on June 10th.
Stephen and Andy report on a comparison of two Medieval rulesets.
We decided to try fighting the same scenario with two sets of Medieval Wargames rules, Lion Rampant 2nd edition and Baron’s War 2nd edition. We would keep the armies as similar as possible in the two games, subject to the requirements of the respective rules.
We based our scenario on the Baron’s War scenario 10 Hidden Treasures and Lion Rampant Scenario 12 The Taxman Cometh.
In Hidden Treasures the players take turns to place six objectives on the table, if a player has a unit in contact with an objective at the start of the turn, they roll a D6, on a 6 that objective is revealed to be the treasure and the other objectives are removed. Who ever controls the treasure at the end of the fifth turn wins the game.
For the Lion Rampant version, we kept the same number of objectives and score to reveal the treasure, but in keeping with the Lion Rampant Glory system we decided that if the player controlling the treasure took the treasure off table he would receive 5 Glory, but only 3 Glory if the treasure was under his control but still on table at the end of the game, plus or minus Glory from Boasts.
We set the terrain up with a small village in the centre of the table, with a couple of fenced fields nearby, with some hills and woods on the flanks. We would keep the same terrain for both games.
1 x Elite cavalry with leader (with Commanding trait) @ 6 points
1 x Flemish Heavy Infantry @ 4 points
2 x Skirmishers with bows @ 4 points
1 x Genoese Crossbows with pavises @ 6 points
1 x German mercenaries (Warriors) @ 4 points
Stephen won the die roll to determine Attacker / Defender and took on the nominal Attacker roll, the deployment mechanism we used was that the defender deployed any 1- or 2-point units, followed by the attacker doing the same, then repeating the sequence for 3- or 4-point units and finally units costing 5 or more units. The end of the game would be determined b either one player getting the treasure off table, or once there were five or fewer units on the table a die roll at the start of each turn of less than the number of units left on table.
Turn 1. Stephen got off to a good start, advancing all his units except his Elite cavalry, I responded by advancing my Heavy Cavalry to contact one of the objectives but ground to a halt when my Heavy Infantry refused to move.
Turn 2. Stephen continued his advance on the objectives, with one of his Skirmisher units on his left flank contacting one of the objectives. I rolled for the objective my Heavy Cavalry had contacted last turn, with no success, so decided to move my Heavy Cavalry on towards Stephen’s Skirmishers and their objective. I then moved my Heavy Foot towards the first objective, and my other units towards other objectives.
Turn 3. Stephen’s Skirmishers rolled for the objective they had contacted and it came up a 6 the treasure had been found! At this point all the other objectives were removed. Stephen immediately pulled his Skirmishers back and started to move his other units towards his left flank. My Heavy Cavalry were just about close enough to Stephen’s skirmishers with the treasure that I could try to charge them, hoping they would fail their probable Evade reaction. Unfortunately for me Stephen succeeded in evading, his archery taking out one of my riders, and his evade move took him just too far away for me to contact him, my Cavalry then failed their courage test and fell back. To add insult to injury, my next activation to shoot with my Skirmishers at his Elite Cavalry failed, ending my turn.
Turn 4. Stephen continued to pull his treasure carrying Skirmishers back towards his table edge, while he brought his Elite Cavalry across to cover them, and advanced his Heavy Foot through the central village towards my Light Foot. This time I managed to activate all my units, rallying my Heavy Cavalry, putting my Light Foot into Wall of Spears anticipating an attack by Stephen’s Heavy Foot, advancing my Crossbows down the side of the village hoping to be able to shoot at his Elite Cavalry in a later turn, and moving my Elite Cavalry towards my right flank.
Andy’s Elite Cavalry halted by a flimsy fence.
Turn 5, Stephen continued to pull back his Skirmishers with the treasure, with his Elite Cavalry getting closer to support them, as were Stephen’s Crossbows. I advanced my Heavy Cavalry towards his Skirmishers, and my Elite Cavalry through one of the fields, but my Crossbows failed in their shooting attempt.
Turn 6 was short, Stephen’s Crossbows and my Heavy Cavalry both failing their activation attempts.
Turn 7 saw Stephen issue a challenge to my Leader, a duel must be fought! Had I refused the challenge all my units would have had to take a courage test due to my Leader’s cowardice. Honour would not allow that, so forth my Leader went. The Duel consisted of three dice each, scoring hits on a 5 or 6, if one Leader scores more hits than the other the loser dies! The duel was anticlimactic, one hit each resulting in a draw, both leaders returned to their units, their honour upheld. Stephen’s German Mercenaries charge my Skirmishers on my left, the Skirmishers evaded, causing a casualty on the Germans, and ending up too far away to be contacted. The Germans passed their courage test, but on my subsequent turn my Skirmishers shot again, causing two more casualties and a courage test which the Germans promptly failed catastrophically, causing them to rout from the field. My Heavy Cavalry charged Stephen’s Crossbows, I won the ensuing melee and the Crossbows failed their courage test becoming battered.
Turn 8 saw Stephen’s Crossbowmen fail their Rally test, but he then went on the offensive, his Heavy Infantry charged my Light Infantry, beating my lighter troops, who then failed their courage test becoming battered
Andy’s Light Foot fall back battered (red marker) from Stephen’s Heavy Foot
Stephen’s Knights then charged my Heavy Cavalry with the fight again going in Stephen’s favour and my Cavalry failing their courage tests and also becoming battered.
Andy’s Heavy Cavalry battered and down to a single figure as Stephen’s Knights look on and Andy’s Heavy Foot advance slowly through a ploughed field.
On my turn both my Heavy Cavalry and Light Infantry failed their Rally tests, the Heavy Cavalry so badly that they fled the field.
Turn 9, Stephen rallied his crossbowmen and got the Treasure bearers off table, ending the game.
So, on to the accounting, Stephen received 5 Glory for getting the treasure off the field of battle, he also succeeded in all three boasts he made:
“They shall tremble before me”, 2 of my units battered at the same time, worth 2 Glory.
“I shall drive them back into the sea”, make one unit retreat off table, worth 1 Glory.
“I shall challenge their leader to a duel”, self-explanatory, worth 1 Glory.
On the other hands, I made two boasts, both of which I failed to achieve, so scoring -1 Glory each:
“They shall tremble before me”, see above.
“I shall destroy more units than I lose”, worth 2 Glory.
Final scores: Stephen 9 Glory, Andy -2 Glory. A decisive victory to Stephen.
Apologies for the lack of photos of this game, I got too tied up in fighting the battle to take pictures.
Baron’s War
Stephen takes over with the account of the Baron’s War game.
We put our retinues together to mirror the Lion Rampant equivalents, but under the army composition rules of Barons’ War – so not identical, but as good as.
Stephen’s Retinue:
Unit: 1 x Veteran Lord Commander (mounted), 5 x Regular Knights (mounted)
Unit: 1 x Veteran Serjeant Commander, 5 x Regular Serjeants
Unit: 1 x Veteran Serjeant Commander, 5 x Regular Serjeants
Unit: 6 x Veteran Bowmen
Unit: 10 x Green Crossbows
Andy’s Retinue:
Unit: 1 x Veteran Lord Commander (mounted), 3 x Regular Knights (mounted)
Unit: 1 x Veteran Serjeant Commander, 5 x Regular Spearmen
Unit: 4 x Regular Mounted Sergeants
Unit: 6 x Regular Crossbowmen
Unit: 5 x Green Spearmen
Unit: 5 x Green Spearmen
Unit: 6 x Green Bowmen
So, same scenario – find the hidden treasure and get off with it.
The main point of these games was to compare the rules. For Barons’ War a unit has one activation, but that can be improved to two, or maybe three, if you have a commander attached to the unit (and a commander can also give extra orders to other units). And in Baron’s War players alternate activation of units. This means there is a fundamental tactical difference between the rules – in Lion Rampant you are thinking about what you are going to do now. That’s also the case in Barons’ War (BW for short), but in BW you are also thinking about what your opponent is going to do in the same round, so you have to think about which unit is best to activate, whether to hold activations back for later (in BW your can do a reaction to your opponent’s action), and how the round will develop so you can exploit it. It’s a bit like Saga in that respect – knowing when to unleash everything and when to hold something back for later.
Off to war we go
Anyway, let’s get on with the game.
We rolled for deployment, as per BW rules. Andy was the ‘red’ side and could deploy in the middle, which he did and meant he was already in control of a couple of objective markers.
Andy’s skirmishers about to search an objective while his Crossbowmen look for targetsAndy’s light foot gather round two more objectives, while his Cavalry trot off
I had the flanks to deploy on, not quite in control of any objectives, but no more than a move away.
Venison tonight lads!
Turn one, and Andy searched the objectives, but no hidden treasure was found. My veteran archers on a small rise took aim and let fly at a group of mounted serjeants – two went down to the deadly fire and first blood went to me.
Ready, aim…
Andy then passed a couple of activations, so I took advantage of this to move units up to take control of a pair of objectives. My crossbowmen (only inexperienced green troops – in BW at least 10% of your army has to be made up of green troops) let rip at Andy’s archers hiding beside a pig-pen. Two were taken down, he failed his morale check and they were broken. However, Andy then returned the gesture, fired back with his crossbows, and three of my troops went down and were also broken. Oh well, eh?
On the second turn my spearmen on the left searched the objective marker and lo and behold, what do they find – treasure! Yup, more church vestments. Funnily enough, the treasure in the Lion Rampant game was found in more or less the exact same spot!
The chase was now on. On Turn three I started to move my spearmen toward the table edge. And this is where the tactical nature of BW may have a slight edge over Lion Rampant, because at the start of the turn both sides roll for initiative to see who goes first. But also (and like Lion Rampant) you have to do compulsory morale checks before moving on to ‘new’ activations. Which means you can’t necessarily guarantee you will move those troops you need to move before your opponent. This builds in tension, tactics, and what makes for an exciting game. In turn three I also did what I think may have been a rash move – my knights charged Andy’s spearmen. Knights do though, eh? That’s why they’re knights. OK, so I demolished and shocked his infantry, but I’d also put myself in charge range of his knights and I had no reactions left.
The knights square up
Andy did what he ought to do – his knights charged mine. It did not go how I would have liked. It took a couple of rounds, but my knights eventually succumbed.
Such an ignoble ending
This also left the game in balance. Because at the end of turn five (the duration of the scenario) I had achieved the scenario objective – find the hidden treasure and get away with it. However, Andy had also achieved the general game-end criteria – kill your opponent’s commander (and none of your other commanders pass a morale check to take control). So, who won? We’ll have to leave that one to the chroniclers.
Let’s rumble!
Final thoughts. For me, it is hard to choose between the two because they are so different. Lion Rampant is a quick pick-up game that anyone can jump into and get the hang of in just a turn or two. There is a lot of merit in that. BW requires a little bit of pre-planning (working out and putting together a suitable retinue), but it’s also a more tactical game which means it will take longer for a newcomer to pick up and appreciate the subtleties. No, not more complex, but more subtle. Of course, that’s not to say there are no tactics to Lion Rampant (there are!) but Lion Rampant does lack the depth of BW. Personally, I couldn’t choose between the two. Lucky me that I don’t have to. There is a place for both depending on what you are after for a game – sometimes I want that simplicity and quick ‘pick-up’ nature, sometimes I want a more challenging and thoughtful game. Lucky me that I have both on my bookshelf and can choose depending on my whim. If you are interested in medieval wargames then I’d suggest you have them both as well, because I can’t pick one over the other.
Back to Andy for his thoughts on the two rulesets.
I should open by saying I have played Lion Rampant, and other rulesets in the same family, for many years and am very familiar with them, whereas I have only played Baron’s War once or twice before. This may have an impact on my assessment of the two sets of rules. Both sets of rules have a small-ish number of unit types to start with, and both allow you to upgrade / configure units but Baron’s War has more variety in the options you can apply, and a couple of limitations on force composition, a minimum of 10% of your points must be spent on Green troops, and no more than 50% of your force can be used for units with attached commanders. Lion Rampant has fewer, simpler, upgrade options, and no mandatory requirements for force composition.
I would say that Lion Rampant is the easier game to pick up, but Baron’s War can probably give you more variety in force composition. It’s a “horses for courses” kind of situation, and there is room in my gaming calendar for both rulesets.
A photo round up of a lively Society meeting- November 26th
First up we have Mark J’s rather impressive Judge Dredd game.
The bright 1980’s colour palette worked very well for the game.
The game consisted of a Block Gang, a group of Mutants, the Citi Defence and some Judges. Highlights of the game were apparently the Citi Def taking out most of the Mutants with their rocket launcher and Mean Angel turning up and headbutting Judge Death!
Next up Jeremey and Tony F had a Full Thrust battle.
To spice up the game up we used some house rules that meant each turn players would have a random number of their ships turn up from a random side of the table.
The battle went all Jeremey’s way at the start but Tony F fought back to make it a very close defeat.
There was also the regular FoG game, a more relaxed affair after the previous meetings FoG competition.
Some brightly coloured knights are about to make an impression.
And the last game on the day was an ACW game put on by Stephen.
Using the Fire and Fury rules John L, John R and Pete M took command of the Union with Tony G and James the Confederates.
There were some notable actions in the game including a wild charge by James’s Confederate cavalry but it was not enough to stop the Union carrying the day.
Stephen reports on a solo game using Song of Blades and Heroes
Apologies from the editorial team, we messed up the publishing schedule.
It is the year 1266. The Baron’s War, led by Simon de Montfort, is at an end – de Montfort and his supporters were beaten decisively at Evesham the previous year.
Since then, not all has been lost. Many of those still devoted to the cause, though dispersed and leaderless, still resist King Henry’s rule.
We find ourselves somewhere in the hills overlooking the Wye valley, early autumn, 1266. A young and idealistic knight, Sir Hugh Bolton, a loyal follower of de Montfort’s, has been lying low on the Welsh border, as have so many of the rebels.
Sir Hugh has received word that another rebel knight, Sir William le Bleu, is also in the area.
Together, they have decided to meet at an isolated traveller’s inn – Woodfell Hall – high above the Wye valley. As night falls, the two knights and their accomplices make their way to their secret rendezvous.
However, what Sir Hugh does not know is that Sir William is not all he seems. His real name is Sir Peter of the Wash, and he is a loyal retainer of Prince Edward! Sir Peter has been sent on a mission by the prince to seek out rebels hiding in the marches and either arrest them or, better still, kill them!
With Sir Hugh is a knight companion, Sir Aymer, plus four experienced men at arms and another four archers – all veterans of Evesham. Sir William/Peter is also not alone. Prince Edward has sent with him two other knights, Sir Fulkes and Sir Gilbert, plus a troop of five spearmen led by a man at arms, and three crossbow-armed sergeants.
Sir Peter’s Men Arrive On The Scene
The first couple of turns were quite quick, with each side only managing to activate one or two models. Sir Peter gave an order to the crossbows to advance up the road, but then the spearmen (presumably tripping over something in the dark) failed. Similarly, Sir Hugh attempted to get his retinue to head down the road toward Woodfell Hall, but only the archers made it.
Sir Hugh With Archers Up Front
It was a slow initial advance.
Things changed for Sir Peter though – he made a group activation of the crossbows again, and they rolled three successes, meaning they could take three actions. They double-timed down the road, coming up to Woodfell Hall, and seeing Sir Hugh and his men further down the road, raised their crossbows and let fly!
The Spearmen Start To Move
This obviously took Sir Hugh by surprise. But fortunately for him (well, those who had been targeted) the shots had no effect. Two can play at that game, thought Sir Hugh, and he ordered his archers to return the gesture. But since the archers, like the crossbows, had been shooting at long range the effect was the same – no hits.
A Volley Of Arrows
The pace soon picked up.
One of the crossbowmen climbed up the side of the inn to take position on a veranda where he could snipe.
Mmm…Wonder If I Can Climb Up That
Meanwhile Sir Peter tried to give more group orders to the spearmen to bring them up in support – his encouragements worked this time.
Sir Hugh’s men also started pouring into the battle. The archers came up to the road junction, formed a line, and let loose. This was a much better tactic – one of Sir Peter’s crossbowmen was struck, and not only struck, but hit with a gruesome shot! Down he went with blood shooting all over the place from the arrow that had severed his jugular. This caused a morale check amongst Sir Peter’s men. The knights held firm, but the tardy spearmen all fell back a little, not wishing to be the next ones to suffer such a terrible fate.
Lying In A Pool Of Blood With An Arrow In The Neck
The remaining crossbowmen showed they could do just as well. Raising their weapons, they took aim at two of Sir Hugh’s men at arms. Both bolts hit home – one of the men at arms fell down dead, and the other was knocked down with a bolt sticking out of his thigh.
One Knocked Down (face down) One Killed (face up)
Sir Hugh got the rest of his men going, urging them to advance through the scrub and bushes that ran alongside the road. The archers drew their arrows again and had another go.
And the same thing happened!
Down went the crossbowman hiding on the veranda, another gruesome kill! This left the remaining crossbowman feeling nervous and, with his morale faltering, he made a run for the rear before an arrow found him and left him a messy, bloody, heap like his friends.
Blood Drips Into The Water Trough
All this missile fire was well enough, but both sides were keen to get stuck in with sword and shield and sort this out the honourable way. Sir Hugh and one of his men at arms had been using Woodfell Hall for cover as they advanced, and the others had moved through the bushes, which meant they had the drop on Sir Peter, whose retinue had stalled under the effectiveness of the longbows.
By the horse troughs outside the inn is where the two sides finally came to blows.
The Melee Starts
The archers tried to stand back and get in a shot where they could, but in the darkness it would be reckless to shoot into the melee. Sir Peter barked out his orders to the spearmen to urge them forward into the melee, and his knight companions also came into the fight.
It was turning into quite a mess. Sir Hugh’s force was split into three – Sir Hugh with one of the men at arms coming down the road, Sir Aymer with another man at arms coming through the bushes, and the archers waiting to take a shot at any target that presented itself.
More Knocked Down Than Killed
Meanwhile Sir Peter’s troops were more consolidated, though this had been more by accident than design. But what this meant was that one of Sir Peter’s men knocked down one of Sir Hugh’s men whilst another was able to come up and finish them off as they rolled around on the ground.
More Killed Than Knocked Down
Then the telling blow happened. Sir Hugh and Sir Peter faced off against each other, and in only a brief exchange Sir Hugh was knocked to the ground and then Sir Fulkes came up and struck Sir Hugh the killing blow!
The fight continued for another couple of rounds, but it was obvious the rebels had been beaten. Realising their cause was lost the remaining rebels made a break and ran.
Sir Peter and his retinue had come out the winners. They had earned their blood money.
At our recent Open Day I ran a 6mm sci-fi game using the Hammer’s Slammers:The Crucible rules. I created a lot of new desert terrain for the event and thought I’d write up some of the methods I used to create it. If you want to read about the game itself, there’s a report on the Hammer’s Slammers website with lots of photos of the game in action.
Sacred Sands
One major component of almost every item of terrain is the ground texture. I used a mixture of sand (bird cage sand from a pet shop), household emulsion paint and PVA glue in a ratio of roughly 3:2:1. I had a litre of paint mixed by my local B&Q to match Army Painter’s Skeleton Bone spray paint (I sprayed a small square of plastic card which they stuck in their scanner) for a very reasonable £18. I made up batches of the ground texture mix in an ice-cream tub so that it was always ready to go – and after building all of the terrain below I have about 2/3rds of the paint left.
Once dry, the ground was washed with a decent coat of Citadel sepia shade, then drybrushed with Citadel Tyrant Skull. This pretty simple method gave me a quick to apply, good looking and consistently repeatable ground texture.
I scoured eBay for suitable grass tufts in various sizes and shades of dry grass and found a good pair of sources in Boontown Metals and Serious-Play. These were used sparingly, the desert was supposed to be arid.
Happiness is the Road
The roads were made them from Busch model railway roads, which are a sort of very thin self-adhesive foam with markings printed on in white. The two-lane roads were 40mm wide, maybe a little overscale but some sci-fi tanks are pretty big so they look fine. As a base I used 3mm sheets of black Foamex – this is less likely to warp, as card or MDF is prone to. The edges were roughly bevelled with a knife and textured. I made some T junctions and crossroads by butting up sections of road surface and drawing in the road markings with a white acrylic paint pen.
2-4-6-8 Motorway
I had visions of making a big four-lane highway for a couple of reasons – firstly, it would be an impressive large terrain piece, which 6mm scenery can sometimes lack, and secondly it would cut down lines of fire and prevent heavy tanks dominating the battlefield and being able to fire from one side of the table to the other (heavy tank guns have no maximum range in Hammer’s Slammers). The motorway was mounted on 2″ thick insulation foam – I used normal white polystyrene, pink or blue foam would have been better but I already had the polystyrene to hand. This was cut into four 8″ wide, 18″ lengths with a hand saw – do this outside, it makes one heck of a mess! The edges were then bevelled at a 45° angle with a hot wire cutter resulting in a 4″ wide plateau. I ran two lengths of Busch roads down either side of this plateau, leaving a narrow central reservation. The edges and centre were textured as normal, and I put in a small piece of tiled plasticard in each section – the intention with this is so I could put in road signs at some point, although I haven’t done that yet.
One length was cut in half, and one end of each short length bevelled to match the sides. I scratchbuilt a simple bridge from plasticard and Plastruct girders, which was long enough so that one of my normal two-lane roads could pass underneath. The bridge was made so that it could be lifted out – this was for two reasons; firstly, I thought that attaching the bridge to the two end pieces would be too fragile, and secondly it gave me the option to add a destroyed version later.
I’ve learnt in the past that linear obstacles need more than one crossing point, otherwise you end up with a nasty bottleneck and the whole game ends up revolving around this one point. So I used the hot wire cutter to make two tunnels under the roadway – one larger one which is big enough to take a road, the other smaller one which is big enough for infantry on foot or small vehicles. For the larger one I used a piece of plastic cable trunking to make the concrete tunnel, the small one was made from plasticard. This left three crossing points so gives the attacking side more options. The sides of the embankment are rather steep, too much for heavy vehicles, but I allowed light vehicles (jeeps and infantry skimmers) and infantry on foot to climb them as if in bad going.
Houses in Motion
All of the buildings are from Brigade Models’ various desert-themed resin scenery ranges. I stuck them on more 3mm Foamex with Uhu glue and textured between them with the usual mixture. The buildings were sprayed with Army Painter’s Skeleton Bone, washed with Agrax Earthshade (GW) and drybrushed with Terminatus Stone (GW again). To add a splash of colour, doors and details were painted using GW Contrast Paints which give a decent effect in one coat.
One of my main sources of inspiration for the look of the buildings was the various Star Wars stories set on Tatooine. One standout feature of these is the fabric awnings across the entrances and frontages of many of them. I tried to replicate this using pieces of textured paper hand towels (some nasty thick industrial ones that don’t so much dry your hands as redistribute the water…) which I soaked in watered down PVA and strung across paperclip wire supports. Once dry I used Contrast Paints and drybrushing, often matching the awning colour to the other spot colours on the buildings.
I put some buildings on sections of road which allowed me to do some more interesting things such as a footbridge that passed over the road, or parking bays/side roads. The obelisk outside the tower below comes from Brigade’s 2mm range.
The objective of the game was to capture a series of radar stations that controlled the approach to the nearby starport. These all came from the Brigade range including several with ‘golf ball’ style radar enclosures and another tall tower with a radar on top. I added extra small buildings to the bases of some.
The Temple of Doom
I had a ruined ancient temple that had been cluttering up my office for ages – it was an aquarium ornament picked up from a pet shop. This was stuck on a small polystyrene hill with ramps and steps up to the summit. I repainted it in the same way as the other buildings. I discovered that the resin was rather fragile – it had an accident that lowered the heights of all the columns at one end…
Hanging on the Telephone
I scratchbuilt some simple telegraph poles using lengths of cocktail stick and short pieces of plastic strip for the crossbars superglued together, based on 20mm wooden discs from The Works. Ground texture, a single coat of brown contrast paint and a quick drybrush and they were done.
We Got the Power
In a box in my shed o’ stuff I unearthed three 3D printed power pylons, bought back in the days when they were still a sensible price on Shapeways. These were duly stuck on Foamex bases, sprayed with gray primer and drybrushed – again, job done and some welcome height added to the board.
Blood on the Track
A monorail ran across the town, made from Brigade Model’s elevated track and a selection of freight wagons. The pylons were based on 30mm wooden discs and the track was painted in the same way as the buildings. I initially painted the track silver and washed it but that made it too dull, so I went over the rail again with a silver paint pen to make it brighter.
And finally, a few shots of the game on the day. The Slammer’s Regiment (silver hovertanks) were mostly painted by Jon Roche, the Zaporoskiye Regiment in their superb green/white/brown urban camo’ were painted by Mark Johnson. The blue tracked vehicles are Guardforce O’Higgins, painted by me.
One of our newer members, Eric, reports on a What a (Grav) Tanker game run by Marcus at a recent meeting.
Today I was fortunate enough to play a modified game of “What A Tanker“. Rather than use the original rules published by “Two Fat Lardies”, my opponent and host, Marcus, had adapted them for a sci-fi setting. I was advised from the off that it was a “beer and pretzels” game aimed at having fun and rolling dice rather than anything with any complex hardcore mechanics and depth. Marcus explained that what we were playing was still very much a work in progress and had only ever played in solo mode. There were kinks to iron out and rules to be tweaked, but what he has done with it so far worked well. I get the impression that it’s not meant to have the scope of some small-scale future skirmish games (e.g., Hammers Slammers) – troops and heavy weapons weren’t present in our game. Maybe that is something that will appear later as Marcus works on the rules.
The original Lardies concept is a one-to-one ratio with multiple players fielding one tank each, and in an ideal situation you would have more than two players. However, Marcus’ adaption allows for two players with an increased unit count and the ability to scale up/down players/tanks if desired. As this was essentially a play test, we had several tanks each to command and the rules would be fluid and subject to change as we went.
We used 15mm tanks – the main battle tanks (MTB’s) were a combination of Old Crow miniatures tank chassis with Brigade Models Rapier MBT turrets.
The wheeled, light tanks were Ground Zero Games Paladin II models.
To add to the atmosphere (and create interruption for lines of site), there was some truly brilliant scratch-built scenery supported by alien flora, which looked suspiciously like plastic home aquarium plants (something that was used in Marcus’ sub aqua game). You can have a house point if you can figure out what the basis is for the 15mm buildings.
The rules were quite simple and easy to pick up. Each tank generates a dice pool which in turn is used to generate power that is allocated to different functions – movement, firing, shields, repair and so forth. This provided a level of complexity which meant that it wasn’t just rolling dice and saying “BANG! Your tank’s been destroyed”. Management of the power available to you is an important factor in making effective use of your tank and how it operates. The dice rolled at the beginning of each activation also determine what actions you can perform, with a wildcard number being available (should you generate one) which could be used to facilitate any one of the other functions. For example, you might generate the numbers needed to acquire a target, aim, fire and reload, but not necessarily move. Clearly this is a hindrance if your enemy has snuck behind that abandoned generator shed with the annoying graffiti, and you can’t get a clear shot. This is where the wildcard can be used to perform any of the prescribed game actions. At this point, you would logically trade it for the opportunity to move your tank to get a better shot. The same can be said for any of the other actions that you might need to perform. The wildcard number can also be used to repair non-critical damage.
Unlike other games that rely on a move -> shoot -> melee formula that you don’t normally deviate from, you can issue the commands for your tank in any order you choose. Instead of moving, aiming and firing, if you’ve already acquired your target and have line of sight, you could fire, then move away and reload. This of course, all depends on the previously mentioned power that you have generated via the dice pool and how you have pre-assigned it to different functions.
Let battle commence!, Game 1.
For our game, I was given command of three Paladin II wheeled units whereas Marcus had two heavy/MBT’s. Whilst the heavier tanks looked like they had the edge, we were in fact quite well balanced by me having three units to his two.
We deployed either end of the table with the intention of getting close enough to acquire each other as a target and then aim and fire. All the time, lines of sight were hampered by the local vegetation and buildings, making it tricky to get a bead on one other without exposing ourselves to a barrage of shells/lasers/railgun rounds.
After a while of getting used to the rules (for my benefit) we managed to engage in combat with one of my Paladins taking a couple of hits from Marcus’ MBT. Damage comes in two forms: critical and non-critical. Both types strip you of dice from your pool. If you were to have five dice in your pool and you took two hits; on your next activation, the dice pool would be reduced from five to three. Critical hits can’t be recovered from; these represent non repairable damage, but non-critical ones can. In your next activation round if you generate a wildcard result, it can be traded to remove one non-critical hit, thus restoring a die to your pool. Without those dice it’s a lot tougher to generate the actions you want and provide the power for them each turn.
After several turns of skulking through the undergrowth I finally managed to get into position and land a good couple of solid hits on one of Marcus’s MBT’s. He fired on me but with power management points applied to the shields, I successfully negated any damage he would have caused. The subsequent turn, I trundled into a kill position and finished off the already crippled MBT. This awarded me a special card which could be used in that game or saved and carried over to a future skirmish.
As it looked like our game would turn into one of cat and mouse between Marcus’s remaining tank and my Paladins, we decided to end it there.
The red Paladin takes down Marcus’ MBT, drawing the first game to a close
As there was still time on the clock, we decided to play a second game.
Game Two
This time Steve and James joined me, so we had a Paladin each, while Tony joined Marcus controlling one of the two MBT’s. The scenery set up remained the same and the deployment as was as the last time, with both teams starting at opposite ends.
James took the left flank, Steve, the right and I went down the middle. Tony had managed to work his MBT into a spot where he could snipe on me and stripped away a couple of dice worth of power which made my next activation extremely difficult. It wasn’t long into the game though before we had our first casualty, me! Trying to shield myself next to a building did no good and a second round of firing from Tony reduced my tank to a burning wreck without me even getting a shot off.
Smoke billows from the blue Paladin after receiving catastrophic damage from Tony’s MBT
Meanwhile Steve moved up the right-hand side of the table exchanging fire with Marcus whilst James tried to outmanoeuvre Tony. Steve took some hits which would have meant he was seriously compromised but managed to recover all the damage he had suffered (including any critical hits) with the help of a special play card. Unfortunately, he subsequently succumbed to fire from Marcus, meaning the MBT’s were in a superior position and dominating the battle, leaving just James to try and slug it out with the two MBT’s on his own.
Steve attempts to take the right flank – Marcus’ MBT is just out of shot
James, still on the flank, his Paladin now damaged and functioning at 80% capacity, managed to get into position which gave him a clear shot at Tony. A hail of fire destroyed Tony’s tank, while Marcus looked for a firing solution against James. Marcus fired, but the shells glanced harmlessly off the Paladin thanks to some wise use of power management to his shield. With only Marcus left and in a clear line of site, James reciprocated Marcus’ salvo after winning initiative. The hits were enough to cause some non-critical damage but with the help of a special play card earned from taking out Tony, James’ shells found a chink in Marcus’s armour and truly ended the battle with a bang and winning the game.
James’ Paladin makes its way up the left flank
I’ve deliberately neglected to include some of the rules that were used – for brevity’s sake and because it’s Marcus’ project it’s undoubtedly subject to change.
I can say in all honesty, I look forward to Marcus getting the rules fully realised and written up as this makes for a great pick-up game, with more subtle complexities than would first appear. With the planned revisions that he has this has all the markings of being a great little game. It’s certainly made me want to buy some 15 mm sci-fi tanks now!
John (well, one of our Johns, we’ve got a few) reports on the Spanish Civil War games he ran at our recent open day.
Crossfire is an innovative ruleset for World War 2 concentrating on infantry actions for Company level. There are no fixed game turns and no rulers, the player with initiative moves squads (bases) from terrain item to terrain item. As the squad moves, it can be subjected to reactive fire from the opponent and if suppressed the initiative is transferred to the opponent. Small arms range is anywhere on the playing area so doesn’t need to be measured.
The game is terrain intensive and true to form the pieces were ready at the 11th hour.
During lockdown a series of mini scenarios had been published on Stephen’s Bagalan website based on a 2ft square board, each scenario lasting about an hour and Open Day seemed an ideal opportunity to try out the rules. I’d last played Crossfire in 2005 and having painted some Peter Pig Spanish Civil War figures was keen to give the rules another go.
Each scenario begins with the same forces:
Defender
One platoon – three rifle squads, a platoon commander, a heavy machine gun, a small on-table mortar and a sniper. There is a forward observation officer for an off-table mortar and a minefield. The defender deploys his troops hidden.
Attacker
Two platoons – each of three rifle squads and a platoon commander, plus a heavy machine gun, an Engineer rifle squad, a small on-table mortar and a forward officer for an off-table infantry gun. The attacker deploys on table and starts with initiative.
During the day we managed to play three scenarios, so how would two relative beginners get on?
Scenario 1 The Woods
The attacker used 6 fire missions from the off table infantry gun to lay smoke screens which prevented the defender targeting a platoon which was used to attack the defender in the flank. The further use of smoke and close assault eliminated outnumbered squads. It proved to be a convincing win for the attacker though the defender was hampered by the placement of the minefield and some unfortunate dice rolls.
In the woods conclusion
Scenario 2 The Hill
This was a much closer game where the attacker got bogged down and made some poor tactical choices. The two woods closest to the hill were selected as jumping off points. In the rules there is a tactic called ‘recon by fire’ where the attacker fires at a terrain item hoping to flush out hidden defenders. Failure to employ this meant that the two attacking platoons got bogged down with pins and suppressions. The attacker hesitated to eliminate a revealed forward observer and paid the penalty when one of the platoon commanders was killed. The attacking platoons were recovered under smoke before the hill was finally taken. Again, better placement of the minefield would have proved costly for the attacker.
The hill conclusion
Scenario 3 The Town This was over very quickly and immediately afterward we wondered whether the scenario was unbalanced.
For this scenario the attacker had checked out ‘recon by fire’ and used this tactic to great effect. The forward officer for the off table mortar was quickly located along with a supporting squad. Under cover of smoke the church where they were hidden was assaulted and they were eliminated. The defender’s on table mortar suppressed one squad but was itself eliminated when the initiative changed. Hidden squads and empty buildings were identified by ‘recon by fire’ then assaulted under cover of smoke. Short and brutal. In retrospect, the defender had deployed his forward observation officer in an exposed location and it’s early elimination made the game easier for the attacker. Perhaps the defender should have deployed the minefield in front of this building to slow the advance.
The town conclusion
Conclusions The game has a good flow where the players have to think about tactical options as the game unfolds and by the end of the third game we had a good grasp of the infantry rules. It appeared to be easier for the attacker and it would be good to replay these scenarios with different ideas for defender deployment. The game proved interesting to other club members and I’m sure that further reinforcements from Peter Pig will appear in coming months.
It had been a while since I’d had a game of Outremer, so I decided it was time for a quick bash.
Although the rules are set during the Crusades they also work as a generic set of medieval skirmish rules. So my games are set during the Barons’ War of the 1250s and 1260s.
I played the hostage scenario in the rules. Young master Perkin Adlington had been kidnapped by the dastardly knight, Sir Giles of Gretchley. No doubt taking advantage of the upheavel during the rebellion and hoping to make some money off the ransom.
Sir Richard Adlington, with his closest bondsmen, set off in pursuit to rescue the young lad. After two days in the saddle, following trails and clues, they finally found Sir Giles and his men. Dismounting, they made their way on foot through the woods to snatch Perkin and take him back home to safety…
The table was only a small one – 2’x3’. The two opposing sides had six men each.
With Sir Richard Adlington was his household knight, Sir Gieffroy de Metz plus Jarrard and Remon la Vielle (a pair of crossbowmen, and Will Fuller and Wilf the Strong, sergeants at arms.
With Sir Giles were Berwick, Ailwin Smith, Keaton Taylor, Pasquier l’Espee, and Burne Brewster.
The table was set up with woods and a couple of hills. On one side of the table was Sir Giles’ camp where Perkin was being held. Under the rules of the scenario, the hostage can not take an action all the time there is a guard within 4”. So Keaton Taylor was detailed with keeping an eye on Perkin. The two crossbowmen, Pasquier and Burne, took up sentry positions on the hills over-looking the approach. This left Sir Giles with Ailwin and Berwick to relax in camp.
Sir Richard led Jarrard and Will Fuller from one corner, and Sir Gieffroy led Remon and Wilf from the other – so they could make a two-pronged approach.
Battlefield and deployment
The game started. Turns take place with a pack of cards. Each character has a card in the deck, these are shuffled, and one card is drawn at a time. When a character’s card is drawn that character completes all its actions and the next card is drawn.
Sir Giles took his men through the woods, to stay in cover. And Sir Gieffroy did the same. Pasquier and Burne, armed with crossbows and away from the camp and away from the boss, sat in the bushes enjoying a bit of peace and quiet.
Burne Brewster settles down for an easy day
Jarrard skirted around the sides of the woods, hoping to sneak up on Burne He took his time, ensuring he stayed hidden for as long as possible. Then he loaded his crossbow, levelled it at his target, and let fly.
He missed.
This made Burne jump and sound the alarm. Roused, Sir Giles and Ailwin made their way over to Burne. Berwick moved toward Pasquier, in case there were others about. Perkin soon perked up as well, but Keaton kept a firm hold of his charge.
Jarrard readies his crossbow
Sir Giles and Ailwin picked up pace and made their way over to Burne as fast as they could. Burne loaded his crossbow and took aim at Jarrard, to return the favour. Except this time Burne hit, and Jarrard went down with a bolt sticking out of his chest. This meant that Sir Richard and Will would have to charge in quickly or else be subject to sniping shots from Burne’s crossbow.
The alarm is raised
Over on the other side Remon had now moved up into a good position where he could see Pasquier on top of the rise behind the bushes. He let a quick shot out that hit its target but did no damage – Pasquier’s armour saved his skin. Taking good hold of his gigantic sword, Berwick stood alongside Pasquier to see what was out there.
Sir Richard and Will strode forward to push the attack against Burne. As they approached, Burne ducked down behind the bushes trying to reload as quick as he could. But as they advanced all of a sudden Sir Giles and Ailwin Smith came out of the woods in front of them. Sir Richard smiled at his luck and both he and Will charged the two abductors!
Berwick takes down Wilf
Over on the other side Wilf decided to take matters into his own hands and charged up the slope to cut down Pasquier. But Berwick stepped forward with his two-handed sword, engaged Wilf, and with a single wild swing cut down the loyal retainer!
An epic fight began between Sir Richard and Sir Giles, and Will Fuller and Ailwin Smith. Sir Richard got in an early lucky blow against Sir Giles and wounded him badly. But Ailwin was equally lucky, and got in a deadly blow against Will. Ailwin, the coward, then came to Sir Giles’ aid and the two of them attacked Sir Richard.
Rumble in the jungle!
A similar state of affairs was taking place over on the other side. Remon began rapidly loading and shooting his crossbow at Pasquier, and Pasquier did similarly against Remon. Whilst Sir Gieffroy, an experienced knight who had seen many combats, was not so easily intimidated by Berwick mighty sword, and he advanced against Berwick meaning to kill him or chase him off!
Sir Gieffroy charges Berwick
Back with Sir Richard and things were looking dicey. With both Sir Giles and Ailwin setting about him he was taking injuries and being pushed back into the woods. Then realising that his days may soon be numbered, Sir Richard broke off and made a run for it – fleeing the field! Later, back home, he would say that he was merely making his way around to support Sir Gieffroy and Remon. We can only take this man of honour at his word.
Sir Gieffroy comes out on top
Fate was going the other way back with Sir Gieffroy. Remon’s crossbow took down Pasquier, badly wounded, but out of the fight. Sir Gieffroy took a slight wound from Berwick, but in the end this goodly knight prevailed and down went Berwick. The way now lay open into Sir Giles’ camp and the rescue of master Perkin!
Burne Brewster had pulled back into the camp whilst Sir Giles and Ailwin chased Sir Richard. Sir Gieffroy advanced as quickly as he could, trying to lure Keaton forward to Perkin could break free and make a run for it. Remon moved up behind a bush, took careful aim, and let fly at Keaton.
Remon takes aim at Keaton
A miss! But Keaton was rattled. Forward came Sir Gieffroy, and he gave Keaton the chase to yield or die. Keaton could see both Sir Giles and Ailwin making their way back, so under the eye of his lord, and hoping for some support, he gave no ground and engaged Sir Gieffroy in melee.
More fool him, because Keaton soon fell beneath the knight’s blows.
Sir Gieffroy gives Keaton a choice – yield or die
Perkin Adlington was now free and under the protection of Sir Gieffroy! All they had to do was get away. But both Sir Giles and Ailwin were not far away. They soon intercepted Sir Gieffroy and, cowardly once again, Ailwin Smith joined Sir Giles in attacking Sir Gieffroy!
Sir Giles and Ailwin assail Sir Gieffroy
For a while it looked like Sir Giles may get away with it. He was pushing the two of them back. But eventually numbers would tell. Sir Gieffroy found himself under a terrible rain of blows. It got so bad that all of a sudden…he decided to flee!
Poor master Perkin! Let’s hope the lad doesn’t grow up with abandonment syndrome.
That was the end. It had been close. They so nearly got away with Perkin. But the wicked Sir Giles and his men prevailed – Perkin Adlington would stay under his guard and doubtless Sir Richard would be expected to pay a higher ransom to make up for the losses.


You must be logged in to post a comment.