Engagement At Tuy Hoa

Engagement at Tuy Hoa – March 1968

After the casualties taken fighting in and around Dak To in the final months of 1967, 2nd Battalion of the 173rd Airborne returned to barracks in Tuy Hoa to rest, refit, and train replacements.

Throughout February 1968 key towns and cities in Vietnam have been rocked by the Tet Offensive. For the most part, the 173rd Airborne have not been involved in the offensive. However, intelligence has come in that units of NVA with VC sappers are planning an assault on Tuy Hoa Air Base. To prevent this your company has been deployed north of Tuy Hoa to block the enemy advance. You will take up position in the area of Nha Long village. As such, this is NOT a free fire zone – all support fire (that includes company mortars) will require authorisation. Additionally, you may not fire small arms at targets within 6” of any village building without authorisation.

The enemy are expected to be arriving from the North West.

Report from Cpt P Smith CO of Alpha Company 173rd Airborne
The Battle Rages

Intelligence had confirmed that Communist forces were advancing towards the US Airbase at Tuy Hoa. The 173rd Airborne Division were tasked with blocking and destroying the enemy in the vicinity to the north and west of the village of Nha Long.

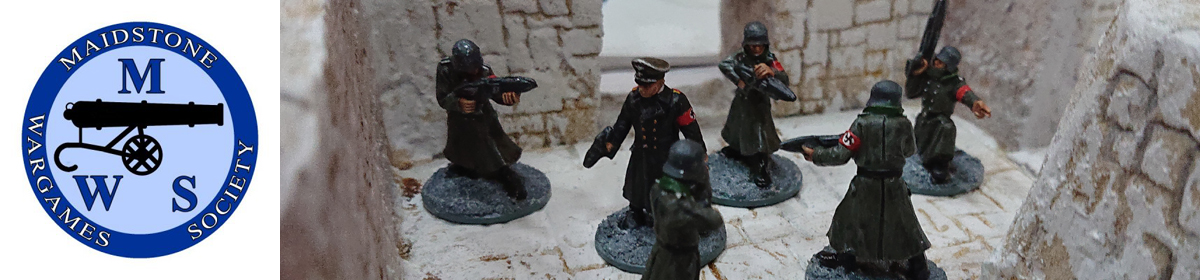
The 1st Platoon, led by Lieutenant Francis, and the Weapons Platoon were deployed to the east of the village and advanced immediately to the west. The squads of the 1st Platoon took up positions to the north, south, and within the village, while the Weapons Platoon advanced westwards, north of Nha Long. We soon made contact with enemy forces to the west in light cover and to the northwest in light cover on higher ground.

I promptly requested authorisation to activate our company mortars to lay down a barrage on the enemy troops to the northwest.

Lieutenant Francis’ 1st Platoon engaged VC sappers to the east of the village. The Weapons Platoon’s M60 machine gun teams provided long-range fire against an NVA platoon to the west. As the engagement intensified, the villagers in the adjacent paddy fields quickly sought cover within the village. Meanwhile, the company’s Dog Team was dispatched to the village at a rapid pace to search for hidden caches of food and ordnance. Thanks to their diligent efforts, a substantial quantity of rice and several satchel charges were discovered.

Lieutenant King’s 2nd Platoon and Lieutenant Claridge’s 3rd Platoon received orders to deploy via Huey transport helicopters in succession. The 2nd Platoon disembarked in open terrain to the north of Nha Long, despite encountering some ineffective small arms fire from the ground. The gunship escorting the transport Hueys provided covering fire to ensure a successful landing and inflicted heavy casualties on the enemy to the front of 1st Platoon before taking evasive action to evade more intensive ground fire from adjacent enemy units.

As the 2nd Platoon commenced their advance from the landing position, the mortar barrage was promptly authorised and initiated on the enemy positions to the west. This stalled the enemy’s advance by pinning them down. The barrage was halted to allow Lt. Claridge’s 3rd Platoon to deploy in a Hot LZ in open ground closest to the enemy.

As 3rd Platoon rapidly disembarked from the Huey transports, they took one fatal casualty as they came under enemy small arms fire, RPGs and sniper fire. Again, the Huey Gunship delivered sustained heavy fire on the enemy positions on the ground. As a consequence, the VC sapper platoon was broken and dispersed from the field.

Shortly after an NVA platoon withdrew from the field as it took heavy casualties from the Gunship and all three of our company’s platoons. An air strike was requested and authorised to attack enemy positions on the high ground to the northwest, but the enemy withdrew before the aircraft arrived.

Along with the food and ordnance caches, a high number of enemy bodies were recovered after the engagement which indicates how the enemy dispersed from the field in disarray.
Although, regrettably, our company took 3 fatal casualties, overall this was an outstandingly successful mission.

Report from Lt T Francis 1st Platoon
1st Platoon Walks Down The Road

Acting on orders from my company commander, I deployed first platoon either side of the main highway, with two squads up and one in reserve. The weapons platoon and company HQ were to our left flank in the open ground. The platoon advanced steadily, keeping an eye out for enemy troops both in the village and on the ridge line beyond the huts, although no definitive sightings were made.

When the weapons platoon were engaged by enemy forces, I ordered first squad to lay down fire in support of them and third squad to advance to take their place and enter the village. Local Vietnamese non-combatants generally kept their distance, although one pointed third squad to a place where he told them that VC forces had stored supplies – this turned out to be a red herring and nothing was found.

First squad continued to engage enemy forces on the edge of the jungle to the north west of the village in support of the weapons platoon, with several hits claimed. Meanwhile, second squad had spotted what turned out to be NVA troops to the east of the village beyond the paddy fields. Judging that they were outside of the restricted zone around the settlement, I ordered them to open fire. Third squad moved through the village and engaged further NVA forces directly north of their position with immediate effect.

The platoon consolidated its position, all squads continuing to engage the enemy, until the aerial insertion of third platoon swiftly alleviated any pressure from NVA forces to our front. I advanced first and second squads in line with the north of the village, at which point it became clear that the enemy had broken.

First platoon’s advance to, and defence of, the village ensured that enemy forces were unable to emplace themselves within it and create a stronghold from which it would have been difficult to eject them. That the operation was carried out without casualties is testament to the skill and professionalism of the American soldier.

Report from Lt A King 2nd Platoon
2nd Platoon Advances Down The Ridgeline

2nd Plt under 2LT King was inserted by UH-1 helicopters on the left flank of the company’s advance, near the edge of a lightly wooded area and close to a patch of elephant grass to the west and northwest of Nha Long village.

On approach to the LZ hostile forces were spotted on a hill within the woods and in the elephant grass. The platoon’s gunship escort engaged the enemy in the Elephant Grass with machine gun fire, causing a number of casualties. The pilot requested approval to use rockets on the hostiles in the woods, due to the mission Rules of Engagement, but this was not received.
1st and 2nd squads, the latter with the platoon LT, disembarked from their slicks and hunkered down, engaging the enemy to their front, pinning them down. 3rd squad disembarked and moved rapidly into the woods, with the intention of advancing on the enemy flank.

1st and 2nd squads came under fire from approximately platoon strength forces, causing some shock and one casualty KIA in 1st squad, Pfc Simms.

3rd squad advanced through the woods and, on reaching a slight rise in the terrain, hunkered down to engage the enemy forces on the wooded hill to their north.

As the slicks lifted off to collect 3rd Platoon, the Huey Gunship repositioned to engage the enemy, but was driven off by some lucky shooting by the enemy.

The enemy in the elephant grass was hit by mortar fire called in by other elements of the company, this, together with the steady fire from 1st squad caused them to lose their nerve and withdraw.

1st Squad had not come through this firefight unscathed, in addition to the KIA they suffered they also had suffered some shock. 2LT King moved up to 1st Squad to provide encouragement, they then advanced onto the vacated enemy position and through diligent searches uncovered a punji pit the enemy had left behind, with no further casualties suffered.
2nd and 3rd Squads, having suffered no casualties, advanced through the woods towards the enemy on the hill, but these troops fell back, perhaps due to casualties inflicted on other elements of the enemy forces by the rest of the Company.

1st Squad was about to police the remains of the enemy they had been fighting when elements of 3rd and Weapons platoon took the position.

2nd platoon’s deployment between the 1st & Weapon’s Platoons and the woods helped tie down around 2 platoons of enemy troops and helped prevent enemy forces, later discovered to be a mixture of NVA and VC Sappers, from reaching Nha Long village.

Report from Lt J Claridge 3rd Platoon
Apocalypse Now

The engagement at Tuy Hoa had been in full swing for a while. 3rd Platoon were on standby having just watched 2nd Platoon take off and head for the landing zone. As the radio traffic became more frantic the order finally came to go.

Embarking on the UH-1 transports and accompanied by a Gunship it was clear this was going to be a rough ride. More radio traffic told of a NVA sniper causing trouble and several hits from a concealed RPG team.

As 3rd Platoon flew over the LZ orders came through from the CO of the 173rd to land in a forward position almost on top of the encroaching VC forces near the village. 3rd Squad disembarked into a hail of enemy fire suffering a casualty in the process and becoming pinned. The squad had no choice but to hunker down and return fire.

Meanwhile the supporting gunship peeled of and laid down a devastating fire against the VC.

Receiving further orders from the CO to step up the rate of fire the VC were routed bringing a much-needed reprieve.

The supporting gunship searched for other targets and managed to destroy the RPG team. This was the last straw for the NVA and VC, they began to withdraw from the field leaving our forces to lick their wounds.

Somewhere In The Hills Above Dak To

At a recent meeting Stephen ran a 15mm Vietnam game using the Charlie Don’t Surf rules. The scenario was based on the Battle for Hill 875.

Stephen umpired the game and ran the Communist forces. The US forces (A Company, 2nd Battalion, 173rd Airborne) were under the command of Captain Pete, who also ran the Weapons Platoon, with the three Rifle Platoons under the command of Lieutenants Tony F, Andy and Jeremey respectively.

We’ll start with Stephen’s summary of the game:

A Company of the 2nd Battalion, 173rd Airborne, scored an important military victory against the North Vietnamese Army today.
Led by Cpt Pete the company advanced up Hill 875, located the enemy and engaged them.
It was 3rd Platoon under the command of Lt Jeremey who first reached the top of 875.  Meanwhile, a grenadier of Lt Andy 2nd Platoon earned recognition for posting a M79 round through a bunker slit. Lt Tony’ 1st Platoon got bogged down in a vicious firefight and took several MIA.
Company mortars, and a Huey gunship that shredded some NVA recoilless rifles, helped the 173rd to victory.
News on stateside TV reported the battle and civil demonstrations ensued at the loss of American life. It may have been a military victory for the US but the NVA scored a political victory.

Here follows the US Platoon commander’s accounts of the battle.

1st Platoon

First Platoon (Tony) advances early in the game.

This is as far as I got, a vicious firefight with an NVA platoon (and some less than favourable activation draws) saw me pretty much stuck in place for the rest of the game.

The NVA platoon in question, about to receive some 60mm mortar vengeance courtesy of Pete.

The 1st Platoon under fire and pinned. 1st squad suffered badly (7 KIA out of 10), although remarkably 2nd and 3rd squads emerged from the action unscathed.

2nd Platoon

2nd Platoon (Andy) A Company were deployed at the base of Hill 875 with the Weapons Platoon and Company HQ to our left, and 3rd Platoon to our right.
The platoon began its advance with 1st and 2nd squad leading, with 3rd Squad and the Platoon CO in reserve.
1st squad soon spotted insurgent troops further up the hill, the first of the Company to do so, and promptly engaged them. 2nd squad and part of 3rd squad joined in, the remainder of 3rd squad being out of line of sight of the enemy. The fire was effective, causing part of the enemy unit to suffer casualties and become pinned. 2LT Andy reported the sighting to CPT Pete, with a request for mortar support.
3rd squad deployed from reserve to the right of 2nd squad in order to bring its full firepower to bear.
The firefight with the enemy continued, with 3rd Platoon joining in, both 2nd and 3rd Platoons suffered some KIAs, but appeared to inflict more than they suffered.
Under the relentless fire of 2nd & 3rd Platoons the insurgents suffered further casualties and were seen running from their positions back over the crest of Hill 875 and presumably they continued down the reverse slope.
Slightly later a few ranging rounds began to land near 2nd Platoon’s position, expecting an NVA mortar barrage 2LT Andy ordered all squads to advance up the hill as fast as they could. 1st & 3rd squads succeeded, but 2nd squad got bogged down and didn’t move very far.
1st squad’s success in movement proved to be their undoing. They soon came under heavy automatic fire, believed to be either a DShK 1938 or KPV heavy machine gun, in a previously unseen bunker.
1st squad took a couple of casualties, but immediately hunkered down and returned fire, the squad’s M79 gunner achieving an excellent shot which put a 40mm HE round into the bunker, silencing the HMG.
2nd and 3rd squads advanced past the battered 1st squad, joining elements of 3rd Platoon in sweeping across the hill, engaging the remnants of the NVA defenders in the flank and driving them from the hill, at the cost of some more US KIA.
Eventually 2LT Andy’s prediction of a VC mortar barrage came true, but by the time it arrived on it’s original target all US forces had moved further up the hill and none were in the beaten zone.
As 1st squad looked after their dead they discovered a food and material cache buried on the hill side.
The mission proved to be something of a Pyrrhic victory for 2nd Platoon, we engaged and defeated the enemy, destroying a bunker and locating a cache, but at a cost of 5 KIA, 4 of them in 1st squad.
3rd Platoon
3rd Platoon (Jeremey) deployed on the far right of Hill 875. The mission was to assault the hill and so I decided to get moving and threw caution to the wind and advanced quickly up the hill.
Unfortunately after a few moves this left my three squads quite scattered. On top of that the first contact with the NVA turned out to be a real unit who immediately scored a casualty. My return fire was more effective and with support from Andy’s 2nd platoon the NVA were soon routed.
Despite the resistance I decided to continue my advance up the hill, I reached the top of the hill without further resistance but then the bunker was revealed along with more NVA troops. I took a few more casualties and would have taken more if not for Andy’s 2nd Platoon taking out the bunker on the first try.
Laying down some more fire on the remaining NVA, they routed and we claimed the hill.
Company Command
A company’s Forward Observer (Pete) performed well by adjusting the ranging mortar rounds and the subsequent Firing for Effect on the NVA positions on the hill which contributed to the general degrading of the enemy.
Also, significant contributions to the victory came from :-
      • Lt. Tony’s 1st Platoon made steady progress up the left flank but took heavy casualties due fire from a heavy weapons squad with recoilless rifles. These were suppressed by the fire of the Co HQ’s MG squad lower down the hill.
      • Lt. Andy’s 2nd platoon’s impressive accurate fire which neutralised the fortified position on the summit of the hill  soon after the position was observed. The HMG in that bunker would have caused devastating casualties if not dealt with swiftly.
      • Lt. Jeremey’s 3rd platoon made a rapid advance up the slopes of our right flank, although sustaining several casualties, routed the enemy troops before them.
Although Air Support was requested, a Huey gunship arrived after a delay due to the Priority 2 rating of our Area of Operations, but completely destroyed the NVA Heavy Weapons squad enabling all platoons to advance and secure the enemy position on the summit of the hill, seizing enemy weapons and rice caches on the way.
 I, Capt. Pete commanding officer of A Company,2nd Battalion,173rd Airborne, recommend citations for all the commanding officers of A Company platoons.
The view from the other side of the hill
The NVA side of things, as recounted by Stephen. Hill 875 was occupied by a reinforced NVA company – three rifle platoons with AK47s, a pair of recoilless rifle teams, plus the regimental HQ (historically, the rest of the regiment was situated in the hills adjacent and being engaged by the ARVN). Regimental HQ had a mortar spotter (the mortars were actually sited on a hill to the west), wireless team, and HMG in a bunker.
My general plan was to close with the enemy as soon as contact was made to mitigate against the inevitable artillery and airstrikes the US would call in, a tactic referred to as “belt-grabbing”.
The bunker being taken out promptly by US 2nd Platoon took the smile off my face. That HMG would have caused havoc and blunted the US advance and I was going to walk the mortars up to leave the US forces
sandwiched between the HMG and the mortars. But it never came to that.
It was a very historical outcome – the US captured the hill but suffered heavy casualties doing so, and there was considerable public outcry because of it.
And the final word also goes to Stephen:
Thanks to Andy, Tony, Pete, and Jeremey for making it an enjoyable game as I learn the rules. But a special thanks to Pete for his help and knowledge.
Just need to come up with a better name than the toe-curling ‘Big Men’ next…

Operation Anvil – A Charlie Don’t Surf encounter

Stephen takes us through a recent game of Charlie Don’t Surf.

Throughout 2024 I put together a collection of 15mm Vietnam stuff. The Vietnam War was one of the first historical wargaming periods I ever gamed, back in the early 90s. This was, of course, because of the spate of Vietnam War films of the late 80s and early 90s and because the music of the period was so good. All of which I loved.
However, like things do, it fell by the wayside and I sold it all on. But last year I joined in a game of Pete S’s ‘Charlie Don’t Surf’ and Pete M’s Vietnam game, both of which I really enjoyed. This re-kindled my interest in gaming Vietnam and so I started collecting models and miniatures.
I also enjoyed ‘Charlie Don’t Surf’ so I decided that would be the rules I would use.
So, having put a game in the club diary for May, I decided I would run a solo game so I could refine my knowledge of the rules. I decided on a simple meeting encounter.

It is late 1967. Military intelligence is bringing in lots of reports of large communist troop manoeuvres in the south. Something is clearly going to be happening in the run-up to the Tet holidays. Two US infantry platoons have been detailed to perform a blocking action to prevent troop movement of local VC elements in the locality of the village of Boc An. This village is known to have communist sympathies and, as such, the provincial authorities are keen not to alienate the locals any further. Therefore, this area is not a free fire zone and any use of indirect fire will require authorisation.
On the opposite side are two platoons of Main Force VC infantry. They are armed with AK47s and so will count as assault rifle squads. Their objective is to exit the table on the opposite side they enter from. The VC are operating on blinds (with two dummies). Since this is a solo game I decided that I would dice to see which blinds are dummies and which are real when the need comes.

The table was set up with the VC blinds on one edge and the US platoons deployed within 6” of the opposite. The US forces had two Big Men (God, I HATE that term!) as platoon commanders, one Big Man is company command with a medic. Company mortars are available but will require authorisation. I set the US platoons up in standard formation – one squad on point with the other two squads behind. All US squads would count as machine gun squads (the M60s having been distributed amongst squads rather than as a separate weapons squad).

The US forces would have a slow advance because they were soon having to wade through the rice paddies. I had them avoid the village just in case anything happened that would antagonise the villagers. The plan was to spread out once they’d passed the village to stop any VC slipping through the net. Similarly, the VC also had a slow advance through the jungle – still operating on blinds, so still unsure which units were real and which were dummies. The two central dummies advanced up the hill with the two flanking dummies moving around the flanks to create a dilemma for the US forces.

The US 1st Platoon rolled badly for movement through the paddies so the squads started bunching up. Meanwhile, 2nd Platoon did quite well and so managed to move up to put them in a position should one of the flanking VC units turn out to be real. Mind you, 2nd Platoon would also have a patch of elephant grass to wade through as well, so making a bit of time through the paddies was a bonus. As for the VC, two of the blinds had reached the summit of the hill with the other two making slightly slower progress on the flanks. It would soon be at the point where the US platoons could start making spot rolls as the VC were now on the edge of the jungle.

The US company command as well as 1st Platoon all failed in their spot rolls and so when it came to the VC activation they had a choice – stay where they were and remain hidden or, with the US platoons in the open, take advantage of that and open fire. I went with the latter – it was going to happen sooner or later and so it made sense to let rip while they had the advantage. I rolled for the two VC blinds on the hill to see if they were the real units. And, you know what, they were! So troops were put on the table. This meant the game would turn into a straight fight rather than a hunt and pursue.

So the VC let rip with their AKs. US 1st Platoon were caught in the open. They’d crossed the paddies and were in the area of scrub between the road and the hill. The lead squad took a pasting and accumulated several Shock and became Suppressed. I was surprised at how lethal the game could be, but then the fire was at a unit in the open at close range. It wasn’t looking good for the US platoons. When the US activated they managed to give back a little of what they’d received, but the VC were in the jungle, so whilst it was at close range it was still a poor shot. Nonetheless the lead VC squads took two kills as well as being Pinned and Suppressed. Ouch!

The firefight now brewed up. The US 1st Platoon commander found himself in a dilemma – whether to get his squad returning fire before the VC went again or to rally some of the Shock to make them more effective. There was only one choice; with all the Shock they’d taken their fire would be ineffective, so he had to take the gamble and rallied some of the Shock on his troops. Meanwhile, the company commander recognised the potentially lethal situation he found himself in and called for the company mortars to strike the hilltop, but he would have to wait until authorisation came through. The VC fire came in once more and this time it was deadlier – two US killed! However, the Critical Wound card came up, meaning one of the killed was a serious injury. The Medic called in a casevac chopper and proceeded to tend to the wounded man and try to get him to a suitable LZ for evacuation.

Two things then happened. The US 2nd Platoon spotted and engaged the second VC platoon. The VC took one killed and a few Shock. Seeing the kind of fire-power the US could give out, the VC second platoon pulled back to the downslope of the hill, the intention being to disappear back into the jungle and find another way off the board. Also, authorisation for the mortars came through nice and quickly (clearly, higher command saw the urgency of the need), which meant the mortars might be coming in soon. 1st squad of the US 1st Platoon pulled back after the mauling it had received so the other two squads of 1st Platoon could engage the enemy.

Then it happened. In came the mortars. Only the shot hadn’t been as accurate as hoped. The barrage actually missed the VC and hit the side of the hill, which meant the barrage also fell on part of the village! The villagers well and truly copped it – not only Pins, Suppressions, and Shock, but four civilian fatalities! Not good. Not good at all. This caused the company command a dilemma – should he call off the mortars or would he be able to correct fire in time. If he called off the mortars then this may result in more delays as authorisation would be needed to resume firing, but if he couldn’t correct fire then the village would take another leathering. Such is the fate of war. Well, such is the random turn of cards. He kept the fire up and just hoped that he could correct the mortars in time.

And lucky him, because that’s just what he managed to do. Yup, his card came up before the mortar card came up. It’s as cold and simple as that. But he managed to correct fire and put it straight on top of the VC 1st Platoon. The effect was devastating.

The VC 2nd Platoon had pulled back, returned to a blind and, when the Di Di Mau card came up managed to bring on a dummy blind so it was hard to say which was the actual platoon and which was a fake. The two dummies split up and went back to the original plan of moving around the flanks. Meanwhile, the VC 1st Platoon moved to get away from the mortars, but the US company command just walked the mortar barrage with them to keep up the pressure. It was now starting to look unlikely for a VC victory. The US casevac also came in allowing the medic to pass on his charge and off it went with the US wounded.

It felt like things were coming to a conclusion. The US 2nd Platoon cleared the elephant grass and made a spotting roll for the VC blind that was moving around that flank. A successful roll, so now to see if it was the actual unit or a fake. It was real! This meant the US would have the VC trapped and their whereabouts known. The VC were not idle though. Whilst their 1st platoon was now stuck under falling mortars, their 2nd platoon opened up on the US 2nd platoon, causing a fatality as well as Suppressing them. It was far from over.

That said, the numbers were starting to tell. The VC 1st Platoon was really piling up the Shock and they were about to break. And with the rest of the US 2nd Platoon coming up to engage the VC 2nd Platoon and the ever-present threat of falling mortars, it was obvious what was going to happen. The result? The US had won a military victory, but with the casualties sustained and, more importantly, the mortar strike on the village, the VC had won a political victory.

Wars of the Roses – Battle of Stoke Field – Battle Report

Although we were only going to play the Battle of Stoke Field as a tie breaker if the main campaign ended in a draw. We thought for completeness we should play the battle.  The Lancastrians were definitely playing for the last scrap of honour they could muster with this battle having already lost the campaign.
Reading about the battle we decided for Stoke Field, the Yorkists should have at least half their army made up of mercenary and militia units to represent bringing together a rebel army. While for the Lancastrians, half of their army would start on the players baseline to simulate the King’s forces arriving late to the battle. Although not a big battle historically we decided to go big with 1000 points per side, with each side divided up into two commands. Stephen and Andy took up command of the Lancastrians (well Tudor) forces, while Tony G joined me to share the Yorkist (well Rebel) army.

I arrayed my forces in typical fashion with the archers in the front and infantry behind. When we play these high points games I normally have to bring everything I have painted, so I also brought my mercenary pike block and a fair bit of cavalry in the form of Mounted knights and currours. I put the pike block on the right and all of the cavalry on the left to try and outflank the enemy.

Tony G went for a similar deployment, Tony was facing Stephen as the Tudor King who had to deploy right at the far edge of the battlefield. I was facing Andy who had deployed as far forward as permitted.

Very much like the historical battle this meant that within the fist activation of units Andy and I were already in bow range before the King had even got moving. The initial exchange of arrows saw the Yorkists inflict more damage, but didn’t come away unscathed.

Some favourable activation dice also allow the Yorkist currours to quickly advance on the flank and threaten the Lancastrian archers. I’ve used this tactic in a number of battles. The cavalry cannot be ignored so I often find they end up drawing units away from the front line. Andy moved some archers to contest the cavalry, but I decided to be bold and charged my cavalry in.

The charge worked and first blood went to the Yorkists. This was to be the start of a trend on the Yorkist left. With four cavalry units the Lancastrians were in for a hard time having brought no cavalry of their own.

Meanwhile on the Lancastrian left Stephen had started to move his forces forward, but the dice were not being kind and so the advance was somewhat piecemeal.

Back on the Yorkist left and emboldened by the initial cavalry success I decided to continue the charges. These were not as successful, Andy’s archers managed to hold off one attack and he had brought forward his billmen units to halt a further charge.

The deployment for the game ended up turning it into a battle of two distinct halves. The Yorkists forces on their left had manage to almost wipe out the Lancastrian archers and had engaged in several rounds of melee combat with the cavalry charges, while on the Yorkist right not a single dice had been rolled in anger.

I had suggested to Tony as my fellow commander to just wait for Stephen’s forces to advance and not worry about moving forward to engage. With the unique activation system in Sword and Spear armies can often find themselves breaking up during an advance if the dice are not being kind.

On the Yorkist left the cavalry charges continued the Currours continued to be locked in combat but the first of the mounted knights pushed through a unit of billmen and charged off in pursuit of the fleeing Lancastrians.

Seeing the Lancastrian casualties mount up I suggested to Tony to ditch the idea of setting up a defence and to take the fight to Stephens forces. Losing no time Tony got his archers into range and started the customary exchange of arrows.

Tony like me had moved his cavalry into a position of harassment on the right. Stephen had attempted to get his crossbows to within firing range but the restrictions on Crossbows not being able to move and fire hampered his efforts. But Tony decided to follow my example and charge in his currours. Unfortunately the Yorkist fortunes had turned and the cavalry were halted.

Tony soon sent in his other unit of currours but it wasn’t enough and the Lancastrian crossbows had prevailed. But the rest of the Yorkist forces on the right were starting make an impression, adding to the growing Lancastrian loses.

Not wanting to wait for the archery duel to play out Tony charged in some billmen, but they could not dislodge the enemy archers. To counter Stephen charged in his highlanders but they were checked in turn by Tony’s infantry.

After what seemed an age Stephen finally managed to move his three large units of pikes in to melee, this was certainly not to little, but it was too late. The Lancastrian forces had already passed their first morale check, which saw a number of units suffer a loss of strength. They failed to destroy the archers giving me time to move my own pike block into the melee.

The Lancastrian cavalry woes continued over on their right flank. The Yorkist knights had managed to defeat several billman units and were running rampant behind the Lancastrian front line.

Tony continued his assault and managed to defeat the last of the Kings archers pushing them over their break point and handing victory to the Yorkist cause. As the last of the turn was played out the Lancastrians suffered yet more units destroyed despite committing more of their forces in an attempt to even the score.

Stephen’s pike blocks had managed to destroy a the unit of archers with a second unit reducing the Yorkist pike block to half strength.

The Lancastrian Highlanders fought hard with a bonus dice in the melee to try and push aside some of Tony’s billmen, but it ended in stalemate.

In the centre of the field I’d made the mistake of putting a bonus dice on my crossbows (crossbows can’t use bonus dice for shooting attacks), and neither did they have a valid target, so with nothing to lose I charged them into the flank of the pike block. It was far closer than it should have been and the crossbows took the pike block to just two remaining strength points, losing only one themselves.

And thus ended the turn and the battle. This was a really interesting fight with mine and Andy’s forces engaged in the fight from turn two, on one side of the battlefield, while on the other side Stephen and Tony’s forces did not even exchange missile fire until around turn five. By that time the Lancastrians had almost reached their first army morale point. Things could still have been turned around but being so far behind in casualties gave the Yorkists forces a morale boost and the confidence to throw caution to the wind and step up the attacks.

The Lancastrians retreated from this final battle adding to what had been a disastrous campaign, but historically the Lancastrians lost more of the major battles during the war they just managed to win the important ones, sadly that wasn’t to be this time round.

Yorkist Loses
3 Units of Currours (12 points)
1 Unit of Billmen (4 points)
3 Units of Militia Archers (9 points)
Total loses 25 points (Army break point 57)

Lancastrian Loses
1 Unit of Crossbows (3 points)
5 Units of Billmen (20 points)
10 Units of Longbows (30 points)
3 Units of Dismounted Men at Arms (12 points)
Total loses 65 points (Army break point 55)


Battle at Blavatsky Station – August 1944 – Battle Report

Society member Stephen kicks of our posts for 2025 with a WW2 game of Crossfire.

During the Festive period I decided to have a non-Festive WW2 game using Crossfire rules.

It was a late-war Eastern Front game with the Russians on the attack. Each side had a company which comprised three platoons with a company HQ and machine gun. In addition, since the Russians were attacking, I gave the Russians an extra SMG platoon. I made these veterans (an NKVD unit, no doubt) and decided this platoon’s command bonus would help in both close combat as well as morale (obviously led by a commissar – usually Russian commanders only assist in close combat). Since it was a late-war game, to reflect the change in training and doctrine the Russian army went through, I also decided that Russian squads could end movement out of line of sight of platoon commanders but still had to start movement within LOS as usual (normally, Russian squads have to start and end movement in LOS). This reflects the Russian adoption of the British and American structure they went through when the Russian army went on the attack.

The battlefield was set up as follows:

The Germans deployed on table with all units deployed north of the east/west road. The two large barns and the railway station were big enough to accommodate three squads. The other houses and the chapel could only accommodate two squads.

The Germans put their first platoon in the easternmost barn. In the house looking south down the road was the German company command and machine gun – this would make it very risky for any Russian squad trying to cross that road. In the big barn in the middle went the second German platoon. The final German platoon deployed with one squad in the chapel and a squad in each of the wooded areas either side.

The Russians would deploy by activating from the southern edge.

Each side would gain 1 Victory Point for each enemy squad/machine gun killed. The first to 7 VP would be declared winner.

This was obviously going to be a difficult job for the Russians. The sides were more or less equal (Russians with four platoons and the Germans with three) but the Germans had the advantage of being in defence and set up in protective cover.

Right then, on with the game.

The Russians started activation by bringing on their first platoon and occupying the sunken ground on the extreme left. Second platoon came on and took position in the adjacent woods, and the third platoon came on and took cover behind the fence that ran alongside the wheat field. The plan was for the Russians to attack on one flank where they could concentrate their firepower and force the Germans to break cover or risk being rolled up. The Russians held the NKVD sub-machine gun platoon and the company HQ with HMG back – these were due to deploy on the right.

Initiative still lay with the Russians and so the platoon in the sunken ground made a group move to advance across the rail track and into the woods in front of them. At this point the Germans opened up with Reactive Fire. Using a coordinated crossfire, the German first platoon in the woods and chapel let rip – a series of Pinned results ensued but no Suppression, so the Russians maintained initiative. The Russian platoon decided to return the favour – they Pinned the German squad in the woods on the left but also failed to cause a Suppression. This meant they lost initiative and it switched to the Germans.

With all the action taking place on the western side of the battlefield the Germans decided to advance one of their platoons: those on the right, in the other barn, crossed the road and rail track and took up position in the woods. The German first platoon chose to keep up the pressure and poured more fire on the Russians in the woods. They caused a Suppression, so carried on firing, hoping for a kill on the Russians. But they failed to cause another Suppression which meant the initiative switched to the Russians.

The Russians did two things. Firstly, they brought on the NKVD platoon, which came on at the extreme right in the sunken ground there. They also decided to advance their third platoon across the wheatfield into cover behind the fence overlooking the rail track. At this point the German second platoon, in the barn opposite, engaged them with Reactive Fire. Not only that, but the machine gun also had line of sight and fire arc to the Russians in the field. This would be a lot of Reactive Fire. The machine gun was firing independently and fortunately scored a Suppression, meaning the Germans could carry on. The Germans in the barn shot as a firegroup but only caused Pinned results and so initiative went back to the Russians. But the Russian platoon had taken a lot of fire and all squads were either Pinned or Suppressed.

Both Russian platoons that had advanced found themselves with their heads down – all Pinned and Suppressed. So the Russians needed to start putting the pressure on elsewhere. They did this by bringing on the company HQ and machine gun. These took position on the edge of the fence by the farm. The German platoon in the woods on the right had line of sight and took Reactive Fire, but failed to score even a Pinned result – squads failing to score at least a Pin are marked No Fire (NF) and are unable to conduct any more Reactive Fire during that initiative. This gave the NKVD squad a chance – since they would receive no Reactive Fire they could charge forward and try to engage the German platoon in close combat! Being SMG armed and veterans would give them a bonus. So that is what they did. And it paid off very well indeed – the NKVD over-ran and eliminated the German platoon!

The Russian Company Command and machine gun moved into the first of the farm buildings. What they needed to do next, though, was try to rally some of their squads. However, failing a rally roll also means initiative is lost. As it happened the platoon in the wheatfield managed to rally all its squads, whilst the platoon in the woods on the left managed to rally one squad but failed the others. So initiative once more went over to the Germans.

The loss of the German platoon to the SMG platoon really blunted the German options. The other two platoons had little choice but to dig in and see what they could do. As such, both platoons were organised into firegroups and crossfires to make the most of what they had. The Germans in the barn once again Suppressed the Russians in the wheat field but the platoon in the woods and chapel could only cause Pins on the Russians in the wood so they lost initiative.

The Russian second platoon which, up to now, had remained ensconced in the woods behind the railway station were given the order to move up – by bringing the whole Russian company into line it would spread the German fire. As a group they moved into the railway station and took Reactive Fire from the Germans in front of them – the Germans causing Pins on each of the Russian squads!

Now, by causing a Pin a squad may continue Reactive Fire, but should they fail to cause a Pin then they may no longer do Reactive Fire during that initiative. So the Germans could carry on with their Reactive Fire, hoping to Suppress and steal initiative. But they’d seen what could happen if they get a No Fire marker and are charged. So rather than continue Reactive Fire they chose to hold back and allow the Russians to continue with their activations and maybe another opportunity to react may present itself.

The Russian company command and machine gun chose to move up to the next farm building which brought them directly opposite the German company command and machine gun. And these decided to do Reactive Fire against the Russians – causing a Suppression and taking initiative away from the Russians! So the German machine gun kept on chattering away, this time turning to the NKVD platoon in the woods in front of them – a kill! One of the NKVD squads was off. The Germans decided to make the most of their firing so the platoon in the barn resumed fire against the Russians in the wheat field – another kill!

Things were starting to improve for the Germans.

But not for much longer – they attempted more fire against the Russians in the station but failed. Initiative went back to the Russians. There then followed an extended exchange of fire between the Russian and German machine guns – one side would fire, fail and initiative would switch, and this went on for several rounds, changing initiative after just a single activation. This ended up inconclusive. Occasionally one side or the other would be Pinned or Suppressed, but then rally this off and resume firing.

Something needed to be done.

Then during one activation the Russians Suppressed the German machine gun and decided to advance the NKVD platoon into the barn on the opposite side of the road on the right. But as they moved into the open crossing the road the German squads further down opened up with Reactive Fire. Being in the open was never going to go down well and one of the NKVD squads was killed and the other Suppressed! The Germans took initiative, rallied their machine gun, which opened fire on the Russian machine gun and…eliminated it!

Victory Points were now equal – 3 each. If the Russians were going to win they would have to think of something daring. For the time being, though, it was still with the Germans who continued with their fire against the Russians in the station, but a failure to Suppress soon meant it went back to the Russians.

Close Combat is very decisive in Crossfire – a simple win means the opposing squad/s are destroyed. So the Russians looked to bring things to close combat since they had advantage of numbers on the left. The Russian platoon in the woods on the left opened up on the solitary squad beside the chapel, causing a Suppression. With that, they decided to go for it and charged across the road with guns blazing.

As soon as they broke cover the Germans in the chapel opened up with Reactive Fire. They scored a Pin against the first squad meaning they could carry on, but failing to score any more hits meant they received a No Fire marker and the other two Russian squads charged the Germans with the inevitable result – one dead German squad. With their blood up, and a No Fire marker on the Germans in the chapel, they kept up the momentum and sought to charge the squad in the chapel. However, they could only get one squad against them (remember, the chapel has a capacity of two squads and there was already a German squad in there), which meant it was an even combat and on the dice roll. Which favoured the Russians! Another German squad gone.

The remaining German squad of this platoon, in the woods to the right of the chapel, used Reactive Fire on the Russian attackers and scored a Suppression. With initiative, what could the Germans do? Truth be told, they didn’t have many options. The machine gun opened up on the Suppressed NKVD squad and killed it. Victory Points were now 5 to the Russians and 5 to the Germans – still tight. The German machine gun then turned its attention to the Russian company command but failed to score a hit.

So what could the Russians do? They decided to see if they could Suppress the Germans in the barn. They did even better than that and killed one squad. With a platoon in the railway station and another moving up through the woods and chapel, they decided to bring things to a close. The platoon in the station opened up at the German squad in the woods and caused a Suppression – this was what they wanted and made a charge against the Germans. The platoon in the station fixed bayonets and moved out. They drew Reactive Fire from the Germans in the barn and found themselves Pinned down by the roadside! So the Russian squad in the chapel, under cover of the woods, made a final charge against the Suppressed German squad.

And that was that. The German squad was killed which meant the Russians had reached their Victory Points – 7 German squads eliminated.

It had been a very close game and a very enjoyable one, and the Russians had won.

Wars of the Roses – Battle of Bosworth – Battle Report

After 11 battles our Wars of the Roses campaign has finally reached the defining battle of Bosworth Field. With the Yorkist having an unassailable lead of 8 victories to 2, the Lancastrians (now Tudor) forces were fighting for pride.  Given the significance of the battle we decided to go big and have 1000 points per side, with each side divided up into three commands. Stephen commanded the Tudor forces as Henry himself, with Andy as the Earl of Oxford and simply because he was the last player to arrive Tony F played the part of the Stanleys already declaring support for the Tudor cause.
As usual I commanded the Yorkists with a new player to the campaign Mark W acting as the Earl of Northumberland. Our other player couldn’t make it so as well as commanding Richards forces I also took charge of the Duke of Norfolk.

The Yorkists are on the left with Northumberland facing the marshland. Henry Tudor is on the right of the picture facing the farm building

As with the other games in the campaign we looked for anything of historical note that influenced the battle. For Bosworth we decided both players must have at least four mounted units and some artillery. As for the battlefield we had a set of hills for the Yorkist forces to start on with some marshland on the Yorkist right.

I divided the Yorkist army so that Northumberland and Norfolk had equal amounts of archers, billmen and mounted men at arms to guard the flanks.
As per history Northumberland was on the Yorkist left with Norfolk on the right. With Richard in the centre I went for a very mixed force of artillery, cavalry, pikemen and dismounted men at arms.
Stephen had done something similar with his Tudor forces with Stanley and Oxford having similar forces while Henry had only cavalry. Stephen also placed Henry on the Tudor left, Oxford in the middle and Stanley on the right.

The battle got underway and the Yorkists won the first initiative. In a change to Northumberland’s inaction historically Mark  immediately advanced his archers into the marshland to take the fight to Tony and the Stanley forces.

With Norfolk on the Yorkist right flank I started with a steady advance as well rather than wait for the inevitable cavalry charge. Stephen had mounted men at arms in a front rank and currours behind, I wanted to try and get a few volleys from my archers to try and soften them up.

I don’t think I needed to provoke the Tudor cavalry, Stephen took the first opportunity to close the distance. I rapidly advanced some dismounted men at arms and my cavalry to threaten the Tudor cavalry in the flank if it charged the archers. A volley from the archers had little effect.

With the Tudor cavalry on the move, King Richard rode to the artillery to get them into action but the first shots failed to cause any damage.

After a run of bad activation dice, Tony finally managed to advance his archers. This delay allowed Mark the chance to charge in on the far left flank and managed to rout some of Tony’s archers.

Back on the Tudor left flank and Stephen’s cavalry charged against Norfolk. The first charge actually went in against the Yorkist men at arms and came close to routing them. Seeing the danger I took the unusual step of charging some archers into the melee, but failed in turn to rout the cavalry.

In the Tudor centre Andy began to advance his archers and men at arms. Andy also had some artillery that began to creep forward.

Despite managing to get a few shots off the Yorkist artillery was charged and routed by Henry Tudors knights.

After another round of melee Stephen’s cavalry managed to rout some of Norfolk’s archers putting the flank in danger. The Yorkist men at arms would have to do their best as the rest of Nofolk’s units were also locked in combat with the Tudor forces.

On the Yorkist left flank Mark and Tony were beginning to exchange volleys but neither were causing much damage. Mark’s cavalry had continued on pass the Tudor flank forcing Tony to act. In the centre King Richards forces were also starting to trade volleys, I’d brought my mercenary crossbows to make up the number but they had never really done very well for me.

Although they did give a good account of themselves this time, they were the only missile troops in the centre, leaving Andy unopposed attacks against the my infantry. They had managed to dispatch a unit of men at arms so I had no choice but to charge my other dismounted knights forward.

Tudor cavalry in the centre had routed the artillery and in their pursuit also routed a unit of knights, I still had a unit of mounted men at arms. Rather than try and turn them round to counter Stephens cavalry I chose to have King Richard accompany them on a charge straight down the centre against Andy’s archers.

The charge swept the archers aside and to my horror I found history repeating its self, I had forgotten about the pursuit rule. Richard continued charging across the field and into some Tudor billmen. This charge however did not manage to defeat the billmen and so Richard was deep in the enemy’s side of the battlefield, with other Tudor forces closing in.

Meanwhile Stephen’s cavalry in the centre had found its self in melee with a large unit of mercenary pikemen and some militia billmen. Normally this would have spelt doom for the cavalry but the knights were going to prove almost impossible to dislodge.

Things had gone better for Norfolk out on the right flank. A number of Stephen’s cavalry had been destroyed. This freed up some archers who were in a position to fire on the second line of Tudor cavalry making an approach.

I also (with much ridicule from the enemy) moved King Richard from the stricken cavalry charge, back to the centre to support the attack against Andy’s archers. Tactically this also brought Richards forces back into command range.

On the Tudor left flank Stephen managed to get part of his second line of cavalry to charge some billmen who were supported by Norfolk himself. The charge didn’t manage to rout the billmen but also didn’t result in the destruction of the cavalry. But the move did mean I suddenly found my last unit of mounted men at arms facing the flank of Stephens second line of cavalry that had yet to charge.

On the far left flank of the Yorkists Mark had managed to cause Tony’s forces some damage but had eventually come off worse, even the flanking cavalry had succumbed to Tony’s billmen. Mark took the decision to consolidate his infantry and move towards the centre of the field in support of King Richard.

Despite getting a volley off Norfolk’s archers were still charged by the Tudor currours, but unlike the previous charges they failed to rout the archers. They had some billmen in support but they were not needed and the melee was locked in stalemate. However elsewhere on the field the Tudor loses were enough to push them to their first morale test.

Stephen finally managed to get his last unit of mounted knights into combat by charging the mercenary pikemen in the rear. But it wasn’t enough to destroy them and the counter from the pikemen managed to rout the cavalry. But in a close game it was the turn of the Yorkists to also test their morale.

King Richard was once again in the fray supporting his billmen against Andy’s archers in the centre, and remarkably the mercenary crossbows managed to score some good hits on Andy’s dismounted men at arms.

At this point the battle was reaching it’s final stages and both sides were trying their hardest to push the other to breaking point. Mark had advanced his dismounted men at arms into the centre and immediately came under fire from the Tudor artillery. Andy had done quite a lot of damage with his guns but despite having a two bonus dice failed to cause any damage to Marks knights on this occasion.

It was at this point that I managed to get Norfolk’s knights charging against the flank of Stephens remaining currours. The luck of the dice had changed (literally, because after a few bad rolls I swapped my dice), destroying the first currours for no loses and dispatched the second unit pushing the Tudors to their breaking point and handing a close fought victory to King Richard and the Yorkist cause.

This battle ended up being quite close, the score don’t show it but we’ve not had many battle where both sides passed their first morale checks. Stephen did much better in this battle with his cavalry, but that also put them in a position of being outflanked. For Richards command I should not have had such a variation in unit types. Between the guns, cavalry billmen and archers it was hard to co-ordinate things. North sides had some good and bad luck with the dice, but what was noticeable were the amount of failed activation dice in the game.

Although the Yorkists have changed history and won the campaign we will be visiting Stoke for the last battle of this period, just for completeness and to give the Tudor forces one last attempt for glory.

Yorkist Loses
3 Units of Mounted Men at Arms (12 points)
5 Units of Longbows (15 points)
2 Units of Artillery (4 points)
3 Units of Dismounted Men at Arms (12 points)
Total loses 39 points (Army break point 56)

Lancastrian Loses
2 Units of Northern Boarder Horse (6 points)
4 Units of Currours (16 points)
4 Units of Mounted Men at Arms (16 points)
6 Units of Longbows (18 points)
1 Unit of Militia Longbows (3 points)
1 Unit of Dismounted Men at Arms (4 points)
Total loses 59 points (Army break point 57)


Maidstone Rampant

Tony F reports on the club’s first encounter with an alien ruleset.

The club has played a lot of Daniel Mersey’s Rampant rules, both the original Lion and the fantasy Dragon spinoff. So there was a lot of interest when a sci-fi variant, Xenos Rampant was announced. We wanted to see how well the game engine would translate to the new setting with (presumably) more emphasis on shooting than close combat. And to be fair, not everyone thought it would work.

Recently, four of us managed to finally get ourselves organised and gave the rules a try (yes, we know that the book came out months ago – the wheels sometimes turn slowly in Maidstone). Eric and Mike had 30mm armies derived from WH40K forces, while Marcus had a 15mm force of mainly Khurasan miniatures and I cobbled together a force in the same scale from my Hammer’s Slammers armies (you can see those in the header photo).

Mike and Eric ran each other very close in their game, with just a handful of figures left on table at the end (although I’m not sure who actually won!) – sadly I didn’t get any photos. Marcus on the other hand had some dreadful luck with the dice and got a bit of a thumping.

My command team (Brigade Models’ power armour) prepare to unleash all sorts of pain into Marcus’ tank (GZG).

We then switched round and I took on Mike, while Eric switched to a 15mm force of Brigade Models miniatures. Mike and I fought a very tight game, I just prevailed but with very little of my force left on the table.

Marcus’ luck improved a little but he still went down to Eric eventually.

So our conclusions? We felt the game worked well, there are plenty of options to customise units to give your army a unique feel. The familiar game mechanics helped for those who have played other games in the series.

All of our games were 24 points, and we managed two each with plenty of time to spare. Units, especially vehicles, are relatively expensive so none of our forces had more than 5-6 units, and the game ran pretty quickly. So we felt that 36 point games would be perfectly manageable. One thing we found odd was the limit of only one vehicle – none of us could see an obvious reason for this.

We’ve penciled in another session for later in the year, some sort of mini-campaign or tournament. These will be 36 point games, and we’ll ignore the one vehicle rule so expect to see a bit more heavy armour. We seem to have won over a couple of previous refuseniks to give the game a go, so look out for another report in a few months, along with plenty of work-in-progress reports as people build up their armies.

Wars of the Roses – Battle of Tewkesbury – Battle Report

As we near the end of our Wars of the Roses campaign we find ourselves at the Battle of Tewkesbury. As with the other games in the campaign we looked for anything of historical note. For Tewkesbury we decided the Lancastrian player would set up the terrain to represent the fact that the ground was of their choosing.
This was a standard 800 point battle with Stephen commanding the Lancastrians left with Charlotte acting as second in command on the right. Assisting me with the Yorkists, Tony F made a return to the field facing Charlottes forces while I took the field opposite Stephen.

This was the battlefield as setup by the Lancastrians. They formed their battles between two sets of walled fields with some marshland just in front to further impede movement. Their right was made up of a mix of archers and billmen, but on the left Stephen had formed up no less than four units of mounted men at arms, and two units of dismounted men at arms in the centre.

The Lancastrian right flank was protected by some archers, while on the left were two units of hand gunners using the walls as a fortified position.
Seeing the Lancastrian deployment, I took some bold choices with how the Yorkists would deploy.

I placed my mounted men at arms in the middle of the field since no Lancastrian flank was on offer. I also felt there was no point trying to face the mass mounted Lancastrian units. I was convinced Stephen had placed those there to perform a mass charge against my forces. I wanted to provoke the Lancastrians into moving rather than wait until my Yorkist forces had advanced between the two walled areas.

Fearing the Lancastrian mounted units I was determined not to leave my infantry behind the advancing archers. So used my commanders to keep the units moving. Although I had some men at arms and retinue billmen, the second line should it be needed were only militia billmen.

But the Lancastrian cavalry didn’t move and it was clear that they were waiting for the Yorkists to advance past the hand gunners in their protected position or to spend time trying to dislodge them.

Trying again to goad the Lancastrians out of position I advanced my mounted men at arms to within charge range, and suggested to Tony he should do the same out on our left flank.

Still no reaction from the Lancastrians cavalry, so I had no choice but to advance my archers and use a few bonus dice to get a speculative flight of arrows in against the mounted units.

And in a result that shocked everyone the archers volley managed to destroy the flower of Lancastrian nobility!

That got the Lancastrians moving but only piecemeal. Stephen sent a lone unit against some advancing men at arms, who managed to blunt the charge and hold up the cavalry.

But the Yorkists didn’t have it all their own way. Tony’s mounted men at arms suffered at the hands of the Lancastrian archers placed behind the marshland. Tony decided the best counter to the loss of the knights was to advance his archers and billmen and take the fight to the enemy, but took some early casualties from the Lancastrian archers.

With my cavalry in the middle of the field still threatening to charge, Stephen decided to advance both his units of dismounted knights. The activation dice where in my favour and although Stephen had stacked the bonus dice onto his men at arms, it was my cavalry unit that got to charge first, however they failed to destroy the men at arms and got bogged down into melee.

Having managed to destroy the first mounted unit sent against the Yorkist right flank, Stephen sent another into the fight, this time he also managed to get off a volley from the hand gunners but to no effect.

The clash in the centre of the field reached a climax with the destruction of the Yorkist cavalry but not before managing to take one of the Lancastrians dismounted men at arms with them.

Over on the Yorkist left flank, despite the Lancastrian archers favourable position behind the marsh, the rest of the Lancastrian line was starting to take casualties with Tony’s archers punching holes in their ranks.

On came the last of the Lancastrian mounted men at arms, but despite giving his cavalry a bonus dice the Yorkist men at arms again refused to budge and the two sides were locked in battle.

At this point the loses for the Lancastrians pushed them over their first morale check. The test saw a number of key Lancastrian units quit the field adding to their misery.
Over on the Lancastrian right flank Tony was still on the offensive. Having dispatched most of the enemy archers he was advancing his men at arms into the fray.

With one last desperate charge Stephen sent his billmen in against my archers. These were actually my Militia archers and I gave them all the dice I could spare for the fight. The militia took the most damage but it wasn’t quite enough to destroy either of the units.

The final stroke came when my men at arms finally got the better of the last Lancastrian cavalry which pushed them over their break point and handed victory to the Yorkists.

The Lancastrians were left scratching their heads at the end of the battle, asking for clues as to what went wrong. The difference in losses suggested a rout, despite their forces having started in a defensive position.

Maybe the Lancastrians can take heart while marching towards the Yorkists greatest defeat on the fields of Bosworth.

Yorkist Loses
2 Units of Mounted Men at Arms (8 points)
2 Units of Longbows (6 points)
1 Unit of Spearmen (4 points)
Total loses 18 points (Army break point 46)

Lancastrian Loses
2 Units of Dismounted Men at Arms (8 points)
6 Units of Longbows (18 points)
4 Units of Mounted Men at Arms (16 points)
Total loses 42 points (Army break point 40)

Yorkist Victory

First Society meeting of the year

Andy rounds up the first meeting of the year.

A good turn out for the Society’s first meeting of 2024, which included the Annual General Meeting, as well as half a dozen games.

The games staged were representative of the many periods and genes covered at the Society, consisting of historical, fictional, fantasy and sci-fi games.

Tony and Phil made a start with their “Quest of the Ringbearer” Middle-Earth campaign, playing out 4 scenarios of the journey from the Shire to Mount Doom.

Scenario 1 Farmer Maggot’s Crop

Farmer Maggot’s cottage
Starting positions for scenario 1. The hobbits by their stash (giant tomato), Grip, Fang and Wolf by the kennel and Farmer Maggot asleep in his cottage.
One of the Hobbits fends off Fang while the others gather cabbages

Scenario 2 – Short cuts make long delays

Pippin gets left behind as Frodo and Sam head for Gildor Inglorion. The Nazgul blunder their way through the woods
Sam has three Nazgul to face, Pippin has fallen and Frodo is nowhere to be seen.

Scenario 3 – Buckleberry Ferry

Starting positions for Scenario three, Three Nazgul spread out near the ferry, the Hobbits are in the trees near the top of the picture.
Stalemate, the sole surviving Nazgul (with 5 points of Will left) has crossed the Brandywine tying the ferry on the far side of the river. The four Hobbits have taken some damage and can’t face swimming the river with a Nazgul waiting for them.

A more detailed report on these scenarios will appear in due course.

Stephen staged a 15mm American Civil War game using Brigade Fire & Fury, ‘The Battle of Mansfield April 1864’

Union defenders on the hill
Union fall back as the Confederates take the hill
Last ditch Union defence
Confederates turn the flank

Alan put on a Pulp Alley game “The Castle of Terror”, teams from the Intelligence Agencies of various countries have been dispatched to investigate secret German activity at Schloß Weidergänger.

The teams approach the castle through the woods
The enemy of my enemy is not necessarily my friend
Russians investigate one of the huts
Sentries patrol, “Hast du etwas gehört, Fritz?”

Jeremey and Eric tried out –“Grimdark Future” from One Hour Wargames using their Space Marines and Robot collections.

Space Marines attack!
Part of the robot horde
Space Marines with air support
Space Marines take a beating

John staged a FoG Renaissance 15mm ECW game pitching Royalists vs Covenanters

Scots Covenanters defend the hill
Push of Pike
Cavalry clash on the wings
Kings’s Lifeguard of Foot supported by cavalry attack the Covenanters

And finally, David put on a 28mm Napoleonic Corps game, Russians vs Prussians using General d’Armee rules

Battle lines are formed
Cavalry clash while infantry hide in the woods.
Russian foot attack the Prussians in the woods
Attack on the Cross Roads

Well, that’s it for the round up of our first meeting.

The Society meets on the 2nd & 4th Saturdays of the month at Linton Village Hall. You can find our diary of games here.

For new members/visitors, we will always endeavour to find you a spot in a game if we can.

5 Parsecs – The Crash Site

Club member Marcus reports on another solo game of 5 Parsecs from Home.

The crew of the “Pi” have had some scares so far but come out about as far ahead as an independent crew of scoundrels starting out in a big universe can expect so far. Turn 3  starts with payment of upkeep and debt on the ship. San and Nira trade for some contraband. There is a risk that they could acquire a rival as a result (law enforcement perhaps or a rival gang?)  but they get away with it and gain 3 CR. Kel and Wellington explore and pick up a shotgun. Always handy! More importantly they gain a rumour “Meet someone interesting…” In a darkened corner of a relic emporium a wizened alien gives them a strange token following a curious discussion over purchasing some old charts. It’s handed over with the words “Perhaps you can make use of this too…key to the temple, or so they say…” Wellington looks at the ancient looking etched cube in his hand with a curious look. “I have seen something like this before, but I can’t remember where…” perhaps it is just what it looks like, a curious old piece of junk. Perhaps not.

Meanwhile Pascal does some schmoozing and finds a new patron with an offer of a job which must be completed this turn or the next. Your patron has been double crossed in a shady information bartering transaction. The perpetrator has however crashed on a shuttle in the southern forests. Eliminate him and the knowledge he carries. It has the benefit of giving access to the company stores for supply purposes. Ultimately this produces a roll which generates 1 CR of scrap! “I told you that was a load of rubbish Pascal!” Very disappointing. This job also a significant hazard. The crew will face veteran opposition at -1 to panic.

They don’t yet know it but they will face the threat of the “Converted” infiltrators. Their opponents appear normal (as normal as anyone looks in this galaxy of diverse lifeforms!) but are part of the cyborg hive mind advance party…there’s a threat of invasion and galactic war!

You can see the Converted moving in from the north-west quite apparently quite close to the wrecked stealth shuttle. The crew can be seen at the south centre. The yellow counter is a randomly generated “curious item”, worth 1 CR if picked up)

The first couple of turns are spent moving in on the location of the crash. Despite the initial proximity of the converted to the site both crews converge at the location almost simultaneously with San and Kel spotting their opponents.

Rolling a 12355, Kel and Nira act. Kell moves and shoots against an opponent in the open rolling a 6! However, a damage roll of 2 leaves the opponent stunned (yellow counter). Nira moves and shoots the leader in the open with a 5. A damage roll of 4 equals the leader’s toughness for a kill (red token)! The enemy return fire, mainly at Nira, but fortunately they all miss. Just. San now opens up with his plasma rifle and hits. His plasma rifle does +1 damage and the resulting 6 kills another converted.  Veyon and Wellington search the shuttle but don’t locate the target, who has taken cover near a bulbous headed insanity plant.

In turn 4 a bad roll means that the crew all move after the converted, who don’t panic because they are (veteran) cold, calculating cyborgs. However, a volley of fire yields no results for the converted as they target San and Nira. Veyon in stealth gear (-1 to enemy shooting) moves into position. She also uses a sonic emitter which impacts enemy rolls with 5” by -1. Veyon shoots with no damage but gets two stuns on her target. Neither San nor Kel can get a hit. Nira rashly charges into close combat trusting in her lethal boarding sabre. Amid the melee of flailing sharp blades perhaps it is the cybernetics that give her opponent the edge, but Nira goes down. She survives the toxic effects of the planet but is a casualty and out of the action.

Turn 5 and having seen Nira go down an angry Kell blasts away at the remaining enemy but misses. They respond by firing at Veyon. She seems certain to be killed but somehow dives to safety (a luck point used, otherwise she would have been toast!) Wellington meanwhile has tracked the target who has moved some way from the shuttle. He shoots but misses. Veyon now return fire at the last of the e. A 5 hit and 5 damage see the last of them go down.

Wellington ultimately brawls with the target and brings the filthy traitor down too.

Far from an easy mission, both Nira and Kel nearly “bought it” (I used a story point to save Nira from a gruesome death). The crew pick up an extra 2 CR danger pay and 8 CR for completing the job. With the infiltrator converted wiped out, there is no evidence of the crew’s involvement and the Converted do not become rivals as a result. The crew also picked up something on the battlefield, a “personal item”. Perhaps representing a time before one of the enemy was converted. There is a chance this can be returned to a relative on visiting a future world, which would be worth a roll on the loot table.  In addition the crew gather some loot – Damaged weapons: a ripper sword and 3 frak grenades.

Experience; Everyone gains +3 except Nira who gets +5. Level-up: Nira, Kell and Veyon get +1 combat and Wellington +1 tough. They purchase a military rifle for 3 CR. Finally there is another chance meeting in a bar…(where else?). Could be an addition to the crew perhaps?