Andy is back with a round up of the Society’s members painting efforts.
We start with some Norman mounted crossbows from Stephen (above). He’s planning to field these against me in a Norman Conquest mini campaign later in the year.
Eric has been working on another car for Gaslands. Is that The Stig driving, or one of his cousins?
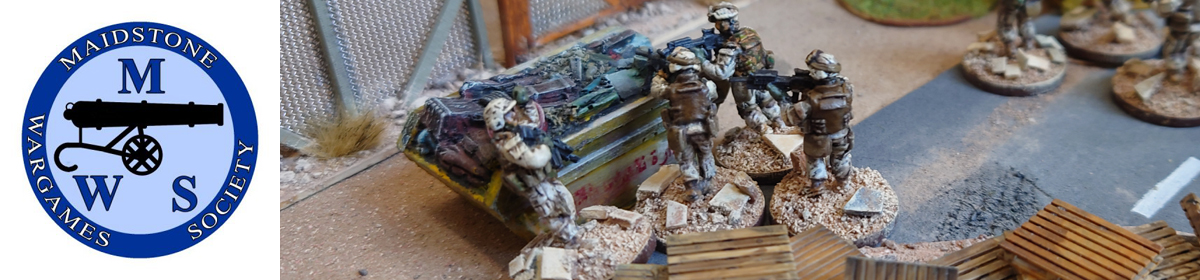
Felix has started work on some BAOR figures.
And Chairman Mark has finished his Vietnam USMC Recon team.
One we missed from last week, Marcus has been working on some Stargrave scenery.
Also on the scenery front, I have been working on a random selection of Lord of the Rings items.
And I’ve finished a couple of 3D prints from Brigade Models, a Ford Model T Armoured Car and a British 13pdr gun. The Ford is available from their website, but the 13pdr is a pre-production model so hasn’t quite made the website yet.
Tony has been making progress on his WW2 Belgians, first up, a Daimler Armoured Car. This is an IBG kit (the only plastic 1/72nd Daimler he could find) and it’s definitely not a quick build wargames model – it’s more like a miniature Tamiya kit with loads of tiny details. It has a fully detailed interior, although some of the parts once fitted would be impossible to see from any angle even with the hatches open, so all of that got left off.
And he’s also working on the 25pdr guns and tractors. And all the wheels!
Finally Peter M has been working on some 28mm Sci FI AFVs for the Hammer’s Slammers universe.
Another week and another roundup of MWS member’s efforts on the modelling and painting front.
First off we’ll take a look at a couple of offerings from Tony. Above we have a 6mm Hammer’s Slammers detachment – the Heliodorus Regiment who carry flamethrowers (not that they can be seen in this image) and ride around in big wheeled vehicles, with a few more bases of 6mm desert scenery. These are Brigade Models products, no surprise there!
Also from Tony we have progress on his late WW2 Belgians, a couple of 25 pdr guns, limbers and tractors, some 15cwt trucks for the motor rifle platoon, and a couple of scout cars. Tony says the green base coat looks nowhere near so pale in real life.
Next up some of Chairman Mark’s work, a Vietnam era USMC Recon Team.
Our main theme for this week is some Stargrave (other SF rules are available) markers, mostly for the Side Hustle option.
Marcus has built a Pylon from odds and ends.
A damaged robot/drone mainly for underwater games:
And finally from Marcus some Coral style scenery pieces.
Eric has built a pit marker, scratch built apart from the doors which are old 40k Rhino top hatches.
And some loot markers:
And I’ve also been working on some Side Hustle markers, although mine are commercial models rather than being scratch built. The Pylon and Pit are from Blotz, and the Robot from Alternative Armies.
I’ve also finished off a repair bot (Crooked Dice) and some sand worm type beasts, not sure where I got those.
Hopefully Jeremey will be back in charge next week.
Andy curates this week’s roundup of members painting and modelling activities.
We’ll start off with some offerings from Tony F this week, above we have the start on some Brigade Models 15mm Yenpalo infantry for Xenos Rampant. They comprise two units each of heavy infantry and light infantry/scouts, plus mortar and railgun teams. The scouts are on open order bases to reflect their Hard to Target rule, with the heavies in closer order. The weapons teams are based with two man crews, while the additional command figure allows the removal of single casualties.
Also from Tony are some 25 lbr guns for his 20mm WW2 Belgian project.
Next up we have some of Eric’s work, an Alien Bounty Hunter inspired by the recent Dead or Alive supplement for Stargrave. This is a Kroot Carnivore figure.
Continuing the Stargrave theme we have some Necrons:
And some Baby Bugs:
Finally we come to my meagre offerings. Firstly some simple markers for Lion Rampant, “Wall of Spears” and “Shieldwall”. Printed labels, PVA glue and some surplus cavalry “pill” bases.
I’ve finished off some Arab Light Cavalry (apart from their shields, which I can’t find!)
Jeremey’s otherwise engaged for the next couple of weeks, so compiling the WIP Wednesday roundup falls to Andy.
After helping Phil with basing figures for the WW2 game he and Tony put on at the Open Day, Phil’s youngest son decided he wanted to do some painting.
So as a start from him we have a GW wolf (above). He is now moving onto some Space Marines.
Marcus has been continuing work on a variety of projects, this week he has completed a couple of Pulp Figures.
Does the one on the left remind you of a character from a certain “motherly” film franchise?
Eric has started a new project, a 15mm force for Xenos Rampant, he’s assembled them, but no paint has been applied yet
I’ll finish off with some of my own work.
I’ve been experimenting with a home made wet palette (a Chinese takeaway container, thick kitchen towel and some greaseproof paper) and a vortex mixer.
The wet palette certainly keeps paint useable for a couple of days, and the vortex mixer seems to work well. We tried it out on some “problem” paints at the open day.
On to the figures, I’m nearing the end of the Arab Light Horse, just some washing and varnishing to do. And the shields. When I find them! Here are four of the twelve.
I’ve also been working on some Footsore slingers while I’ve been painting the Arab horse.
That’s all for this week, we’ll be back next Wednesday.
Andy completes the write up of the Crusades mini campaign.
First off, I must apologise to my fellow gamers, it has taken me far too long to complete this report.
Stephen and I continued the Five Battles Campaign from Lion Rampant Version 2. This time we were joined by two other members, joining Stephen with the Ayyubid Egyptians was club treasurer Mark, and joining me with the Frankish Settlers was new member Charlotte.
Photo credits: Charlotte, Stephen and Andy.
To recap the first day, we played three games, with my Pullani (Frankish Settlers) forces winning each battle. I had 3 victories and 23 Glory, Stephen had 3 defeats and -1 Glory. You can read about these games in a previous blog entry here.
The second day would comprise two more battles, the final battle using double size armies
When planning these games, we had prepared five warbands with differing points values for the five battles, and had assigned each warband to a battle before the campaign started. Stephen had used his larger warbands in the battles on the first day of the campaign, so would be at a disadvantage in the first game of day two.
Having won the final battle on day one, I got to choose the first battle on day two; I chose “The Road” and the die roll resulted in “The Convoy” scenario with Charlotte and I as the attacker (see part 1 for the battles that make up the campaign).
In this scenario the attacker has three convoy tokens that must be conveyed from one corner of the table to the opposite corner. For our game these comprised of a cart, a group of pious monks and a group of civilians. Each token had to be assigned to a unit, although more than one token could be assigned to the same unit. Escorting units were restricted to a maximum move of 6”. The convoy tokens have no effect in the game, other than marking the escorting units.
Stephen and Mark’s forces (Ayyubid Egyptian) comprised:
1 x Mounted Mamluks (Heavy Cavalry with Bows) Leader Blessed (Once per game, reroll any one full set of dice by any player) @ 7 points
3 x Mounted Turcomen (Wild Turk Light Cavalry) @ 4 points each
1 x Foot Ghilmen (Light Infantry with Javelins) @ 4 points
1 x Ahdath (Skirmishers) @ 2 points Total 25 points
Andy and Charlotte’s force (Frankish Settlers (Pullani))
1 x Knights (Elite Cavalry, Motivated), Leader Strongbow (Once per turn, unit within 12” automatically passes shoot activation) @ 8 points
2 x Sergeants (Heavy Cavalry) @ 4 points each
1 x Foot Sergeants (Heavy Infantry) @ 4 points
1 x Foot Yeomen (Light Infantry) @ 3 points
1 x Crossbowmen @ 4 points
2 x Skirmishers @ 2 points each Total 31 points
The scenario requires the attacker to deploy the units escorting the convoy tokens first in one corner of the table. The defender then deploys their forces, placing at least 4 points of units in each of the other three corners of the table.
We deployed our Foot Sergeants with the Monks and Civilians, and the Foot Yeomen with the Cart in the south east corner of the table, along with a unit of Skirmishers. We couldn’t fit anything else into the deployment area, so our remaining units would have to enter the table as a Move activation.
Andy’s convoy and escorts deploy (Andy)
Stephen and Mark deployed their main force of the Mamluks and two units of Mounted Turcomen in the North East corner.
Stephen’s main contingent (Andy)
In order to satisfy the requirements to deploy at least 4 points in each of the other two corners they deployed a unit of Mounted Turcomen in the South West corner
Stephen’s flanking force (Andy)
And their Ghilmen and Ahdath in a village in the North West corner (our exit point).
Stephen’s blocking force (Andy)
Prior to the first turn of the game the units escorting the convoy are allowed to attempt one move activation as a “head start”. Our Yeomen succeeded in their attempt and moved forward with the cart, but the Foot Sergeants refused to budge.
Our first turn was more successful, the first unit of Skirmishers and both escorting units succeeded in their moves, and we also managed to bring on both units of Mounted Sergeants, one on each flank. Our Crossbows and our Knights also made it onto the board. We deliberately kept our Leader’s Knights close behind the Crossbows to maximise the use of the leader’s Strongbow ability. The only unit that failed to come on was the second unit of Skirmishers.
Andy’s contingent advances, well, some of it! (Andy)
Stephen and Mark brought their Mamluks and Turcomen forward from the North East corner, to get in a position where they could block our path to the North West corner.
Stephen’s main force advance (Stephen)
In the North West corner, the Ghilmen found a wall to hide behind and the Ahdath occupied a building.
Stephen’s Ahdath occupy a building (Stephen)
I think Stephen wanted to use his only infantry units to block our exit from the table, but it did mean that in the early stages of the battle he would only have four units totalling 19 points to try and slow down our force of 31 points, or 24 points if you exclude the units escorting the convoy.
In our next couple of turns Charlotte and I concentrated on getting our units forwards, and didn’t advance the convoy escorts. We had a unit of Mounted Sergeants on each flank, with both the Crossbows and Skirmishers near to the Leader’s unit. Actually, looking at the photos I think we forgot to deploy the second unit of skirmishers!
Andy’s force spreads out (Andy)Stephen’s main force continued to advance ahead of us, with one unit of Turcomen lagging behind, and the lone unit of Turcomen advancing towards our left flank getting close enough to shoot at our Mounted Sergeants and inflicting a casualty.
On our Northwestern flank one of Stephen’s Turcomen units engaged our Mounted Sergeants, but with the help of our skirmisher’s shooting honours were even with both units being reduced to half strength.
Stephens main force skirmishes with Andy’s right flank, casualties on both sides. (Andy)
Meanwhile Stephen’s Mamluks came within range of our Crossbows, and with our Leader’s Strongbow ability guaranteeing a shooting activation each turn our quarrels took out a couple of figures, the Mamluks eventually came to blows with our left flank Mounted Sergeants, both sides taking casualties and falling to half strength but his Leader didn’t succumb to any lucky blows!
Stephen’s leader’s unit, or what’s left of it, and a unit of Turcomen (Andy)Remnants of Andy’s Left Flank face off against Stephen’s leader (Charlotte)
Meanwhile our convoy stayed back near the hill guarded by the Crossbows and Knights.
Stephen’s Turcomen closed on our Crossbows, and managed to kill one of them, but the Crossbows stayed firm and their return fire decimated the Turcomen.
Stephen’s Mamluks charged our Mounted Sergeants again, but this time his luck ran out and his leader fell.
One of the units of Turcomen got close enough to the Yeomen to shoot at them and caused a casualty, but they passed their Courage test.
Our Crossbowmen continued to shoot at anything that came within range, guaranteed by the Leader’s Strongbow ability and both the Mamluks and Turcomen were practically wiped out, only a couple of figures were left, allowing the convoy and escorts to advance off the hill.
The convoy advances, slowly (Charlotte)
The only functioning units Stephen and Mark had left were the Ghilmen and Ahdath in the village blocking the Pulanni’s exit. Although our Mounted Sergeants had been sorely damaged, our Crossbows and Skirmishers had only taken a few casualties and it was apparent that eventually we could position our Crossbows where they could shoot at the Ghilmen and Ahdath every turn from outside the range of their bows and javelins, and even with the benefit of cover they would eventually be whittled down, allowing us to escort the Convoy off the table.
So, at this point Stephen and Mark conceded the game.
Stephen and Mark made three boasts: “They will Cower before me” (3 Glory, failed). “They will Tremble before me” (2Glory, failed) and “My Arrows are Deadlier Than my Spears” (2 Glory, success). The failed Boasts cost 1 Glory each, so that made a total of zero Glory for the Ayyubids.
The Pullani only made two boasts, “They will Tremble before me” (2Glory, failed), and “I will Destroy more than I Lose” (2 Glory, success), making a total of 1 Glory to add to the 2 glory points per Convoy marker escorted off table. That gave the Pullani an additional 7 Glory.
After the fourth battle the Pullani had 4 victories and 30 Glory, the Ayyubid Egyptians had 4 defeats and -1 Glory.
The final battle.
From the outset of the campaign, we had agreed that the final battle would be a major clash using the Bloodbath scenario, and that each side would bring 50 points, split into two contingents, each with a leader. The two contingents did not have to have equal points.
On the Ayyubid Egyptian side the two contingents were:
Emir Mark al-Harris.
1 x Mounted Mamluks (Heavy Cavalry with Bows) Leader @ 6 points
2 x Mounted Turcomen (Wild Turk Light Cavalry) @ 4 points each
2 x Foot Ghilmen (Light Infantry with Javelins) @ 4 points
1 x Ahdath (Skirmishers) @ 2 points Total 24 points
Emir Stephen a’t-Ucker
1 x Mounted Mamluks (Heavy Cavalry with Bows) Leader @ 8 points
Skills: Blessed (+2 points) and Strongbow (+1 points)
2 x Mounted Turcomen (Wild Turk Light Cavalry) @ 4 points each
1 x Hashishin (Warrior Infantry, Assassin) @ 5 points
2 x Ahdath (Skirmishers) @ 2 points each Total 25 points
Notice the sudden appearance of the Strongbow skill in both contingents?
The Pullani contingents were:
Count Andrew:
1 x Knights (Elite Cavalry, Motivated), Leader @ 9 points
Skills: Commanding (+2 points)
1 x Sergeants (Heavy Cavalry) @ 4 points each
1 x Foot Sergeants (Heavy Infantry) @ 4 points
1 x Archers @ 4 points
1 x Holy Characters @ 2 points
1 x Skirmishers @ 2 points Total 25 points
Holy Characters are a unit type from the Crusader States supplement, they are similar to Skirmishers, but with only a 6” move, no shooting capability and lacking all the Skirmisher’s special rules, they do however allow, once a turn, a partial re-roll of dice for units within 6”. Re-roll 2 dice if 12 were rolled, otherwise re-roll 1 die.
Countess Charlotte:
1 x Knights (Elite Cavalry, Motivated), Leader @ 8 points
Skills: Strongbow (+1 point)
1 x Sergeants (Heavy Cavalry) @ 4 points each
1 x Foot Sergeants (Heavy Infantry) @ 4 points
1 x Foot Yeomen (Light Infantry) @ 3 points
1 x Crossbowmen @ 4 points
1 x Skirmishers @ 2 points Total 25 points
Summary of Leader skills
Strongbow: Once per turn, one unit within 12” of Leader’s model automatically passes a shoot activation)
Commanding: Each turn may re-roll one failed Move, Attack or Shoot activation withing 12” of Leader’s model.
Insipid: The Leader does not give the usual +1 modifier to Courage tests to unis within 12” of Leader’s model
Blessed: Once per game, re-roll any one set of dice, rolled by any player.
Stephen included his Hashishin in his contingent again, this time their dastardly plan failed and the Assassin sent after Count Andrew met a grisly end.
There would be no subtlety about the final battle, no scenario objectives other than defeating the enemy.
On the Christian side Andy deployed his contingent on the right flank. Archers on the left of his front line, then the Foot Sergeants, Skirmishers on the hill and Mounted Sergeants on the right flank.
Andy’s Knights and Holy Characters (the monks) were kept in reserve.
Andy’s contingent, the monks are the Holy Characters (Andy)
Charlotte deployed on the left flank, she kept her Knights and Mounted Sergeants in the centre of her deployment, with the Foot Yeomen on her left and Foot Sergeants on her right. Her Skirmishers and Crossbows were deployed in front of her cavalry, both within 12” of her Leader, to make best use of her Strongbow ability.
Charlotte’s contingent (Andy)
Opposing us Stephen deployed opposite Charlotte, and Mark deployed opposite Andy. We didn’t take many pictures of the Ayyubid deployment, but here’s a close-up of Stephen’s Turcomen and Hashishin Ahdath,
Stephen’s Turcomen and Ahdath in the village (Stephen)
Mark wasted no time advancing his cavalry towards Andy’s troops, lots of mounted archers approaching!
Mark’s cavalry approach Andy’s troops (Charlotte)
The exchange of arrows was fairly one sided, with two of Mark’s attacking units taking casualties with no loss to Andy’s forces.
Andy & Mark’s contingents, latter has taken some casualties. (Andy)
On the other side of the battle, Stephen advanced his Ahdath and a unit of Turcomen towards a village, with his Leader’s Mamluks supporting them, while his Hashishin and other Turcomen unit failed to advance. Charlotte’s crossbows and Yeomen also entered the outskirts of the village, with the Knights and Sergeants following up.
Charlotte’s and Stephen’s contingents (Andy)
Back on the Christian right flank, Andy and Mark’s troops came to blows, Mark’s cavalry charged Andy’s Archers, and after the latter took 4 casualties, they failed a courage test with a very low roll and routed from the field. The same fate befell Andy’s Skirmishers.
Andy then committed his cavalry; the Knights drove off one of Mark’s Turcomen units and then charged Mark’s Leader’s unit. After a couple of rounds of combat Mark’s leader fell dead as his unit was wiped out, meanwhile Andy’s Mounted Sergeants forced back Mark’s other Turcomen unit.
Andy’s Holy Characters took the hill previously occupied by his Skirmishers, a touch of religious frenzy perhaps?
Andy’s contingent, his Archers and Skirmishers have routed, but the Ayyubids have also suffered losses (Andy)
On the other side of the battlefield, Charlotte’s and Stephen’s troops exchanged missiles, both Charlotte’s Crossbowmen and Skirmishers took a beating, being reduced to half strength and failing their courage tests and becoming battered, but one of Stephen’s Turcomen fled the field. One of Stephen’s Ahdath also fell to half strength, but were made of sterner stuff and passed their courage test. Each side also suffered slight losses to their mounted troops.
Charlotte’s crossbow and skirmishers reduced to half strength and battered. One of Stephen’s Ahdath reduced to half strength. (Andy)
Their battle continued, Charlotte’s missile troops rallied, but didn’t seem keen to get back into the fray. Her Yeomen drove off one of Stephen’s Turcomen units. Stephen had advanced his Hashishin, and Charlotte’s Knights charged them and battered them sending them falling back, however this left her Knights exposed to Stehen’s Mamluks and Turcomen.
Charlotte’s Knights advance as the skirmishers flee. (Andy)
Stephen’s Hashishin recovered their composure, but Stephen decided it was time for his leader to show his mettle, and brought his Mamluks forward to face Charlotte’s Knights, supported by a unit of Turcomen.
Stephen’s contingent commit against Charlotte (Stephen)
Charlotte brought her skirmishers back to support her Knights, taking up residence in some bad going and just in range of one of Stephen’s Ahdath, who took more casualties from the skirmishers and fled the field. Charlotte’s skirmishers then turned their attention to the Mamluks.
The final clash (Andy)
Finally, the Mamluks and the Knights came to blows, and eventually wiped each other out. Fortunately, Charlotte’s units all passed their subsequent courage test forced by the loss of the leader.
On the other flank, Andy’s Mounted Sergeants and Mark’s Turcomen came to blows, the Turcomen winning this battle and the Sergeants fled the field.
Andy’s Knights however made short work of the Mark’s other Turcomen unit, routing it.
By now both Mark and Stephen had lost their leaders and just over half their original points value, so were both forced to take Courage tests on their remaining units (although Andy was also close to that point as well). Several of their damaged units failed the courage tests and became battered.
At this point, with several battered units and both of their leaders now dead or having fled the field, Mark and Stephen conceded the final battle.
Totting up the losses the Ayyubids had lost 28 points of troops, 14 each for Mark and Stephen, while the Pullani had lost 18 points, 10 points of Andy’s contingent and 8 points of Charlotte’s.
This gave the Pullani 5 Glory for the victory, now on to the boasts.
Stephen’s boasts were: “They Will Tremble before me” (2 Glory, success). “My Arrows are Deadlier Than My Spears” (2 Glory, success) and “I shall Slay Their Leader” (3 Glory, failed). The successful boasts gave Stephen 4 Glory, but he lost one for the failed boast making a total of 3 Glory
Mark’s Boasts were: “We Shall Avenge Them” (2) (success), “My Arrows are Deadlier Than My Spears” (2) (failed) and “They Will Tremble before me” (2 Glory, failed). The successful boast gave Mark 2 Glory, but he lost one for each of the failed boast making a total of 0 Glory
The final battle gave a total of 3 Glory for the Ayyubids.
Andy made two boasts, “They will Tremble before me” (2Glory, success), and “I will Destroy more than I Lose” (2 Glory, failed), giving Andy a total of 1 Glory
Charlotte made only one boast, “I will make them run” (1 Glory, failed), so she ended up on -1 Glory
The final Glory tally for the Pullani was 5 for the victory, 1 for Andy’s boasts and -1 for Charlotte’s boasts, a net gain of 5 Glory
After the final battle the Pullani had 5 victories and 35 Glory, the Ayyubid Egyptians had 5 defeats and 2 Glory.
A conclusive campaign win for the Pullani!
Stephen wants revenge and has already issued a challenge, the same 5 battles campaign, but this time set during the Norman Conquest of England! We have put these in the diary for later in the year.
Boasts
For those not familiar with Lion Rampant, Boasts are additional objectives you can set for yourself in addition to the scenario objectives. The Boasts we used in these battles, and their success criteria and Glory value are as follows (failing to achieve a boasts costs 1 Glory, irrespective of its positive Glory value).
Boast
Criteria
Glory
I shall slay your Leader
Your Leader must kill the enemy Leader in a Challenge or Attack. Routing the enemy Leader does not count as a success. If the enemy Leader refuses your challenge and survives the game, you succeed but score only 1 Glory
3
I will destroy more units than I lose
Your Warband must rout/kill more enemy units than you lose (the actual number of models destroyed and their points value is not relevant).
2
My arrows are deadlier than my spears
Your Warband must rout/kill more individual models with Shooting than Attacks (put casualties in two separate piles!)
2
They will tremble before me!
At least two enemy units on the table must be Battered at any one time.
2
We Shall Avenge Them
Secretly choose one enemy unit, you must rout of kill it during the battle
2
I will make them run
One of your units must be the first to fail a Courage test
In the year AD1058 there was a Norse invasion of England. The Anglo Saxon Chronicle doesn’t have much to say about it, just ‘In this year came a pirate host from Norway; it is tedious to tell how it all happened.’
And that’s it.
So Eric and myself decided to refight this tedious invasion using Saga.
I created a matrix of games from The Book of Battles, the game moves on to the next fight depending on who wins each encounter. If you also fancy giving this a go then below is a copy of the matrix. You can work out what to do – who is attacking and defending should be apparent from the previous game and what works best to create a story.
Game Matrix
Eric had Vikings led by Sigvald Ironhand, and I had Anglo-Danes (the English) led by Edward Oswaldsson. We used Warlord Experience from The Book of Battles to have games with a bit of depth and also to help create a narrative flow.
Sigvald and his raiders
First game was Feasting & Pillaging. Three objectives were laid out (loot from the nearby church) with the Vikings trying to steal as much as they could and the English trying to take it away from them. We went with 6 points each. The English had three points of hearthguard, two points of warriors, and one of levy. The Vikings had two points of hearthguard, two of warriors, and two of levy.
Edward and his hearthguard
The English hearthguard massed on their right flank, with the levy and the warriors on the left intending to use some woods as cover. This was because the Vikings had put their bow-armed levy in the middle meaning that a lot of missile fire would meet anyone there. I think Sigvald was being a bit cautious to start with since his raiders didn’t make the most of their moves – coming forward only slowly. Meanwhile, Edward knew that speed was of the essence and so started double-timing his troops, huffing and puffing as they went, to try and secure the church valuables.
Vikings skulk behind the stones
The Vikings advanced through an area of standing stones (clearly this site had been of religious significance for centuries), which also slowed their advance. This allowed the English hearthguard to capture one of the objectives. However, in the centre the English warriors realised that if they were to stop the Vikings then they would have to expose themselves to some bowfire if they were to secure one of the objectives. So they made a dash for it! The bowfire came but no casualties were taken. The Vikings hadn’t been idle though. Their warriors came forward and they managed to capture the last of the objectives.
Vikings with the vestments
The English levy, hiding in the woods, were within striking distance of the Viking thieves. But they had a dilemma – they could stay where they were and loose their slings or they could rush out of the woods and charge the Vikings. If they were going to stop the Vikings then a flurry of sling bullets was unlikely to take them all out – clearly they were going to have to get stuck in!
Anglo-Dane levy make a charge
They made a valiant attempt. The Vikings took casualties but they also gave them out. The English levy lost this exchange and were pushed back. This gave the Vikings the chance to make off with the treasure. On the left Sigvald had moved his Vikings through the stones and saw Edward ordering his hearthguard to make off with the loot. Another unit of English hearthguard had moved to shield the laden hearthguard and took a round of bowfire on the chin. Ouch! Down went three hearthguard.
Go on lads, I’m right behind you
And that was it – game over. The English had managed to get two of the objectives off the table, whilst the Vikings were in control of just one. Victory points came out at 36 to the English and 32 to the Vikings. Edward gained 3 experience points and took the level 1 Exploration ability. Sigvald gained 2 experience points which wasn’t enough to gain any abilities.
So checking the game matrix we see that, with an Anglo-Dane win, we move on to the Ambush scenario. The Vikings, having only partial success with their raid on the church of St Hildaburga, are now trying to flee the scene. The English are going to see if they can cut them off, finish the job, and take back what’s been stolen (which includes some slaves!)
Viking slave traders
We had 4 points each in this game. The English took two points of hearthguard, one of warriors, and one of levy. The Vikings had one point of hearthguard, two points of warriors, and one point of levy. In this scenario all units start off-table and you have to choose when and where to bring them on. There are three units of baggage moving across the table and the aim is to capture the baggage.
The English went first and brought on about half their units. They came on roughly in the middle, the thought being that by the time they got to the road so would the baggage. Sigvald’s Vikings did similar. I then made my first mistake – I brought the rest of my units (mainly hearthguard) on at the far edge of the table. My thoughts were they could block the baggage if anything made its way through. Turned out this wouldn’t happen – both the Vikings and English would intercept the baggage in the middle, this meant I had put one of my units out of the game because they were too far away.
Viking hirdmen advancing
Eric had learnt something from the previous game – sometimes it pays to double move a unit and take the fatigue. Especially in the games we’d played so far, where speed and movement were important. So that’s what he did and soon took control of one of the baggage items. In the middle my levies stepped on to the road to block another of the baggage items. This is where I made another mistake. Because I decided to pull them back (still don’t know why) rather than leave them where they were so they could start peppering the Vikings with their slings. Thus taking another of my units out of the game!
Then something bad happened that was out of my control – I rolled my Saga dice and the result meant I would be unable to activate my warriors (sorry, can’t remember what symbol I needed). I had one of the helmets so went for the Activation Pool, rolled them, and…they all came up the same as well! This meant that I could not move the warriors who I intended to charge the Vikings carrying the baggage. I did move up the hearthguard and Edward though.
And on Eric’s turn he did what any man of honour would do – sent in Sigvald so we had a warlord versus warlord scrap!
Trial by combat
This did not go well. Sigvald had 12 combat dice and Edward was on 10. That’s even enough and with the warlord’s ability to turn hits into fatigue I expected us both to come out of this alive but with a few cuts.
But no.
Edward got two hits on Sigvald. But Sigvald got ten hits on Edward, of which eight went through!
That’s a dead warlord.
At the end of the game it was 21 Victory Points to the English and 34 to the Vikings. A convincing win. Edward gained 2 experience points and Sigvald gained 3 and took the level 1 Tenacity ability.
Seems quiet enough for the time being
So we move on to our last game – Guard The Loot.
The Vikings, having escaped the English ambush, are now nearly home and dry. All they need to do is get their plunder aboard the boats and off they go.
The rules of this scenario mean that each player places 3 objective markers. At the end of the game you get Victory Points based on how many you control – those placed by your opponent are worth more than ones placed by yourself.
We had 5 points each. The English (now led by Edward’s son, Gyrth Edwardson) had three points of hearthguard, one of warriors, and one of levy. The Vikings had two points of hearthguard, two of warriors, and one of levy.
I made a slight mistake in my deployment. There were six objectives on the table but I only had five units. This meant it would be impossible for me to control all six objectives, but if I’m honest, I reckon that would be hard to achieve anyway. So not that bad.
We’d set up with a river running across the table with a bridge in the middle. This was slightly on my side. Normally you roll for how passable the river is at the beginning of the game but we decided we’d roll for it when a unit reaches the river. We decided we’d roll separately for the river either side of the bridge.
Vikings secure control of the booze
Both the Vikings and English soon gained control of two objectives each. The Viking warriors found some crates in the woods and Sigvald and his hearthguard found some more near a hill. The English levies took control of some cargo beside the river but rather than cross to another piece of loot just the other side of the river they chose to stay where they were so they could shoot at any Vikings that tried to claim it. Edward and his hearthguard soon took control of some barrels. The fight was going to be for the remaining loot. I had placed one of the loot tokens on the bridge which, being on my side of the table, meant I should be able to grab it. However, due to the scores I knew I had to push it and gain as much loot as possible and, ideally, the ones Eric had placed (worth more Victory Points) if I was to win the day.
So what do we do now
I pushed a unit of hearthguard and warriors toward the bridge. The intention was that the hearthguard would cross over where they could make a grab for one of the other pieces of loot and the warriors would come up to control the loot on the bridge. With Edward controlling one piece of loot I decided the other unit of hearthguard would cross the river to ultimately attack the Vikings with the loot in the woods. I let Eric roll for the river. Impassable! Yup, a steep, slippery, bank and deep, fast-flowing, rapids made it impassable. So I made the decision to double-time them to the bridge where I could launch an attack on the Viking side of the river. Meanwhile Eric moved a unit of hearthguard to control the loot by the river. The English levies opened up with their slings but…nothing!
Here we go! Here we go!
Now things hotted up! The first unit of English hearthguard crossed the bridge and made for the Vikings in the woods. Eric did the brave thing and backed up. And the Viking levies opened up with their bows. I used the Shieldwall ability to raise armour to 6 and thought that would be enough to stop the arrows. But no – three casualties caused! I then moved the warriors on the bridge along the banks of the river (and behind a hill to protect them from any arrows) so I could contest control of the loot there. This meant Eric only had control of two loot tokens whilst I had control of three, and the possibility of taking control of a fourth. Would that be enough to win the day?
Give us back our barrels
On the last turn Eric decided to go for it. Realising the difficult position he was in it was clearly an all or nothing situation. He counter-attacked on the bridge, meaning the English lost control of the loot token there, and then he brought up a unit of hearthguard to charge the warriors who were threatening control of the loot by the river. In this fight it went the Viking way – no Viking losses but two dead English warriors. This meant the warriors had to withdraw and therefore the Vikings would regain control of that loot token.
And that was the end of the game. The Vikings had just managed to snatch victory from the jaws of defeat – they had three loot tokens worth 9 Victory Points and the English had control of just two loot tokens worth 6 Victory Points. A close one.
But final Victory points for the day came to 63 for the English and 75 for the Vikings. A narrow Viking win. They had got away with some loot but not as much as they could have.
Jeremey is a bit under the weather this week, so WIP round up duties fall to me.
It’s been a fairly active week for Society members.
First up we have club chairman Mark’s continuing work on his 28mm Vietnam project. Above we have a Riverine Patrol Boat, still WIP, and below a finished ACAV and SEAL boat.
28mm Vietnam
For the opposition, Mark’s son has painted up some “Charlie”.
Vietnamese
Staying in Vietnam, but going down to 15mm, we have some of Stephen’s work.
15mm ACAVs and M114
For a bit of relaxation after the rigours of salute, Tony took a stone elemental that Jeremey sculpted, he did a simple basecoat-wash-drybrush-drybrush again job on it then filled in the etched runes.
Stone Elemental
Charlotte has been working on some terrain bits (and models) for Project Z and other games. A couple of billboards
Entertainment in the Zombie AgeYour Country Needs You!
And some modular road sections (complete with dodgy council line painting and potholes).
Modular road (complete with dodgy council line painting and potholes).
Peter has been kit-bashing some more Victorian Sci Fi Martian Cloudships, first up the Long Range Assault Carrier, H.M.S. Whirlwind, intended to deploy Royal Marine and Redcoat landing parties.
HMS Whirlwind readies mixed Royal Marine and Redcoat landing parties
Also recently launched from the Martian shipyards are the smaller ‘V’ Class of Cloudship, the Martian Torpedo Boat (or MTB):
‘V’ Class Martian Torpedo Boat (or MTB) HMS Valiant, Victor and Vulcan
Andy has finally got some painting mojo back, and has been working on a Salute purchase, some more figures for his Mexican Adventure forces.
Additions to Andy’s Mexican forces. Purchased and painted in less than 2 weeks!
Finally Marcus has been working on some air support for his Mant (ant-man) Army for Xenos Rampant (or other Sci Fi games)
Marcus’ VTOL
That’s all for this week, hopefully Jeremey will be back in charge next week.
Jeremey is otherwise engaged this week, so compiling the WIP Wednesday round up falls to Andy.
Mark J has finished another section of WW2 British Infantry (picture above) and is working on a couple of support units and an M10 Tank Destroyer.
Mark’s British Support and M10
And Felix has built a Sherman ‘Easy 8’ he purchased from Cavalier and started work on some civilians and a TV/Film crew for Vietnam games.
Felix’s Sherman M4A3E8Felix’s Vietnamese civilians, livestock and a film crew
Stephen splashed out on some medieval models at Cavalier and has made a start on them.
Stephen’s Tent and Trebuchet
Eric has been working on some scenery from Battle Of Osgiliarth, and is summoning up the courage/fortitude to attempt the actual figures themselves
Eric’s Ruins of OsgiliathEric’s Ruins of Osgiliath
Tony F has got back to his 20mm derelict farmyard after a bit of a hiatus. The corner behind the right hand shed will become a small garden with flowers and an apple tree once the glue under the lawn is dry. It needs some sacks and barrels to add a bit of clutter, then he thinks it’ll be there.
Tonys FarmTony’s Farm close up
David has started work on some Caissons for his Napoleonic collection.
David’s Napoleonic Caissons
Finally, Marcus continues with his Stargrave and Pulp Alley figures. The larger sandy coloured figure will be a power armoured robot.
Andy rounds up a busy weekend for the Society. Photos by Andy unless stated otherwise, header photo by Stephen.
Last weekend saw both a Society meeting and our annual trip to the Cavalier Wargames show run by Tunbridge Wells Wargames Society.
Only three games at the meeting on Saturday, perhaps due to some members only being able to get out on one of the days.
First up, David ran a Napoleonic Corps game using General d’Armee rules and figures from his collection. This was a popular game with half a dozen members partaking.
Eric ran a Judge Dredd RPG, only a couple of photos of this one I’m afraid.
Judge Dredd RPGJudge Dredd Bar room Brawl
Finally on Saturday Andy and Stephen finished off their Lion Rampant Five Battles campaign, joined this time by Treasurer Mark and new member Charlotte.
Game one.
This was a Convoy mission, the Christians had to escort three “baggage” markers diagonally across the table, a cart, some monks and some civilians. The Muslim forces had to stop them.
Much reduced cavalry face off (Charlotte)Andy’s convoy and escorts (Charlotte)Egyptian Light Cavalry (Charlotte)
Game 2. This was to be our “Big Battle”, with two commands on each side. Here the objective was simply to defeat the opposition.
Andy’s warbandAndy’s Warband (Charlotte)Charlotte’s and Stephen’s warbandsStephen’s view point (Stephen)
We will post a write up of the final games in the campaign in the near future.
CAVALIER
On Sunday half a dozen or so members travelled to Tonbridge for Cavalier.
The Society’s game for this year was masterminded and built by Phil, and was a 3D representation of a map game published in the 1977 Warlord Comic Summer Special portraying a Luftwaffe raid on Southern England during the Battle of Britain.
Phil’s board, 560 individually marked squares!Airfields and ammunition dumps are three of the targets for the LuftwaffeA close up of the townA copy of the original game can just be seen at the bottom of the photo
Andy reports on the first part of a short campaign.
Stephen and I started the year with the Five Battles Campaign from Lion Rampant Version 2. We decided to set the campaign as part of the Crusades, and allow the use of the additional rules and forces from Lion Rampant: The Crusader States.
Stephen would take the Muslim forces and I would take the Christian forces.
The campaign comprises of five battles, the participants prepare 5 Warbands and they allocate each of these Warbands to one of the battles. In the book these are of 20, 24, 24, 24 and 30 points, we decided that we would go large, and would use Warbands of 24, 24, 30, 30 and 48 points.
We gave leaders the free skill to allow a single reroll for a failed Move Shoot or Attack order, and allowed an extra point to each of the warbands (2 to the 48-point warband) to be used solely on additional leader skills (up to 2 skills per leader), so the warbands would effectively be 25, 25, 31, 31 and 50 points. Any points spent on leader skills in excess of the one or two extra points would be taken from the point value of the Warband.
The 48+2-point warband would be used in the last game, and would be split into 2 contingents, players choice if this warband contains contingents of equal or unequal points values.
Throughout the campaign Stephen would be the Red player, and I would be the Blue player.
For each battle the roll of a D6 would determine which scenario would be used, with the basic Bloodbath scenario being a 1 in 6 chance for each battle.
The five battles in the campaign, and the possible scenarios and attackers are:
Battle
Die Roll 1-3
Die Roll 4-5
Die Roll 6
Scenario
Attacker
Scenario
Attacker
Scenario
The River Valley
6: A Gentle Stroll (p146)
Blue (Andy)
16: Bloodfeud (p166)
Red (Stephen)
1: Bloodbath (p137)
Roll D6. Highest is Attacker
The Hills
3: Defending the Indefensible (p140)
Red (Stephen)
7: Hold on Tight (p148)
Blue (Andy)
The Road
13: The Convoy (p160)
Blue (Andy)
14: Meeting the Neighbours (p163)
Red (Stephen)
The Meadows
11: The Messenger (p154)
Red (Stephen)
4: The Fugitive (p142)
Blue (Andy)
The Village
8: Sausages with Mustard (p149)
Red (Stephen)
12: The Taxman Cometh (p156)
Blue (Andy)
To determine the first battle of the campaign we rolled a d10, subsequently the winner of a battle would choose which battle came next.
Battle 1.
The d10 result was 2, leading us to fight the battle in the River Valley, for this battle one long edge, the south edge, is a deep, impassable river, and we placed a stream, counting as bad going, just over halfway across the table, just to the east of the middle of the table.
The subsequent d6 roll resulted in scenario 6, A Gentle Stroll (p146). This made me the attacker and Stephen the defender. I had chosen a 31-point warband for this scenario, Stephen had a 25-point warband.
Andy (Frankish Settlers (Pullani)) Total 31 points
1 x Knights (Elite Cavalry, Drilled), Leader Braveheart (In challenges only hit on a 6) @ 8 points
2 x Sergeants (Heavy Cavalry) @ 4 points each
1 x Foot Sergeants (Heavy Infantry) @ 4 points
1 x Foot Yeomen (Light Infantry) @ 3 points
1 x Crossbowmen @ 4 points
2 x Skirmishers @ 2 points each
I should have had a unit of Light Cavalry, instead of one of the Heavy Cavalry units, but these are still on the painting table.
Stephen (Ayyubid Egyptian) Total 24 points
2 x Mounted Mamluk (Heavy Cavalry with Bows) @ 5 points each
3 x Mounted Turcomen (Light Cavalry) @ 4 points each
1 x Ahdath (Skirmishers) @ 2 points
Yes, Stephen should have had a 25-point warband, but he forgot to add a Leader skill!
Stephen deployed his forces in the North West Corner, with the objective of getting his warband off the South East corner. He had to leave one of his units of Turcomen off table initially, as they wouldn’t all fit into the deployment area.
I had to deploy in the North East and South West corners, with at least one unit in each area. My objective was to prevent Stephen from exiting the board. My plan was to deploy most of my force in the North East corner, including my Skirmishers and Crossbows, with the intention of moving them as quickly as possible to the South East corner to block Stephen’s exit.
Positions after turn 1. Sorry it’s a bit blurred.
I had to deploy at least one unit in the South West corner, I decided to use one of the Heavy Cavalry units and the Light Infantry, I wanted units that could move fairly quickly, but that would also be a threat to Stephen’s flank.
Andy’s “Forlorn Hope”
Stephen sent one of his units of Mamluks and his unit of Ahdath to counter my force in the South West, while the rest of his mounted units headed for the South East corner and safety.
Stephen’s Ayyubid Egyptians spread out
I Sent my Skirmishers forward, headed for the rocky ground to the east of the stream, hoping to be able to shoot at any of Stephen’s troops trying to cross the stream while taking advantage of the rocky ground as cover. I sent my second unit of Heavy Cavalry toward the Northern part of the stream to guard against a unit of Turcomen getting behind me, while I tried to keep my Leader’s unit of Elite Cavalry centrally positioned to enable him to use his failed activation re-roll should my heavier foot fail in a move activation.
Andy’s main force making all speed
On the West of the table my Yeomen made it to the hill only to receive an arrow storm from the Mamluks and Ahdath, sending them battered back off the hill.
Some of Stephen’s main force reached the stream, and came within range of my Skirmishers, fortunately I came out on top of the duel, and a couple of his Turcomen were forced back from the stream with heavy losses. He did get one unit of Turcomen across the stream and headed for the exit point, but by this time my Crossbows were in range and their quarrels took their toll.
Stephen’s Emir crosses the stream
In the West my Yeomen spectacularly failed their Rally attempt and fled the field, leaving the Mounted Sergeants a bit isolated. I decided to move these into the lee of the hill to take them out of sight of the Ayyubids, Stephen moved his Mamluks in parallel, and they eventually came to blows, both units being reduced to below half strength, with my Mounted Sergeants eventually routing.
Meanwhile Stephen’s Emir bravely pressed on crossing the stream, but by this time I had brought my second unit of Mounted Sergeants and my Knights further to the south.
The Mounted Sergeants were able to charge the Emir’s unit, reducing the unit to Emir himself. He must have been blessed with luck as he survived all the Leader casualty rolls he had to take, but did fail a Courage test, forcing him back across the stream.
I failed in an attempt to shoot him down with my Skirmishers, and we then came to a critical point. The Emir had to take a Rally test, if he failed, he would rout as he was the only figure left in the unit, and if that happened then all of Stephen’s remaining units would also have to take courage tests. Of course he passed, and I was unable to inflict a further casualty with archery before Stephen moved him out of range of my Skirmishers.
Stephen’s only full-strength unit now was his Ahdath, who were still well to the west of the stream, he had one unit of Turcomen just over half strength, but the remainder of his units were below half strength.
Stephen’s remnants
On the other hand, I had lost my Heavy Cavalry and the Light Infantry west of the stream, but all my other units were at over half strength and my Crossbows and Heavy Infantry were now blocking the Ayyubid’s exit point, with the latter in Wall of Spears.
At this point Stephen conceded that he could not win the battle, he did not think he could get enough of his troops off the exit point to win the scenario, so he conceded.
At the start of the game, I had made three boasts, ‘I shall slay their leader’ (3), ‘I will destroy more units than I lose’ (2) and ‘They will tremble before me’ (2). I failed to achieve the first two, but I did succeed with the last one, so I netted out at 0 Glory for the boasts (failed boasts cost you 1 Glory, irrespective of their value if you win), but took 5 Glory for the win.
Stephen made three boasts as well, ‘My arrows are deadlier than my spears’ (2), ‘Their arrows shall be lost like tears in the rain’ (1) and ‘They will tremble before me’ (2). He succeeded with the first two boasts, but failed the last for a total of 2 Glory for the boasts.
So, after the first battle it was 1-0 to me, I had 5 Glory and Stephen had 2 Glory.
Battle 2
For this battle I had selected a 25-point warband and Stephen had selected a 30-point warband (he forgot the additional point for a leader skill again).
Having won the first battle, I chose “The Meadows” as the second battle, and the d6 rolls resulted in the Bloodbath scenario with me as the attacker.
Andy (Frankish Settlers (Pullani)) Total 25 points
1 x Knights (Elite Cavalry, Drilled), Leader Braveheart (In challenges only hit on a 6) @ 8 points
1 x Sergeants (Heavy Cavalry) @ 4 points
1 x Foot Sergeants (Heavy Infantry) @ 4 points
1 x Foot Yeomen (Light Infantry) @ 3 points
1 x Crossbowmen @ 4 points
1 x Skirmishers @ 2 points
Stephen (Ayyubid Egyptian) Total 30 points
2 x Mounted Mamluk (Heavy Cavalry with Bows) @ 5 points each
3 x Mounted Turcomen (Light Cavalry) @ 4 points each
2 x Ahdath (Skirmishers) @ 2 points each
1 x Foot Ghilman (Light Infantry, with Javelins) @ 4 points
In this scenario each side deploys in three phases, first any 1- and 2-point units, then 3- and 4-point units, then units worth 5 or more points. The defender deploys first in each phase.
I knew I was going to be outnumbered and I also knew that due to the deployment rules Stephen would have to deploy most of his Warband before I deployed anything heavier than my Skirmishers. So, I decided on a ruse, I planned to concentrate my force in the South West corner and rely on an interior lines defence, trying to prevent Stephen being able to bring all his troops to bear at the same time, but I would try to make it look like I was going for a central deployment.
Stephen started by deploying his Ahdath on his left flank, near some rocky ground. I deployed my Skirmishers about a third of the way across the table, near to a building, I was hoping Stephen would think that these would be guarding the left of my line, when I actually intended them to be the right of my line.
Stephen then deployed his Ghilman and Turcomen, one of the latter to the east of his Ahdath and the other two in the North West corner with the Ghilman unit.
Stephen’s left flank
Now it was time to deploy my main force, I put my Yeomen on the extreme left of my deployment zone, then the Crossbows, then the Heavy Foot. I put the Mounted Sergeants on the right, immediately behind the Skirmishers. These would act as flank guard.
Stephen then deployed his remaining units, two groups of Mamluks, including his leader.
Stephen’s Turcomen, Ghilman and Mamluks
I deployed my Leader behind my Infantry line, intending to position him so that he could influence courage rolls on the main infantry line.
Turn 2 Andy’s Pullani brace themselves for the attack.
On my first couple of moves I advanced my skirmishers to occupy one of the buildings to form a bastion on my right, and advanced the rest of the infantry to form a diagonal line, getting the Yeomen and Sergeants into Wall of Spears.
Andy’s defensive line
Stephen advanced his forces, but he let his Ghilman get too far ahead of his other troops so they came in range of both my skirmishers and crossbows, taking casualties from both and being forced to retreat battered.
Stephen’s Turcomen units on the West flank advanced and shot at my Yeomen, temporarily battering them, and forcing them back. Fortunately for me they rallied at the first attempt and resumed their place in the line before Stephen could exploit the gap. Stephen also got his Ahdath close enough to my Skirmishers to start shooting, but having the advantage of cover my Skirmishers won that shooting contest. Stephen’s Turcomen unit on the East flank came up, so I advanced my Mounted Sergeants to chase them off, if memory serves, I charged them, they tried to evade but failed and had to fight with Armour of 1, all but being wiped out in the first round of combat.
On my left (the West) Stephen tried attacking my line of foot but his units were rebuffed. My crossbows and skirmishers must have been practicing because they inflicted many casualties breaking a couple of Stephen’s units.
With over half of Stephen’s units wiped out or routed, and with the hope of getting a third battle in, Stephen conceded.
This time I only made two boasts, ‘Half of the Enemy shall fall to my Sword’ (2) and ‘They will tremble before me’ (2). I succeeded with both boasts, so I gained 4 Glory for the boasts, and took 5 Glory for winning the battle.
Stephen made three boasts again, ‘I will destroy more units than I lose’ (2), ‘Half the enemy shall fall to my sword'(2) and ‘My arrows are deadlier than my spears’ (2) this time Stephen failed to achieve the first two boasts, but did succeed with the third, which cancelled each other out, so no change in his Glory total.
So, after the second battle I had 2 victories and 14 Glory, Stephen had two defeats and 2 Glory.
Battle 3
For the third battle I chose “The Hills” and the die roll resulted in Scenario 3 “Defending the Indefensible” with Stephen as the Attacker and I as the Defender. The table was set up with 5 hills, one in the centre of each quadrant, and one more in the central area of the table, with a shrine on the central hill. I had to deploy up to 10 points in the central zone, defending the shrine, with the remainder of my force in the Western deployment zone. Stephen’s force would deploy on the Eastern zone with the objective of getting one of his units into contact with the shrine.
Andy (Frankish Settlers (Pullani)) Total 25 points
1 x Knights (Elite Cavalry, Drilled), Leader Braveheart (In challenges only hit on a 6) @ 8 points
1 x Sergeants (Heavy Cavalry) @ 4 points
1 x Foot Sergeants (Heavy Infantry) @ 4 points
1 x Foot Yeomen (Light Infantry) @ 3 points
1 x Crossbowmen @ 4 points
1 x Skirmishers @ 2 points
Stephen (Ayyubid Egyptian) Total 29 points
1 x Foot Mamluk (Heavy Foot, Expert) @ 6 points
2 x Foot Ghilman (Light Infantry, with Javelins) @ 4 points each
1 x Hashishin (Warrior Infantry, Assassination) @ 5 points
1 x Mounted Turcomen (Light Cavalry) @ 4 points
3 x Ahdath (Skirmishers) @ 2 points each
The astute among you will notice the inclusion of a unit of Hashishin in Stephen’s warband, with the Assassination upgrade. These troops and the upgrade are from Lion Rampant: The Crusader States. The Assassination upgrade normally costs 2 points but the Hashishin get a discount so it only costs them 1 point. This allows a pre-game assassination attempt against the enemy leader, requiring a 5 or 6 on a d6 to succeed. Needless to say, Stephen rolled a 6, and my leader left this mortal coil clutching his throat. This meant that I would not get any Leader benefits in the next game.
I decided I would need to keep my fastest units as my “reserve” to give them the best chance of getting into the fray (this may have been a mistake), so I deployed my Foot Sergeants occupying the shrine on the hill, with the Crossbows facing Stephen’s deployment area, and the Skirmishers to one flank. In the Western deployment zone I put my two mounted units and my Yeomen.
Stephen deployed his Hashishin and Ghilman in the northern half of his deployment zone, with his Mamluks and Ahdath in the centre and his Turcomen on his southern flank.
As Attacker Stephen took the first move and advanced most of his troops towards the shrine, I advanced my crossbows and moved the skirmishers behind them to the northern flank. I then started to move my reserves up, thankfully all the units succeeded in their move activations in the first turn.
In the next couple of turns our missile troops exchanged fire, generally to my advantage, Stephen advanced his Hashishin and Ghilman closer to the shrine, and I managed to bring up my Mounted Sergeants on my southern flank and my Foot Yeomen on the Northern flank. My unit of Knights, bereft of their Leader, resolutely refused to advance any further (needing a 7+ to move, and having lost the ability to reroll a failed activation with the assassination of my leader).
On the southern flank our cavalry units came to blows, with my Sergeants coming out on top.
Stephen’s Ghilman advanced towards my Crossbows, taking casualties on their way in, but his Hashishin eventually got close enough to charge my Skirmishers, who managed to evade the charge.
By this time, I had brought up my Yeomen to hold off one of the Ghilman units, and Stephen’s Hashishin diverted their attention to my Crossbowmen who miraculously survived the Hashishin’s charge, driving them back.
Andy’s Pullani defend the shrine
And my Knights, you ask? Still sat stubbornly on the edge of my deployment zone refusing to move.
Stephen closes in on the Shrine, my Knights have hardly moved.Andy’s Knights “resolutely guarding the rocky ground”.
Stephen continued to throw his Ghilman at my Yeomen, and although the latter were reduced to half strength, they held on long enough that the Gilman unit eventually failed its Courage and Rally tests and melted away.
One of the conditions for ending this scenario is when the Attacker has lost 50% of their starting points, and eventually Stephen’s mounting casualties brought him to this point ending the battle.
For this battle I again only made two boasts: I shall destroy more than I lose (2) and Tremble before me (2). I succeeded with both boasts, so I gained 4 Glory for the boasts, and took 5 Glory for winning the battle.
Stephen made three boasts again: ‘My arrows are deadlier than my spears’ (2), ‘I shall strike the first blow’ (1), and ‘I shall run rings around them’ (1). Unfortunately for Stephen he failed to achieve any of these boasts so lost 3 Glory.
My recalcitrant knights did do one good thing, as they refused to move away from my deployment zone it made it all but impossible for Stephen to achieve his ‘’I shall run rings around them’ boast.
So, after the third battle I had 3 victories and 23 Glory, Stephen had 3 defeats and -1 Glory.
In our next session we will fight the fourth battle, where I expect to have a larger force than Stephen, and the final 50-point battle, which we will open up to a second commander on each side.
Boasts
For those not familiar with Lion Rampant, Boasts are additional objectives you can set for yourself in addition to the scenario objectives. The Boasts Stephen and I used in these battles, and their success criteria and Glory value are as follows (failing to achieve a boasts costs 1 Glory, irrespective of its positive Glory value).
Boast
Criteria
Glory
I shall slay your Leader
Your Leader must kill the enemy Leader in a Challenge or Attack. Routing the enemy Leader does not count as a success. If the enemy Leader refuses your challenge and survives the game, you succeed but score only 1 Glory
3
I will destroy more units than I lose
Your Warband must rout/kill more enemy units than you lose (the actual number of models destroyed is not relevant).
2
Half of the enemy shall fall to my sword
Your Warband must rout/kill at least half of your enemy’s total number of units (the actual number of models destroyed is not relevant).
2
My arrows are deadlier than my spears
Your Warband must rout/kill more individual models with Shooting than Attacks (put casualties in two separate piles!)
2
They will tremble before me!
At least two enemy units on the table must be Battered at any one time.
2
I shall strike the first blow
One of your units must declare the game’s first Attack
1
I shall Run rings around them
At the end of one turn of the game, have one of your own units closer to the enemy’s base line than any of their units.
1
Their arrows shall be lost like tears in the rain
None of your units may be ultimately routed or destroyed by missile fire (they may take missile casualties, but this cannot be the cause of their removal from play).


You must be logged in to post a comment.