A quieter meeting this time, just three games in progress.
Paul and Colin staged a 2mm recreation of the Battle of Waterloo.
French advance covered by skirmishers
Mark J and Tony F were trying out ‘O’ Group with an early WW2 encounter between the French and Germans in 10mm.
German and French Infantry line the hedgesFrench InfantryFrench ArmourGerman ArmourGerman InfantryGermans push back the French right flank
And finally Stephen ran a Stargrave game, with a Valentine’s Day theme. Look out for the Captains’ unbiased reports in a blog post soon.
Some nere-do-wells in the streets of Verona on the planet RomanceThe mean streets of the west side of VeronaCarnage outside the pub.Mariah – the Angel, guarded by Captain Greyfax’s crewCaptain Reynold’s crew passing quietly down a back alley.All is quiet again in Verona
MWS meet on the 2nd and 4th Saturdays of the month (except the 4th Saturday in December) from 10:00 to 17:00 at Linton Village Hall, south of Maidstone on the A299.
Information about the Society, including directions, can be found here.
The diary of planned games can be found here, this is updated throughout the year so please have a look from time to time.
This was our third, and final, game in a trilogy of scenarios based on actions conducted by the 173rd Airborne in Vietnam.
This game was based around Operation McLain, where the US and ARVN sought to regain control over rural communities they lost during the Tet Offensive. The company was supported by their mortar teams and a firebase of 105mm howitzers dedicated to their operations, plus the possibility of air support from the US Navy. The mission was to locate and engage suspected NVA and VC units in the area.
The NVA comprised a reinforced company atop Hill 435 – three rifle platoons, plus company mortars, and a command bunker with the Company HQ consisting of the CinC, a mortar spotter with radio, plus a HMG. The US forces had advanced too closely on the hill and I could tell that if they requested artillery it would be refused due to proximity of friendly troops. This would cause them a lot of problems. But Cpt Smith wisely called artillery in on the reverse slope so he could walk the artillery in to position.
The VC were in position around the northern village and were an understrength local force company of three platoons. Lt Francis had the job of sweeping through the villages, something he’d also done in the previous game.
The area was not a Free Fire Zone, so authorisation was required for any support from artillery or air. The southern village was neutral, trying to keep its head clean. Whilst the northern village was firmly in the grip of the local VC who were using it to store war materials.
Airborne assault underway
Company Commander’s report of military Operation McLain in the vicinity of Da Lat June 1968.
Our company of 173rd Airborne was ordered to conduct a recce and aggressive sweep to the north of our designated LZ , clearing the two villages in the SE and the NE, taking Hill 435 and to locate and destroy any enemy we engaged. A US press team joined our company and for security reasons I decided they should be attached to the Company HQ.
The company HQ, the weapons platoon and press team made the first Heli drop in middle of the LZ and prepared to give fire to any enemy that may attack platoons 1, 2 and 3 as they came in to land in quick succession.
All platoons came in and landed without any interruption from the enemy. Platoon 1 (Lt. Francis) to the right of Weapons platoon and HQ’s position. Platoon 2 (Lt. King) to the left and Platoon 3 (Lt. Claridge) to the left, just behind and between HQ & weapons platoon and Platoon 2. Lts King & Claridge were ordered to advance their platoons with caution – hunkering down in cover at intervals – towards Hill 435.
Lt Francis’ platoon advanced cautiously towards the village to the SE. HQ and Weapons platoon advanced also.
Weapons platoon gives supporting fire
Hill 435 was likely to be heavily defended, probably by regular NVA. Enemy positions were soon located on the Hill and consequently our weapons platoon commenced to lay down heavy fire with
M60 machine guns and 75mm recoilless rifles with devastating effect. Our company mortars were called in to fall on the north sector of the hill. This was potentially dangerously close to Pltn’s 2 & 3, but with careful direction from our Forward Observer and myself the mortar rounds landed accurately on target. Lts King & Claridge were ordered to temporally halt and hunker down whilst our mortars hit the top of Hill 435.
Meanwhile, enemy mortar rounds started to fall in the vicinity of our HQ and Pltn’s 2 & 3. This seemed to be an enemy observed bombardment as the barrage was steadily moved to the north for several minutes which put more of our platoons in danger.
It was under this bombardment that Lts Claridge and King took casualties including one fatality. Lt King himself had to be medevaced out by Heli along with three other casualties. It could have been worse, but Lts King and Claridge had kept their men hunkered down which undoubtedly protected them from further casualties.
Weapons platoon about to take mortar fire
Casualties were also taken by the weapons platoon’s machine gun squad and unfortunately one of the Press team had to be medevaced out by Heli also. Our mortar bombardment of Hill 435 caused regular NVA to move down the hill into the fire from weapons platoon which caused heavy enemy casualties. The enemy mortar bombardment stopped abruptly and we at HQ realised that the enemy mortars and FO were probably on top of Hill 435 and were destroyed by our mortar barrage. I ordered our barrage to cease to allow Pltns 2 & 3 to advance up the hill. A squad from Pltn 2 skirted around the hill to the west to discover an enemy unit of VC irregulars.
Lt Claridge discovered an enemy bunker on the upper slopes of Hill 435. After 2 light assault weapons were fired at the bunker without success it was an M79 blooper round that went straight into the bunker through the slit and despatched it with a devastating explosion.
Weapons platoon about to take mortar fire
Navy Air support was requested to engage suspected enemy positions to the north of the hill but was not available at that time.
By this time, the weapons platoon was also engaging enemy units, which looked like VC irregulars, to their front and right front, again pouring withering fire into them from the M60s and the recoilless rifles. Lt King’s platoon, under command of an NCO as Lt King was seriously wounded and evacuated, engaged irregular VC on the slopes of the hill and around the north of the hill.
Lt Francis’ platoon searched and cleared the village successfully in the SE sector and advanced through the dense jungle terrain towards the second village. Despite comms problems, they engaged and routed more irregular VC to the North of the dense terrain area and eventually entered the village. Several enemy bodies were recovered along with a concealed arms cache.
All across our company’s front, the enemy completely dispersed, abandoning several bodies and equipment. The enemy bunker turned out be the NVA’s Company HQ and also contained a heavy machine gun crew which would have been lethal for Pltns 2 & 3 had they managed to open fire before the bunker was destroyed.
The company took relatively very light casualties and all the objectives were taken. Apart from the wounded Press journalist no further civilian casualties were observed or reported.
All in all, I’d say a very successful mission. Very well done gentlemen.
173rd Airborne and the USA are very proud of you all.
AAR – 1st Platoon (Lt A Francis)
As per company orders, 1st Platoon dropped in the SE corner of the LZ behind CoHQ. 1st Squad immediately moved to search the nearby village of Bien Na while 2nd and 3rd took up position along the road, covering the nearby jungle boundary.
1st platoon enters the village of Bien Na
Following the all clear from the village, considerable mortar and small arms fire began to be heard from the western side of the LZ where CoHQ and the other two platoons were engaging the enemy on the hill. 2nd and 3rd squads crossed the road and entered the jungle to flush out any enemy towards the village situated NE of the LZ.
At this point, a communications glitch hit the platoon. Radio comms within the squad went down and we also dropped off the company net for a period. I personally was with 2nd squad and managed to establish voice contact with 3rd, but contact was lost completely with 1st who, lacking further orders, held position in the SE village. I continued to lead 2nd and 3rd squads towards the northern treeline although progress was hampered by dense undergrowth and lack of working radios (game note – the umpire accidentally dropped 1st platoon’s activation card on the floor and it was missing from the deck for several turns – hence little activity from the platoon until it was discovered !).
Eventually the radio net was restored; I ordered 1st squad to catch up with the rest of the platoon at the double (since we’d already swept the jungle ahead of them they were able to move swiftly). The jungle was less dense on its northern edge and I took 2nd and 3rd to the treeline, and we spotted a VC platoon in the paddy fields between the trees and the other village. We immediately engaged them with all available firepower, reinforced shortly after by the arrival of 1st squad. Multiple enemy casualties were observed before the survivors fell back; a subsequent follow-up sweep confirmed at least 10 enemy KIA, all VC. The platoon suffered no casualties in return, as enemy return fire was sporadic at most.
VC troops engage 1st platoon in the jungle
Following the cessation of enemy fire, all three squads advanced to the NE village. 3rd squad on our left flank briefly engaged another VC unit along with the weapons platoon who were positioned to our west as we emerged from the jungle. The enemy rapidly withdrew under heavy fire, casualties unknown.
As all enemy activity had ceased at this point, the platoon conducted a post-action sweep of the second village, uncovering a VC weapons cache.
The last few VC about to break
AAR – 2nd Platoon (submitted by Platoon Sergeant R. Turpin 2ic 2nd Platoon, vice 2LT A. King WIA)
2nd Platoon was deployed by helicopter several hundred yards to the south of Hill 435, arriving between 1st and 3rd Platoons. Sgt Turpin with 2nd and 3rd Squads were in the lead, with 1st Squad, armed with an M72 LAW in reserve with the 2LT.
Initial orders from Co HQ were to advance cautiously on hill 435 in conjunction with 3rd Platoon.
On arrival LT King noted the lack of cover in the immediate area of the LZ and ordered the platoon to move toward the cover of some elephant grass between the LZ and hill 435.
During the advance 3rd Squad spotted hostile forces on the hill, estimated at platoon strength, and I passed this intelligence back to the LT. 1st Squad acted on this information laying down fire on the enemy position while the LT contacted the company mortar platoon to request support.
NVA 1st Platoon on the hill
2nd Squad hunkered down and fired on the hill, while 3rd Squad attempted to get into the elephant grass, but were slowed down by the dense grass, making little progress, however they did manage to lay down some fire on the hill. The LT and 1st Squad closed up at the double, the LT’s request for mortar support was denied as the platoon was considered to be too close to the point of aim.
The LT was now close enough to direct 3rd Squad to open fire, while he checked paddy fields to the east of Hill 435 for possible enemy activity, finding none. At this point the LT and 1st Squad came under enemy mortar fire, with PFC Houston KIA.
Shortly afterwards LT King was grievously wounded by the sustained mortar fire and needed to be CASEVAC’d.
Lt King injured by NVA mortars
As platoon 2ic I took command, and ordered a team from 1st Squad to evacuate the LT and PFC Houston’s body to the dust-off RV point. I ordered the remainder of 1st Squad to move to the west to try to escape the mortar’s beaten zone. 2nd and 3rd Squads managed to advance into the elephant grass and take cover.
2nd and 3rd Squads both engaged the enemy on the hill with effective fire, at least two casualties were seen to fall. The team from 1st Squad saw the LT and PFC Houston loaded onto the dust-off chopper and then re-joined the rest of 1st Squad.
US forces start to take casualties
With the LT out of action 2nd Platoon would be vulnerable to accumulated shock hampering movement and reducing the effect of their weapons.
Someone in the chain of command must have persuaded the Mortar Platoon to risk danger close fire as our mortars began to fall on the rear of the hill.
Elements of 3rd platoon to our east advanced upon the hill to discover a well concealed bunker with an HMG. I ordered 1st Squad to deploy their LAW in an attempt to destroy the bunker but the shot missed. 2nd and 3rd Squads were more effective, continuing to fire at the enemy on the hill outside the bunker inflicting more casualties which caused the enemy to withdraw rapidly.
3rd Platoon tried to take out the bunker with their LAW but also failed. One of their Squads had better luck as they appeared to get a grenade into the bunker, destroying it.
With the bunker destroyed by 3rd Platoon, 2nd Platoon’s 2nd and 3rd Squads advanced to search the vacated enemy positions flanking the bunker, finding 8 NVA KIA who had been abandoned by their comrades. We left evaluation of the bunker’s ruins to 3rd Platoon.
There was then a lull in the action (2nd Platoon’s card wasn’t drawn before the end of the turn) as the VC mortar’s fell silent.
NVA 2nd platoon comes off the hill to avoid US mortars
2nd and 3rd Squads advanced to the western side and crest of hill 435, but 1st Squad’s follow up was severely hampered by the elephant grass. 2nd and 3rd Squads could see some activity in the jungle to the north of Hill 435 and attempted to identify if there were any enemy forces present, but the results were inconclusive. 1st Squad made slow progress through the elephant grass.
After another lull in the action, 3rd Squad confirmed no enemy presence immediately to the north of the hill, so 1st and 2nd Squads continued their cautious advance. 2nd and 3rd Squads continued their advance across the hill, with 1st Squad still battling their way through elephant grass.
As they advanced 2nd Squad spotted a reduced strength VC platoon in the jungle to the north east of hill 435, 3rd Squad didn’t spot them and 1st Squad FINALLY got out of the elephant grass, only to encounter the jungle on hill 435!
US troops sweep across the hill mopping up stragglers
Following another lull in the action 2nd and 3rd Squads laid down withering fire on the VC platoon they had spotted earlier, causing 4 casualties and forcing the VC to withdraw. 1st Squad cleared the jungle and advanced in the clear area to the west of hill 435.
VC take cover in the rice paddies
At this point Co HQ confirmed all enemy forces had withdrawn, leaving the Company in control of hill 435 and the surrounding villages.
Post battle analysis confirmed an overwhelming military and political victory for free world forces.
Update: 2LT King was evacuated to Tuy Hoa field hospital where he was stabilised, awarded a Purple Heart, and subsequently flown to Walter Reed Army Medical Center, Bethesda, Maryland for further treatment. The NCOs and other ranks of 2nd Platoon wish the LT a speedy recovery.
It ain’t easy being a dust off pilot – you might lose your tail rotor
AAR – 3rd Platoon (Lt J Claridge)
As part of Operation McLain the company was sent to Da Lat for a reconnaissance-in-force, once again 3rd Platoon were going to arrive last to the LZ. This time the boss said everyone was to be at the LZ before we started moving out so we could bring our full weight against the enemy, this was a welcome plan given last time we went in hot, taking fire on the way down.
Embarking on the UH-1 transports we were en route when the CO confirmed his teams were in place and the other platoons were already deployed on the ground. Then everything changed, radio chatter confirmed 1st Platoon was checking out a local village, 2nd Platoon was advancing into the elephant grass at the foot of Hill 435, while M60’s of the platoon HQ were already engaging targets on the hill. So much for the plan, then the birds took a sharp swing towards the LZ to avoid the ranging shots coming in from enemy mortars, it was going to be another hot landing.
As 3rd platoon arrived at the LZ we were still under orders to hold until the full force was gathered. But mortar shells were already falling to our rear and there was intense fire being poured onto the hill. After a few failed attempts to get clear orders from the CO we decided to head towards the hill and get as much distance from the mortars as possible.
It wasn’t enough, 2nd and 3rd squads got caught in the barrage and were lucky to avoid any casualties. 2nd Platoon was making cautious progress towards the hill while 1st platoon was nowhere to be seen. The CO was in a fierce firefight with the enemy on the hill, but it seemed like they had the upper hand. We finally got conformation to ditch the hold orders and advance on the hill.
Despite getting out of the barrage 2nd squad came under fire from the hill causing a casualty that needed immediate evac. Still trying to avoid the mortar fire and seeing 2nd platoon hunkering down again rather than make progress towards the hill we decided it was time to move. 1st squad ran through 2nd platoons’ positions in the elephant grass and advanced to the base of the hill.
3rd squad rushed past the platoon HQ to the road junction near the hill, taking a shocking amount of fire but managing to avoid any casualties. There was still no sign of 1st platoon.
At last, we saw the first enemy units retreating off the hill and so 3rd squad rushed up the hill to flush more of the enemy out only to run straight into an enemy bunker. 3rd squad quickly hunkered down and radioed in the bunker’s location. Immediately two rockets flew over but to no effect, later 1st squad reported one was theirs, I guess the other must have come from 2nd platoon. With the failure of the rockets 3rd squad engaged at point blank range and the bunker erupted in flames.
3rd platoon takes out the bunker
With the bunker out and the mortar threat neutralised by our own supporting mortar fire we advanced off the hill to support the platoon HQ. VC could be seen retreating from the jungle opposite the hill, I guess that’s where 1st platoon got to, and from the fields next to the far village. Taking up position, we continued pouring fire onto the remnants of the NVA from the hill and the VC units. 2nd squad regrouped after their casualty was evac’d and joined in to support platoon HQ. The fight had clearly been taken out of the enemy, and we were ordered to halt as they dispersed. Looking forward for some R&R and buying 3rd squad some well-earned beers.
A Corsairs eye view
Final Word
I’ve really enjoyed playing these games and learning the rules as we go. But the thanks for that must go to Pete, Andy, Jeremey, and Tony, who all entered the spirit to create a great story and narrative to the games. I think Charlie Don’t Surf (CDS) offers a splendid take on the Vietnam War – we are used to seeing those 28mm games where a platoon approaches a village and takes some fire, but games at the level of CDS give more context to those encounters and more accurately reflect the experience of the Vietnam War where it was all about company and battalion actions rather than the platoon (a certain film from the 80s left us with that impression). A great set of rules that provide a very good game.
They will always remember the day the soldiers came…
Stephen takes us through a recent free set of medieval rules that appeared in the Wargames Illustrated magazine.
‘Assassins & Templars’ (A&T) was a free set of rules that came with issue 455 of Wargames Illustrated. If you missed it then you can purchase a copy from WI, along with all the paraphernalia required. Or you can download it all free from the WI website (not the rules though – if you missed the free copy you now have to buy it).
Having downloaded the card decks from WI and printed and cut them out, I thought I would have a test game because it was absolutely chucking it down with rain outside.
It has a lot in common with its predecessor: Here’s The Ruckus. Ruckus is focussed on the War of the Roses. Both use the exact same mechanics and if you know one then you know the other. Warbands comprise 12 models. They are led by three ‘Hero’ figures – a single commander (a knight) and two sub commanders (squires, or lesser knights). The remaining 9 models are made up of spearmen, crossbowmen, archers, etc. In A&T they have introduced horse archers. The Hero models each control 1 or more of the retinue troops so on a simple level a warband will comprise three 4-man ‘Spears’.
Hero figures also have specific traits or special skills. The list of traits in A&T is much smaller than Ruckus but I see no reason at all why the expanded trait list can’t be imported into A&T.
Turns are completed by turning cards in the Hero deck. This will tell you which Hero (and Spear) to activate, or it could be a Cunning Plan card. The Cunning Plan deck contains cards that allow extra bonuses – things like a re-roll, etc. But there’s also a Divers Alarums card – these are better thought of as special events.
Both Ruckus and A&T are aimed at ‘narrative games’ where the game is more about the story and the cinematic elements of the game than a simple win or lose. To that end there are rules in there for things such as climbing, falling, swimming, balancing, etc. An important part of this, and an important part throughout the rules, is the concept of the ‘Mishap’.
If you roll a 1 when shooting, for example, you have a Mishap (e.g. bow string snaps) or if you have a Mishap whilst climbing you may fall. This whole section on Mishaps felt ‘tacked-on’ to me. I love the concept, and it’s what gives narrative games their…well, narrative. But there was quite a bit of this in A&T – sub-rules just tacked on (‘If X or Y happens then check table C for the effect). Arguably no big deal, but at the same time it didn’t feel like some things were baked in to the rules. You get the feeling that during the play test something happened and someone suggested, ‘well, if that happens just get them to roll on a Mishap table’. And they just shrugged their shoulders and said, ‘yeah, alright’. And there’s a different Mishap table for each different action.
It’s a free set of rules, so no big deal. Good concept, average execution.
Right then, Heroes have a command radius. If a member of their ‘Spear’ is outside they are considered ‘Feckless’ and, you guessed it, they have to roll on a table to see what they do.
Things are kept nice and simple though. You need a 6+ to hit at long range, and a 5+ at short range (different ranges for different weapons). Melee is a bit more involved, as you would expect with a low-model count. What will happen is that when two (or more) models move into contact they will fight up to three consecutive melee phases. In the first phase, all combatants fight at their full potential. If both are still standing you conduct a second phase of melee immediately, where chances to hit are reduced. If they are both still standing after that then a third, and final, phase of melee is fought immediately – still with a reduced chance to hit and now unable to bring to bear any special skills. All this is to reflect fatigue during combat. This means that there’s a chance to pull something back in melee, but also means that combat is likely to produce a resolution that round rather than drag over multiple rounds. If both are still standing at the end of the third melee phase then both participants back off so they are 1” apart.
Heroes have three wounds with other models having just the one. All models also get a Save roll, in both missile and melee. In missile fire an extra roll (again!) is made for any intervening obstacles for the shot (why that couldn’t be added into the shooting mechanism I have no idea – probably because the game uses D6s and just one modifier can have a big effect. Which begs the question, why not design the game with D10s?)
So how did it play in the end?
Actually, it gave a very enjoyable game.
I used the scenario that came in the rules – there’s a central watering hole and the winner is the first who has sole control of the watering hole or kills the opposing leader. To have control you have to be the only one with models within 1” of the watering hole. Realistically, that’s only going to happen if you completely wipe out the opposition so in actuality killing the opposing leader is going to be the way to win the scenario.
It’s a short game (about an hour), so would be great for a one-day campaign. In the scenario I played there was no need for climbing and jumping etc, so that aspect was missing. I did forget about the shooting Mishaps though. On a couple of occasions 1s were rolled but I forgot to apply the Mishap rules. Just put that down to first-time play where rules do get missed. To be honest, it doesn’t take long to master the game so next time around I am sure I will remember to use the Mishaps. That’s no reflection of the rules.
In the game the assassins moved up. The templars (I didn’t use templar models and just used my Normans as early crusaders, there was nothing really that exclusive to why they couldn’t just be Frankish crusaders), moved up with one of the Spears taking up position by a wall and letting rip with a crossbow. The Assassins and the Templars reached the waterhole at about the same time. Two of the Assassins ganged up on the Templar leader, who took two wounds but was still standing at the end of the melee so all participants were separated. But the Assassins went in again with wounds being taken by both sides – the Templar leader was killed but he also killed his assailants. The Templars had lost their leader, though, so the game went to the Assassins.
Yeah, it’s a good game.
Will we be playing it at the club? I don’t know. Keep in mind that we have a whole Saturday, and I’m not sure the game has legs for a whole day. If you meet in the evening for a couple of hours, then it’d make a great game because you can fit in two or three linked games, which is precisely what A&T is all about.
It’s great as a freebie but, having played it, I’m glad I didn’t spend money on it, although at £5.99 it probably is worth taking a punt on. I think Osprey’s ‘Outremer’ does the job better though, so if I was looking at a medieval game with a dozen figures a side I would probably play that instead.
Another good turn out for the second meeting of the year, around 20 members were present with 5 games in progress.
First up we have John L running another naval game, this time in the South China Sea with Emperor Ming taking on Li Chee (the Pirate Queen) using Galleys and Galleons rules.
We then move on to David P running a small Chain of Command 2 game, in 20mm, to introduce the rules to a couple of players.
Former Chairman John ran a 6mm Ancient FOG game with multiple players
Current chairman Mark, together with Dave and Chris put on a Legions Imperialis game using masses of tanks etc.
And finally Stephen ran the third of his trilogy of 173rd Airborne in Vietnam games, Operation McLain, in 15mm. A write up of this game will be appearing soon.
MWS meet on the 2nd and 4th Saturdays of the month (except the 4th Saturday in December) from 10:00 to 17:00 at Linton Village Hall, south of Maidstone on the A299.
Information about the Society, including directions, can be found here.
The diary of planned games can be found here, this is updated throughout the year so please have a look from time to time.
Maidstone Wargames Society held their first meeting of the year on Saturday. This meeting includes our AGM so often has a good turnout.
Around 24 members were in attendance for the meeting. The AGM was, as usual, short, only around 30 minutes. Also, as usual, the existing committee was re-elected without opposition. Despite the chairman’s pleas to be released!
There was also a very good turnout of games, covering a variety of scales, periods of genres, here’s a short photo round up.
John L brought out his 1:1200 Baltic Galleys for some Naval action.
Another naval game, but a few centuries later and under the water rather than on it, Peter M staged a 1:100th Stingray game, “Anything can happen in the next half hour“.
Paul and Colin brought out some 3mm Ancients for some FoG games.
Tony G and Stephen both fielded Anglo-Saxon warbands for some 28mm SAGA games.
Some more recent conflict now, some late WW2 Chain of Command action staged by chairman Mark J with 28mm vehicles and figures.
And last, but by no means least, Tony F and Phil staged a battle from the Lord of the Rings, again in 28mm.
That’s it for the round up of the first meeting of the year.
MWS meet on the 2nd and 4th Saturdays of the month (except the 4th Saturday in December) from 10:00 to 17:00 at Linton Village Hall, south of Maidstone on the A299.
Information about the Society, including directions, can be found here.
The diary of planned games can be found here, this is updated throughout the year so please have a look from time to time.
After the casualties taken fighting in and around Dak To in the final months of 1967, 2nd Battalion of the 173rd Airborne returned to barracks in Tuy Hoa to rest, refit, and train replacements.
Throughout February 1968 key towns and cities in Vietnam have been rocked by the Tet Offensive. For the most part, the 173rd Airborne have not been involved in the offensive. However, intelligence has come in that units of NVA with VC sappers are planning an assault on Tuy Hoa Air Base. To prevent this your company has been deployed north of Tuy Hoa to block the enemy advance. You will take up position in the area of Nha Long village. As such, this is NOT a free fire zone – all support fire (that includes company mortars) will require authorisation. Additionally, you may not fire small arms at targets within 6” of any village building without authorisation.
The enemy are expected to be arriving from the North West.
Report from Cpt P Smith CO of Alpha Company 173rd Airborne
The Battle Rages
Intelligence had confirmed that Communist forces were advancing towards the US Airbase at Tuy Hoa. The 173rd Airborne Division were tasked with blocking and destroying the enemy in the vicinity to the north and west of the village of Nha Long.
The 1st Platoon, led by Lieutenant Francis, and the Weapons Platoon were deployed to the east of the village and advanced immediately to the west. The squads of the 1st Platoon took up positions to the north, south, and within the village, while the Weapons Platoon advanced westwards, north of Nha Long. We soon made contact with enemy forces to the west in light cover and to the northwest in light cover on higher ground.
I promptly requested authorisation to activate our company mortars to lay down a barrage on the enemy troops to the northwest.
Lieutenant Francis’ 1st Platoon engaged VC sappers to the east of the village. The Weapons Platoon’s M60 machine gun teams provided long-range fire against an NVA platoon to the west. As the engagement intensified, the villagers in the adjacent paddy fields quickly sought cover within the village. Meanwhile, the company’s Dog Team was dispatched to the village at a rapid pace to search for hidden caches of food and ordnance. Thanks to their diligent efforts, a substantial quantity of rice and several satchel charges were discovered.
Lieutenant King’s 2nd Platoon and Lieutenant Claridge’s 3rd Platoon received orders to deploy via Huey transport helicopters in succession. The 2nd Platoon disembarked in open terrain to the north of Nha Long, despite encountering some ineffective small arms fire from the ground. The gunship escorting the transport Hueys provided covering fire to ensure a successful landing and inflicted heavy casualties on the enemy to the front of 1st Platoon before taking evasive action to evade more intensive ground fire from adjacent enemy units.
As the 2nd Platoon commenced their advance from the landing position, the mortar barrage was promptly authorised and initiated on the enemy positions to the west. This stalled the enemy’s advance by pinning them down. The barrage was halted to allow Lt. Claridge’s 3rd Platoon to deploy in a Hot LZ in open ground closest to the enemy.
As 3rd Platoon rapidly disembarked from the Huey transports, they took one fatal casualty as they came under enemy small arms fire, RPGs and sniper fire. Again, the Huey Gunship delivered sustained heavy fire on the enemy positions on the ground. As a consequence, the VC sapper platoon was broken and dispersed from the field.
Shortly after an NVA platoon withdrew from the field as it took heavy casualties from the Gunship and all three of our company’s platoons. An air strike was requested and authorised to attack enemy positions on the high ground to the northwest, but the enemy withdrew before the aircraft arrived.
Along with the food and ordnance caches, a high number of enemy bodies were recovered after the engagement which indicates how the enemy dispersed from the field in disarray.
Although, regrettably, our company took 3 fatal casualties, overall this was an outstandingly successful mission.
M60 Teams Lay Down Fire
Weapons Platoon In The Rice Paddies
Weapons Platoon Advances
Viet Cong Sappers Approach The Village
Report from Lt T Francis 1st Platoon
1st Platoon Walks Down The Road
Acting on orders from my company commander, I deployed first platoon either side of the main highway, with two squads up and one in reserve. The weapons platoon and company HQ were to our left flank in the open ground. The platoon advanced steadily, keeping an eye out for enemy troops both in the village and on the ridge line beyond the huts, although no definitive sightings were made.
When the weapons platoon were engaged by enemy forces, I ordered first squad to lay down fire in support of them and third squad to advance to take their place and enter the village. Local Vietnamese non-combatants generally kept their distance, although one pointed third squad to a place where he told them that VC forces had stored supplies – this turned out to be a red herring and nothing was found.
First squad continued to engage enemy forces on the edge of the jungle to the north west of the village in support of the weapons platoon, with several hits claimed. Meanwhile, second squad had spotted what turned out to be NVA troops to the east of the village beyond the paddy fields. Judging that they were outside of the restricted zone around the settlement, I ordered them to open fire. Third squad moved through the village and engaged further NVA forces directly north of their position with immediate effect.
The platoon consolidated its position, all squads continuing to engage the enemy, until the aerial insertion of third platoon swiftly alleviated any pressure from NVA forces to our front. I advanced first and second squads in line with the north of the village, at which point it became clear that the enemy had broken.
First platoon’s advance to, and defence of, the village ensured that enemy forces were unable to emplace themselves within it and create a stronghold from which it would have been difficult to eject them. That the operation was carried out without casualties is testament to the skill and professionalism of the American soldier.
Elements of 1st Platoon Approach The Village
Mayhem In The Village
Taking Cover By The Paddie Fields
Dog Teams In The Village
Report from Lt A King 2nd Platoon
2nd Platoon Advances Down The Ridgeline
2nd Plt under 2LT King was inserted by UH-1 helicopters on the left flank of the company’s advance, near the edge of a lightly wooded area and close to a patch of elephant grass to the west and northwest of Nha Long village.
On approach to the LZ hostile forces were spotted on a hill within the woods and in the elephant grass. The platoon’s gunship escort engaged the enemy in the Elephant Grass with machine gun fire, causing a number of casualties. The pilot requested approval to use rockets on the hostiles in the woods, due to the mission Rules of Engagement, but this was not received.
1st and 2nd squads, the latter with the platoon LT, disembarked from their slicks and hunkered down, engaging the enemy to their front, pinning them down. 3rd squad disembarked and moved rapidly into the woods, with the intention of advancing on the enemy flank.
1st and 2nd squads came under fire from approximately platoon strength forces, causing some shock and one casualty KIA in 1st squad, Pfc Simms.
3rd squad advanced through the woods and, on reaching a slight rise in the terrain, hunkered down to engage the enemy forces on the wooded hill to their north.
As the slicks lifted off to collect 3rd Platoon, the Huey Gunship repositioned to engage the enemy, but was driven off by some lucky shooting by the enemy.
The enemy in the elephant grass was hit by mortar fire called in by other elements of the company, this, together with the steady fire from 1st squad caused them to lose their nerve and withdraw.
1st Squad had not come through this firefight unscathed, in addition to the KIA they suffered they also had suffered some shock. 2LT King moved up to 1st Squad to provide encouragement, they then advanced onto the vacated enemy position and through diligent searches uncovered a punji pit the enemy had left behind, with no further casualties suffered.
2nd and 3rd Squads, having suffered no casualties, advanced through the woods towards the enemy on the hill, but these troops fell back, perhaps due to casualties inflicted on other elements of the enemy forces by the rest of the Company.
1st Squad was about to police the remains of the enemy they had been fighting when elements of 3rd and Weapons platoon took the position.
2nd platoon’s deployment between the 1st & Weapon’s Platoons and the woods helped tie down around 2 platoons of enemy troops and helped prevent enemy forces, later discovered to be a mixture of NVA and VC Sappers, from reaching Nha Long village.
Viet Cong Sappers Engage The 173rd
NVA Platoon Atop The Hill
Rock n Roll!
Air Assault
Report from Lt J Claridge 3rd Platoon
Apocalypse Now
The engagement at Tuy Hoa had been in full swing for a while. 3rd Platoon were on standby having just watched 2nd Platoon take off and head for the landing zone. As the radio traffic became more frantic the order finally came to go.
Embarking on the UH-1 transports and accompanied by a Gunship it was clear this was going to be a rough ride. More radio traffic told of a NVA sniper causing trouble and several hits from a concealed RPG team.
As 3rd Platoon flew over the LZ orders came through from the CO of the 173rd to land in a forward position almost on top of the encroaching VC forces near the village. 3rd Squad disembarked into a hail of enemy fire suffering a casualty in the process and becoming pinned. The squad had no choice but to hunker down and return fire.
Meanwhile the supporting gunship peeled of and laid down a devastating fire against the VC.
Receiving further orders from the CO to step up the rate of fire the VC were routed bringing a much-needed reprieve.
The supporting gunship searched for other targets and managed to destroy the RPG team. This was the last straw for the NVA and VC, they began to withdraw from the field leaving our forces to lick their wounds.
Jeremey is on holiday this week, so he’s left Tony the keys to the WIP Wednesday post…
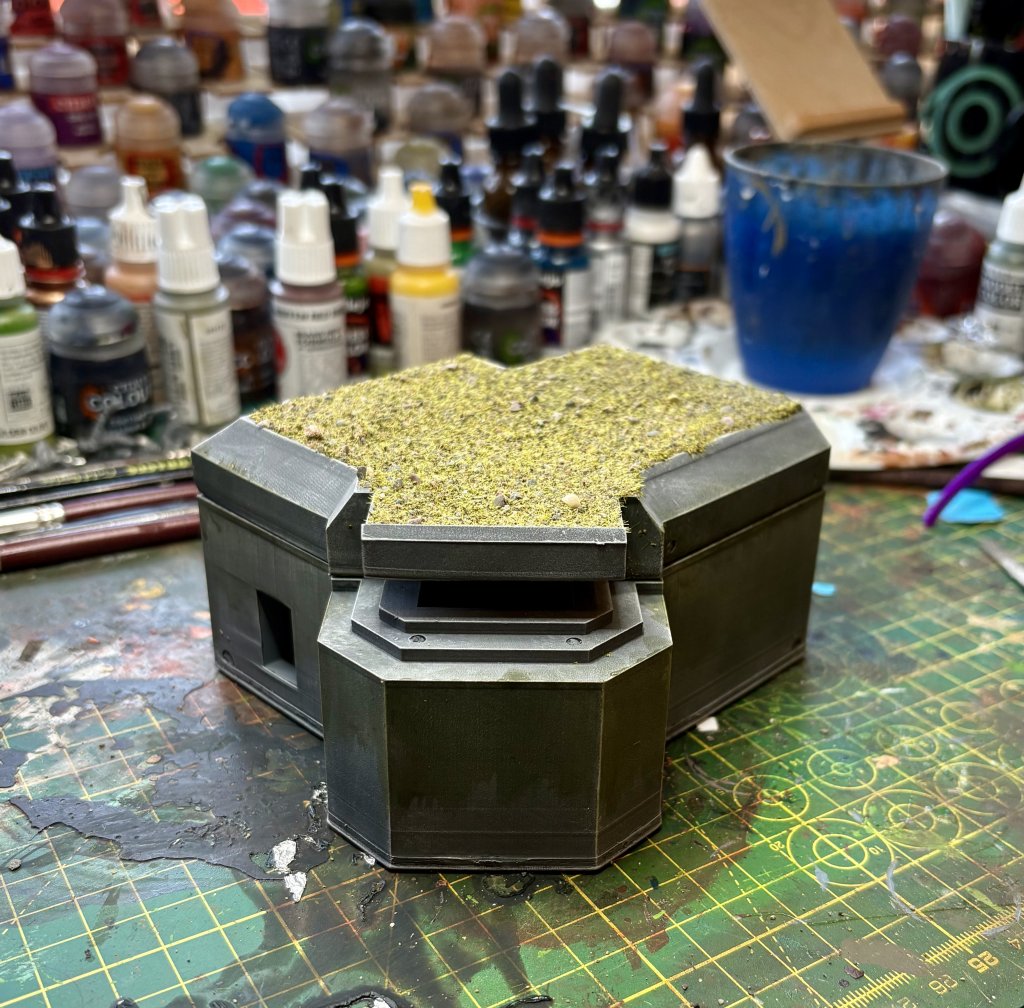
We’ll start off with Chairman Mark’s fine collection of 28mm Shermans that he’s been working on for a while, building up towards a big Nijmegen game later this year. There’s been a bit of rivalry at the club over who has the biggest Sherman collection – we suspect Phil is still ahead, with Dave also a strong contender, but Mark’s catching up…
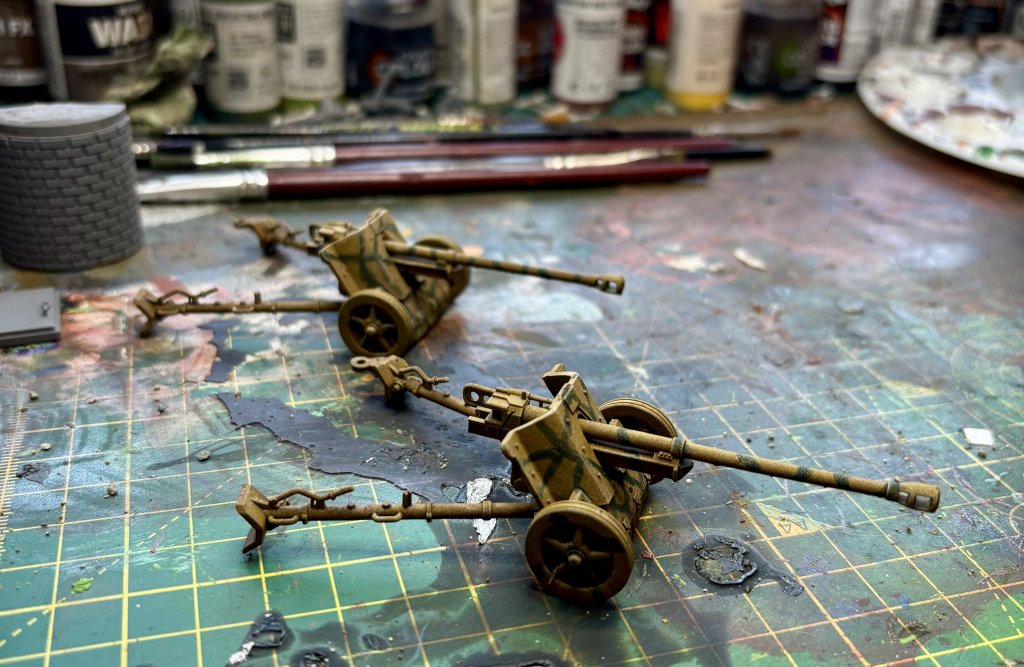
He’s also added a British half-track (likely an M5) and Daimler armoured car, a German bunker and some anti-tank guns (type unspecified, but some internet research points at them being 50mm Pak 38s).
Eric has been turning yet more Matchbox cars into wasteland warriors for a Gaslands game with all manner of add-ons and accessories. The one on the right with exposed wheels looks especially cool.
Stephen has made some 15mm objective markers for Vietnam games, which should also serve for WW2. I suspect a few of us will be hunting for those in an upcoming game of Charlie Don’t Surf.
And finally, I quickly turned out some individually based figures to act as Big Men (NCOs and officers) for a game of TFL’s Quadrant 13. They’re only 6mm, so really they should be Little Men. Or Little Big Men ?
Jeremey will be back next week, you’ll doubtless be pleased to hear !
Stephen umpired the game and ran the Communist forces. The US forces (A Company, 2nd Battalion, 173rd Airborne) were under the command of Captain Pete, who also ran the Weapons Platoon, with the three Rifle Platoons under the command of Lieutenants Tony F, Andy and Jeremey respectively.
We’ll start with Stephen’s summary of the game:
A Company of the 2nd Battalion, 173rd Airborne, scored an important military victory against the North Vietnamese Army today.
Led by Cpt Pete the company advanced up Hill 875, located the enemy and engaged them.
It was 3rd Platoon under the command of Lt Jeremey who first reached the top of 875. Meanwhile, a grenadier of Lt Andy 2nd Platoon earned recognition for posting a M79 round through a bunker slit. Lt Tony’ 1st Platoon got bogged down in a vicious firefight and took several MIA.
Company mortars, and a Huey gunship that shredded some NVA recoilless rifles, helped the 173rd to victory.
News on stateside TV reported the battle and civil demonstrations ensued at the loss of American life. It may have been a military victory for the US but the NVA scored a political victory.
Here follows the US Platoon commander’s accounts of the battle.
1st Platoon
First Platoon (Tony) advances early in the game.
This is as far as I got, a vicious firefight with an NVA platoon (and some less than favourable activation draws) saw me pretty much stuck in place for the rest of the game.
The NVA platoon in question, about to receive some 60mm mortar vengeance courtesy of Pete.
The 1st Platoon under fire and pinned. 1st squad suffered badly (7 KIA out of 10), although remarkably 2nd and 3rd squads emerged from the action unscathed.
2nd Platoon
2nd Platoon (Andy) A Company were deployed at the base of Hill 875 with the Weapons Platoon and Company HQ to our left, and 3rd Platoon to our right.
The platoon began its advance with 1st and 2nd squad leading, with 3rd Squad and the Platoon CO in reserve.
1st squad soon spotted insurgent troops further up the hill, the first of the Company to do so, and promptly engaged them. 2nd squad and part of 3rd squad joined in, the remainder of 3rd squad being out of line of sight of the enemy. The fire was effective, causing part of the enemy unit to suffer casualties and become pinned. 2LT Andy reported the sighting to CPT Pete, with a request for mortar support.
3rd squad deployed from reserve to the right of 2nd squad in order to bring its full firepower to bear.
The firefight with the enemy continued, with 3rd Platoon joining in, both 2nd and 3rd Platoons suffered some KIAs, but appeared to inflict more than they suffered.
Under the relentless fire of 2nd & 3rd Platoons the insurgents suffered further casualties and were seen running from their positions back over the crest of Hill 875 and presumably they continued down the reverse slope.
Slightly later a few ranging rounds began to land near 2nd Platoon’s position, expecting an NVA mortar barrage 2LT Andy ordered all squads to advance up the hill as fast as they could. 1st & 3rd squads succeeded, but 2nd squad got bogged down and didn’t move very far.
1st squad’s success in movement proved to be their undoing. They soon came under heavy automatic fire, believed to be either a DShK 1938 or KPV heavy machine gun, in a previously unseen bunker.
1st squad took a couple of casualties, but immediately hunkered down and returned fire, the squad’s M79 gunner achieving an excellent shot which put a 40mm HE round into the bunker, silencing the HMG.
2nd and 3rd squads advanced past the battered 1st squad, joining elements of 3rd Platoon in sweeping across the hill, engaging the remnants of the NVA defenders in the flank and driving them from the hill, at the cost of some more US KIA.
Eventually 2LT Andy’s prediction of a VC mortar barrage came true, but by the time it arrived on it’s original target all US forces had moved further up the hill and none were in the beaten zone.
As 1st squad looked after their dead they discovered a food and material cache buried on the hill side.
The mission proved to be something of a Pyrrhic victory for 2nd Platoon, we engaged and defeated the enemy, destroying a bunker and locating a cache, but at a cost of 5 KIA, 4 of them in 1st squad.
3rd Platoon
3rd Platoon (Jeremey) deployed on the far right of Hill 875. The mission was to assault the hill and so I decided to get moving and threw caution to the wind and advanced quickly up the hill.
Unfortunately after a few moves this left my three squads quite scattered. On top of that the first contact with the NVA turned out to be a real unit who immediately scored a casualty. My return fire was more effective and with support from Andy’s 2nd platoon the NVA were soon routed.
Despite the resistance I decided to continue my advance up the hill, I reached the top of the hill without further resistance but then the bunker was revealed along with more NVA troops. I took a few more casualties and would have taken more if not for Andy’s 2nd Platoon taking out the bunker on the first try.
Laying down some more fire on the remaining NVA, they routed and we claimed the hill.
Company Command
A company’s Forward Observer (Pete) performed well by adjusting the ranging mortar rounds and the subsequent Firing for Effect on the NVA positions on the hill which contributed to the general degrading of the enemy.
Also, significant contributions to the victory came from :-
Lt. Tony’s 1st Platoon made steady progress up the left flank but took heavy casualties due fire from a heavy weapons squad with recoilless rifles. These were suppressed by the fire of the Co HQ’s MG squad lower down the hill.
Lt. Andy’s 2nd platoon’s impressive accurate fire which neutralised the fortified position on the summit of the hill soon after the position was observed. The HMG in that bunker would have caused devastating casualties if not dealt with swiftly.
Lt. Jeremey’s 3rd platoon made a rapid advance up the slopes of our right flank, although sustaining several casualties, routed the enemy troops before them.
Although Air Support was requested, a Huey gunship arrived after a delay due to the Priority 2 rating of our Area of Operations, but completely destroyed the NVA Heavy Weapons squad enabling all platoons to advance and secure the enemy position on the summit of the hill, seizing enemy weapons and rice caches on the way.
I, Capt. Pete commanding officer of A Company,2nd Battalion,173rd Airborne, recommend citations for all the commanding officers of A Company platoons.
The view from the other side of the hill
The NVA side of things, as recounted by Stephen. Hill 875 was occupied by a reinforced NVA company – three rifle platoons with AK47s, a pair of recoilless rifle teams, plus the regimental HQ (historically, the rest of the regiment was situated in the hills adjacent and being engaged by the ARVN). Regimental HQ had a mortar spotter (the mortars were actually sited on a hill to the west), wireless team, and HMG in a bunker.
My general plan was to close with the enemy as soon as contact was made to mitigate against the inevitable artillery and airstrikes the US would call in, a tactic referred to as “belt-grabbing”.
The bunker being taken out promptly by US 2nd Platoon took the smile off my face. That HMG would have caused havoc and blunted the US advance and I was going to walk the mortars up to leave the US forces
sandwiched between the HMG and the mortars. But it never came to that.
It was a very historical outcome – the US captured the hill but suffered heavy casualties doing so, and there was considerable public outcry because of it.
And the final word also goes to Stephen:
Thanks to Andy, Tony, Pete, and Jeremey for making it an enjoyable game as I learn the rules. But a special thanks to Pete for his help and knowledge.
Just need to come up with a better name than the toe-curling ‘Big Men’ next…
Club member John reports on a game from a lesser known historical conflict.
Introduction
Our youngest daughter lives in Chile and she gave me a copy of ‘Andean Tragedy’ a history of the Pacific War 1879 – 1884. This detailed book covered the war between Chile and the allied forces of Peru and Bolivia, a war which started over mining claims in the Atacama Desert. The area was an important source of Nitrates for explosives and fertilisers and when the Bolivian government sought to tax Chilean mining companies mining on Bolivian soil, war was inevitable.
It was impractical to march a Chilean army by land through the Atacama Desert so the initial campaign was a Naval one (itself a good subject for wargaming) where Chile gained control of the sea and could then launch amphibious operations initially on the Bolivian coast and later the Peruvian coast. These were successful with Lima being captured and resulted in Bolivia being land locked (still contentious today). A later Guerrilla war took the fighting high into the Andes before Peru was finally defeated.
The Andean Tragedy, W.F. Sater University of Nebraska Press, Jan 2007
I started to paint up forces from Pendraken intending to use ‘Principles of War’ as the rule set but in 2020 a new rule set ‘It’s Getting a Bit Chile’ was launched and I decided to use this period specific set. This required more troops and a gridded cloth. The project stagnated then Stephen kindly donated me a cloth, the reverse side being ideal for a desert, it was the kick up the backside I needed and within a few weeks I was ready.
Chilean infantryBattalion Misti PeruBolivian Colorado BtnLibres del Sur BoliviaArtillery
Review of ‘It’s Getting a Bit Chile’
It’s Getting a Bit Chile, G. Evans, Wargaming for Grown Ups Publications 2020
I was attracted to this set of rules for its period specific nature which I felt was merited after reading ‘Andean Tragedy,’ I didn’t want to use any generic 19th Century rules. When I received my copy, I realised it was more than just a rule book. The book includes a history of the war, a uniform painting guide and a bibliography, it is well laid out and the rules are easy to follow with diagrams to help with explanation, there is a scenario included with the rules and a quick play sheet is included. I also discovered that the author had visited the same location in Peru which was his inspiration, the previous year to us.
The rules are army level where each army can be organised into divisions, though these are smaller than European armies. The rules are I go – you go. The lowest organisational unit is an Infantry battalion or Cavalry Regiment consisting of four bases, Artillery are a single base. Unit formation is determined by how the bases are aligned in a grid square.
Each formation has a different number of firing bases, support bases and melee bases and is a specific target type if fired at and a separate melee target type. For combat a dice is rolled for each eligible base and the sum of the dice rolls is compared on a “To hit multiple” table to determine how much damage is dished out. This avoids the 6 to hit method of casualty calculation and damage is instead noted as disorder. A fresh unit with no disorder fights using a d8 per eligible base, a unit with one disorder uses d6’s and a unit with two disorders uses d4’s. If the target formation has a support base, a disorder marker can be absorbed by the support base allowing the formation to fight unaffected if all disorder is absorbed. Changing formation can reduce the number of support bases and hence increased unabsorbed disorder, reducing fighting capability. Disorder can be rallied off by the unit itself or an adjacent Divisional or Army Commander and this is key to maintaining fighting capability.
The “to hit multiple” table and disorder mechanic are very neat and set these rules apart.
Play Test
The set up
As usually happens with a new project, there was lots of last minute stuff to do which meant I hadn’t spent much time on planning a scenario. I decided to have three objectives on table, two minor ones were to secure water supply either at a village or Nitrate mine.
Peruvians advance on the villageChileans occupy the Oficina
The main objective being capturing the hill. The Allied forces had an extra infantry battalion and an extra Cavalry unit, this last tied down some Chilean artillery as it threatened to outflank.
The Battle for the hill
In the centre, the Chilean assault on the hill ran out of steam and in true style, the Chilean Cavalry followed the routed Bolivian cavalry off table.
The Cavalry Battle
Thanks to Tony Gibbs and Jon Roche for helping. The rules played very smoothly with hardly any queries. Afterwards, I read through the rules again and posted some queries with the Author. I received an e mail back within 24 hours so excellent support.
Next Steps
I have three Peruvian battalions ready for painting and artillery limbers have arrived this week. I’m considering the small dice holders and dice to keep track of disorder. Whilst the card buildings are OK from three feet away, I’m considering making some better alternatives. Finally, I’ll need to put some time aside to consider scenarios, perhaps working those into a campaign.
Stephen takes us through a recent game of Charlie Don’t Surf.
Throughout 2024 I put together a collection of 15mm Vietnam stuff. The Vietnam War was one of the first historical wargaming periods I ever gamed, back in the early 90s. This was, of course, because of the spate of Vietnam War films of the late 80s and early 90s and because the music of the period was so good. All of which I loved.
However, like things do, it fell by the wayside and I sold it all on. But last year I joined in a game of Pete S’s ‘Charlie Don’t Surf’ and Pete M’s Vietnam game, both of which I really enjoyed. This re-kindled my interest in gaming Vietnam and so I started collecting models and miniatures.
I also enjoyed ‘Charlie Don’t Surf’ so I decided that would be the rules I would use.
So, having put a game in the club diary for May, I decided I would run a solo game so I could refine my knowledge of the rules. I decided on a simple meeting encounter.
It is late 1967. Military intelligence is bringing in lots of reports of large communist troop manoeuvres in the south. Something is clearly going to be happening in the run-up to the Tet holidays. Two US infantry platoons have been detailed to perform a blocking action to prevent troop movement of local VC elements in the locality of the village of Boc An. This village is known to have communist sympathies and, as such, the provincial authorities are keen not to alienate the locals any further. Therefore, this area is not a free fire zone and any use of indirect fire will require authorisation.
On the opposite side are two platoons of Main Force VC infantry. They are armed with AK47s and so will count as assault rifle squads. Their objective is to exit the table on the opposite side they enter from. The VC are operating on blinds (with two dummies). Since this is a solo game I decided that I would dice to see which blinds are dummies and which are real when the need comes.
The table was set up with the VC blinds on one edge and the US platoons deployed within 6” of the opposite. The US forces had two Big Men (God, I HATE that term!) as platoon commanders, one Big Man is company command with a medic. Company mortars are available but will require authorisation. I set the US platoons up in standard formation – one squad on point with the other two squads behind. All US squads would count as machine gun squads (the M60s having been distributed amongst squads rather than as a separate weapons squad).
The US forces would have a slow advance because they were soon having to wade through the rice paddies. I had them avoid the village just in case anything happened that would antagonise the villagers. The plan was to spread out once they’d passed the village to stop any VC slipping through the net. Similarly, the VC also had a slow advance through the jungle – still operating on blinds, so still unsure which units were real and which were dummies. The two central dummies advanced up the hill with the two flanking dummies moving around the flanks to create a dilemma for the US forces.
The US 1st Platoon rolled badly for movement through the paddies so the squads started bunching up. Meanwhile, 2nd Platoon did quite well and so managed to move up to put them in a position should one of the flanking VC units turn out to be real. Mind you, 2nd Platoon would also have a patch of elephant grass to wade through as well, so making a bit of time through the paddies was a bonus. As for the VC, two of the blinds had reached the summit of the hill with the other two making slightly slower progress on the flanks. It would soon be at the point where the US platoons could start making spot rolls as the VC were now on the edge of the jungle.
The US company command as well as 1st Platoon all failed in their spot rolls and so when it came to the VC activation they had a choice – stay where they were and remain hidden or, with the US platoons in the open, take advantage of that and open fire. I went with the latter – it was going to happen sooner or later and so it made sense to let rip while they had the advantage. I rolled for the two VC blinds on the hill to see if they were the real units. And, you know what, they were! So troops were put on the table. This meant the game would turn into a straight fight rather than a hunt and pursue.
So the VC let rip with their AKs. US 1st Platoon were caught in the open. They’d crossed the paddies and were in the area of scrub between the road and the hill. The lead squad took a pasting and accumulated several Shock and became Suppressed. I was surprised at how lethal the game could be, but then the fire was at a unit in the open at close range. It wasn’t looking good for the US platoons. When the US activated they managed to give back a little of what they’d received, but the VC were in the jungle, so whilst it was at close range it was still a poor shot. Nonetheless the lead VC squads took two kills as well as being Pinned and Suppressed. Ouch!
The firefight now brewed up. The US 1st Platoon commander found himself in a dilemma – whether to get his squad returning fire before the VC went again or to rally some of the Shock to make them more effective. There was only one choice; with all the Shock they’d taken their fire would be ineffective, so he had to take the gamble and rallied some of the Shock on his troops. Meanwhile, the company commander recognised the potentially lethal situation he found himself in and called for the company mortars to strike the hilltop, but he would have to wait until authorisation came through. The VC fire came in once more and this time it was deadlier – two US killed! However, the Critical Wound card came up, meaning one of the killed was a serious injury. The Medic called in a casevac chopper and proceeded to tend to the wounded man and try to get him to a suitable LZ for evacuation.
Two things then happened. The US 2nd Platoon spotted and engaged the second VC platoon. The VC took one killed and a few Shock. Seeing the kind of fire-power the US could give out, the VC second platoon pulled back to the downslope of the hill, the intention being to disappear back into the jungle and find another way off the board. Also, authorisation for the mortars came through nice and quickly (clearly, higher command saw the urgency of the need), which meant the mortars might be coming in soon. 1st squad of the US 1st Platoon pulled back after the mauling it had received so the other two squads of 1st Platoon could engage the enemy.
Then it happened. In came the mortars. Only the shot hadn’t been as accurate as hoped. The barrage actually missed the VC and hit the side of the hill, which meant the barrage also fell on part of the village! The villagers well and truly copped it – not only Pins, Suppressions, and Shock, but four civilian fatalities! Not good. Not good at all. This caused the company command a dilemma – should he call off the mortars or would he be able to correct fire in time. If he called off the mortars then this may result in more delays as authorisation would be needed to resume firing, but if he couldn’t correct fire then the village would take another leathering. Such is the fate of war. Well, such is the random turn of cards. He kept the fire up and just hoped that he could correct the mortars in time.
And lucky him, because that’s just what he managed to do. Yup, his card came up before the mortar card came up. It’s as cold and simple as that. But he managed to correct fire and put it straight on top of the VC 1st Platoon. The effect was devastating.
The VC 2nd Platoon had pulled back, returned to a blind and, when the Di Di Mau card came up managed to bring on a dummy blind so it was hard to say which was the actual platoon and which was a fake. The two dummies split up and went back to the original plan of moving around the flanks. Meanwhile, the VC 1st Platoon moved to get away from the mortars, but the US company command just walked the mortar barrage with them to keep up the pressure. It was now starting to look unlikely for a VC victory. The US casevac also came in allowing the medic to pass on his charge and off it went with the US wounded.
It felt like things were coming to a conclusion. The US 2nd Platoon cleared the elephant grass and made a spotting roll for the VC blind that was moving around that flank. A successful roll, so now to see if it was the actual unit or a fake. It was real! This meant the US would have the VC trapped and their whereabouts known. The VC were not idle though. Whilst their 1st platoon was now stuck under falling mortars, their 2nd platoon opened up on the US 2nd platoon, causing a fatality as well as Suppressing them. It was far from over.
That said, the numbers were starting to tell. The VC 1st Platoon was really piling up the Shock and they were about to break. And with the rest of the US 2nd Platoon coming up to engage the VC 2nd Platoon and the ever-present threat of falling mortars, it was obvious what was going to happen. The result? The US had won a military victory, but with the casualties sustained and, more importantly, the mortar strike on the village, the VC had won a political victory.


You must be logged in to post a comment.