Society Meeting March 25th 2023

We had a very good turn out at the last meeting, 5 games in progress with over 20 members present.

First up, John and Alex were play testing John’s Border Reivers game.

All quiet at the Bastle house, for now.
Action at the ford.

Mark ran another Dungeons and Dragons session, taking his adventurers to sea and then deep into the dungeon depths.

The dungeon master looks on as the adventurers ponder their next action.
Action at the Quayside
Dungeon delving
Who let the dogs out?

Paul ran a 6mm FoG Ancients game, Late Bulgarians vs Ottomans.

Light cavalry on the right somewhat outnumbered
The centre of the battle seems a bit empty
Clash of cavalry

Stephen and Jeremey continued their refight of the War of the Roses, using Sword and Spear rules, this time recreating the Second Battle of St Albans. There will be a write up of this game shortly.

The Yorkist camp, artillery and cavalry await the approaching Lancastrian vanguard.
The artillery has fallen to Lancastrian archery, but the first Yorkist reinforcements are now approaching the camp
A Lancastrian pike block about to dispose of some Yorkist archers, but Yorkist Men at Arms are waiting behind the archers.
Towards the end of the battle, the Yorkists have pushed the Lancastrians back from the camp
On the Yorkist left flank there are few Lancastrians left.

Finally, Mark H ran a War of the Spanish Succession game, using his own fast play rules.

Cavalry advance
More Cavalry
The armies line up
Cavalry wings clash
The infantry engage


Society Meeting, October 22nd

It’s been a while since we posted any pictures of society meetings, but here are some from our latest meeting, which had a good turn out with five games in progress and around 20 members present.

First up we have a 2mm Ancients game using Strength and Honour rules, Republican Romans vs Germans.

Marcomanni & Suebi Warbands clash with the Auxilia
Same clash, different angle
Close up of the Suebi Warband
Line of battle

Our second game was a clash between a 100 Year’s War English army and some Ottoman Turks, this time in 6mm using Field of Glory rules

Archers flanking Men at Arms
Close up of Archers
Archers holding the hill
Cavalry charge the Men at Arms
Men at arms punch a hole through the line of Archers

Slightly later historically we turn to the War of the Roses, and a game based on the Battle of Wakefield, this time in 15mm using Sword and Spear rules.

Battle of Wakefield, starting positions. Jeremey feeling somewhat surrounded.

In the background you can see Stephen’s representation of Sandal Castle, you can see an article on its construction here.

Close up of the Yorkist right flank.
Lancastrian Left Flanking force
Yorkist Archers, the small dice show the remaining strength
Uneven archery duel, all units started at strength 3.

Our fourth game, chronologically, takes us to the East End of London, where things go bump in the night. A Victorian Gothic Horror game using “A Fist Full of Lead” rules in 28mm.

Just another day in the East End
A bit of a barney
Hello, hello, hello, what’s going on here aaarghh
It’s not even safe indoors
A Hansom Cab
Police raid a house of ill repute
They’s big n hairy & I be afraid of ’em

And finally, we go to Vietnam, with a 1:600 scale Air game using Thud Ridge rules.  Only a couple of photos of this game unfortunately.

SAM-2 site protecting a vital bridge as a Skyhawk attacks.
Close up of the Skyhawk, pursued by MiG-15s


Populating the Desert

At our recent Open Day I ran a 6mm sci-fi game using the Hammer’s Slammers:The Crucible rules. I created a lot of new desert terrain for the event and thought I’d write up some of the methods I used to create it. If you want to read about the game itself, there’s a report on the Hammer’s Slammers website with lots of photos of the game in action.

Sacred Sands
One major component of almost every item of terrain is the ground texture. I used a mixture of sand (bird cage sand from a pet shop), household emulsion paint and PVA glue in a ratio of roughly 3:2:1. I had a litre of paint mixed by my local B&Q to match Army Painter’s Skeleton Bone spray paint (I sprayed a small square of plastic card which they stuck in their scanner) for a very reasonable £18. I made up batches of the ground texture mix in an ice-cream tub so that it was always ready to go – and after building all of the terrain below I have about 2/3rds of the paint left.

Once dry, the ground was washed with a decent coat of Citadel sepia shade, then drybrushed with Citadel Tyrant Skull. This pretty simple method gave me a quick to apply, good looking and consistently repeatable ground texture.

I scoured eBay for suitable grass tufts in various sizes and shades of dry grass and found a good pair of sources in Boontown Metals and Serious-Play. These were used sparingly, the desert was supposed to be arid.

Happiness is the Road
The roads were made them from Busch model railway roads, which are a sort of very thin self-adhesive foam with markings printed on in white. The two-lane roads were 40mm wide, maybe a little overscale but some sci-fi tanks are pretty big so they look fine. As a base I used 3mm sheets of black Foamex – this is less likely to warp, as card or MDF is prone to. The edges were roughly bevelled with a knife and textured. I made some T junctions and crossroads by butting up sections of road surface and drawing in the road markings with a white acrylic paint pen.

2-4-6-8 Motorway

I had visions of making a big four-lane highway for a couple of reasons – firstly, it would be an impressive large terrain piece, which 6mm scenery can sometimes lack, and secondly it would cut down lines of fire and prevent heavy tanks dominating the battlefield and being able to fire from one side of the table to the other (heavy tank guns have no maximum range in Hammer’s Slammers). The motorway was mounted on 2″ thick insulation foam – I used normal white polystyrene, pink or blue foam would have been better but I already had the polystyrene to hand. This was cut into four 8″ wide, 18″ lengths with a hand saw – do this outside, it makes one heck of a mess! The edges were then bevelled at a 45° angle with a hot wire cutter resulting in a 4″ wide plateau. I ran two lengths of Busch roads down either side of this plateau, leaving a narrow central reservation. The edges and centre were textured as normal, and I put in a small piece of tiled plasticard in each section – the intention with this is so I could put in road signs at some point, although I haven’t done that yet.

One length was cut in half, and one end of each short length bevelled to match the sides. I scratchbuilt a simple bridge from plasticard and Plastruct girders, which was long enough so that one of my normal two-lane roads could pass underneath. The bridge was made so that it could be lifted out – this was for two reasons; firstly, I thought that attaching the bridge to the two end pieces would be too fragile, and secondly it gave me the option to add a destroyed version later.

I’ve learnt in the past that linear obstacles need more than one crossing point, otherwise you end up with a nasty bottleneck and the whole game ends up revolving around this one point. So I used the hot wire cutter to make two tunnels under the roadway – one larger one which is big enough to take a road, the other smaller one which is big enough for infantry on foot or small vehicles. For the larger one I used a piece of plastic cable trunking to make the concrete tunnel, the small one was made from plasticard. This left three crossing points so gives the attacking side more options. The sides of the embankment are rather steep, too much for heavy vehicles, but I allowed light vehicles (jeeps and infantry skimmers) and infantry on foot to climb them as if in bad going.

Houses in Motion

All of the buildings are from Brigade Models’ various desert-themed resin scenery ranges. I stuck them on more 3mm Foamex with Uhu glue and textured between them with the usual mixture. The buildings were sprayed with Army Painter’s Skeleton Bone, washed with Agrax Earthshade (GW) and drybrushed with Terminatus Stone (GW again). To add a splash of colour, doors and details were painted using GW Contrast Paints which give a decent effect in one coat.

One of my main sources of inspiration for the look of the buildings was the various Star Wars stories set on Tatooine. One standout feature of these is the fabric awnings across the entrances and frontages of many of them. I tried to replicate this using pieces of textured paper hand towels (some nasty thick industrial ones that don’t so much dry your hands as redistribute the water…) which I soaked in watered down PVA and strung across paperclip wire supports. Once dry I used Contrast Paints and drybrushing, often matching the awning colour to the other spot colours on the buildings.

I put some buildings on sections of road which allowed me to do some more interesting things such as a footbridge that passed over the road, or parking bays/side roads. The obelisk outside the tower below comes from Brigade’s 2mm range.

The objective of the game was to capture a series of radar stations that controlled the approach to the nearby starport. These all came from the Brigade range including several with ‘golf ball’ style radar enclosures and another tall tower with a radar on top. I added extra small buildings to the bases of some.

The Temple of Doom
I had a ruined ancient temple that had been cluttering up my office for ages – it was an aquarium ornament picked up from a pet shop. This was stuck on a small polystyrene hill with ramps and steps up to the summit. I repainted it in the same way as the other buildings. I discovered that the resin was rather fragile – it had an accident that lowered the heights of all the columns at one end…

Hanging on the Telephone
I scratchbuilt some simple telegraph poles using lengths of cocktail stick and short pieces of plastic strip for the crossbars superglued together, based on 20mm wooden discs from The Works. Ground texture, a single coat of brown contrast paint and a quick drybrush and they were done.

We Got the Power
In a box in my shed o’ stuff I unearthed three 3D printed power pylons, bought back in the days when they were still a sensible price on Shapeways. These were duly stuck on Foamex bases, sprayed with gray primer and drybrushed – again, job done and some welcome height added to the board.

Blood on the Track
A monorail ran across the town, made from Brigade Model’s elevated track and a selection of freight wagons. The pylons were based on 30mm wooden discs and the track was painted in the same way as the buildings. I initially painted the track silver and washed it but that made it too dull, so I went over the rail again with a silver paint pen to make it brighter.

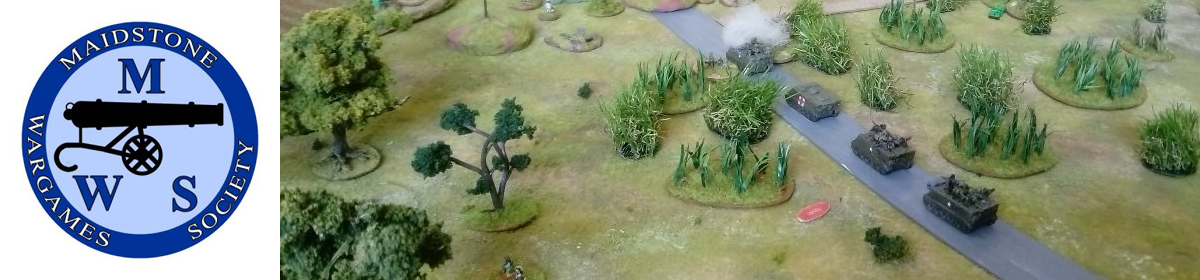
And finally, a few shots of the game on the day. The Slammer’s Regiment (silver hovertanks) were mostly painted by Jon Roche, the Zaporoskiye Regiment in their superb green/white/brown urban camo’ were painted by Mark Johnson. The blue tracked vehicles are Guardforce O’Higgins, painted by me.

Society Meeting 23rd July 2022

A short roundup of the games at our last meeting.

Four periods/genres were staged at the last meeting.

First up, a couple of games of Field of Glory, using 6mm figures, Early Alans vs Selucids.

Stephen, Tony & Andy played three, three sided SAGA Age of Vikings games, using the Battle Royale scenario from the Book of Battles. Victory is normally decided by Survival points in this scenario, and that’s how we played the first game. In the second game we decided to use Slaughter points, and in the third reverted to Survival Points, but with 5 points for controlling the central objective (the building) and for each charge made.

The first three sided battle.
Stephen’s Hearthguard
Tony’s Vikings
Vikings and Scots clash
Tony’s Viking Warriors vs Andy’s Anglo Danish Hearthguard – battle joined!
Tony’s Viking Warriors – the aftermath, where did the Hearthguard go?
More Scots and Vikings

The first two games finished with the same result, Stephen won, Andy came second and Tony came third. The third game was a tie between Stephen and Andy, with Tony bringing up the rear.

Alan staged an Early WWII game using the I Ain’t Been Shot Mum! rules.

Germans advance through the woods
British Anti Tank Gun
German combined arms
German advance

Finally, Peter ran a 75mm Lord of the Rings skirmish game. This is a participation game set in the Mines of Moria, with players controlling one main character and one Hobbit each. They must buy time for the NPC Gandalf to cast a delaying/blocking spell on the escape route – before the Balrog turns-up! There will be a more in depth report on this game in the near future.

The initial onslaught, “They have a Cave Troll”
They had a Cave Troll!
Gandalf concentrating on his spell.
The Balrog arrives.

Society Meeting 11/06/2022

A bit later than planned, but here’s a brief photo roundup of the games staged at our meeting on June 11th.

Field of Glory, 6mm Ancients.

Sword & Spear (15mm) – Wars of the Roses

Star Wars Armada

Work in Progress Wednesday

Jeremey has briefly been sidelined, so Tony F takes over the WIP Wednesday reins this week.

The club’s gone relatively quiet lately – obviously everyone’s efforts went into the jubilee ! However, there has still been some progress – Mark J has employed his magnifying glass for his 6mm Saxons (above), then broke out the electron microscope for some 2mm Antonine for Strength and Honour, which are based on perspex.

Warbases’ 2mm Roman Legion (Mark J)

Marcus meanwhile has been working on some 28mm Spy-fi and 15mm Sci-fi miniatures.

The initial stages of some 28mm Spy-fi from Marcus (who, like Bond, seems to have an eye for the ladies !).
15mm Sci-fi from Marcus – mostly Brigade Models but with the odd interloper.

Jeremey has been converting a Copplestone figure to act as his Stargrave crew’s first mate.

Jeremey has named this image ‘Avon’ – a nod to the Blake’s 7 character perhaps ?

And finally, something from me – these were missed from the last WIP Wednesday post (about which I’m not bitter at all…) but since I’m in charge this week, I’m putting them in. First, it’s more additions to my Middle Earth armies – half-a-dozen elf spearmen to accompany the cavalry I painted a few weeks ago.

Six Rivendell elf spearmen

Next is my take on Radagast the Brown – it’s not either of the official GW figures which are rather expensive, but a Conquest Miniatures hedge witch. I added a bird from an OOP Celtos figure which is positioned as if the wizard is talking to it, painted up as a falcon.

Talking to the birds…

And to round things off, another small piece of 6mm desert terrain, an oasis made from 3mm Foamex, a sand/paint/PVA texture, cheap palm trees from eBay and clear PVA for the water.

Water, water everywhere.

Society Meeting 14/05/2022

In addition to the Stargrave game previously reported, there were two other games run at this meeting, both using rulesets new to the Society from from Two Fat Lardies .

First up the 6mm Ancients players tried out the Strength and Honour rules with a couple of games involving Roman and Pontic armies.

Our members collections are primarily based for Field of Glory / DBM, so for this trial game Perspex bases were used to reflect the bases sizes in Strength & Honour.

The left of the Roman Battle Line
Pontics on the left, Romans on the right
Roman Legions form up
Pontic pike phalanxes
Pontic scythed chariot supported by cavalry and clibanarii
View from the Roman lines
Pontic phalanxes with skirmisher supports
Clash of cavalry, Pontic Clibanarii against lighter Roman cavalry
Infantry lines get into the fray

The first game was a narrow Pontic victory, the second was a Roman walkover.

Some members are also building some armies in 2mm for these rules on the regulation bases, here’s a Roman legion arrayed in the triplex acies:

Trial basing for 2mm figures.

The second game to feature a new ruleset was an early WW2 game using “O” Group rules. This featured a British advance on German positions, and ended in a German victory as the British failed to inflict enough damage on the Germans.

The battlefield in the lull before the storm
German officer giving orders
Two Matilda II tanks advance
German Pak 36
German Pak 36
British infantry advance
Matilda IIs with infantry support
Germans take cover behind the hedge.
British infantry also take cover
German heavy weapons, le.IG 18 75mm Infantry Support Gun in the forground. Pak 36 in the background

Finally, a few pictures from the Stargrave game that didn’t make the game report.

Tony’s crew advance
A cyber enhanced critter, the bane of Andy’s crew
Andy’s sniper takes position to cover the flank

Work In Progress Wednesday

A tad late today, sorry folks, but here’s the latest update on member’s painting.

First off, Stephen is painting up some sample packs to test the waters on a couple of projects he’s been umming and ahhing about for the last year or so.

Above you can see some 15mm ECW Scots from Peter Pig.

He’s also trying to find his WW2 mojo, he’s undecided on figure size, but wants to focus on infantry actions rather than tanks.

First off we have some Warlord Games 28mm Late war British infantry, a recent free sprue from one of the wargames magazines.

WW2 British

And changing size, some Russians based up for Crossfire, also from Peter Pig.

WW2 Russians, for Crossfire

Eric continues to work on some Games Workshop figures, a chaos marauder and cultist:

Chaos Marauder & Cultist.
Chaos Marauder & Cultist

Mark has been working on his 6mm Saxon 1809 army, Ist Corp division Generallieutenant Polentz, brigade Generalmajor Lecog, Prinze Celement, von Low and von Cerrini regiments. Basic uniform colour and regimental facings done, flesh, weapon, knapsack and bases to do, you can see the rest of the division in the background including some cuirassiers

Saxon 1st Corp, division Generallieutenant Polentz

That’s all folks, we’ll be back next week.

A Wretched Hive of Scum and Villainy

Tony F moves into real estate development.

Last year, as a bit of a lock-down#2 project, I decided to make a small desert village for 6mm sci-fi games. All of the components come from Brigade Models (quick disclaimer here – I’m one of the owners of said company) but the techniques would work with any other manufacturer’s buildings. The wall pieces were taken from the Town Walls range, while the buildings are mostly from the Desert Outlands set. The photos in this post are all thumbnails – click on them for larger versions.

The first decision to make was how large it was going to be; I decided that it would have to fit in a 4l Really Useful Box, which gave me a maximum of a 348x220mm footprint and a height limit of 68mm. I based it on a sheet of Foamex, which is great for terrain projects as it doesn’t warp like MDF or hardboard when you apply paint. This came in 300x200mm sheets, so one of those did the job nicely.

I spent a while laying out wall pieces until I had a configuration that I liked – I wanted to avoid a simple rectangular wall. I positioned a gateway and sanded down the base at that point so it sloped away, and added a pair of watchtower pieces to the walls. Once I was happy with this I glued them down with a clear glue (Uhu). I smeared some wall filler around the joins to fill in the odd gap, this has a similar texture to the wall pieces so blends in better. I then laid out the buildings – I wanted enough space around them to be able to position figures and vehicles, so didn’t cram them in too tightly. In the end there were nine altogether. Again I fixed them in place with clear glue.

Now that the main components were in place, I was able to texture the ground. Inside the walls I simply glued a layer of sand using PVA, with the odd small stone around the edges. Outside the walls I mixed up a batch of emulsion paint, sand and PVA and applied this with an old paintbrush. I mixed in some larger grades of sand and small stones (sold in homeware shops for basing candles) so that I achieved a much rougher texture than the inner area.

The next stage was to add lots of small details to the buildings. I used a few parts from the Brigade 2mm scenery range, there are bits of girder bridges, barns, support frames from an airship hangar, a Roman lighthouse (makes a good chimney) and an obelisk in the main square. There’s the odd roof-mounted water tank and aerial from the 15mm range. There’s also a radio antenna which is the broken off top of a much larger 3D (mis)printed mast. This part proved to be a nightmare as I kept knocking it off – in hindsight it would have been better to paint it separately and attached when everything else was finished, but I kept supergluing it back on.

I also fitted some supports for fabric canopies made from paperclips and wire staples – I drilled into the buildings, walls and base with a 1mm bit and superglued them in. I didn’t add the canopies themselves yet to make it easier to paint around them.

Everything was then sprayed in Halfords white primer, followed by a coat of Army Painter Skeleton Bone. The walls and buildings were them washed with GW Agrax Earthshade, while the ground was washed with Seraphim Sepia. This gave the buildings a distinctly different shade from the ground, even though they were painted with the same base colour. Walls, buildings are ground were all heavily drybrushed with bone or stone paints from the Citadel Dry range.

Other details were painted in – doors and windows, various roof accessories and so on, mostly using Citadel contrast paints which worked well over the pale bone base colour. With this done I was now able to make the canopies from small pieces of paper towel – the type of nasty, non-absorbent cheap towels that we used to get in school toilets! I soaked the pieces in dilute PVA and draped them across the supports, making sure that they drooped as naturally as possible in between. Once the glue dried they were pretty solid. I painted them in either dark red or dark brown using GW contrast paints.

The finished conurbation was christened Mos Arun; ‘Mos’ from the Star Wars Tatooine naming convention, and ‘Arun’ taken from the road name where I live. I’m planning a series of other small building bases to accompany it in the near future, which will also appear on this blog in due course. All being well, they should appear at the club’s Open Day later in the year.

Society Meeting 22nd January 2022

Back to the normal schedule, a short roundup of games at the last meeting…

Firstly, our second game of Barons War, this time a 1500 point a side affair with Jeremey & Stephen facing up to John & Andy

Opening positions.
John’s crossbows await the onslaught of Jeremey’s troops.
Stephen’s Lord all on his own.
Near the end.

One of our regular Field of Glory games, Italian Condotta vs Late Hungarian in 6mm.

The FOG battlefield
Serried ranks of Knights
Knights outflank Light Cavalry

Another 6mm game, Napoleonic Peninsula with a British, Portuguese and Spanish force attacking a French held town.

Allied forces approach the French positions. Where are the rest of the French?
View from the French lines
The Spanish prepare to advance
Battle in full swing
The Allies take the town
Close up of an Allied Brigade

And finally, Alan ran a Sudan game in 28mm using Sharp Practice.

The head of the British relief column enters the “empty” battlefield
The first of the British
Mhadist reserves await their turn.
Mahdist leader and escort
Mhadists outflank the cavalry